
Putting coolant in your car may seem like a daunting task, but it’s actually quite simple. Just like how we need to stay hydrated to keep our bodies cool and functioning properly, our cars need coolant to prevent overheating and maintain optimal performance. Coolant, also known as antifreeze, is a liquid that regulates the temperature of the engine and radiator by absorbing excess heat and dissipating it.
Much like a superhero with a cape, coolant swoops in to save the day by preventing our car’s engine from turning into a steaming hot mess. So, if you’re ready to become the hero of your car’s cooling system, let’s dive into the step-by-step process of how to put coolant in your car.
Table of Contents
Introduction
So you’re driving along and suddenly notice that your car’s temperature gauge is rising. Yikes, that’s never a good sign! One possible cause could be that your car is low on coolant. Don’t panic though, because I’m here to guide you through the process of how to put coolant in your car.
Coolant is a vital component in keeping your engine cool and preventing it from overheating. It circulates throughout the engine, absorbing heat and then releasing it through the radiator. Without enough coolant, your engine is at risk of overheating, which can cause extensive damage.
Luckily, adding coolant to your car is a relatively simple task that you can do yourself with a few basic tools. Just follow these steps, and you’ll be back on the road in no time!
Why is Coolant Important?
coolant importance, importance of coolant

Signs that Coolant is Low
introduction, low coolant levels, signs, overheating engine, warning light, coolant leak, engine temperature, radiator fluid, maintenance, car engine, fluid levels, temperature gauge. Introduction: Keeping your car’s engine cool is crucial for its proper functioning and longevity. One of the essential components in maintaining the right engine temperature is coolant.
Coolant, also known as radiator fluid, helps dissipate heat from the engine and prevents it from overheating. It’s important to regularly check your coolant levels to ensure they are adequate. In this blog post, we’ll discuss some signs that indicate your coolant is running low and needs attention.
By being aware of these signs and taking prompt action, you can avoid engine damage and costly repairs. So let’s dive in and see what these signs are.
Step 1: Prepare the Car
So, your car’s been heating up more than usual lately, huh? Well, one probable cause for this could be a low coolant level. Don’t worry, though – adding coolant to your car is a pretty simple task that you can do on your own. To get started, the first thing you’ll want to do is prepare your car for the addition of coolant.
Now, this might sound like a big task, but I promise it’s not! Firstly, park your vehicle on a flat and level surface. Make sure the engine is completely cooled down before proceeding – you don’t want to burn yourself! It’s also a good idea to put on some gloves to protect your hands. Next, locate the coolant reservoir, which is usually a translucent plastic tank located near the radiator.
Once you’ve found it, open the reservoir cap and check the coolant level. If it’s low or below the minimum line, it’s time to top it up! And that’s it for step one – you’ve successfully prepared your car for adding coolant! In the next step, we’ll dive into how to actually put the coolant in. So stay tuned for step two!
Park the Car on a Flat Surface
When it comes to parking your car on a flat surface, there are a few steps you need to follow to ensure that everything goes smoothly. The first step is to properly prepare your car for parking. This means making sure that the car is turned off and in park.
You should also engage the parking brake to provide an extra level of security. By taking these simple steps, you can ensure that your car stays in place while it is parked. So, next time you find yourself needing to park on a flat surface, remember to prepare your car properly to prevent any accidents or unexpected movement.
Turn off the Engine and Let It Cool Down
car engine, cool down, preparation. So, you’ve been driving your car for a while, and now it’s time to turn off the engine and let it cool down. This step is crucial to ensure the longevity of your car’s engine and prevent any potential damages.
But before you just switch off the ignition and walk away, there are a few things you need to do to properly prepare the car for cooling down. First, make sure you are in a safe location, away from any traffic or potential hazards. Then, take a moment to turn off any accessories that may put a strain on the engine, such as the air conditioner or the heater.
Finally, engage the parking brake to secure the car in place. Now that the car is ready, it’s time to let the engine cool down properly.
Step 2: Locate the Coolant Reservoir
When it comes to keeping your car running smoothly and preventing overheating, knowing how to put coolant in your car is essential. Step 2 in this process is to locate the coolant reservoir. This is where you will pour the coolant into your vehicle.
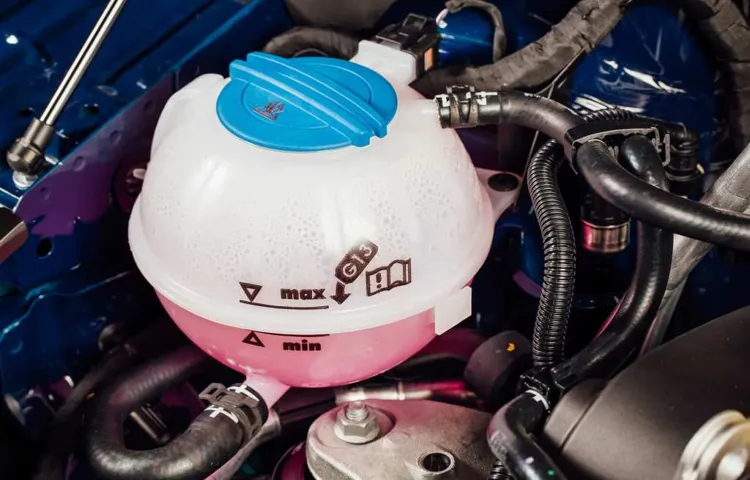
The coolant reservoir is typically a white or translucent plastic container with markings indicating the minimum and maximum levels of coolant. It is often located near the radiator, but the exact location can vary depending on the make and model of your car. If you’re having trouble finding it, consult your car’s owner manual for guidance.
Properly locating the coolant reservoir is crucial for adding the right amount of coolant to your car and preventing any damage to the engine.
Open the Hood
coolant reservoir Once you’ve popped the hood of your car, it’s time to locate the coolant reservoir. This vital component is responsible for holding the coolant that helps to regulate the temperature of your engine. It’s usually a translucent plastic tank with a cap on top, and it may be labeled with the word “coolant” or have a symbol that looks like a thermometer.
The location of the coolant reservoir can vary depending on the make and model of your vehicle, but it is typically located near the front of the engine compartment. It’s important to note that the engine must be cool before you open the coolant reservoir cap to avoid burns or injuries.
Locate the Coolant Reservoir
coolant reservoir When maintaining your vehicle, it’s essential to know where the coolant reservoir is located. This step is crucial, as the coolant reservoir plays a vital role in keeping your engine running at the optimum temperature. The coolant reservoir is typically a plastic container, often transparent, located near the front of the engine bay.
Its purpose is to hold the coolant, which helps regulate the temperature of the engine and prevent overheating. The coolant reservoir is usually easy to spot, as it is often labeled with the words “coolant” or “engine coolant.” Additionally, it may have markings indicating the maximum and minimum levels of coolant that should be maintained.
By locating the coolant reservoir, you’ll be one step closer to ensuring the proper functioning of your vehicle’s cooling system.
Step 3: Add Coolant
Adding coolant to a car is a simple and important task that every car owner should know how to do. Coolant, also known as antifreeze, is responsible for keeping the engine cool and preventing it from overheating. Without sufficient coolant, your car’s engine can suffer serious damage.
To add coolant to your car, start by locating the coolant reservoir, which is usually a translucent plastic container with a cap labeled “Coolant” or “Engine Coolant.” Open the cap and check the current coolant level. If it is low or empty, you will need to add more coolant.
Before adding coolant, it’s essential to make sure the car’s engine is cool to avoid any potential burns. Once the engine has cooled down, mix equal parts of coolant and distilled water to create the proper coolant mixture. You can find pre-mixed coolant at an automotive store if you prefer convenience.
Using a funnel, slowly pour the coolant mixture into the coolant reservoir, ensuring not to overfill it. As you pour, keep an eye on the level and stop pouring once it reaches the recommended level indicated on the reservoir or in your car’s owner’s manual. After adding the coolant, securely close the cap on the coolant reservoir, ensuring it is tightly sealed.
It’s essential to recheck the coolant level after a few days of driving to ensure it hasn’t dropped, as this may indicate a leak or another issue. Remember, proper coolant levels are crucial for the engine’s health and performance. Regularly checking and adding coolant as needed is a simple way to maintain your car’s cooling system and prevent costly repairs.
So, the next time you need to add coolant to your car, follow these easy steps to keep your engine running smoothly and cool.
Check the Coolant Type
coolant type, add coolant Adding coolant to your vehicle is an essential part of routine maintenance, as it helps regulate the temperature of your engine and prevents it from overheating. But before you go pouring just any coolant into your radiator, it’s important to check the coolant type recommended for your specific vehicle. Different vehicles require different types of coolant, so it’s crucial to use the right one to ensure optimal performance.
First, check your vehicle’s owner’s manual to find out what type of coolant is recommended for your make and model. It may specify either an ethylene glycol-based coolant or a propylene glycol-based coolant. These two types of coolant have different properties and are not interchangeable.
Ethylene glycol-based coolants are the most common type and are typically advised for most vehicles. They provide excellent heat transfer capabilities and offer protection against freezing and boiling. On the other hand, propylene glycol-based coolants are less toxic and are often recommended for certain electric or hybrid vehicles.
Once you have determined the correct coolant type for your vehicle, you can proceed to add coolant. Start by locating the coolant reservoir. It is usually a translucent plastic tank, often labeled as “coolant,” “anti-freeze,” or “radiator fluid.
” Make sure the engine is cool before opening the reservoir cap to avoid any potential injuries from hot steam or coolant. Using a funnel, carefully pour the coolant into the reservoir until it reaches the “Full” or “Max” line. Be mindful not to overfill, as excessive coolant can cause leaks or other mechanical issues.
Afterward, securely tighten the cap back onto the reservoir. Adding coolant to your vehicle is a relatively simple task, but using the correct coolant type is crucial for optimal engine performance and longevity. By following the guidelines in your owner’s manual and taking the necessary precautions, you can ensure that your vehicle’s cooling system functions effectively and keeps your engine in top shape.
Remove the Coolant Reservoir Cap
Step 3: Add Coolant Now that you have removed the coolant reservoir cap, it’s time to add coolant to your vehicle. But before you start pouring it in, there are a few things you need to keep in mind. First, make sure you have the correct type of coolant for your vehicle.
Different vehicles require different types of coolant, so be sure to check your owner’s manual or consult with a professional to ensure you’re using the right one. Next, locate the coolant reservoir tank. This is usually a clear or white plastic tank located near the radiator.
Look for markings on the side that indicate the minimum and maximum levels of coolant. Once you’ve located the reservoir tank, carefully pour the coolant into it. Be sure not to overfill the tank, as this could cause it to overflow and lead to overheating.
Pour the coolant slowly and stop pouring once it reaches the maximum level indicated on the tank. After you’ve added the coolant, it’s a good idea to check for any leaks. Look around the reservoir tank and the surrounding area for any signs of coolant leakage.
If you notice any leaks, you may have a damaged reservoir or hose and should have it inspected by a professional. Finally, replace the coolant reservoir cap securely. It’s important to make sure the cap is on tightly to prevent any coolant from leaking out.
Adding coolant to your vehicle is an important maintenance task that should be done regularly to ensure your engine stays cool. By following these steps and taking the time to do it properly, you can help keep your vehicle running smoothly and prevent any potential overheating issues.
Add Coolant Up to the Recommended Level
coolant, recommended level
Step 4: Check for Leaks
Now that you’ve successfully located the coolant reservoir and filled it up, the next step is to check for any leaks. This is an important part of the process, as coolant leaks can lead to overheating and engine damage. To check for leaks, start by inspecting the area around the coolant reservoir.
Look for any signs of coolant stains or wetness. If you notice any, it could be an indication of a leak. Next, check the hoses connected to the reservoir.
Give them a gentle squeeze to see if they feel firm and secure. If they feel soft or loose, there may be a leak in the hose. Finally, take a look underneath your car.
Check for any puddles or drips of coolant, as this would be a clear sign of a leak. If you do spot any leaks, it’s important to address them as soon as possible. Depending on the severity of the leak, you may need to take your car to a mechanic for repairs.
Remember, it’s always better to be safe than sorry when it comes to taking care of your car’s coolant system. So don’t forget to check for leaks after filling up the coolant reservoir.
Inspect the Coolant Reservoir and Hoses
coolant reservoir, coolant hoses, leaks
Look for any Leaks or Cracks
When it comes to checking your plumbing for any potential issues, it’s important to thoroughly examine for leaks and cracks. Leaks can cause significant water damage to your home and can result in costly repairs if not addressed promptly. Start by inspecting all visible pipes for any signs of water or moisture.
Look for puddles, damp spots, or discoloration on the wall or floor near the pipes. If you notice any of these signs, it could indicate a leak. Additionally, check for any cracks or gaps in the pipes themselves.
Even small cracks can lead to major leaks over time. One effective way to detect leaks is by listening for the sound of dripping or running water when no faucets or appliances are in use. This can help pinpoint the exact location of the leak.
Remember, even a small leak can cause big problems, so it’s essential to be thorough in your inspection.
Step 5: Secure the Coolant Reservoir Cap
Now that you’ve successfully poured the coolant into the radiator, it’s time to secure the coolant reservoir cap. This may seem like a simple step, but it’s crucial for maintaining the proper pressure in the cooling system. Make sure the cap is clean and free of any debris or dirt.
Then, align it with the reservoir opening and twist it until it clicks into place. This will create a tight seal and prevent any coolant from leaking out. Once the cap is secure, you can now close the hood of your car and pat yourself on the back for a job well done.
Just remember, regular maintenance is key to keeping your car running smoothly, so don’t forget to check your coolant levels periodically and top them up if necessary.
Place the Cap back on the Coolant Reservoir
coolant reservoir cap, secure, prevent leaks, overheating, engine damage, proper cooling system operation, engine coolant level, cooling system maintenance Once you have finished adding coolant to your vehicle’s reservoir, the next step is to securely place the cap back on the coolant reservoir. This is an important step in maintaining the proper cooling system operation of your vehicle. The coolant reservoir cap plays a crucial role in preventing leaks and maintaining the engine coolant level.
It creates a sealed environment within the reservoir, ensuring that no coolant is lost through evaporation or leaks. By securely placing the cap back on the coolant reservoir, you are ensuring that the cooling system is able to function properly. It helps to maintain the right pressure within the system, which in turn helps prevent overheating and engine damage.
If the coolant reservoir cap is not securely placed, it can lead to coolant leakage, which can result in a loss of coolant and the cooling system being unable to function effectively. A low coolant level can lead to overheating, which can cause serious damage to the engine. In addition to preventing leaks and engine damage, securing the coolant reservoir cap also helps to prevent dirt and debris from entering the cooling system.
This can help maintain the cleanliness of the coolant and prevent blockages within the system. In conclusion, securing the coolant reservoir cap is an essential step in proper cooling system maintenance. By ensuring that the cap is securely in place, you can prevent leaks, overheating, and engine damage.
So, the next time you add coolant to your vehicle’s reservoir, don’t forget to place the cap back on securely for the optimal performance of your cooling system.
Make sure it is Tight and Secure
coolant reservoir cap, tight and secure, step 5 Once you have filled up your coolant reservoir to the proper level, it’s important to make sure that the coolant reservoir cap is tight and secure. This step is crucial because a loose or improperly secured cap can lead to coolant leaks and a loss of pressure in the cooling system. To secure the coolant reservoir cap, simply place it on top of the reservoir and twist it clockwise until it is tightly sealed.
You should feel some resistance as you twist the cap, which is a good sign that it is properly sealed. It’s important to note that over-tightening the cap can also cause damage, so be careful not to apply too much force. Just tighten it until you feel resistance, and then stop.
Securing the coolant reservoir cap is an often overlooked step in the cooling system maintenance process, but it is crucial for maintaining the proper functioning of your vehicle’s cooling system. So don’t forget to double-check that the cap is tight and secure before hitting the road.
Step 6: Dispose of Unused Coolant
Once you have finished adding coolant to your car, it’s important to properly dispose of any unused coolant. You can’t just pour it down the drain or throw it in the trash, as it can be harmful to the environment. Instead, you’ll need to take it to a designated recycling center or an automotive service shop that accepts used coolant.
These facilities have the proper equipment and processes in place to safely dispose of coolant. It’s important to follow proper disposal procedures to ensure that the coolant is handled and disposed of in an environmentally friendly manner. By doing so, you can help protect the environment and prevent any harm to yourself or others.
Remember, taking the extra step to properly dispose of unused coolant is just as important as putting coolant in your car in the first place.
Follow Proper Disposal Guidelines
dispose of unused coolant, proper disposal guidelines, environmental impact, recycling centers, local waste management facilities After completing the necessary cooling system maintenance, the final step is to properly dispose of any unused coolant. This is crucial to ensure we are not harming the environment or endangering our health. It’s of utmost importance to follow the proper disposal guidelines set by our local waste management facilities.
They can provide us with specific instructions on how to dispose of coolant safely. In most cases, we cannot simply pour the coolant down the drain or throw it in the trash. Since coolant contains harmful chemicals, it must be handled with care.
Recycling centers often accept used coolant, as they have the necessary equipment to treat and dispose of it properly. By choosing to dispose of unused coolant at a recycling center, we are taking a responsible step towards reducing our environmental impact. So let’s do our part and follow the proper disposal guidelines to ensure a cleaner and healthier future for our planet.
Do not Pour Coolant Down the Drain
coolant disposal Prompt: Do not Pour Coolant Down the Drain When it comes to disposing of unused coolant, it’s important to handle it properly to protect both the environment and your plumbing system. Pouring coolant down the drain is not only harmful to the environment but can also cause serious damage to your plumbing. Coolant contains toxic chemicals that can contaminate water sources and harm aquatic life.
Additionally, the chemicals in coolant can corrode your pipes, leading to costly repairs. So what should you do with your unused coolant? Instead of pouring it down the drain, you should take it to a designated hazardous waste disposal facility. These facilities are equipped to handle and dispose of hazardous materials safely, ensuring minimal impact on the environment and your plumbing system.
By making this small effort, you can do your part in protecting the environment and keeping your plumbing system in good condition.
Conclusion
So, there you have it, my friends. The art of putting coolant in a car is truly a delicate balancing act between science, expertise, and a splash of drama. It’s like conducting a symphony, where each component plays its part to ensure a smooth and harmonious ride.
Remember, coolant is not just a liquid, but a magical elixir that keeps our engines cool, prevents overheating meltdowns, and ultimately saves us from being stranded on the side of the road, profusely sweating and cursing the merciless sun. As you approach your vehicle, coolant jug in hand, stride confidently and proclaim to the world, “Fear not, for I am the master of coolant replenishment!” And when faced with the confusing labyrinth of hoses, tanks, and valves, let your inner Sherlock Holmes guide you to the right spot. You are the coolant detective, after all.
Embrace the beauty of the process, my friends. The gentle pssst as the cap is released, the satisfying glug-glug-glug of the coolant pouring into its rightful chamber, and the whoosh of relief as your car thanks you for quenching its thirst. But be warned! This is not a task for the faint of heart.
It requires bravery, finesse, and a strong constitution in the face of potential spills, splashes, and the occasional coolant-induced fashion mishaps. So don your cape, grab your trusty funnel, and embark on this heroic mission. The fate of your engine rests in your capable hands.
And when you have successfully completed the coolant ritual, take a moment to bask in the glory of your accomplishment. You have tamed the wild beast known as overheating, and your car is forever in your debt. You, my friend, are the hero of the road, the coolant connoisseur, and the savior of engines everywhere.
So, go forth and spread the gospel of proper coolant replenishment. Share your wisdom, your wit, and your impeccable knowledge of the inner workings of cars. And remember, when faced with the question of how to put coolant in a car, always respond with confidence and flair.
Regularly Check and Maintain Coolant Levels
dispose of unused coolant, coolant disposal Maintenance of coolant levels is an important aspect of keeping your vehicle’s engine running smoothly. Regularly checking and maintaining the coolant levels ensures that your engine is properly cooled and protected from overheating. However, what many people overlook is the proper disposal of unused coolant.
Disposing of coolant in an environmentally friendly manner is crucial to prevent any harm to the environment. Unused coolant can contain harmful chemicals and heavy metals that can be harmful if not disposed of properly. So, what should you do with unused coolant? One option is to take it to a recycling center or a local automotive shop that accepts coolant for recycling.
These centers have the necessary equipment and knowledge to dispose of coolant safely. It is important to avoid pouring coolant down the drain or in the trash, as this can contaminate water sources and harm wildlife. Taking the time to dispose of unused coolant properly ensures that you are doing your part to protect the environment and prevent any potential harm.
Consult a Professional if Needed
“disposal of unused coolant” In the process of changing your vehicle’s coolant, it’s important to remember that disposing of unused coolant should be handled properly. While it may be tempting to pour it down the drain or into the ground, this can have harmful effects on the environment. Coolant contains chemicals such as ethylene glycol, which is toxic to humans, animals, and plants.
Therefore, it’s crucial to consult a professional or a waste management company to ensure that the coolant is disposed of in a safe and environmentally friendly manner. These experts will have the knowledge and resources to handle the disposal process correctly, minimizing any potential harm to the environment. So, if you find yourself with unused coolant, don’t hesitate to reach out to the professionals for guidance.
The extra step is well worth it to protect our planet and those who inhabit it.
FAQs
How do I know if my car needs more coolant?
You can check the coolant level in your car by locating the coolant reservoir tank and visually inspecting the level. If the level is below the minimum mark, it’s a sign that your car needs more coolant.
What type of coolant should I use for my car?
The type of coolant you should use depends on your car’s make and model. It’s best to refer to your car’s owner’s manual or consult with a professional mechanic to determine the appropriate coolant type for your specific vehicle.
Where is the coolant reservoir located in my car?
The coolant reservoir is usually located near the engine compartment and can be identified by a translucent plastic tank with a cap. It may have “coolant” or “antifreeze” labeled on it.
How do I open the coolant reservoir cap?
Before opening the coolant reservoir cap, ensure that the engine is cool to prevent any injuries. Slowly twist the cap counterclockwise to release any built-up pressure, then carefully remove the cap.
How should I mix the coolant with water?
The ratio of coolant to water will depend on the climate conditions in your area. Typically, a 50/50 mix of coolant and distilled water is recommended. However, it’s wise to check your vehicle’s owner’s manual for the correct ratio, as it may vary.
Can I use tap water instead of distilled water to mix with the coolant?
It’s best to use distilled water rather than tap water when mixing with coolant. Tap water contains minerals that could potentially lead to scale buildup in the cooling system.
How do I properly add coolant to my car?
To add coolant, locate the coolant reservoir and pour the mixture slowly into the tank until it reaches the desired level. Avoid overfilling. Once done, securely reattach the cap.
How often should I check and add coolant to my car? A8. It is recommended to check the coolant level in your car regularly, especially before long drives or extreme weather conditions. Adding coolant should only be done when necessary, such as when the level is below the minimum mark.
What are the signs of low coolant in a car?
Some signs of low coolant in a car include the engine temperature gauge rising above the normal range, the engine overheating, or a warning light on the dashboard indicating low coolant level.
Can I add coolant directly to the radiator?
It is generally advised to add coolant to the coolant reservoir rather than directly to the radiator. The coolant reservoir acts as a buffer and allows for expansion and contraction of the coolant as needed.
Is it normal for the coolant level to decrease over time?
It is normal for the coolant level to decrease slightly over time due to evaporation. However, a significant decrease in the coolant level may indicate a leak, and it’s essential to have it checked by a professional mechanic.
Are there any precautions to take when adding coolant to a car?
Yes, a few precautions to keep in mind when adding coolant to a car include ensuring the engine is cool, using the recommended coolant type, following the correct coolant-to-water ratio, and avoiding spills to prevent environmental hazards.