
Hey there! Are you ready to dive into a fascinating topic? Well, buckle up because today we’re going to explore the intriguing world of “Introduction.” Now, you might be wondering, what exactly is an introduction? Think of it as a gateway – the doorway that leads you into a whole new experience or adventure. Just like the opening lines of a book or the first few moments of a movie, an introduction sets the stage, grabs your attention, and hooks you in.
It’s that initial spark that ignites curiosity and makes you want to learn more. In our everyday lives, introductions play a crucial role. They help us form connections with others, whether it’s meeting new people, starting a conversation, or even presenting ourselves in a professional setting.
The way we introduce ourselves can shape how others perceive us and how we navigate the social landscape. In the world of writing, introductions are equally important. They serve as the foundation for any piece of content, be it a blog post, an essay, or a research paper.
A well-crafted introduction not only grabs the reader’s attention but also provides a roadmap for what’s to come. It sets the tone, establishes the context, and outlines the main points that will be discussed. But what makes a great introduction? Well, it’s all about striking a balance.
It should be engaging enough to capture the reader’s interest but not too lengthy that it loses their attention. It should be informative, but not give away too much, leaving them hungry for more. It’s like a teaser trailer – giving them a taste of what’s to come, building anticipation, and leaving them eager to explore further.
So, whether you’re writing a blog post, giving a presentation, or simply making a new acquaintance, remember the power of a good introduction. It’s the key that unlocks doors, sparks curiosity, and creates connections. So, are you ready to master the art of introduction? Let’s dive in and discover the magic it holds!
Table of Contents
Why is it important to check the coolant in an AC unit?
Having the proper coolant level in your AC unit is crucial for its efficient performance. Coolant, also known as refrigerant, is responsible for absorbing heat from the air inside your home and releasing it outside. If the coolant level is too low, it can affect the cooling capacity and put extra strain on the system, leading to higher energy bills and potential breakdowns.
Therefore, regularly checking the coolant level is important to ensure that your AC unit is operating at its optimal capacity. So, how can you check the coolant level in your AC unit? It’s always recommended to hire a professional HVAC technician for this task as they have the necessary equipment and expertise to handle refrigerants safely. They can use a gauge to measure the pressure in the AC unit and determine if the coolant level is adequate.
Furthermore, they can also inspect for any leaks or other issues that might be affecting your AC unit’s performance. By regularly monitoring the coolant level in your AC unit, you can ensure that it is functioning properly and avoid any potential problems in the future.
Tools and materials needed
To check the coolant in an AC unit, you’ll first need to gather a few tools and materials. One key tool is a refrigerant pressure gauge, which allows you to measure the pressure of the coolant in the system. You’ll also need a screwdriver or wrench to remove the access panel on the AC unit.
Additionally, you may need a flashlight if the area is poorly lit. It’s important to have a pair of gloves and safety goggles to protect yourself during the process, as refrigerant can be harmful if it comes into contact with your skin or eyes. Finally, you’ll need a cloth or towel to wipe away any excess moisture or debris that may be present.
With these tools and materials at hand, you’ll be ready to check the coolant in your AC unit and ensure that it’s at the proper levels for optimal performance.
Step-by-step guide to check the coolant in an AC unit
If you want your AC unit to run efficiently and keep your home cool, it’s essential to regularly check the coolant levels. Here’s a step-by-step guide on how to check the coolant in your AC unit. First, turn off the power to the unit and remove the access panel.
Look for the copper coolant lines attached to the unit’s evaporator coil—they should be cold if the coolant level is sufficient. If they feel warm or lukewarm, it may indicate a low coolant level. Next, locate the sight glass on the unit.
This small window allows you to see the state of the coolant. If the sight glass is clear and colorless, it means that the coolant level is fine. However, if you notice any bubbles, oil, or other discoloration in the sight glass, it may indicate a problem with the coolant.
Additionally, you can also use a manifold gauge set to measure the pressure and temperature of the coolant. This can provide more accurate information on the coolant level and help identify any potential issues. Checking the coolant level in your AC unit is crucial for maintaining its performance and preventing any potential problems.
By following these steps, you can ensure that your AC unit is running smoothly and efficiently.
Step 1: Turn off the AC unit
coolant in an AC unit In order to check the coolant in an AC unit, the first step is to turn off the unit. This is important for safety reasons and to prevent any accidents while working on the AC unit. Once the AC unit is turned off, you can proceed with checking the coolant level.
This involves locating the coolant lines and determining if there is enough coolant in the system. It’s important to note that checking the coolant level is not a task that can be easily done by just anyone. It requires the knowledge and expertise of a trained professional.
If you are not familiar with AC units or do not feel comfortable working on them, it is best to hire a technician to check the coolant level for you. They will have the necessary tools and knowledge to ensure that the coolant level is at the appropriate level for optimal AC performance.
Step 2: Locate the coolant access point
After determining that your AC unit needs more coolant, the next step is to locate the coolant access point. This is where you will be able to add the coolant to your unit. The coolant access point is typically located near the outdoor condenser unit.
It may be a small valve or cap that you can unscrew to access the inside of the unit. Look for a clearly marked label or symbol indicating the coolant access point. If you are unsure of its location, it is best to consult the owner’s manual or contact a professional for guidance.
Once you have located the coolant access point, you are ready to move on to the next step in checking the coolant in your AC unit.
Step 3: Prepare the tools and materials
checking coolant, AC unit, step-by-step guide, tools and materials Step 3 of our step-by-step guide to checking the coolant in an AC unit is all about preparing the necessary tools and materials. Before you begin, it’s important to gather everything you’ll need to complete the task efficiently and effectively. Firstly, you’ll need a few basic tools such as a screwdriver, a wrench, and a pair of gloves.
These tools will come in handy when removing any necessary panels or covers to access the coolant system. You’ll also want to have a flashlight on hand to help you see into those tight and dark spaces. In addition to the tools, you’ll also need some materials to help you with the inspection.
One important item is a container or tray to catch any coolant that may spill during the process. It’s essential to be prepared for any potential leaks or spills to prevent damage to your surroundings and the environment. Next, you’ll need a clean cloth or rag to wipe away any dirt or debris that may be blocking your view.
Keeping the area clean will help you get a clear and accurate picture of the coolant levels and ensure a proper inspection. Finally, you’ll need a coolant pressure gauge to check the pressure of the coolant. This gauge will give you an indication of whether the coolant levels are too high or too low.
It’s important to remember that different AC units may have different pressure requirements, so consult your owner’s manual to ensure you’re using the correct gauge for your specific model. By gathering these tools and materials before you begin, you’ll be well-prepared to check the coolant in your AC unit. This step will help you ensure the proper functioning of your unit and maintain its efficiency and longevity.
So let’s move on to the next step and get started on our coolant inspection!
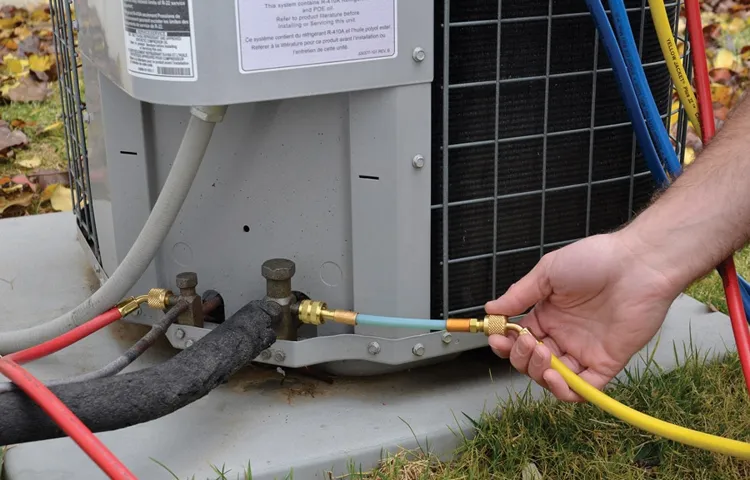
Step 4: Check the pressure of the coolant
coolant, AC unit, pressure, check
Step 5: Check the level of coolant
Step 5 of our step-by-step guide on how to check the coolant in an AC unit is to check the level of coolant. Coolant, also known as refrigerant, is a crucial component in an air conditioning system as it absorbs heat from the air inside the unit and carries it outside. Without sufficient coolant, the AC unit won’t be able to effectively cool the air.
To check the coolant level, you’ll need to locate the access valve on the AC unit. This valve is usually covered by a cap and can be found on the larger pipe connected to the unit. Once you’ve found the access valve, you’ll need a refrigerant gauge to check the pressure of the coolant.
The pressure should be within the recommended range, which can vary depending on the specific AC unit. If the coolant level is low, it’s important to add more coolant to ensure optimal performance of the AC unit. However, it’s crucial to consult a professional or refer to the manufacturer’s guidelines before adding coolant, as using the wrong type or adding too much can damage the system.
Step 6: Add coolant if necessary
checking coolant in AC unit, adding coolant if necessary, step-by-step guide, maintaining AC unit One important step in maintaining your AC unit is to check the coolant level and add more if necessary. Coolant is essential for the proper functioning of your AC system, as it helps to cool the air that is blown into your home. Over time, the coolant in your AC unit can evaporate or leak, which can lead to reduced cooling efficiency.
Checking the coolant level is a simple process that you can do yourself, and it can help you identify any potential issues with your AC unit before they become bigger problems. So, let’s dive into a step-by-step guide on how to check the coolant level in your AC unit and add more if necessary.
Precautions to take when checking the coolant
When it comes to checking the coolant in your AC unit, there are a few precautions you should take to ensure your safety. First and foremost, always make sure to turn off the power supply to the AC unit before starting any maintenance work. This will prevent any electrical accidents and keep you safe.
Additionally, wear protective gloves and safety goggles to protect your skin and eyes from any chemicals or spills. It is also important to allow the AC unit to cool down before attempting to check the coolant levels. This will prevent any burns or injuries from hot surfaces.
Finally, when handling the coolant, be careful not to inhale the fumes, as they can be harmful. By taking these precautions, you can safely check the coolant in your AC unit and ensure that it is running efficiently.
Conclusion
In conclusion, checking the coolant in your AC unit is a crucial step in maintaining its optimal performance and keeping your cool in the summer heat. Just like a detective hunting for clues, you need to become a coolant inspector extraordinaire. Armed with a flashlight and a keen eye, you can venture into the mysterious world of your AC unit and uncover any coolant-related conundrums.
Remember, the coolant is the lifeblood of your AC unit, just like coffee is the lifeblood of many humans. So, don your investigative cap, grab your trusty flashlight, and embark on a coolant-checking adventure to ensure that your AC unit keeps you chilled and your home a haven of coolness. And just like a detective, be sure to keep your puns on ice and your wit as frosty as the air blowing from your AC unit—cool and refreshing.
“
FAQs
How often should coolant levels be checked in an AC unit?
Coolant levels should be checked at least once a year, preferably before the start of the summer season.
What are the signs of low coolant levels in an AC unit?
Signs of low coolant levels in an AC unit include reduced cooling capacity, longer cooling cycles, and increased energy consumption.
Can low coolant levels cause damage to an AC unit?
Yes, low coolant levels can cause damage to an AC unit. It can lead to compressor failure and other costly repairs.
How can I check the coolant levels in my AC unit?
Checking coolant levels in an AC unit requires a professional technician who can perform a pressure test and visually inspect the coolant lines.
What should I do if I suspect low coolant levels in my AC unit?
If you suspect low coolant levels in your AC unit, you should contact a professional technician who can properly diagnose and fix the issue.
How can I prevent low coolant levels in my AC unit?
Regular maintenance and annual inspections can help prevent low coolant levels in an AC unit. Additionally, keeping the air filters clean and ensuring proper airflow can also help.
Is it possible to add coolant to an AC unit myself?
No, adding coolant to an AC unit should only be done by a certified technician who has the proper tools and knowledge to handle refrigerants safely.