
Have you noticed that your car’s engine seems to be running hotter than usual? It could be a sign that your coolant reservoir is full and needs to be emptied. The coolant reservoir plays a crucial role in maintaining the engine’s temperature and preventing overheating. It acts as a storage tank for coolant, which is a mixture of antifreeze and water that helps regulate the engine’s temperature.
Over time, the coolant may become contaminated with debris and particles, which can negatively affect its performance. Therefore, it’s important to regularly empty the coolant reservoir and replace it with fresh coolant to ensure optimal engine function. But how exactly do you go about emptying the coolant reservoir? In this blog, we will discuss step-by-step instructions on how to empty your car’s coolant reservoir, so you can keep your engine cool and running smoothly.
So, let’s dive in and get started!
Table of Contents
Introduction
Are you experiencing issues with your car’s cooling system? If so, it might be time to empty your coolant reservoir. The coolant reservoir, also known as the overflow tank, is where excess coolant flows when the engine is overheating. Over time, this reservoir can become filled with old coolant, debris, and other contaminants, which can compromise the performance of your cooling system.
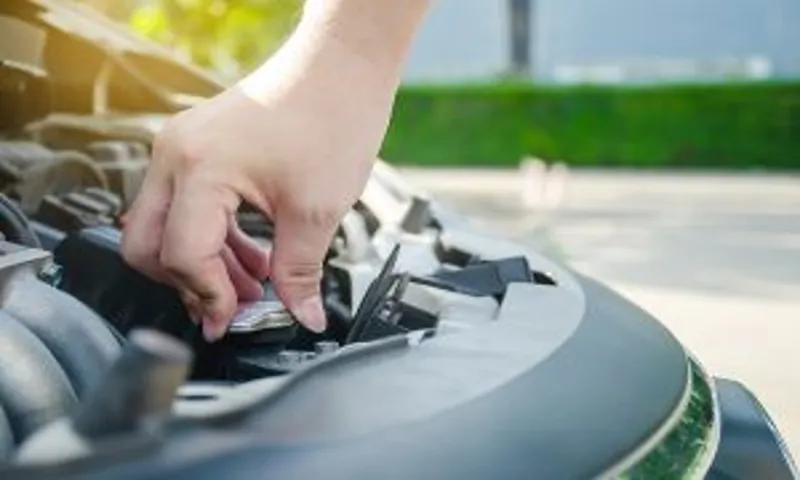
To empty the coolant reservoir, start by locating it in your engine bay. It is usually a translucent plastic container with markings indicating the recommended coolant level. Use caution when removing the cap, as the coolant may still be hot.
Once the cap is off, you can use a siphon or turkey baster to remove the old coolant from the reservoir. Be sure to dispose of the old coolant properly, as it is toxic and harmful to the environment. After you have emptied the reservoir, refill it with fresh coolant, following the manufacturer’s recommendations.
Regularly emptying and refilling the coolant reservoir can help keep your cooling system running smoothly and prevent overheating issues.
What is a Coolant Reservoir?
coolant reservoir, radiator, engine cooling system, overflow tank Introduction: Have you ever popped the hood of your car and noticed a plastic tank sitting next to the radiator? That tank is known as a coolant reservoir, also referred to as an overflow tank or an expansion tank. It may seem like a small and insignificant component, but it actually plays a crucial role in the proper functioning of your vehicle’s engine cooling system. The coolant reservoir is connected to the radiator and serves as a storage container for excess coolant.
It helps to maintain the correct level of coolant in the system, preventing overheating and maintaining optimal engine performance. In this blog section, we will dive deeper into what a coolant reservoir is, how it works, and why it is an essential part of your car’s cooling system. So, let’s get started!
Importance of Emptying the Coolant Reservoir
“coolant reservoir” The coolant reservoir is an essential part of a vehicle’s cooling system. Its main function is to store and supply coolant to the engine as needed. Over time, coolant can become contaminated with rust particles, debris, and other impurities.
These contaminants can clog the cooling system, causing it to overheat and potentially lead to engine damage. That’s why it’s important to regularly empty and clean the coolant reservoir. By doing so, you can ensure that the coolant remains clean and free of contaminants, keeping your engine running smoothly and efficiently.
Tools and Materials Needed
If you need to empty the coolant reservoir in your vehicle, there are a few tools and materials you’ll need to have on hand. First, you’ll need a pair of safety gloves to protect your hands from any potential spills or splashes. You’ll also need a container to catch the coolant as you drain it from the reservoir.
It’s important to use a container that is properly labeled and designated for coolant, as it can be harmful if not handled correctly. Additionally, you’ll need a funnel to help you pour the coolant back into the reservoir once you have emptied it. Finally, you may need a wrench or pliers to loosen any clamps or connections that are keeping the coolant reservoir in place.
By having these tools and materials ready before you start the process, you can ensure a smooth and safe coolant reservoir emptying experience.
Coolant drain pan
coolant drain pan. The coolant drain pan is an essential tool when it comes to servicing your vehicle’s cooling system. Whether you are changing the coolant or performing maintenance on the radiator, having a drain pan can make the job much easier and less messy.
To use a coolant drain pan effectively, there are a few tools and materials that you will need. Firstly, you will need the drain pan itself. This is a specially designed pan that is deep enough to catch the coolant as it drains from the system.
It typically has a built-in pour spout for easy disposal of the collected coolant. In addition to the drain pan, you will also need a few other tools. You will need a pair of pliers or a wrench to loosen the drain plug on the radiator.
This plug is typically located at the bottom of the radiator and allows the coolant to drain out. Next, you will need a funnel to help ensure that the coolant goes into the drain pan and not all over your garage floor. A funnel with a filter is especially helpful as it will catch any debris or contaminants that may be in the coolant.
Lastly, you will need a container to collect and dispose of the coolant. Many auto parts stores will accept used coolant for recycling, so be sure to check with your local store for proper disposal options. Overall, having a coolant drain pan and the necessary tools will make working on your vehicle’s cooling system much easier and less messy.
The drain pan will catch the coolant, preventing it from spilling all over the place, and the other tools will help to ensure that the process goes smoothly. So, the next time you need to change your coolant or service your radiator, don’t forget to grab your coolant drain pan and these other essential tools.
Screwdriver
tools and materials needed for using a screwdriver When it comes to using a screwdriver, there are a few tools and materials that you should have on hand to ensure that your project goes smoothly. First and foremost, you will obviously need a screwdriver. There are many different types and sizes of screwdrivers, so it’s important to consider the specific screws you will be working with.
A flat-head screwdriver is perfect for screws with a single slot, while a Phillips-head screwdriver is designed for screws with a cross-shaped recess. It’s also a good idea to have a set of screwdriver bits with different sizes and types, as this will allow you to work with a variety of screws. In addition to the screwdrivers themselves, you will also need a few other tools and materials.
A level is essential for ensuring that your screws are straight and aligned properly. A tape measure or ruler will come in handy for measuring the distance between screws or marking where the screws need to go. Depending on the project, you may also need a power drill for pre-drilling holes or driving screws into harder materials.
Finally, it’s important to have a good selection of screws on hand. Different projects call for different types and sizes of screws, so it’s wise to have a variety of options available. Choose screws that are the appropriate length for your project and make sure they are made of a durable material such as stainless steel.
By having these tools and materials on hand, you’ll be well-equipped to tackle any project that requires the use of a screwdriver. Whether you’re assembling furniture, installing shelves, or making repairs around the house, having the right tools will make the job much easier and more efficient. So before you get started, make sure you gather everything you need to ensure a successful outcome.
Rubber gloves
rubber gloves, tools and materials, DIY projects
Safety glasses
safety glasses
Step-by-Step Guide
So, you’re wondering how to empty your coolant reservoir? No worries, I’ve got you covered with a step-by-step guide! First off, make sure your engine is cooled down completely before attempting to empty the coolant reservoir. This will ensure your safety and prevent any accidents from happening. Once the engine is cool, locate the coolant reservoir, which is usually a translucent plastic tank located near the radiator.
Next, remove the cap of the coolant reservoir carefully. Be cautious as there may still be residual pressure inside. Then, find the drain plug at the bottom of the radiator and place a container underneath to catch the coolant.
Slowly unscrew the drain plug, making sure not to lose it. The coolant will start to flow out of the drain plug and into the container. Once the coolant has drained completely, replace the drain plug and tighten it securely.
Finally, pour the used coolant into a container that can be properly disposed of, as coolant is harmful to the environment. And there you have it – your coolant reservoir is now empty! Remember to refill it with fresh coolant before hitting the road again.
Step 1: Preparation
preparation, step-by-step guide, organizing a party So, you’ve decided to host a party! Congratulations, that’s always a great idea! However, before you dive headfirst into the planning process, it’s essential to take some time to prepare. Preparation is key to ensuring your party goes smoothly and that everyone has a fantastic time. With that in mind, here is a step-by-step guide to help you get organized and ready for the big day.
First and foremost, it’s vital to determine the purpose and theme of your party. Are you celebrating a special occasion like a birthday or an anniversary? Or is it just a casual get-together with friends? Once you have a clear idea of what you want to achieve with your party, it will be much easier to plan the details and make appropriate decisions. Next, you need to consider your guest list.
Who do you want to invite to your party? Are you going for an intimate gathering or a larger event? Remember to think about the space you have available and how many people it can comfortably accommodate. Consider the dynamics of the group and make sure you invite people who will enjoy each other’s company. Once you have your guest list sorted, it’s time to set a date and time for your party.
Think about what day of the week and what time would be most convenient for your guests. Also, consider any conflicts with holidays or other events that might affect attendance. Flexibility is key here, so be open to adjusting the date and time if necessary.
After determining the date and time, you can start planning the logistics. Decide on a location for your party, whether it’s at home, a rented venue, or even an outdoor space. Consider what amenities and facilities are available at the chosen location and make any necessary arrangements for seating, tables, and decorations.
Now that you have the basics covered, it’s time to think about the food and drinks. Decide whether you want to provide a full meal, a buffet, or just appetizers and snacks. Don’t forget to consider any dietary restrictions or preferences of your guests.
Step 2: Locate the Coolant Reservoir
coolant reservoir, step-by-step guide, locate, finding the coolant reservoir, engine coolant, car’s cooling system To properly maintain your car’s cooling system, it’s important to know where to locate the coolant reservoir. This handy step-by-step guide will help you find it with ease. The coolant reservoir, also known as the overflow tank or expansion tank, is typically a small, translucent plastic container located near the radiator.
It’s designed to hold extra coolant for your engine when it expands and contracts due to temperature changes. To begin, open the hood of your car and secure it so that it stays propped open. Take a moment to familiarize yourself with the engine compartment, locating the different components.
Now, look for a plastic container that’s attached to the side or near the top of the radiator. The coolant reservoir is usually a white or translucent container, making it easier to identify. Once you’ve located the coolant reservoir, you’ll want to take a closer look at it.
Check the fluid level inside to ensure that it’s within the recommended range. There should be minimum and maximum marks on the side of the container. If the fluid level is low, it’s necessary to add more coolant to the reservoir.
Knowing how to find the coolant reservoir is an essential step in properly maintaining your car’s cooling system. By regularly checking the fluid level and adding coolant as needed, you can help prevent engine overheating and potential damage. So, the next time you pop open the hood, take a moment to locate the coolant reservoir and ensure that your engine stays cool and running smoothly.
Step 3: Remove the Reservoir Cap
In order to start the process of changing your brake fluid, the first step is to locate the brake fluid reservoir. This can usually be found under the hood of your car, near the back of the engine compartment. Once you have located the reservoir, the next step is to remove the reservoir cap.
This cap is usually either a screw-on type or a snap-on type. If it is a screw-on type, you will need a pair of pliers or a wrench to loosen it. If it is a snap-on type, you can simply use your hands to pry it off.
It is important to be cautious when removing the cap, as the brake fluid can be under pressure and may spray out when the cap is removed. To prevent any spills or accidents, it is a good idea to place a rag or towel over the reservoir before removing the cap. Once the cap is removed, you can move on to the next step in the brake fluid changing process.
Step 4: Place the Coolant Drain Pan
coolant drain pan, step-by-step guide. In this step-by-step guide, we’ll walk you through the process of placing a coolant drain pan. Now, you might be wondering, why is this step necessary? Well, when it comes to working on your vehicle’s cooling system, it’s essential to have a drain pan in place to catch the coolant that will be drained from the system.
This prevents any spills or messes and allows for easy disposal of the old coolant. So let’s dive right in and get started with step four, placing the coolant drain pan. First, make sure you have a coolant drain pan that is large enough to hold all of the coolant that will be drained from your vehicle’s cooling system.
This is crucial because you don’t want any spillage or overflow. Look for a pan with a capacity that matches or exceeds the amount of coolant your system can hold. Next, locate the drain plug on your vehicle’s radiator.
This is usually a small valve or plug located on the bottom of the radiator. Place the drain pan directly beneath the drain plug to catch the coolant as it drains. Now, carefully remove the drain plug from the radiator using a wrench or socket.
Be cautious as the coolant may be hot, and it can cause burns if it comes into contact with your skin. Once the plug is removed, allow the coolant to flow into the drain pan until it stops. Finally, once all of the coolant has drained from the radiator, replace the drain plug securely.
Make sure it is tightened properly to prevent any leaks. At this point, your coolant drain pan has served its purpose, and you can now dispose of the old coolant in an environmentally friendly manner. Placing a coolant drain pan is an essential step when working on your vehicle’s cooling system.
Step 5: Drain the Coolant
“draining coolant” One important step in the process of maintaining your vehicle’s cooling system is to drain the coolant. This is necessary in order to remove any old or contaminated coolant that could be causing problems with your car’s engine. To start, you will need to locate the drain plug on the radiator.
This plug is usually located at the bottom of the radiator and may require a wrench or screwdriver to loosen. Once you have located the plug, place a drain pan or bucket underneath to catch the coolant as it drains out. Next, carefully remove the drain plug, being cautious not to burn yourself as the coolant may still be hot.
Allow the coolant to fully drain out until there is no more flowing. Remember to dispose of the old coolant properly as it is toxic and harmful to the environment. Once the coolant has been drained, you can proceed with the next steps in maintaining and replacing your vehicle’s coolant.
Step 6: Clean the Reservoir
cleaning the reservoir. Once you’ve removed the coffee grounds and filter from the coffee maker, it’s time to move on to the next step: cleaning the reservoir. This is an important step in maintaining the cleanliness and efficiency of your coffee maker.
To start, you’ll want to unplug the coffee maker and allow it to cool down completely. This will ensure your safety and prevent any potential burns. Once it’s cool, you can remove the reservoir from the coffee maker.
Next, you’ll want to pour out any remaining water in the reservoir. Be sure to do this over the sink to avoid any spills. Once it’s empty, you can fill the reservoir with a mixture of equal parts water and vinegar.
The vinegar will help to remove any mineral deposits or buildup that may have accumulated inside the reservoir. After you’ve filled the reservoir with the vinegar mixture, you can place it back into the coffee maker. Make sure it is securely in place before moving on to the next step.
Now, it’s time to run a cleaning cycle. Replug the coffee maker and turn it on, as you would if you were brewing a pot of coffee. Allow the vinegar mixture to run through the machine and into the carafe.
This will help to clean the internal components of the coffee maker and remove any impurities. Once the cleaning cycle is complete, you’ll want to empty the carafe and rinse it well. Then, fill the reservoir with fresh water and run another cycle.
Step 7: Reinstall the Reservoir Cap
Once you’ve finished bleeding your brakes and reconnected all the lines, it’s time to move on to the final step: reinstalling the reservoir cap. This little cap plays a crucial role in keeping the brake fluid clean and free from contaminants, so it’s important to make sure it’s properly sealed. Start by wiping the cap and the opening of the reservoir clean with a lint-free cloth.
This will ensure a tight seal and prevent any dirt or debris from getting in. Next, carefully line up the cap with the opening and press it down firmly until it clicks into place. Give it a gentle twist to make sure it’s secure.
Double-check that the cap is correctly aligned and seated to avoid any leaks. And that’s it! With the reservoir cap reinstalled, your brake bleeding process is complete. Time to take your car for a test drive and enjoy those smooth, responsive brakes.
Tips and Precautions
If you need to empty your coolant reservoir, it’s important to follow a few tips and precautions to ensure the process goes smoothly. First, make sure the engine has cooled down before attempting to remove the coolant. This will prevent any burns or injuries.
Next, locate the coolant reservoir, which is usually a translucent plastic container near the radiator. Once you’ve found it, carefully remove the reservoir cap, being cautious of any built-up pressure. Use a clean funnel or siphon to drain the coolant into a suitable container.
Remember to dispose of the coolant responsibly, as it can be harmful to the environment. Finally, after emptying the reservoir, it’s a good idea to flush the system with clean water before refilling it with fresh coolant. This will help remove any debris or contaminants from the system.
Taking these precautions will ensure a safe and effective coolant reservoir emptying process.
Wear protective gear
In any activity or sport that involves physical exertion, it’s crucial to prioritize safety and protect yourself from potential injuries. One of the most effective ways to do this is by wearing protective gear. Whether you’re biking, skateboarding, or playing a contact sport, wearing the appropriate gear can make a significant difference in preventing serious injuries.
Helmets, knee pads, elbow pads, and wrist guards are just a few examples of protective gear that can provide crucial protection to vulnerable areas of the body. When you wear protective gear, you’re not only safeguarding yourself, but you’re also setting a good example for others. By prioritizing safety and wearing the necessary gear, you’re telling others that their well-being matters too.
So, before you embark on your next adventure, make sure you’re properly equipped with the right protective gear. Your body will thank you for it!
Allow the engine to cool down
“Allow the engine to cool down”
Dispose of the coolant properly
dispose of coolant properly, coolant disposal, disposing of coolant, coolant waste management, coolant recycling One important aspect of maintaining a vehicle is properly disposing of coolant. Coolant is a vital component in your vehicle’s cooling system, but it can also be hazardous if not handled and disposed of correctly. When it comes time to replace your coolant, it is crucial to follow proper procedures to ensure it is disposed of safely and responsibly.
One option is to take your old coolant to a local recycling center or hazardous waste collection facility. These centers have the knowledge and equipment to handle coolant waste properly, preventing harm to the environment and human health. If a recycling center is not available in your area, contact your local municipal waste management department for guidance on how to dispose of coolant safely.
It is crucial not to pour coolant down the drain, onto the ground, or into storm drains, as it can contaminate water sources and harm aquatic life. Taking the time to dispose of coolant properly is a small step you can take to protect the environment and human health.
Monitor the coolant level
monitor coolant level
Conclusion
In summary, emptying your coolant reservoir is about as simple as draining the excitement out of a suspenseful thriller. It’s like saying goodbye to a lukewarm cup of tea that just didn’t hit the spot. Just follow these steps, and you’ll have your coolant reservoir empty faster than a magician pulling a disappearing act.
So go forth and rid your vehicle of its overheating woes, leaving your radiator with a sense of refreshed coolness. Remember, coolant emptying may not be the most glamorous of tasks, but it’s a necessary part of keeping your engine running smoothly. So grab your wrench, channel your inner Houdini, and bid adieu to your old coolant with finesse and style.
Your vehicle will thank you for it, and who knows, maybe even give you a standing ovation.”
Importance of Regular Coolant Maintenance
coolant maintenance, regular coolant maintenance. Regular coolant maintenance is crucial for the overall health and longevity of your vehicle. Coolant, also known as antifreeze, plays a crucial role in regulating the temperature of your engine.
Over time, coolant can become contaminated with dirt, rust, and other debris, which can lead to a decrease in its effectiveness. This can result in overheating, potential damage to your engine, and costly repairs. To ensure that your coolant is performing at its best, it’s important to follow a few tips and precautions.
First, make sure to check your coolant levels regularly and top up as necessary. It’s also important to flush and replace your coolant according to your vehicle’s manufacturer’s recommendations. This will help to remove any accumulated debris and maintain the effectiveness of the coolant.
Additionally, be sure to use the correct type of coolant for your vehicle, as different vehicles may require different formulations. By following these tips and precautions, you can ensure that your coolant is properly maintained and your engine stays cool and protected. So, don’t overlook the importance of regular coolant maintenance and keep your vehicle running smoothly for years to come.
Follow the Steps for a Healthier Cooling System
cooling system maintenance, healthier cooling system, tips for a healthier cooling system, precautions for a healthier cooling system
FAQs
How do I empty the coolant reservoir on my car?
To empty the coolant reservoir, locate the reservoir under the hood of your car. Look for a cap labeled “coolant” or “engine coolant.” Carefully remove the cap and use a funnel to pour the coolant into a drain pan or container. Make sure to wait until the engine has cooled down before attempting to empty the reservoir.
Can I just remove the cap to empty the coolant reservoir?
No, it is not recommended to simply remove the cap to empty the coolant reservoir. The coolant can be very hot and pressurized, so removing the cap without taking proper precautions can result in injury. Always follow the proper steps to safely empty the coolant reservoir.
How often should I empty and refill the coolant reservoir?
It is recommended to empty and refill the coolant reservoir every 2 years or 30,000 miles, whichever comes first. Regular maintenance of the coolant system helps to ensure proper engine cooling and prevent overheating.
What should I do with the old coolant when emptying the reservoir?
Proper disposal of old coolant is important for the environment. Check with your local recycling center or automotive service provider for guidelines on how to dispose of coolant safely. It is not recommended to pour coolant down the drain or onto the ground.
Can I reuse the coolant after emptying the reservoir?
In most cases, it is not advisable to reuse the coolant that has been emptied from the reservoir. Coolant can become contaminated with debris, rust, or other impurities over time, which can hinder its effectiveness in cooling the engine. It is best to use fresh coolant when refilling the reservoir.
Is emptying the coolant reservoir something I can do myself?
Yes, emptying the coolant reservoir is a relatively simple task that can be done by most car owners. However, it is important to take precautions, such as wearing gloves and safety glasses, and to follow the proper steps to ensure safety and prevent any mishaps.
What should I do if I accidentally spill coolant while emptying the reservoir?
If you accidentally spill coolant while emptying the reservoir, it is important to clean up the spill immediately. Coolant is toxic to animals and harmful to the environment. Use an absorbent material, such as cat litter or an absorbent pad, to soak up the spilled coolant. Dispose of the material as directed by your local recycling or hazardous waste facility.