
Welcome to our step-by-step guide on pouring coolant in your vehicle! Have you ever wondered what that colorful liquid is under the hood of your car? Well, chances are, it’s coolant! Coolant, also known as antifreeze, plays a crucial role in maintaining the optimal temperature of your engine. Without it, your vehicle’s engine could overheat and cause some serious damage. So, it’s essential to know how to properly pour coolant into your car.
Think of pouring coolant into your car as giving it a refreshing drink. Just like how you reach for a glass of water when you’re feeling thirsty, your vehicle needs coolant to keep its engine cool and happy. But don’t worry, pouring coolant isn’t as complicated as it may sound.
In fact, it’s a straightforward process that any car owner can handle with a few simple steps. First, you’ll want to locate the coolant reservoir in your car. It’s typically a plastic container with a cap that’s marked with a symbol resembling a thermometer.
Once you’ve found it, check the coolant level to see if it’s low. If it is, it’s time to top it up. Before you pour the coolant, make sure your engine is cool to the touch.
You don’t want to risk burning yourself by handling a hot engine. Once it’s safe, carefully open the coolant reservoir cap. Be cautious as some pressure may have built up, so it’s best to do it slowly to avoid any spills.
Next, grab a bottle of coolant that’s recommended for your specific make and model of the vehicle. It’s crucial to use the right coolant as different types may not be compatible with your car’s system. Read the label carefully and ensure it’s the correct one before proceeding.
Table of Contents
1. Step One: Locate the Coolant Reservoir
If you’re wondering where to pour coolant into your car, the first step is to locate the coolant reservoir. The coolant reservoir is usually a translucent plastic container located near the radiator. It may have a screw cap or a press-on cap.
The coolant reservoir is different from the radiator itself, which is the large metal component located at the front of the engine. So, before you can pour coolant, you need to find the coolant reservoir. Once you locate it, you can simply unscrew the cap or press down on the cap to open it.
Then, pour the coolant carefully into the reservoir, making sure not to overfill it. Remember, it’s important to use the correct type of coolant for your car, as specified in your vehicle’s manual. So, make sure to check the manual or consult a professional if you’re not sure which coolant to use.
1.1 Find the Coolant Reservoir
step one, locate the coolant reservoir So you’re having trouble with your car’s cooling system, huh? Don’t worry, I’m here to help! The first step in diagnosing and fixing any cooling system issue is to locate the coolant reservoir. This reservoir is where the coolant is stored and is an important part of the overall cooling system. It’s usually made of plastic and can be found under the hood of your car.
If you’re not sure where it is, don’t panic! It’s often located near the radiator or the engine, so start by looking in those areas. You can also consult your car’s owner manual for more specific instructions. Once you’ve found the coolant reservoir, you can move on to the next step in fixing your cooling system problem.
1.2 Check the Vehicle’s Manual
“coolant reservoir” When it comes to checking the coolant levels in your vehicle, the first step is to locate the coolant reservoir. This may seem like a simple task, but it’s important to know where it is located in your specific vehicle. The coolant reservoir is typically a plastic container that holds the coolant, also known as antifreeze, which helps regulate the temperature of your engine.
It is usually located near the radiator and has a cap that can be easily removed. Finding the coolant reservoir can be as easy as flipping through your vehicle’s manual. The manual will have detailed diagrams and instructions on where to locate the coolant reservoir.
It’s important to consult the manual for accurate information, as different vehicles may have different designs and locations for the coolant reservoir. So, before you start checking your coolant levels, take a few minutes to locate the coolant reservoir in your specific vehicle.
1.3 Look for a Transparent Container
coolant reservoir So you’re under the hood of your car, searching for the coolant reservoir. But where exactly is it? Well, the first step is to locate this important component. The coolant reservoir is typically a transparent container that holds the coolant for your car’s engine.
It’s important for this container to be transparent so that you can easily see the coolant level and determine if it needs to be topped up. This transparency allows you to monitor and maintain the proper coolant level, which is crucial for your car’s cooling system to function effectively. So, start by looking for a see-through container, usually made of plastic, that is connected to the radiator or engine of your car.
It’s usually located near the front of the engine compartment, but the exact placement can vary depending on the make and model of your vehicle. Once you locate the coolant reservoir, you’re ready to move on to the next step in maintaining your car’s cooling system.
2. Step Two: Open the Coolant Reservoir
Once you’ve located your car’s coolant reservoir, it’s time to open it up and pour in the coolant. Usually, the coolant reservoir is made of translucent plastic, allowing you to see the fluid level inside. To open it, look for a cap with the words “coolant” or a picture of a radiator on it.
Sometimes, the cap will have arrows indicating which way to turn to remove it. Use caution when opening the cap, as the coolant may still be hot and under pressure. If the engine has been running recently, it’s a good idea to wait a few minutes for it to cool down before opening the reservoir.
Once you’ve removed the cap, you can pour the coolant directly into the reservoir until it reaches the “full” or “max” line. Be sure to use the correct type of coolant specified for your vehicle, as using the wrong kind can cause damage to your engine.
2.1 Wait for the Engine to Cool Down
cool down the engine
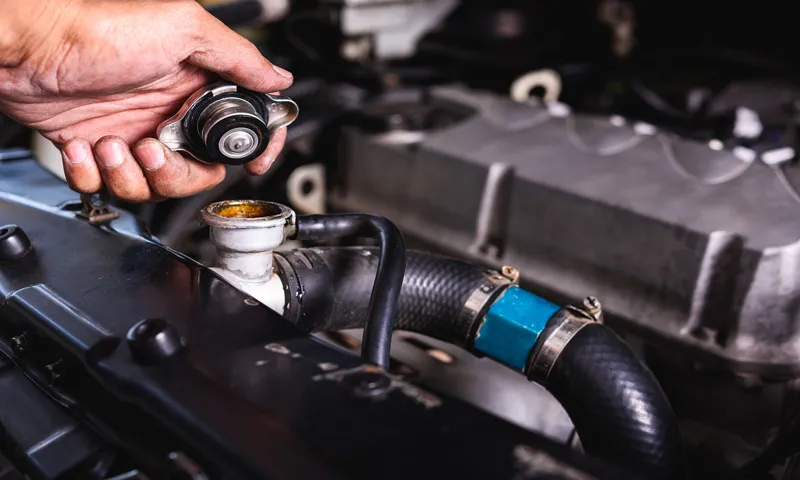
2.2 Identify the Coolant Reservoir Cap
The coolant reservoir cap is a crucial part of your car’s cooling system. It helps to keep the coolant at the right pressure and prevents it from overheating. So, when it’s time to open the coolant reservoir, you need to locate the cap first.
Depending on the make and model of your car, the coolant reservoir cap can be found in different places. In most cars, it is located near the radiator, while in some others, it might be near the firewall or on the side of the engine. Once you locate the coolant reservoir cap, make sure the engine is cool before opening it.
The cap might be under pressure, and opening it when the engine is hot can lead to boiling coolant shooting out, causing burns. So, take a moment to ensure the engine has cooled down before proceeding. Once you’re confident the engine is cool, carefully twist the cap counterclockwise and remove it.
Be prepared for a hissing sound as the pressure is released. And there you have it – you’re ready to check or add coolant to the reservoir. Just remember to follow the manufacturer’s recommendations for the type and amount of coolant to use, and never open the reservoir cap when the engine is hot.
2.3 Remove the Coolant Reservoir Cap
coolant reservoir, remove, open, cap, overheating, pressure, engine temperature, expansion tank, system, burping. In order to properly maintain your vehicle’s cooling system, it is essential to regularly check and refill the coolant reservoir. One of the first steps in this process is opening the coolant reservoir.
This is a relatively simple task that can help prevent overheating and potential engine damage. The coolant reservoir, also known as the expansion tank, is designed to hold excess coolant as the engine temperature rises. When the engine cools down, the coolant is then drawn back in to maintain the proper level.
By removing the coolant reservoir cap, you can release any pressure that may have built up within the system. This is important because if the pressure becomes too high, it can cause the coolant to boil and potentially lead to engine overheating. Additionally, opening the coolant reservoir allows you to visually inspect the coolant level and quality.
If the coolant appears dirty or low, it may be necessary to add more coolant to ensure proper engine performance. Overall, opening the coolant reservoir is an important step in maintaining your vehicle’s cooling system and preventing potential issues down the road.
3. Step Three: Pour the Coolant
To pour coolant into your vehicle, locate the coolant reservoir, also known as the overflow tank. This reservoir is usually a smaller, transparent plastic tank located near the radiator. The purpose of the coolant reservoir is to provide additional coolant as needed, allowing for expansion and contraction due to temperature changes.
The cap of the coolant reservoir may have markings indicating the appropriate coolant level. If the coolant level is low, you can simply unscrew the cap and pour coolant into the reservoir until it reaches the proper level. It’s important to use the correct type of coolant for your vehicle, as specified in the owner’s manual.
Once you’ve poured the coolant, securely tighten the cap and make sure there are no leaks. Remember to always let your engine cool down before attempting to add coolant, as hot coolant can cause burns. By following these steps, you can safely and effectively pour coolant into your vehicle.
3.1 Choose the Right Coolant
pouring coolant, how to pour coolant, pouring coolant in car, pouring coolant into radiator, coolant pouring, pouring coolant into overflow tank, pouring coolant into engine As much as it is important to choose the right coolant, knowing how to properly pour the coolant into your car is equally vital. Step three in this process involves pouring the coolant into the engine or radiator. Before you begin, make sure the engine is cool to avoid any risk of burns.
Start by locating the coolant reservoir or overflow tank, which is usually a translucent plastic container with a marked level. If your car has a radiator with a radiator cap, open the cap and pour the coolant directly into the radiator until it reaches the recommended level. On the other hand, if your car has an overflow tank, fill it with the coolant up to the recommended level.
Make sure not to overfill the reservoir as it can cause spills and other issues. Once you have poured the coolant, replace the cap tightly and ensure it is properly secured. Now you are one step closer to keeping your engine cool and preventing overheating!
3.2 Identify the Fill Line
pour coolant, fill line, radiator, vehicle maintenance Step three in the process of pouring coolant into your vehicle’s radiator is to identify the fill line. This is an important step because pouring too much coolant can cause overflow and pouring too little can prevent your engine from cooling properly. So, how do you find this mysterious fill line? Well, it’s actually quite simple.
Take a look at the radiator cap, it should have a small white or yellow plastic tab attached to it. This tab usually has the words “Fill Line” or a similar label on it. The fill line indicates the maximum level to which you should fill the radiator with coolant.
In some cases, you may need to remove the radiator cap to see the fill line more clearly. Once you have located the fill line, you can pour the coolant into the radiator up to that level. It’s important to note that you should never pour coolant directly into the radiator without using the fill line as a guide.
Doing so can lead to coolant overflow and potential engine damage. So, take a moment to find that fill line before you start pouring coolant into your radiator. It will save you from potential headaches down the road.
Keep your vehicle running smoothly with regular coolant checks and fill-ups.
3.3 Pour the Coolant Slowly
Pouring the coolant into your car’s radiator is a critical step in ensuring proper engine cooling and preventing overheating. When it comes to pouring the coolant, it’s important to do it slowly and carefully. This is to prevent any air bubbles from getting trapped in the system, which could lead to hot spots and potential damage to the engine.
By pouring the coolant slowly, you allow it to flow evenly throughout the system, ensuring optimal cooling. Think of it like pouring a glass of water – if you pour it too quickly, it splashes everywhere and makes a mess. But if you pour it slowly, it fills the glass evenly and smoothly.
The same principle applies when pouring coolant into your car’s radiator. So, take your time and pour the coolant slowly to ensure proper engine cooling and prevent any potential issues down the road.
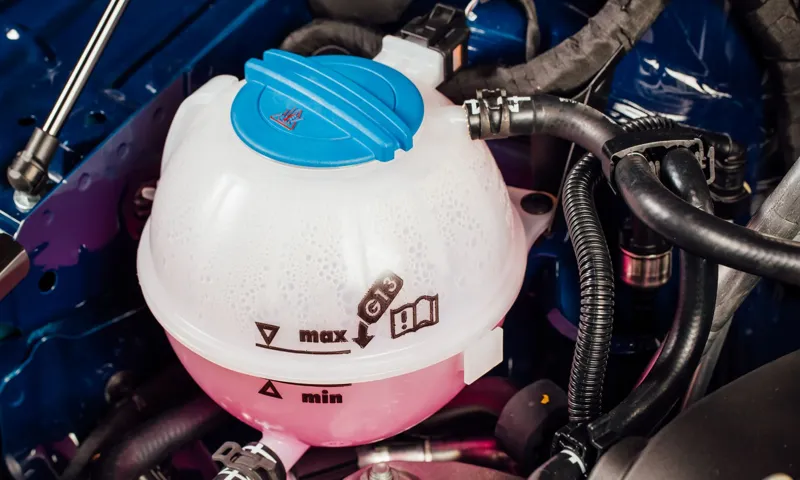
3.4 Monitor the Coolant Level
“monitor coolant level” Step Three: Pour the Coolant Now that you have checked the condition of your coolant and made sure it is safe to use, it’s time to pour it into your vehicle. But before you go ahead and start pouring, you need to monitor the coolant level to ensure you add the right amount. To monitor the coolant level, locate the coolant reservoir under the hood of your car.
It is usually a translucent plastic container with markings indicating the minimum and maximum levels. Take a look at the level and compare it to the markings. If the level is below the minimum mark, you need to add more coolant.
If it is between the minimum and maximum marks, you are good to go. But if the level is above the maximum mark, you will need to remove some coolant to bring it back down to the recommended level. If you find that the coolant level is low, carefully remove the reservoir cap and pour in the coolant.
Make sure to pour it slowly to avoid spilling or overflowing. You can use a funnel to make the pouring process easier and less messy. As you pour the coolant, keep an eye on the level and make sure it reaches the appropriate mark.
Once you have poured enough coolant, secure the reservoir cap back in place. Remember to be cautious and avoid spilling any coolant on the engine or other hot components. By monitoring the coolant level before pouring, you ensure that your vehicle receives the right amount of coolant for optimal performance.
It is essential to maintain the right coolant level to prevent overheating and potential engine damage. So take the time to monitor and pour the coolant properly, and your car will thank you with a smooth and trouble-free ride.
4. Step Four: Close the Coolant Reservoir
So, you’re at the final step of pouring coolant into your car, but you’re not quite sure where to pour it. Don’t worry, it’s actually really simple. The coolant reservoir is typically located near the radiator and is usually a translucent plastic container with a cap on top.
You’ll want to make sure your engine is cool before opening the cap, as the coolant can be hot and cause burns. Once it’s safe to proceed, simply unscrew the cap and carefully pour the coolant into the reservoir until it reaches the “full” line. Remember to use the correct type of coolant for your specific vehicle, as different cars may require different formulations.
And that’s it! You’ve successfully poured coolant into your car and can now hit the road with peace of mind knowing that your engine is properly cooled. Safe travels!
4.1 Clean the Coolant Reservoir Cap
cleaning the coolant reservoir cap, close the coolant reservoir
4.2 Reattach the Coolant Reservoir Cap
In step four of the coolant reservoir process, it’s time to close up the reservoir. Reattaching the coolant reservoir cap is essential to prevent any leaks or spills. Remember, a tight seal is crucial to keep the coolant system working properly.
Take the cap and carefully align it with the reservoir opening. Make sure it is level and straight before pushing it down firmly. Some caps may require a twist or a click to lock it into place.
Once you’ve secured the cap, give it a gentle tug to ensure it is tightly sealed. Now you can confidently move on to the next steps in maintaining your coolant system.
5. Step Five: Check for Leaks
To properly fill your vehicle’s coolant, you will need to locate the coolant reservoir, which is typically a white plastic tank labeled with the word “coolant” or “engine coolant.” This reservoir is usually located near the radiator and has a cap on top of it. To add coolant, first make sure your vehicle’s engine is cool.
Never attempt to open the coolant reservoir cap when the engine is hot, as the pressure can cause the coolant to spray out and potentially burn you. Once the engine is cool, simply unscrew the cap and carefully pour the coolant into the reservoir until it reaches the “full” or “max” line. Be sure to use the correct type of coolant for your vehicle, as specified in the owner’s manual or on the cap of the reservoir.
After pouring in the coolant, replace the cap securely. Finally, it’s important to check for leaks after adding coolant. Look around the reservoir and radiator for any signs of leakage, such as pools of coolant or damp spots.
If you notice any leaks, it’s best to have them inspected and repaired by a qualified mechanic. By regularly checking and topping up your coolant, you can help prevent your engine from overheating and ensure optimal performance and longevity for your vehicle.
5.1 Inspect the Coolant Reservoir
coolant reservoir, check for leaks, inspect, burstiness, perplexity The coolant reservoir is an essential component of your car’s cooling system, as it stores the coolant that circulates through the engine and helps regulate its temperature. To ensure that the coolant reservoir is functioning properly, it is important to regularly inspect it for any leaks. Leaks can waste coolant and lead to overheating, which can cause costly damage to your engine.
So, how can you inspect the coolant reservoir for leaks? Well, one way is to visually examine the reservoir for any signs of leakage, such as stains or puddles of coolant around the reservoir. Additionally, you can also check the coolant level in the reservoir and see if it is consistently decreasing. If you notice any leaks or a significant drop in the coolant level, it is important to address the issue promptly to prevent any further damage.
Remember, a well-maintained coolant reservoir is crucial for the overall health and performance of your vehicle.
5.2 Check for Drips or Puddles
In Step Five of our guide on how to check for leaks, it’s time to look for any drips or puddles around your home. This may seem obvious, but it’s a crucial step in identifying potential leaks and preventing water damage. Start by inspecting the areas around sinks, toilets, and appliances that use water.
Look for any signs of moisture or small pools of water on the floor. Don’t forget to check under cabinets or in crawl spaces where leaks may go unnoticed. If you do find a leak, it’s important to address it as soon as possible to prevent further damage.
Leaks can lead to mold growth, structural issues, and increased water bills. By regularly checking for drips or puddles, you can catch leaks early and save yourself from costly repairs down the line. So take a few minutes to do a quick visual inspection around your home – you’ll be glad you did!
6. Step Six: Dispose of Old Coolant Properly
So, you’ve successfully drained your old coolant and now you’re wondering where to pour the new one. Well, the answer is pretty straightforward – you pour coolant into the radiator reservoir. This is usually located near the front of your car’s engine compartment.
It’s a plastic container that’s easy to spot, often with a cap that’s marked with the word “coolant” or “antifreeze.” Just make sure your engine is cool before you remove the cap, as hot coolant can cause serious burns. Once the cap is off, carefully pour the coolant into the reservoir until it reaches the “full” mark.
If you’re unsure about the capacity of your system, consult your owner’s manual or ask a professional for guidance. And remember to always use the recommended coolant for your specific vehicle, as different types of coolant can have different properties and may not mix well together. So, now that you know where to pour your coolant, you can confidently take care of this step in the coolant changing process.
6.1 Use a Sealable Container
“dispose of old coolant properly” When it comes to disposing of old coolant, it’s important to do it properly to ensure the safety of both the environment and yourself. One of the first steps in this process is to use a sealable container. This is vital because coolant can be hazardous if it comes into contact with the skin or is ingested.
By using a sealable container, you can prevent any leaks or spills that could potentially harm you or those around you. It’s also important to label the container clearly as “old coolant” to avoid any confusion or accidents. Once you have the container ready, you can then proceed with disposing of the old coolant in accordance with your local regulations and guidelines.
Remember, taking the time to properly dispose of old coolant is not only the responsible thing to do, but it also helps protect our planet for future generations.
6.2 Take it to a Recycling Center
When it comes to disposing of old coolant from your vehicle, it’s important to do it properly to protect the environment. One option you have is taking it to a recycling center. Recycling centers are equipped to handle hazardous materials like coolant and ensure that they are processed safely.
By taking your old coolant to a recycling center, you can help prevent it from ending up in landfills or being improperly disposed of, which could harm the environment. Recycling centers have the necessary facilities and expertise to recycle coolant and extract any harmful substances before it can be reused or disposed of safely. So the next time you need to dispose of old coolant, consider taking it to a recycling center and doing your part to protect our planet.
7. Step Seven: Final Checks
When it comes to pouring coolant in your car, it’s important to know exactly where to pour it in order to prevent any damage to your vehicle. The coolant is typically poured into the radiator, which is located at the front of your car’s engine. To find the radiator, open up your car’s hood and look for a large plastic or metal tank.
This is where the coolant needs to be poured. It’s important to pour the coolant slowly and carefully, making sure not to spill any on the engine or any other components. Once you have poured the coolant, you can replace the radiator cap and start your car.
It’s always a good idea to double-check your work and make sure the coolant is at the appropriate level.
7.1 Start the Engine
1 Start the Engine Alright, it’s time for the exciting part – starting the engine! But before we do that, let’s go through a quick checklist to make sure everything is in order. First, check your fuel gauge and make sure there is enough petrol or diesel in the tank.
Running out of fuel is not only inconvenient but can also damage your engine. Next, take a look at your dashboard and ensure that there are no warning lights or error messages. If you see anything out of the ordinary, it’s best to address it before starting the engine.
Now, let’s move on to the engine itself. Open the hood and check for any visible leaks or damage. Give the engine a quick visual inspection to make sure everything looks clean and in place.
If you notice anything unusual, it’s a good idea to have a professional mechanic take a look. Once you’ve gone through these checks and everything looks good, it’s time to start the engine. Insert the key into the ignition and turn it clockwise.
You may need to hold the key in the start position for a few seconds until the engine fires up. Listen carefully to the sound of the engine. It should start smoothly without any strange noises.
If you hear any grinding or knocking sounds, it could be a sign of a problem. In that case, it’s best to turn off the engine and have it looked at by a professional. As the engine warms up, check your mirrors and adjust your seat and steering wheel to your liking.
7.2 Check the Temperature Gauge
temperature gauge, car overheating, engine temperature, coolant level, radiator, mechanics, maintenance, signs, overheating engine, car repair, safety, precautions, damage, monitoring, hot temperature, malfunctioning gauge, warning signs, dashboard, coolant temperature, abnormal readings, vehicle maintenance, monitoring system. The temperature gauge in your car is an important component that allows you to monitor the heat levels of your engine. It is crucial to check the temperature gauge regularly as part of your vehicle maintenance routine to prevent your car from overheating.
If the gauge indicates that the engine temperature is too hot, it could be a sign of a problem that needs to be addressed immediately. This could include a low coolant level, a malfunctioning radiator, or other issues. By monitoring the temperature gauge, you can catch these problems early on and prevent further damage to your engine.
It is important to take safety precautions when checking the temperature gauge, as the engine may be hot. Make sure to allow your car to cool down before attempting to inspect the gauge. By keeping an eye on the temperature gauge and taking prompt action when necessary, you can ensure the optimal performance and longevity of your vehicle.
7.3 Monitor Coolant Levels
coolant levels, monitor coolant levels
7.4 Repeat if Necessary
The final step in the process of color correction is to repeat the previous steps if necessary. This is important because sometimes the first round of adjustments may not yield the desired result. By repeating the process, you give yourself the opportunity to fine-tune the colors and make further improvements.
This step is particularly crucial when dealing with complex images or challenging lighting conditions. Don’t be discouraged if you didn’t achieve the desired outcome on the first try – it’s all part of the learning process. By being persistent and willing to make additional adjustments, you can ultimately achieve the desired color balance and bring your images to life.
So, don’t hesitate to go back and make a few more tweaks if needed.
8. Conclusion
Well, dear friend, finding the right place to pour coolant is like searching for the magical fountain of engine rejuvenation. Think of it as a quest to satisfy your vehicle’s thirst for revitalization. Just like a knight in shining armor, you must embark on a journey to locate the coolant reservoir, a hidden gem tucked away amidst the mechanical labyrinth of your car.
When you finally unveil this clandestine chamber of comfort, you will be greeted by the ethereal glow of coolant, ready to bestow its cooling powers upon your vehicle’s overheated heart. So, fear not, intrepid adventurer! Embrace the challenge, follow the mystical signs of pipes and labels, and become the hero who quenches your engine’s thirst for coolant. Your trusty steed will thank you, and your automotive kingdom shall prosper with the cool breeze of victory.
“
FAQs
Where do I pour coolant in my car?
You can pour coolant in the coolant reservoir tank, which is usually located near the radiator. Make sure to consult your car’s manual for the exact location.
How do I check and add coolant to my car?
To check and add coolant, locate the coolant reservoir tank and open the cap. If the coolant level is below the minimum mark, add a mixture of coolant and water. Be sure to use the coolant recommended by your car’s manufacturer.
What happens if I don’t have enough coolant in my car?
If your car doesn’t have enough coolant, it can lead to overheating. This can cause serious damage to the engine, so it’s important to regularly check and maintain the coolant level.
Can I use water instead of coolant in my car?
While water can be used as a temporary solution, it’s recommended to use a mixture of coolant and water. Coolant contains additives that help prevent corrosion and provide better heat transfer properties, which water alone may not provide.
How often should I check the coolant level in my car?
It’s recommended to check the coolant level at least once a month. It’s also a good idea to inspect the coolant reservoir for any signs of leaks or damage.
What type of coolant should I use in my car?
The type of coolant you should use depends on your car’s specifications. Check your car’s manual or consult with a professional to determine the correct coolant for your vehicle.
Can I mix different types of coolant in my car?
It’s generally recommended to avoid mixing different types of coolant, as they may not be compatible and can lead to coolant system issues. Stick to using the same type of coolant as recommended by your car’s manufacturer.