
Refilling coolant after draining is an essential step to maintain the health and performance of your vehicle’s engine. Whether you’ve just changed your coolant or performed a repair requiring you to drain the radiator, knowing how to properly refill the coolant is crucial. Without the right level and mixture of coolant, your engine can overheat, leading to potentially costly damage.
So, how do you refill coolant after draining? First, you need to ensure that your engine is completely cool before beginning the process. Opening the radiator cap while the engine is still hot can result in a dangerous release of pressure and steam. Once your engine is cool, locate the radiator cap and remove it.
The next step is to mix the proper ratio of coolant and water. This ratio can vary depending on the type of coolant you are using and your climate. It’s always a good idea to consult your vehicle’s owner’s manual or the coolant manufacturer’s instructions for the exact ratio.
After mixing the coolant and water, slowly pour it into the radiator through the fill hole. If necessary, you can also pour coolant directly into the coolant reservoir, which is connected to the radiator. Continue pouring coolant until the level reaches the full mark on the reservoir or radiator.
Once you’ve refilled the coolant, it’s important to check for any leaks or air pockets. Start your engine and let it run for a few minutes, allowing the coolant to circulate. Keep an eye on the temperature gauge to ensure that your engine doesn’t overheat.
If you notice any leaks or the temperature continues to rise, it’s crucial to address the issue promptly. In conclusion, refilling coolant after draining is a straightforward process that requires patience and attention to detail. By following the steps outlined above, you can ensure that your engine is properly cooled and protected.
Table of Contents
- 1 Introduction
- 2 Step 1: Gather the necessary tools and materials
- 3 Step 2: Locate the coolant reservoir
- 4 Step 3: Open the coolant reservoir cap
- 5 Step 4: Pour the coolant into the reservoir
- 6 Step 5: Check the coolant level
- 7 Step 6: Close the coolant reservoir cap
- 8 Step 7: Start the engine and check for leaks
- 9 Conclusion
- 10 FAQs
Introduction
So you’ve drained your coolant and now you’re wondering how to refill it. Don’t worry, the process is actually quite simple. First, make sure your engine is cool before you begin.
Then, locate the coolant reservoir under the hood. It’s usually a translucent plastic container with a cap labeled “coolant” or “engine coolant.” Once you’ve found it, remove the cap and set it aside.
Now, using a funnel, slowly pour the coolant into the reservoir until it reaches the “full” or “max” line. Be careful not to overfill it, as this could cause damage to your engine. Once you’ve added the coolant, replace the cap securely.
Finally, start your engine and let it run for a few minutes to help the coolant circulate throughout the system. And there you have it, your coolant is now properly refilled and your engine should be running cool and happy.
Why do you need to refill coolant?
Introduction Have you ever wondered why you need to refill coolant in your vehicle? It might seem like just one more maintenance task on your to-do list, but understanding the importance of coolant and why it needs to be refilled can help you better care for your car or truck. Coolant, also known as antifreeze, plays a crucial role in keeping your engine running smoothly. It helps to regulate the temperature and prevent overheating, which can cause significant damage to the engine.
In this blog post, we will delve deeper into why coolant needs to be refilled and the consequences of neglecting this essential task. So, let’s get started and explore the importance of coolant refills!

Importance of correctly refilling coolant
coolant refill, importance of coolant refill, correctly refilling coolant
Step 1: Gather the necessary tools and materials
Refilling coolant after draining is an important step in maintaining your vehicle’s cooling system. To get started, you’ll need a few tools and materials. First, make sure you have a coolant mixture that is compatible with your vehicle’s specifications.
This can usually be found at an automotive store or dealership. You’ll also need a funnel to pour the coolant into the reservoir. Additionally, it’s a good idea to have a pair of gloves and safety glasses to protect yourself from any spills or splashes.
Lastly, you may need a screwdriver or wrench to remove the radiator cap or drain plug, depending on your vehicle. With these tools and materials handy, you’ll be ready to begin refilling your coolant system and keeping your engine running smoothly.
List of tools and materials needed
When starting any DIY project, it’s important to gather all the necessary tools and materials beforehand. For this particular project, you’ll need a few key items to get started. First and foremost, you’ll need a measuring tape or ruler to accurately measure and mark the materials you’ll be working with.
A pencil or marker will also come in handy for marking your measurements and making any necessary cuts. To actually cut the materials, you’ll need a saw – either a hand saw or a power saw, depending on your preference and the size of the project. Don’t forget to grab some safety glasses as well to protect your eyes from any flying debris.
Additionally, you’ll need some sandpaper or a sanding block to smooth out any rough edges after cutting. Finally, you’ll need a drill and some screws or nails to secure the materials together. With these tools and materials in hand, you’ll be well-equipped to tackle your DIY project with confidence!
Step 2: Locate the coolant reservoir
When it comes to refilling the coolant after draining, the second step is to locate the coolant reservoir. This is an essential part of your vehicle’s cooling system where the coolant is stored. The coolant reservoir is usually a plastic container with a clear or translucent color, allowing you to see the coolant level.
It is typically located near the radiator or the firewall, but the exact location can vary depending on the make and model of your vehicle. It might be labeled with a symbol or the word “coolant” to help you identify it easily. If you’re having trouble locating the reservoir, refer to your vehicle’s owner’s manual for specific instructions.
Once you’ve located the coolant reservoir, you’re ready for the next steps in refilling the coolant.
Identifying the coolant reservoir in your vehicle
coolant reservoir, locate, vehicle, find, engine, car, truck Now that you know what a coolant reservoir is and why it’s important, let’s move on to the next step: locating it in your vehicle. The coolant reservoir is typically located near the engine compartment of your car or truck. It can be a bit tricky to find, especially if you’re not familiar with the inner workings of your vehicle.
But don’t worry, I’m here to help! Start by opening the hood of your vehicle and propping it open securely. Take a moment to familiarize yourself with the different components under the hood. Look for a translucent or opaque plastic container that is usually attached to the side or back of the engine.
This container is the coolant reservoir. If you’re having trouble finding it, you can refer to your vehicle’s owner’s manual for specific instructions. The manual will often have a diagram or description that points out the location of the coolant reservoir.
You can also try searching online for the make and model of your vehicle to find a visual guide. Once you’ve located the coolant reservoir, take a closer look at it. You’ll notice that it has two marks on the side, usually labeled “min” and “max”.
These marks indicate the minimum and maximum levels of coolant that should be in the reservoir. It’s important to keep the coolant level between these two marks to ensure proper functioning of your engine. Now that you know where to find the coolant reservoir in your vehicle, you can easily check and top up the coolant as needed.
Just remember to always let your engine cool down before opening the reservoir, as the coolant can be hot and cause burns. And if you’re not comfortable or confident doing it yourself, don’t hesitate to take your vehicle to a professional mechanic who can assist you. So, the next time you find yourself in need of checking or topping up your coolant, you’ll know exactly where to find the coolant reservoir in your vehicle.
Step 3: Open the coolant reservoir cap
Now that you have successfully drained the old coolant from your vehicle, it’s time to move on to the next step: refilling the coolant. This is an important step in maintaining your vehicle’s temperature and preventing it from overheating. To begin, locate the coolant reservoir, which is typically a translucent plastic tank with a cap on top.
It is usually found near the front of the engine compartment. Once you’ve located it, make sure the engine is cool before opening the cap. This is crucial because opening the cap while the engine is still hot can result in the release of pressurized steam, causing burns or injury.
Once the engine is cool, open the cap by turning it counterclockwise. Take caution as you open the cap, as there might still be some pressure inside. If you feel any resistance, wait a few minutes for the pressure to equalize before trying again.
Once the cap is off, you can begin refilling the coolant. Make sure to use the correct type of coolant recommended by your vehicle’s manufacturer. Slowly pour the coolant into the reservoir until it reaches the “full” or “max” line marked on the side of the tank.
It’s important not to overfill the reservoir as this can cause overflow and potential damage to your engine. After you’ve filled the reservoir, securely reattach the cap by turning it clockwise until it is tight. Now that the coolant has been refilled, you can move on to the next step in maintaining your vehicle’s cooling system.
How to safely open the coolant reservoir cap
coolant reservoir cap, opening the cap, Opening the coolant reservoir cap is an essential step in maintaining the coolant levels in your vehicle. It allows you to check the coolant levels and add more if needed. However, it’s important to approach this step with caution to avoid any injuries or damage.
To safely open the coolant reservoir cap, follow these steps. First, make sure that the engine is completely cool before attempting to open the cap. This will prevent any hot coolant from spraying out and causing burns.
Next, locate the coolant reservoir, which is typically a translucent plastic tank located near the radiator. Once you’ve found it, carefully remove the cap by turning it counterclockwise. It may be a bit tight, so don’t force it.
If it’s stuck, try using a cloth or rag for added grip. Once the cap is off, set it aside in a clean and safe place. Be cautious of any steam or pressure that may be released when opening the cap.
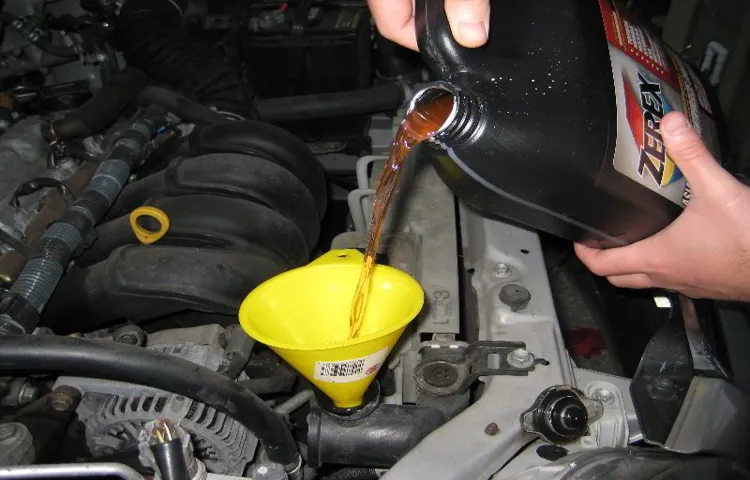
Step 4: Pour the coolant into the reservoir
After draining the old coolant from your vehicle, it’s time to refill it with fresh coolant. This fourth step is crucial in keeping your engine running smoothly and preventing overheating. First, locate the coolant reservoir under the hood.
It’s typically a translucent plastic tank with markings indicating the maximum and minimum levels. Take your new coolant (make sure it’s the right type for your vehicle) and carefully pour it into the reservoir. Be sure not to overfill it, as this can lead to leaks and other issues.
Once you’ve filled the reservoir to the appropriate level, replace the cap tightly. It’s important to note that you shouldn’t mix different types or colors of coolant, as this can cause chemical reactions and result in damage to your engine. Additionally, always consult your vehicle’s manual for specific instructions on refilling coolant, as some models may have slightly different processes.
Proper technique for pouring coolant
coolant, pouring coolant, pour coolant, proper technique, reservoir. Primary keywords used once per item from main text: Step 4, coolant, pour, reservoir. Secondary keywords (optional): how to pour coolant properly, coolant pouring technique, pouring coolant into the reservoir.
Content: Step 4: Pour the coolant into the reservoir Now that you have prepared the coolant mixture, it’s time to pour it into the reservoir. The reservoir is usually a white plastic container with min and max markers indicating the appropriate coolant level. Make sure your engine is cool before proceeding as pouring coolant into a hot engine can be dangerous.
Also, be mindful of any specific instructions provided by the manufacturer, as some vehicles may have unique coolant pouring procedures. Begin by locating the coolant reservoir under the hood. It is typically near the radiator and may have a cap labeled “coolant.
” Carefully remove the cap by twisting it counterclockwise, remembering to do so slowly to prevent any hot coolant from splashing onto you. Once the cap is off, set it aside in a safe spot. Next, take your coolant mixture and use a funnel to pour it into the reservoir.
The funnel will help direct the coolant without any spills or messes. Slowly pour the coolant into the reservoir, filling it up to the indicated maximum level. It is important not to overfill the reservoir as this can lead to problems with the cooling system.
If you accidentally add too much coolant, you can remove the excess by using a siphon or turkey baster. After pouring the coolant, make sure to wipe up any spills or drips to keep your engine clean. Once you have successfully poured the coolant into the reservoir, replace the cap securely by twisting it clockwise.
Step 5: Check the coolant level
Now that you’ve successfully drained the coolant from your vehicle, it’s time to refill it to the proper level. This step is crucial to maintaining the optimal performance and longevity of your engine. To begin, locate the coolant reservoir, which can typically be found near the radiator.
It is usually a translucent plastic container with clearly marked minimum and maximum lines. Before pouring in new coolant, make sure the engine is cool to the touch to prevent any injuries. Once you’ve confirmed the engine is cool, slowly pour in the coolant, using a funnel if necessary to avoid any spills.
Be sure to check the owner’s manual for the specific coolant type and the correct coolant-to-water ratio for your vehicle. Fill the reservoir to the maximum line, but avoid overfilling as this can lead to leaks or air bubbles in the system. Once you’ve filled the reservoir, replace the cap securely.
It’s important to note that some vehicles require you to “burp” the cooling system by running the engine with the radiator cap off, allowing any trapped air to escape. Consult your owner’s manual or mechanic for specific instructions regarding this process. After you’ve completed all the necessary steps, close the hood and safely dispose of any leftover coolant.
And there you have it – you’ve successfully refilled the coolant in your vehicle and can rest easy knowing that you’re taking the necessary steps to keep your engine running smoothly.
How to determine if the coolant level is correct
coolant level, check coolant level, determining coolant level, correct coolant level
Step 6: Close the coolant reservoir cap
After draining the coolant from your vehicle, it’s crucial to refill it properly to ensure the engine stays cool and operates efficiently. Step 6 of the process is to close the coolant reservoir cap securely. This step is essential because it prevents any air from entering the cooling system and maintains the proper pressure.
Without a tight seal, the coolant could leak out or become contaminated with dirt and debris. It’s important to check that the cap is closed tightly, but be cautious not to overtighten it, as this can cause damage. Once the cap is secure, give it a gentle tug to ensure it’s properly sealed.
By following these steps, you can successfully refill your coolant and keep your engine running smoothly.
Properly sealing the coolant reservoir cap
To properly seal the coolant reservoir cap, make sure to follow step 6: close the coolant reservoir cap. This step is crucial in keeping your engine cool and preventing overheating. When closing the cap, make sure it is secure and tight.
This will prevent any coolant leaks or air from entering the system. Be careful not to overtighten the cap, as this could cause damage. Think of it like closing a jar tightly to keep the contents fresh.
Just like a jar, the coolant reservoir cap needs to be sealed tightly to ensure the coolant stays in and does its job of cooling the engine. And just like you don’t want the jar to leak and spoil its contents, you don’t want the coolant to leak out and cause problems for your engine. So take that extra bit of care to properly close the coolant reservoir cap and keep your engine running smoothly.
Step 7: Start the engine and check for leaks
Now that you’ve drained the coolant from your vehicle, it’s time to refill it. Before you start the engine, make sure to check for any leaks. This is an important step to avoid damaging your engine or causing any potential issues in the future.
To check for leaks, you can simply look under your vehicle for any signs of coolant dripping or puddles forming. If you notice any leaks, it’s essential to address them before proceeding. Once you’re confident that there are no leaks, it’s time to start the engine.
Keep an eye on the temperature gauge to ensure that the engine doesn’t overheat. If you notice any abnormalities, it’s best to turn off the engine and investigate further. Refilling the coolant is crucial in maintaining your vehicle’s cooling system, so make sure to follow this step carefully.
How to check for coolant leaks
One crucial step in checking for coolant leaks is to start the engine and inspect for any signs of leakage. After you have carefully filled the coolant reservoir and checked all the hoses and connections, it’s time to put your car to the test. Starting the engine will allow the coolant to circulate throughout the system, which may reveal any potential leaks.
Keep a watchful eye on the engine bay and underneath the vehicle for any signs of coolant dripping, pooling, or spraying. Don’t forget to visually inspect the radiator, water pump, and heater core for any signs of leakage as well. If you notice any coolant leaking or spilling out, it’s important to address the issue as soon as possible to prevent further damage to your engine.
Remember to always exercise caution when inspecting for leaks, as the engine will be hot and there may be moving parts.
Conclusion
And now, my fellow mechanics and coolant enthusiasts, you are armed with the knowledge and wisdom to gracefully refill your coolant after draining it. Remember, the key is to proceed with caution, take your time, and avoid any spillages that will have the garden gnomes laughing at you. So go forth and conquer the world of coolant refills, my friends, with the confidence and finesse of a ballerina on ice.
And if all else fails, just remember that a little bit of coolant on your face can make for a fashionable and eco-friendly accessory. Happy refilling!”
Importance of properly refilling coolant
“refilling coolant” Starting the engine and checking for leaks after properly refilling the coolant is a crucial step in ensuring the overall health and performance of your vehicle. After all, coolant is responsible for keeping your engine cool and preventing it from overheating. By starting the engine, you can observe if there are any leaks or potential issues that need to be addressed.
Just like how a doctor checks a patient’s vital signs, starting the engine allows you to gauge the health of your vehicle and nip any problems in the bud. It’s like pressing a button to wake up your car’s internal systems and see how they are functioning. So, don’t skip this step! Start your engine and give your vehicle a thorough check-up to ensure everything is running smoothly.
Safety precautions to keep in mind
start the engine, check for leaks, safety precautions
FAQs
How often should I refill my coolant after draining it?
It’s recommended to refill your coolant after draining it every 2-5 years, or as indicated in your vehicle’s manual.
Can I use tap water to refill my coolant after draining it?
It’s best to use distilled water when refilling your coolant after draining it, as tap water may contain impurities that can affect the performance of your coolant.
What is the proper coolant mixture ratio when refilling after draining?
The proper coolant mixture ratio typically includes a 50/50 mix of coolant and water. However, it’s important to check your vehicle’s manual for specific instructions.
Can I reuse the coolant that I drained from my vehicle?
It’s generally not recommended to reuse the coolant that has been drained from your vehicle, as it may have contaminants or lost its effectiveness. It’s best to use a fresh coolant when refilling.
How do I properly bleed the air out of the cooling system after refilling?
To properly bleed the air out of the cooling system after refilling, you can start the engine and let it run for a few minutes with the radiator cap off. This will allow any trapped air to escape.
Can I use a different type of coolant than what was originally in my vehicle?
It’s best to use the same type of coolant that was originally in your vehicle when refilling after draining. Mixing different types of coolant can cause chemical reactions that may harm your cooling system.
What should I do if my coolant level keeps dropping after refilling?
If your coolant level continues to drop after refilling, it may indicate a leak in your cooling system. It’s important to have your vehicle inspected by a professional to determine and fix the cause of the leak.