
If you want your car’s engine to perform at its best, it’s essential to properly maintain it. One crucial aspect of engine maintenance is flushing out the coolant regularly. Flushing the coolant ensures that old, dirty coolant is replaced with fresh coolant, allowing your engine to stay cool and run smoothly.
But how exactly do you flush the coolant out of your engine? In this blog post, we’ll guide you through the process step by step, so you can confidently tackle this task on your own. Whether you’re a car enthusiast or a beginner, we’ve got you covered. So grab your tools and let’s get started!
Table of Contents
Why You Should Flush Your Coolant
If you’ve never thought much about your vehicle’s cooling system, you might be surprised at how important it is to regularly flush the coolant out of your engine. Coolant, also known as antifreeze, plays a vital role in keeping your engine running smoothly and preventing it from overheating. Over time, however, coolant can become contaminated with dirt, rust, and other debris that can hinder its ability to do its job effectively.
That’s where flushing your coolant comes in. By flushing the old coolant from your engine and replacing it with fresh coolant, you can ensure that your engine stays cool and protected from damage. So, how do you flush coolant out of your engine? It’s a relatively simple process that you can do yourself with a few basic tools and some new coolant.
1. What is coolant and why does it need to be flushed?
coolant flushed, why flush coolant, importance of coolant flush, benefits of cooling system flush Have you ever wondered why it’s important to flush your coolant? Well, let me tell you. Coolant, also known as antifreeze, is a fluid that helps regulate the temperature in your engine. It circulates through the engine, absorbing heat and preventing it from overheating.
Over time, this coolant can become contaminated with rust, dirt, and other debris. This can cause it to become less effective at cooling your engine and can even lead to damage. That’s why it’s important to regularly flush your coolant and replace it with fresh fluid.
Flushing your coolant involves draining the old fluid and cleaning out any contaminants. This ensures that your cooling system is working optimally and can help prevent costly engine repairs down the line. So, the next time you’re wondering why you should flush your coolant, remember that it’s all about keeping your engine cool and protected.
Don’t skip this important maintenance task!
2. Benefits of flushing your coolant
coolant flush, benefits of flushing coolant Flushing your coolant regularly is an essential part of car maintenance that shouldn’t be overlooked. Coolant plays a crucial role in the cooling system of your vehicle, which helps prevent the engine from overheating and keeps it running smoothly. Over time, however, the coolant can become contaminated with dirt, debris, and rust particles.
This can cause the coolant to lose its effectiveness and become less efficient at transferring heat away from the engine. That’s where a coolant flush comes in. By flushing the old coolant and replacing it with fresh coolant, you can help remove any contaminants that may be causing problems.
This not only improves the performance of your cooling system but also extends the lifespan of your engine. Regular coolant flushes can also help prevent the corrosion and damage that can occur when old, dirty coolant is left in the system. So, if you want to keep your engine running smoothly and avoid costly repairs down the line, be sure to schedule a coolant flush for your car.
What You’ll Need
When it comes to flushing the coolant out of your engine, there are a few things you’ll need to get the job done properly. First, you’ll need a drain pan or bucket to catch the old coolant as it drains out. This will help keep your workspace clean and prevent any spills.
Next, you’ll need a socket wrench or pliers to remove the drain plug from the bottom of the radiator. Once the plug is removed, the coolant will start to flow out, so be sure to have your drain pan ready. You’ll also need a hose and some water to flush out the system.
Attach the hose to the radiator and turn on the water, allowing it to flow through the system and push out the old coolant. Finally, you’ll need a new coolant to refill your engine once the flushing process is complete. Make sure to choose the appropriate coolant for your specific make and model of vehicle.
With these tools and materials, you’ll be able to flush the coolant out of your engine and keep it running smoothly.
1. Coolant flush cleaner
coolant flush cleaner, engine maintenance, automotive maintenance When it comes to taking care of your car’s engine, one important aspect is maintaining the coolant system. Over time, the coolant in your car can become contaminated with dirt, debris, and other impurities. This can affect the efficiency of the coolant system and potentially lead to engine problems.
That’s where a coolant flush cleaner comes in handy. This powerful solution is designed to flush out any built-up contaminants in your coolant system, ensuring that your engine stays cool and operates at its best. And the best part is, you can easily do this maintenance task yourself, saving you time and money.
All you need is a coolant flush cleaner and a few other basic tools. To get started, you’ll need a coolant flush cleaner, which you can easily find at your local automotive store or online. Make sure to choose a cleaner that is compatible with your vehicle’s coolant system, as different types of coolant require different cleaners.
Additionally, you’ll need a drain pan to catch the old coolant as you flush it out, a pair of gloves to protect your hands, and a set of pliers or a wrench to remove the drain plug on your radiator. Once you have all your materials, the first step is to locate the radiator drain plug. This can typically be found on the bottom of the radiator and is usually a hexagonal-shaped nut.
Place your drain pan underneath the drain plug to catch the coolant as it drains out. Use your pliers or wrench to loosen and remove the drain plug, allowing the old coolant to flow out. Next, it’s time to add the coolant flush cleaner to your system.
Refer to the instructions on the bottle for the proper amount to use, as this can vary depending on the size of your coolant system. Once you’ve added the cleaner, replace the drain plug on the radiator and tighten it securely. Now it’s time to refill your coolant system with fresh coolant.
2. Distilled water
distilled water, benefits of distilled water, purified water, clean drinking water, home water purification system. Water is an essential component of our daily lives, and it’s crucial to ensure that the water we consume is clean and safe. One option for obtaining purified water is through the use of distilled water.
So, what exactly is distilled water, and what makes it different from regular tap water or filtered water? Distilled water is produced through a process called distillation. It begins by heating regular tap water or any other source of water to create steam. The steam is then captured and cooled down, which causes it to condense back into water.
During this process, impurities, such as minerals, chemicals, and other contaminants, are left behind, resulting in water that is purer. The benefits of using distilled water are numerous. Firstly, it provides a clean and pure source of drinking water.
Since it has undergone the distillation process, it is free from impurities that may be present in tap water. This makes it especially beneficial for those with compromised immune systems or health conditions that require them to be cautious about the water they consume. Another advantage of distilled water is its versatility.
Because it is pure and free from minerals and impurities, it can be used for various household purposes. It is ideal for use in humidifiers, steam irons, and car batteries. Additionally, distilled water is often recommended for use in aquariums, as it helps to maintain the delicate balance of marine life by avoiding any potential chemical reactions that can harm fish or corals.
While distilled water has its benefits, it is essential to note that it may lack some beneficial minerals that are present in regular tap water or filtered water. These minerals, such as calcium and magnesium, can contribute to the overall taste and health benefits of water. However, it is worth considering that most of our daily mineral intake comes from the food we eat rather than the water we drink.
3. Drain pan
Drain pan, like the name suggests, is a pan that is used to collect any liquid or debris that may come out of a drain. Whether you’re doing some plumbing work or simply trying to catch water from a leaky pipe, a drain pan is an essential tool to have. So, what do you need to have to use a drain pan effectively? Well, first and foremost, you’ll need a drain pan itself.
These pans are typically made of heavy-duty plastic or metal, and they come in a variety of sizes to accommodate different drain sizes. You’ll also need some rags or absorbent materials to place in the drain pan. These will help soak up any liquids that accumulate in the pan.
Additionally, you should have some gloves and safety goggles on hand to protect yourself from any potential hazards. Finally, it’s always a good idea to have a bucket or larger container nearby to transfer the contents of the drain pan once it’s full. So, the next time you find yourself facing a plumbing issue, make sure you have a drain pan on hand – it’ll save you a lot of hassle and potential mess!
4. Funnel
“What You’ll Need for Your Funnel” Creating a successful sales funnel requires a few key components. First and foremost, you’ll need a clear understanding of your target audience and their needs. This will help you tailor your messaging and offers to resonate with them on a deeper level.
Next, you’ll need a compelling offer or lead magnet that entices people to join your email list or take the desired action. This could be a free e-book, webinar, or exclusive discount. Additionally, you’ll need a platform or tool to capture and manage leads, such as an email marketing software or CRM system.
This will allow you to efficiently communicate and nurture your leads as they move through the funnel. Finally, you’ll need a well-designed landing page or website to showcase your offer and collect contact information. This page should be visually appealing, user-friendly, and optimized for conversions.
By having these key elements in place, you’ll be well on your way to building an effective sales funnel that drives results.
5. Hose and hose clamp
hose, hose clamp, installation, DIY, home improvement What You’ll Need: When it comes to tackling DIY projects or home improvements, having the right tools and materials is essential. If you’re planning to work with hoses and hose clamps, here’s a list of what you’ll need to ensure a successful installation.
Hose: The first item you’ll need is, of course, the hose itself. Hoses come in various sizes and materials, so make sure you choose one that is suitable for your specific application. Whether you need a hose for your garden or for a plumbing project, selecting the right type and size is crucial.
Hose Clamp: A hose clamp is a device used to secure a hose onto a fitting or nipple. It is essential in preventing leaks and ensuring a tight seal.
Hose clamps are available in various materials, including stainless steel and brass. Choose a hose clamp that is durable and corrosion-resistant.
Screwdriver: Most hose clamps require a screwdriver for installation. Make sure you have the appropriate screwdriver size that matches the clamp you’re using. This tool will help you tighten the clamp securely around the hose, providing a reliable connection.
Pliers: Pliers come in handy when adjusting hose clamps. They provide extra leverage and ensure a tight grip.
6. Screwdriver or socket wrench
For any basic home repairs or DIY projects, having the right tools is essential. When it comes to fastening or loosening screws, a screwdriver or socket wrench is a must-have. These tools are designed to grip the screw or bolt securely, allowing you to tighten or loosen it with ease.
Depending on the type of screw or bolt you’re working with, you may need either a screwdriver or a socket wrench. A screwdriver is a handheld tool with a slotted or Phillips head that matches the shape of the screw. It allows you to turn the screw clockwise to tighten it or counterclockwise to loosen it.
Screwdrivers come in various sizes, so choose one that matches the size of the screw you’re working with. On the other hand, a socket wrench is a tool that allows you to tighten or loosen nuts and bolts. It consists of a handle and a detachable socket that fits over the nut or bolt head.
Socket wrenches come in different sizes, so you’ll need to use the correct size socket to ensure a proper fit. So, whether you’re putting together a piece of furniture, fixing a loose cabinet handle, or working on your car, having a screwdriver or socket wrench on hand will make the task much easier. So, go ahead and add these essential tools to your toolbox, and you’ll be prepared for any project that comes your way.
Step-by-Step Guide to Flushing Your Coolant
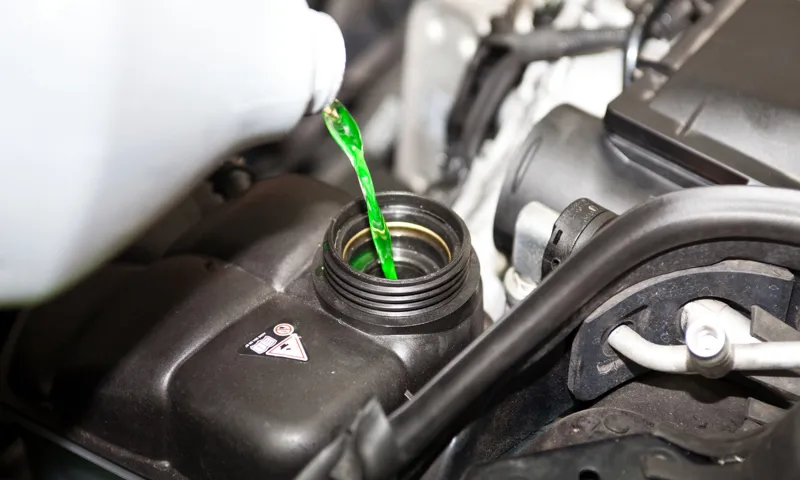
If you’re experiencing overheating issues with your car or noticing a sweet smell coming from the engine, it may be time to flush your coolant. Flushing the coolant system is an important part of regular vehicle maintenance, as it helps remove any debris or contaminants that can cause engine damage. Luckily, flushing the coolant out of your engine is a fairly straightforward process that you can do yourself with a few basic tools.
First, make sure the engine is cool before starting. Next, locate the coolant drain plug underneath the vehicle and place a drain pan underneath. Then, open the drain plug and allow the old coolant to drain completely.
Once all the coolant is drained, close the drain plug and move on to flushing the system. To do this, you’ll need a mix of water and coolant flush solution. Add the flush solution to the radiator and fill the rest with water.
Start the engine and let it run for about 10 minutes, then turn it off and allow it to cool. Finally, open the drain plug again and let the flush solution and water drain out. Once all the solution is drained, close the plug again and refill the radiator with a mixture of water and coolant.
Make sure to bleed any air from the system and check for any leaks. And voila, you’ve successfully flushed the coolant out of your engine, helping to keep it running smoothly and avoid any overheating issues.
1. Prepare your engine
coolant flushing, engine preparation, step-by-step guide, SEO-optimized
2. Drain the old coolant
An important step in flushing your coolant is draining the old coolant from your vehicle’s cooling system. This is necessary to remove any contaminants or impurities that may have built up over time. To begin, make sure your engine is cool and you have the necessary tools such as a drain pan and a pair of gloves.
Locate the drain plug on the bottom of your radiator, and place the drain pan underneath it to catch the old coolant. Unscrew the drain plug and allow the coolant to drain completely. Once the coolant has drained, you can reinstall the drain plug and move on to the next step of the flushing process.
Remember to dispose of the old coolant in accordance with local regulations, as it can be toxic to the environment. By draining the old coolant, you are taking an important step towards keeping your cooling system clean and functioning properly.
3. Add coolant flush cleaner
One crucial step in the process of flushing your coolant is adding a coolant flush cleaner. This is an important step to ensure that your coolant system is thoroughly cleaned and any debris or contaminants are removed. The coolant flush cleaner works by breaking down any deposits or build-up in the system, allowing it to be flushed out more easily.
It is essential to choose a high-quality coolant flush cleaner that is compatible with your vehicle’s cooling system. Follow the manufacturer’s instructions carefully when adding the cleaner, and remember to always wear protective gloves and goggles when working with chemicals. Once the cleaner is added, allow it to circulate through the system for the recommended amount of time before proceeding with the flush.
This step is crucial for maintaining the overall health and performance of your vehicle’s cooling system.
4. Run the engine
In the final step of flushing your coolant, it’s time to run the engine. This step is crucial as it helps to circulate the new coolant throughout the system and remove any remaining contaminants. Here’s a step-by-step guide to running the engine:
Start by reconnecting any hoses or components that were disconnected during the previous steps. Make sure they are securely attached and properly tightened.
Fill the radiator with the recommended amount of coolant mixture. Refer to your vehicle’s manual for the correct coolant type and the appropriate coolant-to-water ratio.
Once the radiator is filled, start the engine and let it run for a few minutes. This will allow the coolant to circulate throughout the system and reach all the necessary components.
While the engine is running, check for any signs of leaks or abnormal noises. If you notice any issues, turn off the engine immediately and address the problem before continuing.
Monitor the temperature gauge on your dashboard to ensure that the engine is not overheating. The coolant should help to regulate the temperature and keep it within a safe range.
5. Drain the flush cleaner
In the final step of flushing your coolant system, it’s time to drain the flush cleaner. This is an important step to ensure that all the old coolant and any contaminants are completely removed from your system. Start by locating the drain plug on your radiator or coolant reservoir.
Place a drain pan beneath the plug to catch the coolant as it drains out. Once everything is set up, carefully remove the plug and allow the flush cleaner to drain completely. Be sure to dispose of the old coolant properly, as it is toxic and should never be poured down the drain or onto the ground.
Once the flush cleaner has drained, replace the drain plug securely and move on to the next step in refreshing your coolant.
6. Rinse with distilled water
In the final step of flushing your coolant, it’s time to give your system a clean rinse with distilled water. Distilled water is important because it is free of impurities and minerals that can cause buildup and damage to your engine. To start, make sure your drain plug is closed and your radiator cap is off.
Then, slowly pour in the distilled water until the radiator is full. Keep pouring until you see the water being discharged from the overflow tube. This is a good sign that the system is thoroughly flushed.
Once the water being discharged is clear and free of any debris, you can turn on your engine and let it run for a few minutes. This will help circulate the water and further flush out any remaining contaminants. After running the engine, turn it off and let it cool down completely.
Once cooled, check the radiator again and top up with more distilled water if needed. Finally, replace the radiator cap and you’re all set! Flushing your coolant and rinsing with distilled water is an important maintenance task to keep your engine running smoothly and prevent overheating issues.
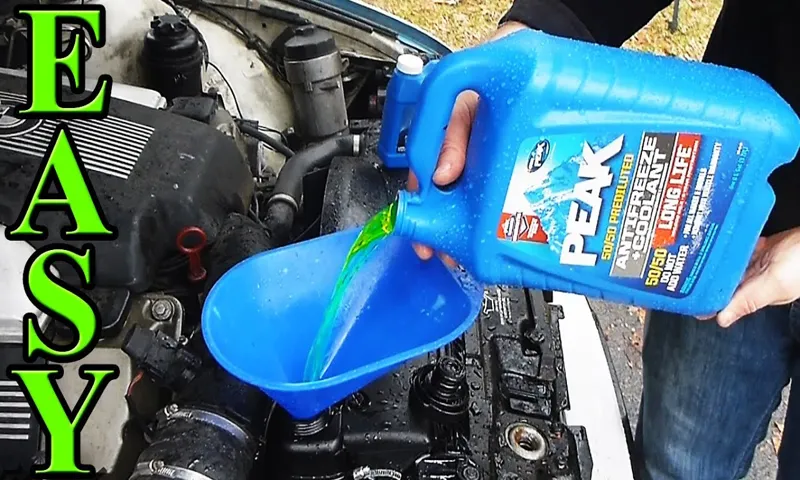
7. Refill with new coolant
refill with new coolant, step-by-step guide, flushing your coolant Once you have successfully completed the process of draining your coolant, the next step is to refill your cooling system with fresh coolant. This step is crucial because the coolant is responsible for regulating the temperature of your engine and preventing it from overheating. To begin, make sure you have the correct type of coolant for your specific vehicle.
Consult your owner’s manual or ask a professional for guidance if you’re unsure. Next, locate the coolant reservoir, which is typically a translucent plastic container with markings indicating the minimum and maximum levels of coolant. Open the reservoir cap and carefully pour the new coolant into the reservoir, making sure to fill it up to the recommended level.
Be mindful not to overfill, as this can cause issues with the cooling system. Once you have refilled the coolant, replace the reservoir cap securely. It’s important to note that the type of coolant you use should match the previous coolant, as mixing different types can lead to a chemical reaction that can damage your engine.
Afterward, start your engine and allow it to run for a few minutes to circulate the new coolant throughout the system. Finally, check the coolant level once more and top it up if necessary. By following this step-by-step guide, you can ensure that your coolant is effectively flushed and replenished, helping to maintain the optimal performance and longevity of your engine.
8. Check for leaks
When it comes to flushing your coolant, one crucial step not to overlook is checking for leaks. After all, what good is a fresh batch of coolant if it’s just going to leak out? Start by inspecting all the hoses and connections in your cooling system for any signs of leakage, such as wet spots or puddles of coolant. You should also check the radiator for any visible cracks or damage.
If you do notice a leak, it’s important to address it promptly to prevent further damage to your engine. Replacing a damaged hose or fixing a leaky connection is relatively simple and can save you from costly repairs down the road. So, take the time to thoroughly examine your cooling system for any leaks before refilling it with fresh coolant.
Your engine will thank you.
Tips and Precautions
When it comes to flushing the coolant out of your engine, it’s important to follow some tips and take precautions to ensure the process goes smoothly. Firstly, make sure your engine is completely cool before attempting to flush the coolant. This will prevent any burns or injuries from hot coolant.
Next, find the drain valve or plug on your radiator and open it to drain the coolant. Once all the coolant has been drained, it’s a good idea to flush the system with water to remove any remaining coolant and debris. You can do this by connecting a garden hose to the radiator and running water through it until it runs clear.
After the system has been flushed, it’s time to refill it with new coolant. Be sure to use the correct type of coolant recommended by your vehicle’s manufacturer. Finally, take the time to properly dispose of the old coolant and any other waste products generated during the flushing process.
Remember, flushing the coolant is an important maintenance task, but it’s essential to follow the proper steps and precautions to ensure the job is done safely and effectively.
1. Follow the manufacturer’s instructions
manufacturer’s instructions, tips, precautions
2. Use protective gear
protective gear, safety precautions, safety equipment When it comes to staying safe during various activities or occupations, one of the most important tips to remember is to use protective gear. Whether you’re playing a sport, working in a hazardous environment, or simply engaging in a potentially dangerous activity, having the right safety equipment can make all the difference. Protective gear is designed specifically to minimize the risk of injury or harm, and it comes in many different forms depending on the situation.
For example, helmets are essential for protecting your head during contact sports or when riding a bicycle, while safety goggles are crucial for shielding your eyes from flying debris or chemicals in a laboratory setting. Other types of protective gear may include gloves, earplugs, masks, and reflective clothing. It’s important to research and select the appropriate gear for the specific activity you’ll be engaging in, as different hazards may require different types of protection.
By using the correct protective gear, you can significantly reduce the likelihood of accidents, injuries, and long-term health issues. So, the next time you’re getting ready for a potentially risky endeavor, don’t forget to gear up for safety!
3. Dispose of the old coolant properly
When it comes to disposing of old coolant, it’s important to do it properly to protect the environment. Coolant is a hazardous substance that can contaminate water sources and harm wildlife if not handled correctly. One of the best ways to dispose of coolant is to take it to a recycling center or a local collection event.
These facilities have the proper equipment and procedures in place to safely handle and recycle coolant. If you can’t find a recycling center near you, it’s important to never pour coolant down the drain or into the ground. Instead, you can contact your local waste management agency for guidance on how to dispose of coolant in your area.
Remember, proper disposal of coolant is crucial to protecting our environment and ensuring the safety of our communities.
4. Check your coolant level regularly
coolant level, car maintenance, engine overheating, radiator. In order to keep your car running smoothly and prevent any potential issues with your engine, it’s important to check your coolant level regularly. Coolant, also known as antifreeze, plays a crucial role in regulating the temperature of your engine and preventing it from overheating.
When your engine runs, it generates a lot of heat, and without proper cooling, it can cause serious damage to your car. Checking your coolant level is a simple and quick process that can be done at home. First, make sure your engine is cool before opening the radiator cap.
The coolant should be at the appropriate level, typically indicated by markings on the side of the reservoir or radiator. If the coolant is below the minimum mark, it’s important to top it up. Not maintaining the proper coolant level can lead to overheating, which can cause severe damage to your engine.
Overheating can lead to blown head gaskets, warped cylinder heads, and even complete engine failure. These repairs can be costly and time-consuming, so it’s best to prevent them by regularly checking and maintaining your coolant level. In addition to checking your coolant level, it’s also important to keep an eye out for any signs of coolant leaks.
If you notice any puddles or stains under your car, it could be a sign that your coolant is leaking. It’s important to address any leaks immediately to prevent further damage to your engine. In conclusion, checking your coolant level regularly is a simple yet important step in maintaining the health of your car’s engine.
By preventing overheating and addressing any coolant leaks, you can avoid costly repairs and keep your car running smoothly for years to come. So, take a few moments to check your coolant level today and keep your engine cool and happy.
Conclusion
And just like that, your engine is ready to leap forward with new-found vigor, as the old coolant is flushed out, bidding farewell to its sluggish ways. You have skillfully navigated the ins and outs of the coolant flushing process, channeling the mighty forces of H2O to restore your engine’s optimal temperature regulation. With this newfound knowledge, you now hold the key to keeping your engine frosty cool, never again succumbing to the woes of overheating.
So, go forth and let the coolant flow, becoming the master of your engine’s destiny, and the hero of every hot-headed road trip. Remember, friends don’t let friends drive with outdated coolant – it’s time to flush out the old and welcome in the refreshingly powerful coolant of tomorrow.”
FAQs about Flushing Coolant
If you’re wondering how to flush coolant out of your engine, you’re not alone. Flushing coolant is an important maintenance task that can help extend the life of your engine and prevent overheating. The process involves draining the old coolant from the system and replacing it with fresh coolant.
To start, make sure your engine is cool before beginning the process. Then, locate the radiator drain plug, which is usually located at the bottom of the radiator. Place a drain pan underneath the plug to catch the old coolant as it drains out.
Once the coolant has been drained, close the drain plug and refill the radiator with a mixture of fresh coolant and distilled water. Be sure to consult your vehicle’s owner manual for the proper coolant mixture and capacity. After refilling the radiator, run the engine for a few minutes to circulate the coolant throughout the system.
Finally, check the coolant level and top off if necessary. By following these steps, you can easily flush the coolant from your engine and keep it running smoothly.
FAQs
What is coolant and why is it important for the engine?
Coolant is a mixture of water and antifreeze that helps regulate the temperature of the engine. It is important because it prevents the engine from overheating and freezing in extreme temperatures.
How often should the coolant be flushed out of the engine?
It is recommended to flush the coolant every 30,000 to 50,000 miles or every 3 to 5 years, whichever comes first. However, it is always best to consult the vehicle’s owner manual for specific recommendations.
What are the signs that indicate the need to flush the coolant out of the engine?
Some signs that it might be time to flush the coolant include overheating, coolant leaks, a sweet smell coming from the engine, or if the coolant appears rusty or contaminated.
Can I flush the coolant out of the engine myself, or should I take it to a professional?
Flushing the coolant can be done by yourself if you have the necessary tools and knowledge. However, if you are unsure or uncomfortable performing this task, it is best to take it to a professional mechanic to avoid any potential damage to the engine.
How long does it take to flush the coolant out of the engine?
The time it takes to flush the coolant can vary depending on the specific vehicle and its condition. On average, it may take about 1 to 2 hours to complete the flushing process.
What steps are involved in flushing the coolant out of the engine?
The steps involved in flushing the coolant out of the engine include draining the old coolant, removing the radiator cap and draining plug, flushing the system with water or a coolant flush solution, refilling with new coolant, and bleeding any air bubbles from the system.
What type of coolant should I use to refill the engine after flushing?
It is important to use the type of coolant recommended by the vehicle’s manufacturer. This information can usually be found in the owner’s manual or by consulting a professional mechanic. Using the wrong type of coolant can potentially damage the engine.