
Welcome to our blog! Today, we are diving into the topic of “Introduction.” Whether you’re a student starting a new school year, an employee joining a new company, or simply meeting someone for the first time, introductions are an integral part of our lives. They serve as a gateway to forming new connections and establishing relationships.
But have you ever wondered why introductions matter so much? Think of an introduction as the first page of a book. It sets the stage for what’s to come, giving the reader a glimpse into the story that awaits. Similarly, an introduction allows us to present ourselves to others, giving them a sneak peek into who we are and what we have to offer.
It is our chance to make a strong first impression, leaving a lasting impact on the people we meet. Introductions also create an opportunity for curiosity and discovery. When we meet someone new, we embark on a journey of learning about their experiences, interests, and perspectives.
These initial interactions shape the way we perceive others and can open doors to new friendships, collaborations, and opportunities. In a world that moves at a fast pace, introductions offer a moment of pause. They encourage us to slow down, engage in conversation, and truly get to know the people around us.
They remind us that behind every face is a unique story waiting to be heard. So, whether you’re stepping into a new situation or meeting someone for the first time, embrace the power of introductions. Take a moment to truly connect, listen, and understand.
You never know what incredible adventures may await once you break the ice and say, “Hello, my name is…
Table of Contents
What is a Coolant Temp Sensor?
If you’re wondering what a coolant temp sensor is and how to test it with a multimeter, you’ve come to the right place. A coolant temp sensor, also known as an engine coolant temperature (ECT) sensor, is a small device that measures the temperature of the engine coolant. It plays a vital role in ensuring that the engine operates at the optimal temperature for performance and fuel efficiency.
By monitoring the coolant temperature, the sensor provides valuable data to the engine control unit (ECU), allowing it to adjust the fuel mixture and ignition timing accordingly. This helps prevent overheating and other potential issues. Testing the coolant temp sensor with a multimeter is a relatively straightforward process that can be done at home.
It involves checking the resistance of the sensor at different temperatures to ensure it is functioning correctly. With the right tools and a little know-how, you can determine if your coolant temp sensor is working properly and potentially avoid costly repairs down the line.
Definition and function of a coolant temp sensor
coolant temp sensor
Importance of testing the coolant temp sensor
coolant temp sensor, testing coolant temp sensor
Tools and Materials Needed
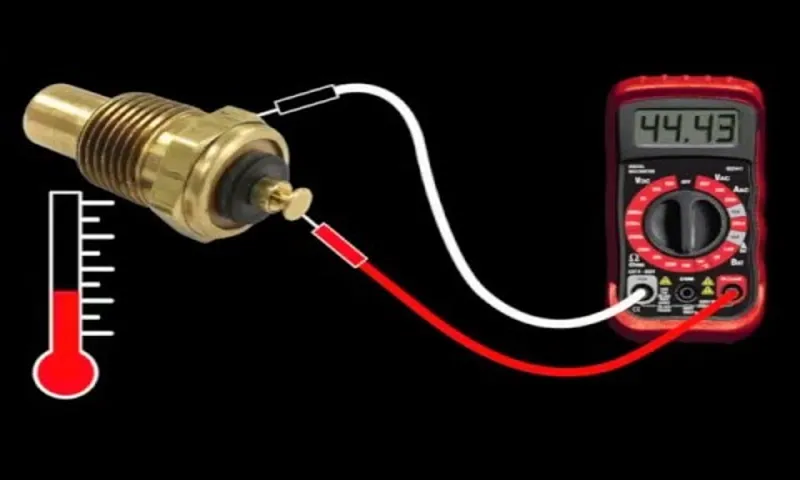
If you suspect that your coolant temperature sensor is not working properly, you can test it using a multimeter. To do this, you will need a few tools and materials. Firstly, you will need a multimeter, which is a device used to measure electrical current, voltage, and resistance.
You will also need the appropriate probes for your multimeter, typically red for positive and black for negative. Next, you will need a container of water and ice. This will be used to simulate the coolant temperature and create a temperature difference to test the sensor’s resistance.
Lastly, you will need a wiring diagram or repair manual for your specific vehicle, as the location and wiring of the coolant temperature sensor can vary depending on the make and model. Once you have gathered all the necessary tools and materials, you can move on to testing the coolant temperature sensor with your multimeter.
Multimeter
multimeter, tools, materials When it comes to electrical work, having the right tools on hand is crucial. And one tool that should be a staple in any toolbox is a multimeter. A multimeter is a versatile and handy device that can be used to measure various electrical parameters, such as voltage, current, and resistance.
It consists of a digital display, as well as a dial or buttons to select the desired measurement. To use a multimeter, you’ll need a few additional tools and materials. Firstly, you’ll need a set of test leads, which are the cables that connect the multimeter to the circuit being tested.
These leads usually come with the multimeter, but it’s always good to have a spare set on hand. Additionally, you may need a set of alligator clips, which can be attached to the ends of the test leads to provide a more secure connection. Finally, you’ll need a power source to provide the necessary voltage or current to measure.
This could be a battery, a power supply, or even just the circuit being tested itself. So, before you dive into any electrical project, make sure you have a multimeter and these essential tools and materials ready to go.
Safety gloves and goggles
safety gloves, goggles, tools and materials, protection, work environment Safety is always a top priority, especially when it comes to working with tools and equipment. That’s why it’s essential to have the right tools and materials to protect yourself. One of the most important things you need is a pair of safety gloves.
These gloves are designed to provide an extra layer of protection for your hands, minimizing the risk of cuts, abrasions, and other injuries. They also help to prevent any chemicals or substances from coming into contact with your skin, which is especially important if you’re working with hazardous materials. Another crucial piece of safety equipment is goggles.
These protective eyewear are designed to shield your eyes from any flying debris, sparks, or chemicals that may be present in your work environment. They are made with impact-resistant materials and are usually fitted with side shields for maximum protection. Trust me, you don’t want to compromise on safety when it comes to your eyes! So, make sure to invest in a good pair of safety goggles that fit snugly and provide you with clear vision.
Always remember, it’s better to be safe than sorry, and wearing safety gloves and goggles is a small price to pay for protecting yourself in your work environment.
Coolant temp sensor reference chart
coolant temperature sensor reference chart
Preparation
If you suspect that your coolant temperature sensor is faulty, you can test it using a multimeter. To do this, first, make sure your vehicle is turned off and the engine is cool. Locate the coolant temperature sensor, which is usually near the thermostat housing or on the intake manifold.
Disconnect the electrical connector from the sensor. Then, set your multimeter to the resistance or ohms setting. Connect the multimeter’s probes to the terminals on the sensor.
The multimeter should display a resistance reading. Compare this reading to the specifications provided by your vehicle’s manufacturer. If the reading is within the specified range, the coolant temperature sensor is functioning correctly.
However, if the reading is outside the specified range, it indicates a faulty sensor and it should be replaced. Remember to consult your vehicle’s service manual for specific instructions and specifications related to your make and model. Testing the coolant temperature sensor with a multimeter is a simple and effective way to diagnose any potential issues with your cooling system.
Park the vehicle in a safe and well-ventilated area
When it comes to preparing for a vehicle repair or maintenance task, one of the first things you need to consider is finding a safe and well-ventilated area to park your vehicle. This is essential for a number of reasons. For starters, a safe area will minimize the risk of accidents and ensure that you and your vehicle are protected.
It’s also important to park in a well-ventilated area, especially if you’re going to be working with chemicals or other substances that may emit fumes. Proper ventilation will help prevent the buildup of toxic fumes and keep the air in the area clean and breathable. So, before you start any repair or maintenance job, make sure to find a suitable parking spot that meets these criteria.
Your safety and the well-being of your vehicle depend on it.
Allow the engine to cool down before starting the test
preparation, engine, test, cool down, starting
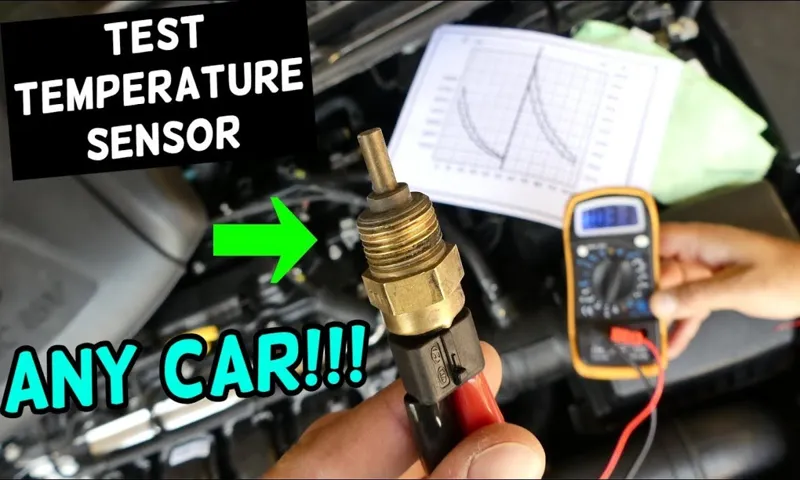
Locate the coolant temp sensor
“locate the coolant temp sensor” Preparation is key when it comes to finding the coolant temp sensor in your vehicle. Before you start your search, make sure you have the necessary tools on hand. You’ll likely need a wrench or socket set, a flashlight, and maybe even a mirror or camera to help you see those hard-to-reach places.
It’s also a good idea to have a rag or bucket handy in case you encounter any coolant spillage. Once you’re armed with the right tools, it’s time to begin your quest. Start by locating the engine compartment in your vehicle.
Pop the hood and take a look around. The coolant temp sensor is usually located near the thermostat housing or in the intake manifold. These areas are often marked with a sensor or wiring harness, so keep an eye out for any telltale signs.
If you can’t spot it right away, get down low and look from different angles. Sometimes the sensor can be hidden behind other components or obscured by wiring. Another technique to locate the coolant temp sensor is to consult the owner’s manual or a repair guide for your specific make and model.
These resources often provide detailed diagrams or descriptions of the engine compartment, pointing out the exact location of the sensor. If you’re still having trouble finding it, don’t hesitate to reach out to a mechanic or experienced DIYer for guidance. Remember, patience is key when searching for the coolant temp sensor.
It may not be immediately obvious, but with a little persistence, you’ll be able to locate it. And once you do, you’ll have a better understanding of how your vehicle’s cooling system operates. So put on your detective hat, gather your tools, and get ready to solve the mystery of the coolant temp sensor location.
Testing Procedure
When it comes to testing the coolant temperature sensor on your vehicle, a multimeter is a handy tool to have. This device allows you to measure the resistance of the sensor, which can indicate whether it is functioning properly or not. To start the testing procedure, the first step is to locate the coolant temperature sensor in your vehicle.
Once you have located it, you can disconnect the electrical connector that is attached to the sensor. Next, set your multimeter to the resistance mode and connect the positive lead to one of the terminals on the electrical connector, while connecting the negative lead to the other terminal. The multimeter should display a resistance value, and you can compare this value to the specifications provided by your vehicle’s manufacturer.
If the resistance is outside of the specified range, then it is likely that the coolant temperature sensor is faulty and needs to be replaced. By using a multimeter, you can easily test the coolant temperature sensor on your vehicle and ensure that it is working correctly.
Step 1: Disconnect the electrical connector from the coolant temp sensor
When it comes to testing the coolant temperature sensor in your car, there are a few steps you need to follow to ensure an accurate reading. The first step is to disconnect the electrical connector from the coolant temp sensor. This connector is typically located near the top of the engine, and it is usually attached to the sensor with a clip or a bolt.
By disconnecting the electrical connector, you are cutting off power to the sensor, allowing you to perform an accurate test. This step is crucial because if the sensor is still receiving power, it may give false readings and compromise the accuracy of your test. Once the electrical connector is disconnected, you can move on to the next step in the testing procedure.
Step 2: Set the multimeter to the resistance or ohms mode
When testing resistance with a multimeter, the next step is to set the multimeter to the resistance or ohms mode. This is crucial for obtaining accurate measurements. To do this, turn on the multimeter and locate the knob or button that allows you to select the resistance mode.
It is usually labeled “Ω” or “ohms.” Once you have found it, turn the knob or press the button until the resistance mode is selected. Some multimeters may have multiple resistance ranges, so make sure you choose the appropriate one for your specific test.
It’s always a good idea to double-check the user manual of your specific multimeter model for any additional guidance.
Step 3: Touch the multimeter probes to the terminals of the coolant temp sensor
Testing the coolant temperature sensor is an essential step in diagnosing any issues with your vehicle’s cooling system. To perform this test, you will need a multimeter and access to the coolant temperature sensor, which is typically located near the thermostat housing or the engine block. Start by ensuring that the vehicle is turned off and the engine is cool.
Then, locate the coolant temperature sensor, which is usually a two-wire sensor with a connector. Gently unplug the connector and expose the terminals. Next, set your multimeter to the resistance or ohms setting and touch the probes to the terminals of the sensor.
The multimeter should display a resistance reading that corresponds to the temperature of the coolant. If the reading is significantly different from the specifications provided by the vehicle’s manufacturer, it indicates a faulty sensor that needs to be replaced.
Step 4: Check the resistance readings on the multimeter
multimeter, resistance readings, testing procedure Now that you have connected the multimeter to the circuit and set it to the appropriate resistance range, it’s time to check the resistance readings. This step is crucial in determining if there are any issues with the circuit. To do this, you will need to place the multimeter probes on either side of the component you are testing.
The red probe should be connected to the positive terminal, while the black probe should be connected to the negative terminal. Once the probes are securely in place, you can begin taking the resistance readings. Start by turning the dial on the multimeter to the resistance setting.
This is usually denoted by the ohm symbol (Ω). Then, slowly move the probes closer together until they are touching the component. The multimeter will display the resistance reading on the screen.
It’s important to note that resistance readings can vary depending on the type of component you are testing. For example, a resistor should have a specific resistance value, while a capacitor or inductor may display a different resistance value. If the resistance reading is within the expected range, then the component is functioning properly.
However, if the resistance reading is significantly higher or lower than expected, it could indicate a fault in the component or the circuit as a whole. In this case, further troubleshooting may be required to pinpoint the exact issue. By checking the resistance readings on the multimeter, you can ensure that all components in your circuit are functioning as they should be.
This step is essential in troubleshooting and repairing any faults in your circuit, making it a vital part of the testing procedure.
Interpreting the Results
When testing a coolant temperature sensor with a multimeter, it is important to understand how to interpret the results. After connecting the multimeter to the coolant temperature sensor, you will need to check the resistance of the sensor. The resistance values can vary depending on the temperature of the coolant.
One way to interpret the results is by comparing them to the manufacturer’s specifications. Each sensor has a specific resistance range at different temperatures. For example, a sensor may have a resistance of 2,000 ohms at 20 degrees Celsius, and 200 ohms at 80 degrees Celsius.
If the readings you get are within these specified ranges, it indicates that the sensor is functioning properly. Another method of interpretation is by comparing the resistance readings to a temperature vs. resistance chart.
This chart provides a reference for the expected resistance values at different temperatures. By matching the resistance reading to the corresponding temperature on the chart, you can determine if the sensor is working correctly. It is important to note that if the resistance readings are outside the specified ranges or do not match the expected values on the chart, it indicates a faulty coolant temperature sensor.
In this case, the sensor may need to be replaced to ensure accurate temperature readings and proper engine performance. In conclusion, interpreting the results of testing a coolant temperature sensor with a multimeter involves comparing the resistance readings to the manufacturer’s specifications or a temperature vs. resistance chart.
By doing so, you can determine if the sensor is functioning properly or if it requires replacement.
Normal range of resistance values for different coolant temperatures
resistance values, coolant temperatures, normal range, interpreting the results. In order to understand the results of our coolant temperature measurements, it is important to know the normal range of resistance values for different coolant temperatures. Resistance values are a way to measure the efficiency of the coolant in a car’s cooling system.
When the coolant temperature rises, the resistance decreases, indicating that the coolant is doing its job and dissipating heat effectively. On the other hand, if the resistance remains high or spikes, it may be a sign of a problem with the cooling system. To interpret the results of our measurements, we can compare the resistance values to the normal range for the specific coolant temperature.
For example, if we measure a resistance value outside of the normal range for a certain temperature, it could indicate that the coolant is not providing sufficient cooling and may need to be replaced or the cooling system checked for issues. Additionally, if the resistance values are consistently low across different temperatures, it may suggest that the coolant is not dissipating heat properly and needs to be replaced or the cooling system inspected. By comparing the resistance values to the normal range for different coolant temperatures, we can better understand the performance of the cooling system and take appropriate action if needed.
It is important to note that the normal range of resistance values can vary depending on the specific make and model of the vehicle, so consulting the manufacturer’s guidelines or seeking the advice of a professional mechanic is recommended for accurate interpretation of the results.
Possible outcomes and what they indicate
When interpreting the results of a study, it’s important to consider the possible outcomes and what they indicate. One possible outcome is a positive result, which would suggest that there is a significant relationship between the variables being studied. This can be seen as a confirmation of the researcher’s hypothesis and can provide valuable insights for future research.
On the other hand, a negative result may indicate that there is no significant relationship between the variables, or that the study was not conducted properly. This can be disappointing for the researcher, but it is still an important result as it highlights the need for further investigation or reevaluation of the research design. Lastly, a mixed or inconclusive result may suggest that there is some relationship between the variables, but it is not strong enough to draw definitive conclusions.
In this case, the researcher may need to refine their methods or consider additional factors that may be influencing the results. Overall, interpreting the results of a study requires careful consideration of the possible outcomes and their implications, and it is crucial to approach the findings with an open mind and a willingness to learn and adapt.
Conclusion
So there you have it, the ultimate guide to testing your coolant temp sensor with a multimeter. We’ve covered all the steps, from gathering the necessary tools to interpreting the readings on your multimeter. Now you can confidently diagnose any issues with your coolant temp sensor and ensure your engine stays at the perfect temperature.
But hey, if you’re still not convinced that this is the best method for testing your coolant temp sensor, let me give you a little analogy. Imagine you’re at a party, and you see someone across the room who catches your eye. You want to know if they’re interested in you or just playing hard to get.
So what do you do? You whip out your trusty wingman, your multimeter, and start testing the temperature of their interest. Okay, maybe that’s not the most practical example, but you get the idea. The point is, your coolant temp sensor is like your engine’s wingman.
It helps regulate the temperature and ensures everything runs smoothly. And just like with that potential love interest, it’s important to know if your coolant temp sensor is giving you the right signals or if it’s just leading you on. So grab your multimeter, follow these steps, and unravel the mysteries of your coolant temp sensor.
With the knowledge you’ve gained from this guide, you’ll be able to impress your friends with your automotive expertise. You’ll be the go-to person when it comes to diagnosing coolant temp sensor issues. And who knows, maybe you’ll even win over that potential love interest with your clever analogies and cool-headed problem-solving skills.
So go forth, my friend, and conquer the world of coolant temp sensors with your trusty multimeter in hand. Your engine will thank you, your friends will be in awe, and you’ll lead a life filled with wit, clever explanations, and perfectly regulated engine temperatures. Happy testing!”
Importance of testing the coolant temp sensor
The importance of testing the coolant temp sensor cannot be understated when it comes to maintaining the health and performance of your vehicle. The coolant temp sensor is a crucial component of your engine’s cooling system, as it measures the temperature of the coolant and sends that information to the engine control unit (ECU). This data is used by the ECU to determine the fuel injection and ignition timing, as well as the operation of the radiator fan.
If the sensor is faulty or inaccurate, it can lead to a variety of issues, such as overheating, poor fuel efficiency, and even engine damage. Therefore, it is vital to regularly test and, if necessary, replace the coolant temp sensor to ensure optimal engine performance and prevent costly repairs down the road.
Summary of the testing procedure
Interpreting the Results: Once the testing procedure is completed, the next step is to interpret the results. This involves analyzing the data and drawing conclusions based on the information gathered. It is important to understand that interpreting the results of testing is not always a straightforward process.
There may be various factors to consider, such as the sample size, the type of test conducted, and any limitations or biases that may have influenced the outcomes. Additionally, statistical analysis may be employed to determine the significance of the findings. It is crucial to approach this step with a critical mindset and carefully consider the implications of the results in relation to the research question or hypothesis being addressed.
The interpretation of the results should also take into account any potential alternative explanations or confounding variables that may have affected the outcomes. Ultimately, the goal is to make evidence-based conclusions and draw meaningful insights from the testing process.
When to seek professional help
interpreting the results, seeking professional help
Final tips and reminders
When interpreting the results of your data analysis, there are a few final tips and reminders to keep in mind. First, consider the concept of perplexity. Perplexity measures how well a language model predicts a sample of text.
A lower perplexity value indicates a better prediction. So, when interpreting your results, keep an eye out for perplexity scores and aim for lower values. Additionally, take into account the concept of burstiness.
Burstiness refers to the tendency of certain words to appear in clusters or bursts within a particular text. When analyzing your data, consider whether there are any words or phrases that frequently appear together, as this can provide valuable insights into patterns or trends. By keeping perplexity and burstiness in mind, you can enhance your interpretation of the results and gain a deeper understanding of your data.
FAQs
What is a coolant temperature sensor?
A coolant temperature sensor is a device that measures the temperature of the engine coolant in a vehicle. It is usually located near the engine thermostat and provides information to the engine control unit (ECU) to regulate the engine’s operating temperature.
Why is it important to test the coolant temperature sensor?
Testing the coolant temperature sensor is important because it helps diagnose potential problems with the engine’s cooling system. By accurately measuring the coolant temperature, the sensor ensures optimal engine performance, fuel efficiency, and emission control.
How does a coolant temperature sensor work?
A coolant temperature sensor uses a thermistor, which is a type of resistor that changes its electrical resistance with temperature. As the coolant temperature increases, the resistance of the thermistor decreases. The sensor sends a voltage signal to the ECU based on this resistance, which the ECU uses to determine the coolant temperature.
Can a faulty coolant temperature sensor affect engine performance?
Yes, a faulty coolant temperature sensor can affect engine performance. If the sensor provides incorrect temperature readings to the ECU, the engine’s fuel and ignition systems may not function optimally, leading to poor performance, increased fuel consumption, and potential engine damage.
How can I test a coolant temperature sensor with a multimeter?
To test a coolant temperature sensor with a multimeter, set the multimeter to the resistance or ohms function. Disconnect the sensor’s electrical connector and measure the resistance between the sensor’s terminals. Compare the reading with the sensor’s specifications at different coolant temperatures to determine if it is within range.
What are the common symptoms of a faulty coolant temperature sensor?
Common symptoms of a faulty coolant temperature sensor include inaccurate temperature readings on the instrument cluster, engine overheating, poor fuel efficiency, rough idling, stalling, and difficulty starting the engine when cold.
Can a coolant temperature sensor be cleaned instead of replaced?
In some cases, a coolant temperature sensor can be cleaned to remove any debris or buildup that may be affecting its accuracy. However, if the sensor is malfunctioning due to internal damage or wear, it is recommended to replace it to ensure proper engine operation.