
Changing the coolant fluid in your car is a crucial part of regular maintenance. It helps to keep your engine running smoothly and prevents overheating. But do you know how to change coolant fluid? Don’t worry, it’s not as complicated as it may seem.
In this blog post, we’ll guide you through the process step by step, so you can confidently tackle this task on your own. By the end, you’ll be equipped with the knowledge to keep your car’s coolant system in top shape and avoid any costly repairs. So, let’s dive in and learn how to change coolant fluid like a pro!
Table of Contents
Introduction
Are you noticing that your car is running hotter than usual or that the engine temperature gauge is climbing into the danger zone? It might be time to change your coolant fluid. The coolant in your car’s radiator helps to regulate engine temperature and prevent overheating. Over time, the coolant can become contaminated with dirt and debris, which can affect its effectiveness.
Changing the coolant fluid is a relatively simple task that you can do yourself with a few basic tools. In this blog section, we will walk you through the steps of changing your coolant fluid, so you can keep your engine running cool and avoid any costly repairs down the road.
What is Coolant Fluid?
coolant fluid. Introduction: Coolant fluid is a vital component of any vehicle’s engine cooling system. It is responsible for dissipating heat and preventing overheating, which can lead to engine damage.
Coolant fluid, also known as antifreeze, is typically a mixture of water and ethylene glycol or propylene glycol. The purpose of the coolant fluid is to absorb heat from the engine and transfer it to the radiator, where it is then cooled down before being recirculated back into the engine. Without the proper amount and quality of coolant fluid, the engine can quickly overheat, leading to costly repairs and potentially rendering the vehicle inoperable.
Why is it Important to Change Coolant Fluid?
changing coolant fluid, importance of changing coolant fluid
Tools and Materials Needed
If you’re thinking about changing your coolant fluid but aren’t sure where to start, don’t worry! With a few simple tools and materials, you’ll be able to easily complete the task. To change your coolant fluid, you’ll need a few key items. First, you’ll need a rubber hose or a vacuum pump to remove the old coolant from your vehicle’s system.
Additionally, you’ll need a container to catch the old coolant as it drains. It’s important to have a large enough container to hold all the coolant, as well as a lid to prevent spills and leaks. You’ll also need a funnel to pour the new coolant back into your vehicle.
This will help ensure that you don’t spill any of the new coolant and that it goes directly into the coolant reservoir. Lastly, you’ll need the new coolant itself. Be sure to check your vehicle’s owner’s manual for the correct type and amount of coolant to use.
By having these tools and materials ready, you’ll be well-prepared to successfully change your coolant fluid.
Coolant fluid
coolant fluid, tools and materials, engine coolant, antifreeze, radiator, funnel, distilled water, coolant tester. When it comes to maintaining your vehicle’s engine, one of the most important fluids to keep an eye on is the coolant fluid. This essential liquid helps regulate the temperature of the engine, preventing it from overheating and causing potential damage.
To properly take care of your coolant fluid, you will need a few tools and materials. First and foremost, you will need the actual coolant fluid, also known as antifreeze. This fluid is specifically designed to withstand extreme temperatures, whether they be hot or cold.
It is important to choose the right coolant for your vehicle, so be sure to consult your owner’s manual or speak with a knowledgeable professional. In addition to the coolant fluid, you will also need a few other tools and materials. A funnel is a must-have item for pouring the coolant into the radiator without spilling.
This will help ensure that you are adding the optimal amount of coolant to your engine. Another important tool to have is distilled water. Sometimes, you may need to dilute your coolant with water in order to achieve the proper concentration.
It is crucial to use distilled water rather than tap water, as tap water can contain minerals and impurities that could potentially clog the radiator. Lastly, a coolant tester can be a valuable tool to have. This allows you to measure the concentration of the coolant in your engine.
Over time, the coolant can become diluted or contaminated, and using a tester will help you determine if it is time to flush and replace the coolant. In conclusion, taking care of your coolant fluid is essential for maintaining a properly functioning engine. By having the right tools and materials on hand, such as coolant fluid, a funnel, distilled water, and a coolant tester, you can ensure that your coolant fluid is always at the correct concentration and temperature.
Funnel
When it comes to creating a successful marketing strategy, having the right tools and materials is essential. In the case of a sales funnel, there are several key elements that you will need to ensure your funnel is effective. First and foremost, you will need a landing page or website where you can capture leads and direct potential customers.
This could be a simple landing page with a form to collect contact information, or it could be a full website with multiple pages. You will also need a way to drive traffic to your landing page or website. This could include utilizing social media, email marketing, or even paid advertising.
Additionally, you will need a way to nurture your leads and move them through the funnel. This could involve creating a series of automated emails or providing valuable content that helps educate and build trust with your leads. Finally, you will need a way to track and measure the success of your sales funnel.
This could include utilizing analytics tools to monitor website traffic, conversion rates, and other key metrics. By having the right tools and materials in place, you can ensure that your sales funnel is optimized for success.
Radiator flush kit
radiator flush kit, radiator maintenance, engine cooling system, DIY car maintenance, cooling system flush. Are you experiencing issues with your car’s engine cooling system? If so, it might be time for a radiator flush. Over time, your radiator can accumulate debris and rust, which can hinder its performance and potentially lead to overheating.
That’s where a radiator flush kit comes in handy. To perform a radiator flush, you’ll need a few tools and materials. First, you’ll need a radiator flush kit, which usually includes a cleaning solution and a hose attachment.
This kit is designed to effectively remove any built-up debris and rust from your radiator. You’ll also need a container or pan to catch the radiator fluid that will be drained during the flush process. Additionally, you’ll need a pair of gloves to protect your hands from the cleaning solution and any hot components.
Once you have your radiator flush kit and other necessary materials, the process itself is relatively straightforward. Start by ensuring that your engine is cool before beginning the flush. Then, locate the radiator drain valve, usually found at the bottom of the radiator.
Place your container or pan underneath the valve to catch the drained fluid. Open the valve, allowing the old coolant to flow out into the container. Next, attach the hose from your radiator flush kit to the radiator flush kit attachment point.
Follow the instructions provided with the kit to properly connect the hose. Once it’s securely attached, turn on your vehicle’s engine and let it idle for a few minutes. This will allow the cleaning solution to circulate throughout the cooling system, breaking down any debris and rust.
Coolant tester
coolant tester, tools and materials needed
Screwdriver
Screwdriver When it comes to DIY projects or fixing things around the house, having a good screwdriver is essential. But with so many different types and sizes available, it can be overwhelming to know which one to choose. So, what tools and materials do you need to have on hand when using a screwdriver? First and foremost, you’ll need a good quality screwdriver set.
This should include a variety of different sizes and types, such as Phillips head and flathead screwdrivers. Having a set ensures that you’ll always have the right tool for the job. In addition to the screwdrivers themselves, you’ll also need some other materials.
One important item is a magnetic bit holder. This handy tool attaches to the end of your screwdriver and holds the screw in place, making it much easier to drive in or remove. It also helps to prevent dropping screws and losing them, which can be frustrating.
Another material that can come in handy is a screwdriver extender. This tool extends the length of your screwdriver, allowing you to reach screws in tight or hard-to-reach places. It’s especially useful when working on appliances or other items that are tucked away in small spaces.
Lastly, it’s always a good idea to have a container or organizer for your screwdriver set. This will help you keep your tools organized and prevent them from getting lost or damaged. It’s also helpful when you need to quickly find the right size screwdriver for a specific job.
So, when it comes to using a screwdriver, having the right tools and materials is key. Make sure you have a good quality screwdriver set, along with a magnetic bit holder, screwdriver extender, and a container for easy organization. With these items on hand, you’ll be well-equipped to handle any DIY project or household repair.
Bucket
One essential item that can be found in almost every household is a bucket. This versatile tool is used for a variety of tasks, from cleaning floors to carrying water. But have you ever wondered what materials are needed to make a bucket? The answer may surprise you.
The main material used to make buckets is plastic. Plastic buckets are lightweight, durable, and easy to clean, making them ideal for everyday use. They are typically made from high-density polyethylene (HDPE), a type of plastic that is resistant to chemicals and can withstand both hot and cold temperatures.
In addition to the plastic material, there are a few other components that are needed to make a bucket. The most important of these is the handle. The handle is usually made from the same plastic material as the bucket and is attached to the sides of the bucket through a process called welding.
This ensures that the handle is securely attached and can withstand the weight of the bucket when it is full. Another important component of a bucket is the lid. The lid helps to keep the contents of the bucket secure and prevents spills or leaks.
It is typically made from the same plastic material as the bucket and can be easily removed and replaced as needed. When it comes to making a bucket, there are also a few tools that are needed. These include a mold, which is used to shape the plastic into the desired bucket shape, and a heat source, such as a furnace or oven, which is used to melt the plastic and make it malleable.
Finally, a manufacturing machine is used to inject the melted plastic into the mold and then cool it down to create the final bucket shape. In conclusion, making a bucket requires a few essential materials and tools. Plastic is the main material used, with the handle and lid being important components.
Rags
rags, tools and materials needed. When it comes to household chores, having the right tools and materials can make all the difference. One essential item that often gets overlooked is rags.
These versatile pieces of cloth are perfect for tackling a wide range of cleaning tasks. To get the most out of your rags, it’s important to have a few key tools and materials on hand. First and foremost, you’ll want to have a good supply of rags.
While you can certainly repurpose old clothing or towels, it’s also worth investing in some high-quality cleaning rags. These are specially designed to be absorbent and durable, making them perfect for tough cleaning jobs. In addition to rags, you’ll also need some cleaning solutions.
Depending on the task at hand, you may need window cleaner, all-purpose cleaner, or even specialized cleaning solutions for things like stainless steel or wood surfaces. Having a variety of cleaning solutions on hand will ensure that you’re prepared for any cleaning challenge that comes your way. It’s also important to have a few basic tools to use alongside your rags.
A good pair of rubber gloves will protect your hands from harsh chemicals, while a microfiber cloth can help you achieve streak-free results on glass surfaces. A spray bottle is another handy tool to have, as it allows you to apply cleaning solutions evenly and effectively. When it comes to storage, it’s a good idea to have a dedicated area for your rags and cleaning supplies.
This will make it easier to find what you need when you need it, and keep your supplies organized and accessible. Consider using a caddy or bucket to store your rags and cleaning solutions, so everything is in one convenient place. In conclusion, having the right tools and materials can make all the difference when it comes to cleaning.
Preparation
Changing the coolant fluid in your vehicle is an essential maintenance task that ensures your engine functions optimally. To start, park your car on a level surface and allow the engine to cool down completely. It’s vital to take the necessary safety precautions, such as wearing gloves and eye protection, as the coolant can be hot and pressurized.
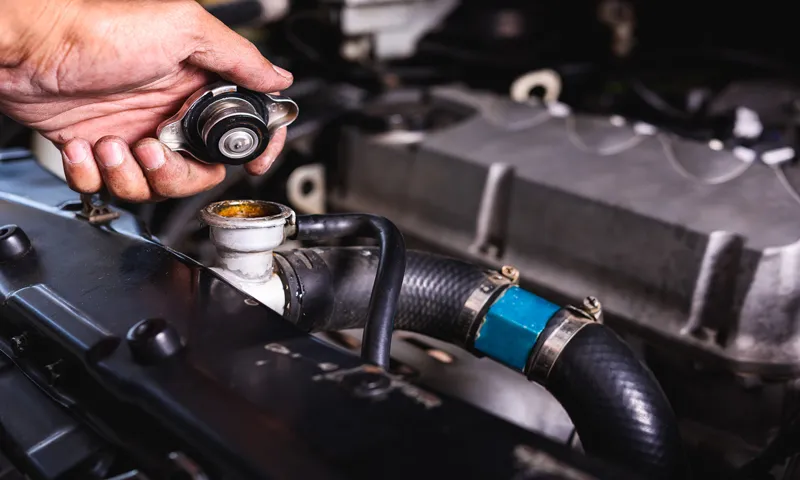
Locate the radiator cap or coolant reservoir, which is usually located near the engine. If you’re unsure, refer to your vehicle’s manual. Once located, carefully remove the cap to release any pressure buildup.
Next, position a container under the radiator’s drain valve and open it to drain the old coolant. After all the coolant has drained, close the valve and dispose of the old coolant properly. Now, it’s time to refill the system with fresh coolant.
Refer to your vehicle’s manual to determine the correct type and mix ratio of coolant to water. Use a funnel to pour the new coolant into the radiator or coolant reservoir, ensuring not to overfill. Finally, replace the radiator cap or coolant reservoir cap and start the engine.
Let it run for a few minutes to allow the new coolant to circulate, and check for any leaks. Regularly changing your coolant fluid will help keep your car’s engine running smoothly and efficiently.
Safety first
preparation for safety, safety measures, safety precautions, safety planning, safety preparation The most important aspect of ensuring safety in any situation is being prepared. Whether you’re going on a trip, participating in an outdoor activity, or even just going about your daily routine, taking the necessary safety measures should always be a priority. Preparation can come in many forms, from basic planning to gathering the necessary equipment or supplies.
For example, if you’re going hiking in a remote area, it’s vital to research the trail beforehand, understand the terrain, and pack essential items such as a first aid kit, a map, and extra food and water. Similarly, if you’re planning a long road trip, checking your vehicle’s condition, packing an emergency roadside kit, and knowing the route in advance can greatly contribute to your safety. By taking the time to prepare and think ahead, you can enhance your safety and minimize any potential risks or accidents.
Remember, safety should always come first, and preparation plays a crucial role in ensuring that.
Gather necessary tools and materials
When it comes to starting a new project or task, preparation is key. Before diving into the actual work, you need to gather all the necessary tools and materials. This step is crucial as it ensures that you have everything you need to complete the task efficiently and effectively.
Imagine trying to build a piece of furniture without the proper tools or missing a crucial ingredient when cooking a recipe. It would be challenging and frustrating, right? That’s why taking the time to gather everything you need upfront is essential. It not only saves you time and frustration but also ensures that the end result is of high quality.
So, whether you’re starting a DIY project, doing some home repairs, or embarking on a creative endeavor, make sure to prepare by gathering all the necessary tools and materials beforehand. That way, you’ll be ready to tackle the task at hand with confidence and ease.
Park the car in a safe and level area
park the car in a safe and level area
Draining the Old Coolant Fluid
Changing the coolant fluid in your vehicle is essential for maintaining optimal engine performance and preventing overheating. One of the first steps in the coolant fluid change process is draining the old fluid. To do this, locate the drain plug or valve on the bottom of the radiator.
Place a bucket or drain pan underneath to catch the old coolant as it drains out. Loosen the drain plug or open the valve, allowing the coolant to flow out. Be aware that the fluid may still be hot, so use caution to avoid burns.
Once all the coolant has drained out, tighten the drain plug or close the valve. It’s also important to properly dispose of the old coolant, as it can be harmful to the environment. Consult with your local waste management facility or an automotive service center for guidance on how to do this safely.
With the old coolant drained, you’re ready to move on to the next step in the coolant fluid change process.
Locate the radiator drain plug
Locate the radiator drain plug When it comes to draining the old coolant fluid from your radiator, one of the important steps is to locate the radiator drain plug. This plug is usually located at the bottom of the radiator and is designed to allow for easy removal of the coolant fluid. To find it, you’ll want to take a look under your car near the front grille.
You might need to use a flashlight or get down on the ground to get a good view. Once you see the radiator, look for a small bolt or plug that is positioned at the bottom of the radiator. This is the drain plug that you’ll need to remove to start the process of draining the old coolant fluid.
Remember, if you’re unsure or having trouble locating the drain plug, consult your vehicle’s manual or consider seeking the help of a professional mechanic.
Place the bucket underneath the drain plug
coolant fluid, drain plug, bucket, old coolant
Open the drain plug and let the coolant fluid flow into the bucket
draining old coolant fluid
Wait until all the coolant has drained out
When it comes to changing your coolant fluid, it’s important to make sure you drain out all of the old coolant before adding new fluid. This is because the old coolant can become contaminated over time and can lose its effectiveness in keeping your engine cool. To drain the old coolant, start by placing a drain pan under the radiator drain plug.
Then, use a wrench to loosen the plug and allow the coolant to slowly drain out. It’s important to wait until all of the coolant has drained out before moving on to the next step. This ensures that you get rid of all the old coolant and any contaminants that may have accumulated in the system.
Once the coolant has fully drained, you can proceed with adding fresh new coolant to your system.
Flushing the Cooling System
Changing the coolant fluid in your vehicle’s cooling system is an important maintenance task that should be done regularly to keep your engine running smoothly. Flushing the cooling system involves removing the old coolant and replacing it with fresh coolant. Over time, the coolant can become contaminated with dirt, debris, and other contaminants, which can affect its effectiveness in regulating the engine’s temperature.
Additionally, the coolant may break down and become less effective at preventing rust and corrosion within the cooling system. By flushing the cooling system and replacing the coolant, you can ensure that your engine stays cool and protected from damage.
Prepare the radiator flush kit
radiator flush kit, flushing the cooling system, radiator flush, radiator coolant, radiator maintenance. Introduction: When it comes to keeping your vehicle running smoothly, it’s essential to take care of its radiator. The radiator plays a crucial role in maintaining the optimum temperature of your engine, preventing overheating and potential damage.
Flushing the cooling system regularly is an important part of radiator maintenance. To accomplish this, you’ll need a radiator flush kit. But what exactly is a radiator flush kit, and how does it work? In this blog post, we’ll discuss the importance of flushing the cooling system, go over the steps to prepare a radiator flush kit, and share some tips for a successful radiator flush.
So, let’s get started! Paragraph 1: What is a radiator flush kit? A radiator flush kit is a collection of tools and chemicals specifically designed to help flush out the cooling system of your vehicle. Over time, debris, sediment, and rust can build up in the radiator and coolant system, affecting its performance. A radiator flush kit typically includes a flushing chemical, a hose attachment, and sometimes a T-adapter or a diverter valve.
The flushing chemical helps break down and remove any deposits in the radiator, ensuring a more efficient cooling system. Paragraph 2: Steps to prepare the radiator flush kit To prepare the radiator flush kit, start by gathering all the necessary tools and materials. You’ll need the radiator flush kit itself, a bucket or drain pan to catch the coolant, a pair of safety gloves, safety goggles, and a rag or towel.
Once you have everything ready, park your vehicle on a flat surface and allow the engine to cool completely. It’s crucial to work on a cool engine to avoid any burns or injuries. Next, locate the radiator cap and remove it.
This will allow the coolant to drain out efficiently. Paragraph 3: Using the radiator flush kit Once the coolant has been drained, it’s time to use the radiator flush kit. Follow the instructions provided with the kit to ensure proper usage.
Flush the radiator and engine block
flushing the cooling system, radiator, engine block
Dispose of the old coolant properly
Flushing the cooling system is a crucial step in properly maintaining your vehicle’s engine. Over time, coolant can become contaminated with rust, debris, and other impurities that can hinder its performance. By flushing the cooling system, you eliminate these harmful elements and ensure that your vehicle runs smoothly and efficiently.
To begin the flushing process, first, make sure the engine is cool. It’s important to never attempt to flush a hot engine as you could risk burning yourself. Once cool, locate the radiator drain plug, which is usually located at the bottom of the radiator.
Place a catch pan or bucket underneath the drain plug to collect the old coolant. Open the drain plug and allow the coolant to completely drain out. This can take a few moments, so be patient.
Once the coolant has drained, close the drain plug securely. Next, it’s time to flush the cooling system. This can be done using a commercial coolant flush kit or simply by running clean water through the system.
If using a flush kit, follow the manufacturer’s instructions carefully. If not using a kit, refill the cooling system with water and start the engine. Allow it to run for several minutes, ensuring that the water circulates throughout the system.
This will help to remove any remaining impurities. Then, turn off the engine and allow it to cool again. Once the engine is cool, open the drain plug once more to allow the water to drain out.
Refilling with New Coolant Fluid
Changing the coolant fluid in your vehicle is an important maintenance task that can help prevent your engine from overheating and potentially causing severe damage. If you notice that your coolant is low or dirty, it’s time to refill it with new coolant fluid. The first step is to locate the coolant reservoir, which is typically a translucent plastic container with a cap labeled “coolant” or “engine coolant.
” Before opening the cap, be sure that your engine has cooled down completely, as the hot coolant can cause burns. Once the engine is cool, open the cap and check the current coolant level. If it’s low, you can add new coolant fluid until it reaches the recommended level.
Be sure to use the correct type of coolant for your vehicle, as different vehicles may require different formulas. To avoid any spills, pour the new coolant fluid slowly and carefully into the reservoir. Once the coolant level is correct, securely tighten the cap and start the engine to let the coolant circulate.
Regularly checking and refilling your coolant fluid can help keep your engine running smoothly and avoid costly repairs down the line.
Prepare the new coolant fluid
refilling with new coolant fluid. Now that you’ve drained and cleaned the cooling system, it’s time to refill it with fresh coolant fluid. But before you do, make sure you have the right type of coolant fluid for your vehicle.
Different vehicles require different types of coolant, so check your owner’s manual or consult a professional if you’re not sure. Once you have the right coolant fluid, it’s important to prepare it properly before adding it to your cooling system. Start by checking the coolant concentration.
Most coolant fluids come as a concentrate, which needs to be diluted with water before use. The ideal coolant concentration typically ranges from 50% to 70%, depending on the climate you live in. To prepare the coolant fluid, follow the instructions on the coolant bottle.
Typically, you will need to mix equal parts of the concentrate and distilled water in a clean container. Avoid using tap water, as it may contain impurities that can damage your cooling system. Make sure the container you use is clean and free of any contaminants.
Once you have prepared the coolant fluid, it’s time to add it to your cooling system. Start by locating the coolant reservoir or radiator cap. It’s usually a translucent plastic tank with markings indicating the minimum and maximum levels of coolant.
Open the reservoir or radiator cap and carefully pour the coolant into the system. Be careful not to overfill the system, as this can cause the coolant to overflow and create more problems. Fill the system slowly and monitor the level to ensure it doesn’t exceed the maximum mark.
Fill the radiator with the new coolant fluid
“fill the radiator with the new coolant fluid” Once you’ve drained the old coolant from your radiator, it’s time to refill it with fresh coolant fluid. This step is essential for maintaining the proper functioning and temperature regulation of your vehicle’s engine. When choosing a new coolant fluid, be sure to check your owner’s manual or consult a professional to ensure you use the correct type for your specific vehicle.
To refill the radiator, locate the radiator cap and remove it. Then, carefully pour the new coolant fluid into the radiator until it reaches the recommended level. Take your time to avoid any spills or overflow.
It’s important to note that coolant fluids are usually mixed with water in a specific ratio, so be sure to follow the manufacturer’s instructions to achieve the correct concentration. Once you’ve filled the radiator, replace the radiator cap securely to avoid any leaks. With the radiator properly filled with new coolant fluid, you can enjoy a well-functioning engine that stays cool and performs optimally.
Top up the coolant reservoir
coolant reservoir, coolant fluid refilling coolant, top up coolant reservoir
Check for leaks and proper coolant level
coolant level, leaks, refilling with new coolant fluid. Checking for leaks and maintaining the proper coolant level in your vehicle is essential for its performance and longevity. Coolant, also known as antifreeze, helps regulate the temperature of your engine and prevents it from overheating.
Over time, coolant can break down, become contaminated, or even leak from various parts of your engine. This can lead to engine damage, poor performance, and costly repairs. To avoid these issues, it’s important to regularly inspect your coolant system for any leaks and ensure that the coolant level is at the recommended mark.
If you notice any leaks or a low coolant level, it’s crucial to address the issue immediately. If your coolant level is low, you’ll need to refill it with new coolant fluid. Before doing so, make sure your engine is completely cool to avoid any burns or injuries.
Locate the coolant reservoir, which is typically a transparent plastic tank near the radiator. Check the fluid level and if it’s below the recommended mark, you’ll need to add new coolant. Start by purchasing the correct type of coolant for your vehicle, as there are different formulations for different engine types.
Read the instructions on the coolant bottle carefully, as some may need to be mixed with water before adding to the reservoir. Slowly pour the coolant into the reservoir, being careful not to overfill it. It’s important to leave some space for the coolant to expand when the engine heats up.
Once you’ve refilled the coolant, securely replace the reservoir cap and start the engine. Let it run for a few minutes, and then check the coolant level again to ensure it’s within the recommended range. Remember to dispose of any used coolant properly, as it can be toxic to humans and the environment.
Conclusion
So go ahead, take the plunge and change that coolant fluid! It may not be as exciting as say, discovering a hidden treasure or tracking down a mythical creature, but it sure is a smart and responsible thing to do. Plus, you’ll be able to impress your friends with your newfound knowledge and expertise on car maintenance. And who knows, maybe one day you’ll even find yourself in a high-speed car chase, where your swift coolant changing skills will save the day.
So grab your tools and get ready to show that coolant who’s boss – because when it comes to your car’s health, ain’t nobody got time for a flirty fluid!
Maintenance tips to keep your coolant fluid in good condition
Refilling with New Coolant Fluid
Importance of regular coolant fluid changes
When it comes to maintaining your vehicle’s cooling system, regular coolant fluid changes are of utmost importance. Over time, coolant fluid can become contaminated with dirt, debris, and other impurities. This can lead to reduced effectiveness in cooling and lubrication, which can cause engine overheating and potential damage.
Refilling your system with new coolant fluid is a crucial step in ensuring your engine’s optimal performance and longevity. By replacing the old fluid with fresh coolant, you are not only removing any accumulated contaminants but also replenishing the system with the necessary additives and properties that help regulate temperature and prevent corrosion. It’s like giving your engine a refreshing drink to keep it cool and healthy.
So, the next time you’re due for a coolant fluid change, don’t skip the refill with new coolant – your engine will thank you for it!
FAQs
How often should I change the coolant fluid in my car?
It is recommended to change the coolant fluid every 30,000 to 50,000 miles, or every 2 to 5 years, depending on the manufacturer’s guidelines.
Can I change the coolant fluid myself or should I take it to a mechanic?
While it is possible to change the coolant fluid yourself, it is generally recommended to take it to a mechanic, as they have the expertise and proper tools to ensure the job is done correctly.
What are the signs that indicate the coolant fluid needs to be changed?
Signs that your coolant fluid needs to be changed include overheating, coolant leaks, a sweet smell coming from the engine, and discolored or rusty coolant.
What is the purpose of coolant fluid in a vehicle?
Coolant fluid is important in a vehicle as it helps regulate the engine temperature by absorbing heat and transferring it to the radiator, preventing the engine from overheating.
Can I mix different brands of coolant fluid?
It is generally not recommended to mix different brands of coolant fluid, as they may have different chemical compositions that can lead to issues such as corrosion or reduced cooling efficiency.
How do I properly dispose of old coolant fluid?
Old coolant fluid should be disposed of in accordance with local regulations. It should never be poured down the drain or onto the ground, as coolant is toxic and harmful to the environment. Many auto supply stores or recycling centers accept used coolant for proper disposal.
Can I use water as a substitute for coolant fluid?
While water can be used temporarily in an emergency situation, it is not recommended as a long-term substitute for coolant fluid. Coolant fluid contains additives that help prevent corrosion and provide lubrication, which water does not offer.