

Hey there! Are you wondering what coolant removal is all about? Well, you’re in the right place! In this blog, we’re going to dive into the world of coolant removal and explore the importance of this process in various industries. So buckle up and get ready for an exciting journey! Coolant removal refers to the process of extracting coolant from a system or machine. Coolants are substances that help regulate and maintain the temperature of equipment, preventing overheating and ensuring optimal performance.
They are commonly used in automotive engines, industrial machinery, and even in some electronic devices. But why is coolant removal necessary? Just like any other fluid, coolants can become contaminated over time. They can accumulate dirt, debris, and harmful particles that can negatively affect the efficiency and longevity of the equipment.
Therefore, periodic removal and replacement of coolant are essential to ensure the smooth operation of the system. Think of it this way: coolant removal is like giving your equipment a refreshing drink. Just like how we need to stay hydrated for our bodies to function properly, our machines also need clean and efficient coolants to keep things running smoothly.
It’s like a breath of fresh air for your equipment! Now, you might be thinking, how exactly is coolant removal carried out? Well, there are several methods and techniques depending on the specific application and requirements. Some common techniques include suctioning, draining, or flushing the coolant out of the system. The process involves carefully draining the old coolant, filtering out any impurities, and then refilling the system with fresh coolant.
This ensures that the equipment is protected and operating at its best, preventing any potential damage or breakdowns. In conclusion, coolant removal plays a crucial role in maintaining the performance and longevity of various systems and machines. By periodically removing and replacing the coolant, you are ensuring that your equipment remains efficient and reliable, avoiding costly repairs or replacements down the line.
So, whether you’re a car enthusiast, an industrial technician, or simply curious about the inner workings of machines, understanding coolant removal is a valuable piece of knowledge. Stay tuned for our upcoming blogs, where we will explore more about the intricacies of coolant removal and its significance in different industries.
Table of Contents
Why is it important to remove coolant from a car?
When it comes to car maintenance, removing coolant is an important task that should not be overlooked. Coolant, also known as antifreeze, plays a vital role in keeping the engine cool and preventing it from overheating. Over time, coolant can become contaminated with dirt, debris, and other impurities, which can reduce its effectiveness.
Additionally, old or worn-out coolant can become acidic, which can lead to corrosion and damage to the engine. By removing and replacing the coolant regularly, you can ensure that your car’s engine stays cool and runs smoothly. So, how do you remove coolant from a car? Well, the process may vary depending on the make and model of your vehicle, but in general, it involves draining the coolant from the radiator and replacing it with fresh coolant.
It’s always a good idea to consult your car’s owner manual or seek professional guidance to ensure you are following the correct procedure for your specific vehicle. By taking the time to remove and replace your car’s coolant, you can help prolong the life of your engine and keep your car running efficiently. So, don’t overlook this important maintenance task!
Prevent engine damage
“Removing coolant from a car may not be the first thing on your mind when it comes to maintenance, but it is actually a very important step in preventing engine damage. Coolant, also known as antifreeze, plays a crucial role in keeping your engine temperature regulated and preventing it from overheating. Over time, coolant can become contaminated with dirt, debris, and other particulates that can clog your engine and reduce its efficiency.
This can lead to a decrease in performance, increased fuel consumption, and even potential engine failure. By regularly removing and replacing the coolant in your car, you can ensure that your engine stays clean and healthy, avoiding costly repairs down the line. So next time you think about skipping this step, ask yourself – is it worth the risk?”
Prepare for maintenance or repair
coolant, maintenance, car, repair
Safety Precautions
If you find yourself needing to remove coolant from your car, it’s important to take the necessary safety precautions. Coolant, also known as antifreeze, is toxic and can be harmful if inhaled, ingested, or absorbed through the skin. Before starting, make sure to wear protective clothing such as gloves, safety glasses, and a long-sleeved shirt.
Additionally, ensure that you are working in a well-ventilated area to minimize the risk of inhaling any fumes. To begin the coolant removal process, locate the radiator drain plug, which is typically located at the bottom of the radiator. Place a container underneath the plug to catch the coolant as it drains out.
Use a wrench to loosen the plug and allow the coolant to drain completely. Once the coolant has drained out, securely tighten the drain plug and dispose of the old coolant properly. Remember to never pour coolant down the drain or into the environment as it is harmful to both humans and animals.
Instead, take the old coolant to a recycling center or a local auto parts store that accepts used fluids. By following these safety precautions, you can remove coolant from your car safely and responsibly.
Gather necessary tools and materials
When embarking on any DIY project, it’s important to gather all the necessary tools and materials before getting started. This will ensure that you have everything you need to complete the task efficiently and effectively. Depending on the nature of the project, the tools and materials required may vary.
For example, if you’re painting a room, you’ll need paint brushes, rollers, trays, and paint. If you’re assembling furniture, you’ll need a screwdriver, hammer, and possibly an Allen wrench. It’s always a good idea to make a checklist of everything you need before you begin, so that you don’t find yourself halfway through the project and realizing you’re missing a crucial tool.
Additionally, it’s important to prioritize safety when working on any DIY project. Make sure to wear protective gear, such as safety goggles and gloves, to prevent any accidents or injuries. Keep your work area well-lit and organized, and take breaks when needed to avoid exhaustion.
By taking these safety precautions and gathering all the necessary tools and materials beforehand, you’ll be well-prepared to tackle any DIY project that comes your way.
Park the car on a level surface
park the car on a level surface
Allow the engine to cool down
Allowing the engine of your vehicle to cool down is an essential safety precaution that should never be overlooked. When your vehicle has been running for a while, the engine can heat up significantly, reaching high temperatures that can be dangerous if not given time to cool down. Just like our bodies need time to rest and recover after periods of exertion, engines also need a break to prevent overheating and potential damage.
By allowing the engine to cool down, you are not only ensuring the safety of your vehicle but also preventing any potential accidents that could occur due to the overheated engine. So, the next time you finish a long drive or notice that your engine is running hot, take a moment to let it cool down before continuing on your journey. It’s a small step that can make a big difference in keeping you and your vehicle safe.
Step-by-step Guide to Removing Coolant
Are you experiencing issues with your car’s coolant system? Wondering how to remove coolant from your car? Well, you’ve come to the right place! Removing coolant from your car is a relatively simple process that can be done with just a few tools and a little bit of time. First, you’ll want to make sure your engine is cool before starting the process. Then, locate the coolant drain plug on the bottom of your radiator and place a drain pan underneath it to catch the coolant.
Carefully remove the drain plug and let the coolant drain completely. Once the coolant has drained, you can then refill the system with fresh coolant. Remember to properly dispose of the old coolant in an environmentally friendly way.
And there you have it, a step-by-step guide to removing coolant from your car.
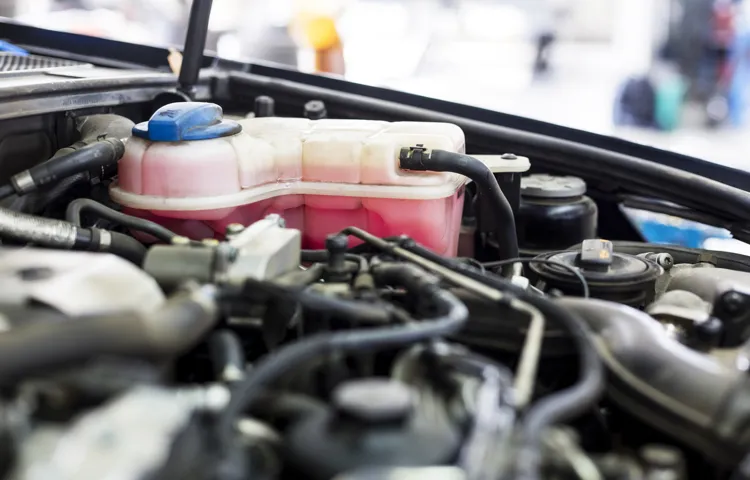
Step 1: Locate the coolant reservoir
coolant reservoir, step-by-step guide, removing coolant What’s the first step to remove coolant from your car? You’ll need to locate the coolant reservoir. This is where the coolant is stored and it can usually be found under the hood, near the radiator. The coolant reservoir is a plastic container that is typically translucent so you can see the coolant level inside.
It may have a cap or a screw-on lid, depending on the make and model of your car. Once you’ve located the coolant reservoir, you can move on to the next step in removing coolant.
Step 2: Open the reservoir cap
In the second step of removing coolant from your car, you’ll need to open the reservoir cap. This might sound simple, but it’s an important part of the process. The reservoir cap is located on top of the coolant reservoir, which is usually a white or translucent plastic container.
It’s important to open the cap with caution, as the coolant can be hot and may cause burns. To do this, make sure the engine has cooled down completely. Then, using a rag or a glove to protect your hand from any hot steam, slowly turn the cap counterclockwise until it comes off.
Be prepared for a hissing noise as you remove the cap, as this is just the pressure being released. Once the cap is off, you can move on to the next step in the coolant removal process. Removing coolant from your car is an important maintenance task that should be done regularly, as old or contaminated coolant can lead to engine overheating and damage.
This step-by-step guide will walk you through the process of removing coolant from your car, ensuring that you do it safely and efficiently.
Step 3: Release system pressure
coolant, remove coolant, release system pressure, step-by-step guide
Step 4: Drain the coolant
drain coolant, removing coolant, step-by-step guide, coolant draining process
Step 5: Clean the reservoir
[Step 5: Clean the reservoir] Once you’ve drained all the coolant from your vehicle’s radiator and engine, it’s important to clean the reservoir as well. The reservoir, also known as the overflow tank or coolant expansion tank, is where excess coolant is stored and released when needed. Over time, it can accumulate debris and sediment that can hinder the proper functioning of the coolant system.
To clean the reservoir, start by removing it from the vehicle. The location of the reservoir can vary depending on the make and model of your car, so consult your owner’s manual for specific instructions. Once you’ve removed the reservoir, inspect it for any visible dirt or debris.
If you notice any, use a gentle cleaner, such as warm soapy water, to clean the reservoir. After cleaning, rinse the reservoir thoroughly with water to remove any residue or cleaning solution. Make sure to check the inside of the reservoir for any signs of damage, such as cracks or leaks.
If you notice any, it may be necessary to replace the reservoir. Once the reservoir is cleaned and inspected, reinstall it back into the vehicle. Make sure to reconnect any hoses or connectors that were removed during the process.
Refill the reservoir with fresh coolant and secure the cap tightly. Cleaning the reservoir is an important step in the coolant removal process as it helps maintain the overall functionality of the coolant system. By removing dirt, debris, and sediment from the reservoir, you ensure that the coolant can flow freely and effectively through the system, preventing any potential overheating issues.
So, don’t forget to include this step in your coolant maintenance routine to keep your vehicle running smoothly.
Disposing of Coolant Properly
If you find yourself needing to remove coolant from your car, it’s important to know the proper way to dispose of it. Coolant, also known as antifreeze, is a toxic substance that can harm the environment if not handled correctly. Luckily, there are a few options for legally and responsibly getting rid of coolant.
One option is to take it to a local recycling center or waste disposal facility. These places often accept coolant and other automotive fluids for proper disposal. Another option is to contact your local auto parts store or mechanic.
They may offer a coolant recycling program where you can drop off your used coolant for them to handle. Regardless of the method you choose, it’s crucial to ensure that the coolant is sealed in a leak-proof container and labeled properly. This will help to prevent any accidental spills or leaks during transportation.
By disposing of coolant correctly, you can help to keep the environment safe and healthy.
Follow local regulations
disposal of coolant safely
Do not pour down the drain
coolant, dispose of coolant, pouring down the drain When it comes to getting rid of coolant, the last thing you want to do is pour it down the drain. Coolant, also known as antifreeze, contains toxic chemicals that can pollute water sources and harm the environment. Instead, it’s crucial to dispose of coolant properly.
So, what should you do? One option is to bring your used coolant to a recycling center. These centers have the equipment and resources to safely handle and dispose of coolant. Another option is to take your coolant to a local automotive shop or service station that offers coolant recycling services.
By taking the time to dispose of coolant responsibly, you are not only protecting the environment but also doing your part to ensure the safety of our water sources.
Consider recycling options
coolant disposal, recycling options
Conclusion
And there you have it, my friends – the artful dance of coolant removal from your beloved chariot. Remember, working with coolant can be a bit slippery, so always take precautions to avoid any unfortunate spills or stains. And don’t forget, if you find yourself in a pickle with your coolant, call upon the powers of a qualified mechanic to save the day.
After all, they are the superheroes of the automotive world, armed with the knowledge and tools to keep your engine running smoothly. So go forth, dear reader, and conquer the land of coolant removal with finesse and flair – for you are now armed with the wisdom of a coolant connoisseur!”
FAQs
If you need to remove coolant from your car, it’s important to do it properly to avoid any damage to your engine or cooling system. Here are some simple steps to guide you through the process. First, make sure your car is completely cooled down before you start.
You don’t want to risk burning yourself on hot coolant. Next, locate the coolant reservoir, which is usually a translucent plastic tank near the radiator. Look for the “Max” and “Min” marks on the side of the reservoir.
If the coolant level is above the “Max” mark, you’ll need to drain some out. To do this, remove the reservoir cap and place a container underneath to catch the coolant. Then, use a suitable tool (such as a drain plug or a siphon) to slowly remove the excess coolant.
Make sure to dispose of the coolant properly by taking it to a recycling center or an auto parts store that accepts used coolant. Once you’ve removed the excess coolant, replace the reservoir cap and check the level again. Repeat the process if necessary until the coolant level is within the appropriate range.
Additional Resources
Are you dealing with a coolant leak in your car and wondering how to remove the coolant? Don’t worry, I’ve got you covered! Removing coolant from your car is a relatively simple process that you can do yourself with just a few tools. First, make sure your engine has cooled down completely to avoid any burns. Then, locate the coolant reservoir, which is usually a clear plastic container with a cap on it.
Open the cap and carefully drain the coolant into a drain pan. Be sure to dispose of the coolant properly, as it is toxic to humans and animals. Once you have removed all the coolant, you can refill the reservoir with fresh coolant to get your car back up and running smoothly.
Remember to always consult your car’s manual for specific instructions and safety precautions. So, say goodbye to that pesky coolant leak and hit the road again with confidence!
FAQs
How do I remove coolant from my car?
To remove coolant from your car, first locate the coolant reservoir. It is usually a white or translucent plastic tank with a blue or green cap. Make sure the engine is cool before opening the cap. Use a towel or rag to protect your hands from hot components. Slowly unscrew the cap to release any pressure. Then, use a funnel to pour the coolant into a clean container. Be sure to dispose of the old coolant properly, as it can be harmful to the environment.
Can I remove coolant from my car without draining the radiator?
Yes, it is possible to remove coolant from your car without draining the radiator. One method is to use a coolant vacuum filler kit. This kit allows you to suck out the coolant from the reservoir and replace it with fresh coolant. Another method is to use a turkey baster or similar tool to remove the coolant from the reservoir. However, keep in mind that these methods may not remove all of the coolant and may not be as thorough as draining the radiator.
How often should I remove and replace the coolant in my car?
The frequency of removing and replacing the coolant in your car depends on the manufacturer’s guidelines. In general, it is recommended to change the coolant every 30,000 to 50,000 miles or every three to five years, whichever comes first. However, it is always best to consult your car’s owner’s manual for the specific recommendations for your make and model.
Is it necessary to remove coolant during a radiator flush?
Yes, removing the coolant is necessary during a radiator flush. A radiator flush involves draining the old coolant, flushing the radiator with water or a radiator flush solution to remove any built-up debris, and then refilling the system with fresh coolant. It is essential to remove the old coolant to ensure that the flush is effective and to prevent the old coolant from contaminating the new coolant.
What are the signs that I need to remove and replace the coolant in my car?
Some signs that indicate the need to remove and replace the coolant in your car include overheating, a sweet smell in the cabin, visible coolant leaks, or a low coolant warning light on the dashboard. If you notice any of these signs, it is essential to check the coolant level and quality. If the coolant is low, contaminated, or expired, it should be removed and replaced.
Can I reuse the coolant after removing it from my car?
In most cases, it is not recommended to reuse coolant after it has been removed from the car. Coolant can become contaminated with debris, rust, or other substances that can affect its performance. Additionally, coolant can degrade over time, so it is best to use fresh coolant when refilling the system. Properly disposing of the old coolant and using new coolant ensures optimal cooling system performance and engine protection.
Is it possible to remove coolant from a car without specialized tools?
Yes, it is possible to remove coolant from a car without specialized tools. As mentioned earlier, you can use a turkey baster or a similar tool to remove the coolant from the reservoir. Additionally, some vehicles have a drain plug at the bottom of the radiator that can be opened to drain the coolant. However, keep in mind that removing coolant without specialized tools may not be as efficient or thorough as using specialized equipment.