
Have you ever experienced overheating issues with your vehicle, despite having enough coolant in the system? The culprit could be air bubbles trapped inside, causing disruptions in the flow. Don’t worry; getting rid of air in your coolant system is easier than you think and crucial for maintaining your car’s optimal performance. In this blog, we’ll dive into the causes of air in the coolant system, the symptoms of a faulty system, and most importantly, ways to fix it.
Think of it as giving your car’s cooling system a refreshing breath of air!
Table of Contents
Understanding Air in Your Coolant System
If you’re noticing strange behavior from your engine or coolant system, it could be due to air bubbles that have infiltrated the system. Air in your coolant system can cause a variety of problems from overheating to a blown head gasket. Fortunately, there are a few straightforward steps you can take to remove air from your coolant system.
First, ensure that your engine has cooled down before removing the radiator cap. Then, refill the radiator with a coolant mixture and let it sit for a few minutes with the cap off. This will allow air bubbles to escape through the radiator cap opening.
After a few minutes, top off the coolant and replace the cap. Be sure to check your coolant levels regularly as there may be a leak that is allowing air to enter the system. By following these simple steps, you can prevent costly and potentially dangerous damage to your engine.
Signs of Air in Your Coolant System
Air in your coolant system can cause significant damage to your engine and affect its performance. But how do you know if there’s air in your coolant system? Well, there are a few signs to look out for, such as overheating, coolant leaks, and strange noises. Overheating can be caused by air pockets in your coolant system, preventing the coolant from circulating properly and causing your engine to overheat.
Coolant leaks can also be a sign of air in your system, as the pressure buildup from air can cause coolant to leak through worn fittings or gaskets. And if you hear strange noises coming from your engine, such as gurgling or bubbling, it’s likely that there’s air in your coolant system. It’s important to address these issues quickly, as air in your coolant system can lead to serious engine damage if left unchecked.
Regular maintenance and inspections can prevent air from building up and ensure that your coolant system is functioning properly.
Consequences of Air in Your Coolant System
Air in your coolant system can lead to significant consequences for your engine’s performance and longevity. One of the main issues with air in your coolant system is that it can create hotspots within the engine that can cause severe damage. This happens because the air bubbles prevent the coolant from flowing correctly, causing certain areas to overheat and other areas to remain cool.
Over time, the hotspots can warp or crack engine parts, leading to expensive repairs. Air in your coolant system can also cause corrosion within the radiator, hoses, and other engine components, reducing the lifespan of these parts. Additionally, air bubbles can cause your engine to run hotter than usual, decreasing fuel efficiency, and increasing the risk of overheating.
Therefore, it’s essential to ensure that your coolant system is free of air bubbles to prevent these issues from occurring. Regular maintenance, such as flushing the coolant and checking for leaks, can help keep your coolant system in good condition and extend the life of your engine.
How to Get Rid of Air in Your Coolant System
Having air in your coolant system can cause significant damage to your engine, which is why it’s essential to get rid of it. The first step is locating the bleed valve, which is a small screw on the radiator or coolant pipe. Next, turn on your engine and let it run for a few minutes, allowing the coolant to circulate.
Once the engine is warm, turn it off and open the bleed valve. You should see some air and coolant escaping from the valve. Keep the valve open until all the air is out, then close it and top up the coolant as needed.
Repeat this process until no more air bubbles come out. It’s important to check your coolant level again after driving the vehicle to make sure it’s at the correct level. Following these steps will help ensure your engine stays happy and healthy.
Step 1: Check for Leaks
Getting rid of air in your coolant system can be a daunting task, but it’s important to keep your engine running smoothly. The first step in tackling this issue is to check for leaks. Leaks can cause air to enter your coolant system, which can lead to overheating and other issues.
Start by inspecting all of your hoses, connections, and the radiator for signs of leaking. If you find a leak, make sure to fix it before moving on to the next step. It’s important to note that even small leaks can allow air to enter your coolant system, so don’t overlook them.
Once you’ve checked for leaks, you can move on to the next step in getting rid of air in your coolant system.
Step 2: Check the Coolant Level
When it comes to maintaining your car’s performance, checking the coolant level should be a priority. Over time, air can seep into the coolant system and cause issues if left unchecked. To get rid of this air, start by locating the coolant reservoir and ensuring that the engine is cool before opening it.
If the coolant level is low, add a 50/50 mix of coolant and water until it reaches the recommended level. Keep in mind that using pure water or the wrong type of coolant can cause damage to your engine. After filling the reservoir, start the engine and allow it to warm up for a few minutes with the radiator cap off.
Watch for bubbles in the coolant, which indicate the presence of air. If bubbles are present, turn off the engine and wait for it to cool down before adding more coolant. Overall, regularly checking the coolant level and removing any air pockets can help prolong the life of your engine and prevent costly repairs down the road.
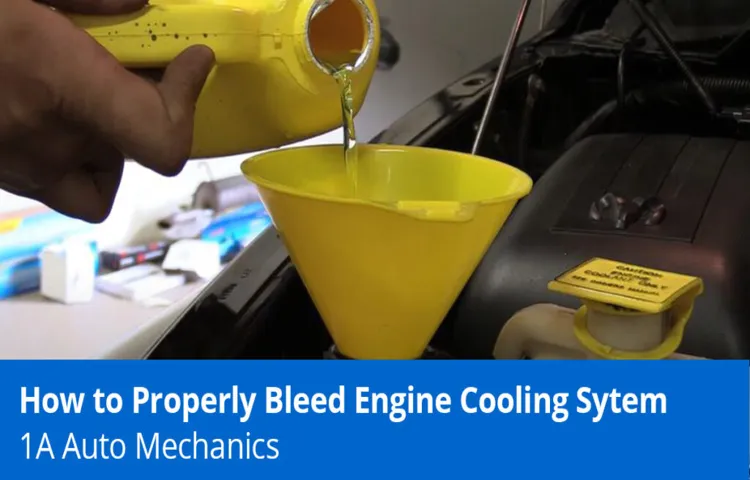
Step 3: Use a Coolant Funnel
If you’re experiencing overheating problems with your car, it might be due to air in your coolant system. Fortunately, getting rid of air pockets is a simple task that involves a coolant funnel. This specialized tool is designed to attach to your radiator and provide a controlled way of adding coolant to your system while removing air pockets at the same time.
The funnel also helps you avoid spills while topping off your coolant, ensuring that your engine stays cool and running smoothly. Whether you’re a DIY-oriented car owner or a professional auto mechanic, a coolant funnel is an essential tool for keeping your vehicle in top condition. So, the next time you notice your engine temperature rising, don’t wait until it’s too late.
Grab a coolant funnel and check your coolant system for air pockets to ensure your car continues serving you until its last breath.
Step 4: Run the Engine and Add More Coolant
After filling up the coolant system you need to run the engine and check for leaks. Turn on your car and allow the engine to idle. With the radiator cap still off, some coolant will overflow.
Once the engine warms up, add coolant as necessary until the level stabilizes. Remember to add coolant slowly to prevent any air pockets from forming. Keep an eye on the temperature gauge to ensure it remains within the normal range.
As the engine heats up, the added coolant will help expel any remaining air. If the engine temperature rises, turn off the car immediately and wait for it to cool down. Once the engine cools, remove the radiator cap, and top off the coolant again.
Do this as often as needed until the temperature stabilizes and your car is running smoothly. By doing this, you can make sure that your cooling system is free from air pockets which could cause significant damages to your engine.
Preventative Maintenance to Keep Air Out of Your Coolant System
To prevent air from getting into your coolant system, it’s essential to perform regular preventative maintenance. This includes checking the coolant level and flushing out the system periodically. However, the most critical step is bleeding the system properly.
If air gets into the coolant system, it can cause various problems such as overheating and poor engine performance. The best way to get rid of air in the coolant system is by using a specialized tool to create a vacuum that will pull the air out. Once you remove the air, it’s essential to refill the system with fresh coolant and water mixture.
Make sure to follow the manufacturer’s instructions carefully and bleed the system thoroughly, ensuring no air remains. With regular maintenance and attention to detail, you can keep your coolant system free of air and extend the life of your engine.
Regularly Check Your Coolant Level
Regularly checking your coolant level is an essential preventative maintenance task that can help you keep air out of your coolant system and ensure the optimal functioning of your engine. The air that enters your coolant system can cause the engine to overheat, leading to costly repairs and significant downtime. Therefore, it is vital to keep your coolant level in check to prevent such issues.
Many modern cars have a transparent coolant reservoir that makes it easy to check the level visually. If your vehicle doesn’t have a transparent reservoir, you can use a dipstick to check the coolant level. It is critical to ensure that the coolant level is between the high and low marks on the reservoir or dipstick.
If you notice that the coolant level is low, be sure to top it up immediately with the recommended coolant for your car. Overall, regularly checking your coolant level can help you maintain your engine’s health and prevent costly repairs down the road.
Inspect Your Hoses and Radiator Cap
Air out of coolant system, hoses, radiator cap, preventative maintenance One of the essential components of any vehicle is its cooling system. It’s what keeps your engine at an optimal temperature and prevents overheating. However, the coolant system can fail due to air entering the system.
Preventative maintenance is the best way to avoid this problem, and one effective method is by inspecting your hoses and radiator cap regularly. Over time, hoses can become brittle and crack, leading to leaks. A damaged radiator cap can also cause issues, such as allowing air to enter the system.
By conducting a visual inspection of your hoses and radiator cap, you can identify any signs of wear and replace them before they cause serious problems. It’s a simple task that can save you from costly repairs down the road. So, take the time to inspect your hoses and radiator cap, and keep your coolant system air-free and functioning smoothly.
Final Thoughts
If you’re experiencing air in your coolant system, the first thing to do is to locate the source of the problem. Check for any leaks or damage to your radiator or hoses. Next, make sure your coolant level is at the proper level and try bleeding the system to remove any trapped air.
This involves opening the radiator cap and filling the system with coolant until it reaches the overflow tank. Then, start your engine and let it run for a few minutes until the coolant starts to circulate and the air bubbles escape. Once the system has been bled of air, top off the coolant level and replace the radiator cap.
It’s important to fix any leaks or other issues that may have caused the air to get into the system in the first place, as these can lead to more serious engine problems if left untreated. Overall, removing air from your coolant system is a relatively simple process that can be done at home with a few basic tools and some patience.
Conclusion
In the battle against air in your coolant system, the key is to attack from all angles. Start by identifying the source of the problem, whether it be a leak, a damaged radiator cap, or a malfunctioning thermostat. Next, flush the system with fresh coolant and follow up with a thorough burping session, ensuring all air pockets are expelled.
And finally, stay vigilant and check your coolant levels regularly to ensure no pesky air bubbles sneak their way back in. With these steps, you’ll master the art of keeping your coolant system air-free and running cool as a cucumber.”
FAQs
What causes air to get into the coolant system?
Air can enter the coolant system through a leak in the radiator, hose, or head gasket. It can also enter when changing the coolant or performing repairs on the cooling system.
What are the symptoms of air in the coolant system?
The symptoms of air in the coolant system include overheating, low coolant levels, bubbling or gurgling sounds coming from the radiator, and a loss of heat in the cabin.
How can I check for air in the coolant system?
To check for air in the coolant system, let the engine cool and remove the radiator cap. If there is air present, you may notice bubbles or a hissing sound coming from the radiator.
Can air in the coolant system cause engine damage?
Yes, air in the coolant system can cause engine damage. When air gets trapped in the system, it can prevent the coolant from circulating properly, which can lead to overheating and engine damage.
How do I bleed air from the coolant system?
Bleeding air from the coolant system involves running the engine with the radiator cap off and allowing the air to escape. You may also need to use a special tool called a coolant funnel to help remove the air.
What should I do if air in the coolant system persists?
If air in the coolant system persists, it may indicate a larger problem such as a leak or a faulty head gasket. It’s recommended to have a professional mechanic diagnose and repair the issue.
How can I prevent air from getting into the coolant system in the future?
To prevent air from getting into the coolant system, make sure to properly maintain the cooling system and address any leaks or repairs promptly. Always follow the manufacturer’s recommended coolant change intervals and procedures.