
Adding coolant is an integral part of keeping your car functioning at optimal levels. It ensures that your engine stays cool and doesn’t overheat, causing damage and breakdowns. However, for those who are new to car maintenance, adding coolant can be a daunting task.
You may be asking yourself, where do you add it? How much do you add? What type of coolant should you use? Don’t worry; we’ve got you covered. In this blog, we will guide you step by step on what to do when adding coolant to your car. By the end of it, you’ll feel confident and empowered to take on this task on your own without any fuss.
Let’s dive in!
Table of Contents
1. Check Your Levels
When adding coolant to your car, there are a few things you need to check. Checking your coolant levels is the first step to ensuring your car’s engine remains cool and functioning at the optimal temperature. You can easily check these levels by opening the hood and locating the coolant reservoir, usually marked by a cap with a coolant symbol.
Make sure your car’s engine is cool before unscrewing the cap and checking the coolant levels. If you find that the levels are low, add the appropriate amount of coolant recommended by your car’s manufacturer. It’s important not to overfill your reservoir, as this can cause the coolant to overflow and potentially damage other parts of your engine.
Checking your coolant levels periodically can help you catch any leaks or issues early on and prevent overheating. So, always make sure to check your levels before adding coolant to your car.
1.1 Check Coolant Reservoir
When it comes to maintaining your vehicle, one of the most important things you can do is check your levels regularly. This means taking a few minutes to make sure the various fluids under the hood are at the proper levels. One of the key fluids you’ll need to check is your coolant.
To do this, simply locate your coolant reservoir under the hood and check the level. You’ll want to make sure it’s between the minimum and maximum marks. If it’s low, it’s important to fill it up to ensure proper engine function and prevent overheating.
This simple task can save you from costly repairs down the line. So, take the time to check your coolant reservoir and make sure your vehicle is running smoothly.
1.2 Check Radiator
When it comes to maintaining your vehicle’s health, checking your radiator is an essential step. The radiator is responsible for cooling your engine and preventing overheating, so it’s crucial to make sure it’s functioning properly. One simple way to check your radiator is to inspect the coolant level.
You can do this by locating the coolant reservoir and checking the level indicator. If the level is below the “minimum” line, then it’s time to add more coolant. Another important factor to consider is the color of the coolant.
If it appears murky or discolored, it’s a sign that the coolant needs to be flushed and replaced. Neglecting to check your radiator can lead to costly repairs down the line, so take the time to ensure your levels are topped off and your coolant is in good condition. Your vehicle will thank you with improved performance and a longer lifespan.
2. Get the Right Coolant
When adding coolant to your vehicle, it’s crucial to make sure that you are using the right type of coolant. Not all coolants are created equal, and using the wrong one can cause serious damage to your engine. Different vehicles require different types of coolant, so check your owner’s manual to ensure you are using the correct one.
Using the wrong coolant can cause corrosion, clogging, and even overheating. It’s also important to never mix different types of coolant, as this can cause chemical reactions that can be harmful to your engine. So, before you add any coolant to your vehicle, make sure you have the right type and never mix different kinds.
By doing so, you’ll help protect your engine and keep your vehicle running smoothly.
2.1 Know Your Engine Type
When it comes to choosing the right coolant for your vehicle, knowing your engine type is crucial. Different engine types require different types of coolants to function efficiently. The two main engine types are gasoline and diesel engines.
Gasoline engines typically require a coolant that is a mix of water and ethylene glycol, while diesel engines require a coolant that is free of silicates to prevent damage to the engine. It’s important to check your vehicle manual to determine the right coolant for your engine type. Using the wrong coolant can cause corrosion, overheating, and engine damage.
It’s also important to ensure that you use the right ratio of coolant and water for your engine type. Typically, a 50/50 ratio is recommended for most engines. By knowing your engine type and using the right coolant, you can keep your engine running smoothly and reduce the risk of costly repairs down the line.
2.2 Determine the Right Coolant
When it comes to the maintenance of your vehicle’s cooling system, one crucial aspect is ensuring that you have the right coolant in use. Not all coolants are the same, and using the wrong type can lead to damage to your engine and other components. It’s essential to take note of the recommended coolant type for your specific vehicle, which can usually be found in your owner’s manual.
Additionally, you need to consider the coolant’s characteristics, such as its freezing and boiling points, the type of additives used, and its compatibility with the materials and metals in your vehicle. Using the right coolant can extend your cooling system’s lifespan, improve your engine’s performance, and prevent costly repairs down the road. So, do your research or consult with a mechanic to determine the right coolant for your vehicle.
Remember, using the right coolant can save you money and headaches in the long run.
3. Prepare to Add Coolant
When it comes to adding coolant to your vehicle, there are a few things you need to do beforehand to ensure the process goes smoothly. First and foremost, make sure your engine is completely cooled off before attempting to add coolant. This will prevent any potential burns or accidents from occurring.
Next, locate the coolant reservoir, which can typically be found near the radiator. Take off the cap and check the fluid level to see if additional coolant is needed. If so, mix the recommended concentration of coolant and water in a separate container before pouring it into the reservoir.
Be careful not to overfill, as this can cause damage to your engine. And finally, replace the cap securely to prevent any leaks or spills. By following these steps, you can rest assured that your vehicle will have the proper amount of coolant to keep it running smoothly.
3.1 Park Your Car on a Flat Surface
When it comes to adding coolant to your car, it’s important to prepare properly and follow the necessary steps to avoid any potential issues down the line. One of the first things to keep in mind is to park your car on a flat surface. This will ensure that the coolant will be evenly distributed throughout the engine and prevent any air pockets from forming.
Additionally, it’s important to make sure the engine is cool before adding coolant. Attempting to add coolant to a hot engine can be dangerous and lead to injury. Always wait until the engine has cooled down to avoid any potential risks.
By following these simple steps, you can ensure that adding coolant to your car is a safe and effective task. Remember, taking care of your car’s cooling system can go a long way in preventing costly repairs in the future.
3.2 Allow Your Engine to Cool
When it comes to adding coolant to your engine, it’s important to prepare properly. One of the first things you should do is allow your engine to cool down. This means giving it enough time to reach a safe temperature before attempting to add coolant.
Trying to add coolant to a hot engine can be dangerous and could lead to serious burns. So, be patient and wait until your engine is cool to the touch before opening the hood and beginning the process of adding coolant. Once your engine has cooled down, you can begin preparing to add coolant.
If you’re not sure what type of coolant to use, be sure to check your owner’s manual or ask a professional for advice. It’s important to use the right type of coolant for your engine, as using the wrong kind could cause damage. When you’re ready to add coolant, locate the coolant reservoir under the hood.
It’s typically a translucent plastic tank with a cap that’s labeled “coolant” or “antifreeze.” Once you’ve located it, remove the cap and add coolant until the level reaches the designated marker. Be sure not to overfill the tank, as this could cause the coolant to leak out or damage the engine.
Adding coolant to your engine may seem intimidating, but with a little patience and preparation, it’s actually a quick and easy task. Remember to always allow your engine to cool down before adding coolant and to use the right type of coolant for your engine. With these simple steps, you can keep your engine running smoothly and avoid costly repairs down the road.
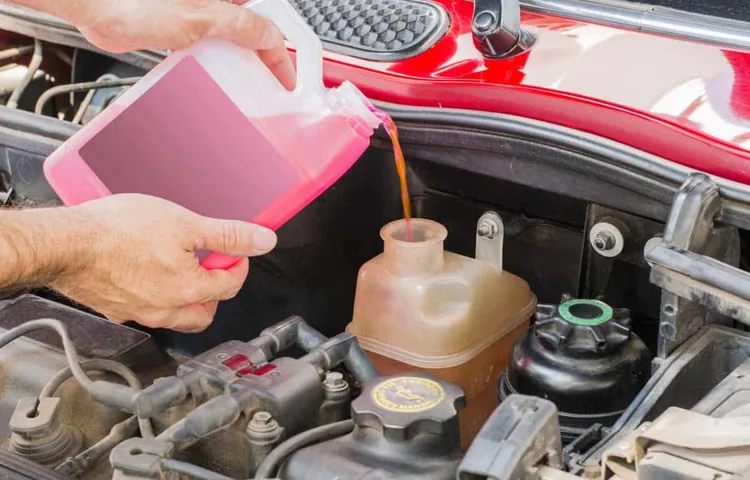
4. Add Coolant to Your Radiator
If you’re wondering what to do when adding coolant to your radiator, don’t worry – it’s a quick and simple process. First, make sure that your engine is cool before attempting to add coolant. You don’t want to risk burns or other injuries by handling hot engine components.
Then, locate the radiator cap, which is usually located on top of the radiator itself. Twist the cap counterclockwise and remove it from the radiator. Next, carefully pour the coolant into the radiator until it reaches the “Full” line.
It’s important to use the correct type of coolant for your vehicle, so check your owner’s manual or consult with a trusted mechanic if you’re unsure. Once the radiator is filled, replace the cap and tighten it by twisting it clockwise. Then, start your car and allow it to idle for a few minutes to make sure that the coolant is circulating properly.
And that’s it – you’re done! Adding coolant is an important part of regular vehicle maintenance and will help keep your engine running smoothly.
4.1 Open the Radiator Cap
Before adding coolant to your radiator, it’s crucial to open the radiator cap first. To open it, wait until your car has cooled down completely. You don’t want to risk burning yourself on hot steam and coolant.
Once you’re sure the engine is cool, wrap a rag or towel around the cap and twist it counterclockwise. Be prepared to hear a hissing sound as the cap releases pressure. If the cap won’t open, don’t force it.
Instead, wait a bit longer and try again. Once the cap is off, you can add the coolant to the radiator. Remember to use the manufacturer’s recommended coolant for your car.
Pour it slowly into the radiator until it reaches the recommended level. Then, screw the cap back in place tightly. By adding coolant regularly, you protect your engine from overheating, which can cause serious damage to your car.
4.2 Pour Coolant into Radiator
Pouring coolant into your radiator is an essential part of maintaining the optimal engine temperature. To begin, ensure that your engine has cooled down before you remove the radiator cap. Be cautious not to burn yourself while handling hot coolant.
Afterward, add the coolant into the radiator until it reaches the maximum fill line. You should first fill about half of it, then spend some time burping the radiator to eliminate any air pockets that may have accumulated inside. Once the air is out, continue pouring until the radiator is full to the maximum line.
It’s essential not to overfill the radiator with coolant. Doing so can cause it to spill over which can lead to problems. Therefore, it’s wise to double-check that the radiator is not overfilled and the cap is placed back on securely.
In cases where you cannot locate the maximum fill line or are unsure how much coolant to add, it’s vital to consult your user manual or reach out to a professional mechanic. Following these steps will ensure your engine stays cool, healthy, and functioning properly.
4.3 Close the Radiator Cap
After adding coolant to your radiator, it’s important to close the radiator cap securely. This might seem like an obvious step, but it’s one that can easily be overlooked. Failing to close the radiator cap properly can result in coolant leaking out, which can cause your engine to overheat.
You don’t want to be stranded on the side of the road with an overheated engine, so make sure you tighten the radiator cap firmly. It’s also important to note that you should wait until the engine has cooled down before attempting to add coolant and close the cap. This will help prevent burns and ensure that you don’t accidentally spill any coolant onto the engine or other components.
By taking these simple precautions, you can help keep your engine running smoothly and avoid any unnecessary breakdowns.
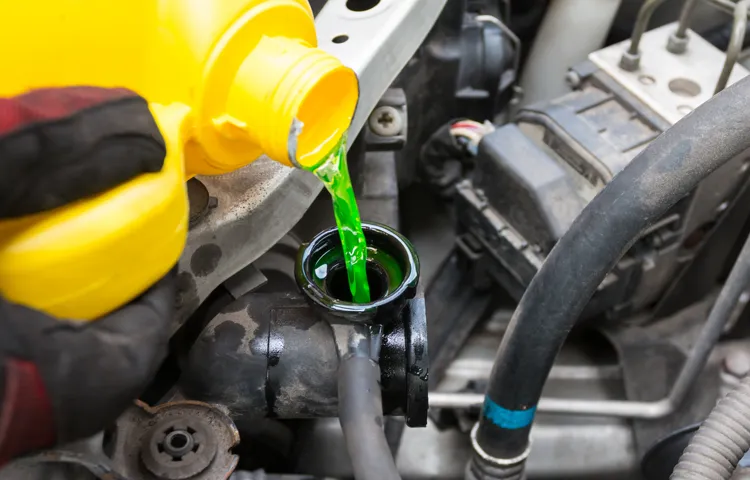
5. Add Coolant to Your Reservoir
When it comes to adding coolant to your car’s engine, the first step is to ensure that the engine is cool and there’s no pressure in the system. Once you’ve confirmed that, locate the coolant reservoir and remove the cap. If the coolant level is low, you can add more coolant to bring it up to the recommended level.
It’s important to use the right type of coolant that matches your car’s specifications; you can find this information in your car’s owner’s manual. Pour the coolant slowly and steadily into the reservoir, being careful not to overfill it. If you spill any coolant, be sure to clean it up thoroughly as it’s toxic to pets and harmful to the environment.
Once you’ve added the coolant, replace the cap and start the car to let it circulate properly. It’s crucial to keep an eye on the coolant level and top it up as needed, as low coolant levels can lead to engine overheating and damage. By following these simple steps, you can ensure your car runs smoothly and avoid any potential problems down the road.
5.1 Locate the Reservoir
When it comes to adding coolant to your car, the first step is to locate the reservoir. This is where the coolant is stored and accessed for filling up the system. The reservoir can usually be found near the radiator, but it may differ depending on the make and model of your vehicle.
To locate the reservoir, consult your car’s manual to see where it’s located. Once you’ve found the reservoir, check the fluid level to ensure it’s not too low. If it’s low, you’ll need to add more coolant to keep your car’s engine running smoothly.
It’s important to use the right type of coolant for your car, so check the manual or consult with a mechanic to make sure you’re using the proper type. As a general rule of thumb, most modern cars use a mixture of water and coolant at a 50/50 ratio. Now that the reservoir has been located, you’re on your way to keeping your engine running smoothly!
5.2 Add Coolant to the Max Line
As you try to maintain your car’s engine, you would want to keep an eye on the coolant level. The coolant plays a crucial role in preventing your engine from overheating. To add coolant to your reservoir, start by finding the coolant reservoir under the hood.
The coolant reservoir usually has a cap with a sign on it. Most newer models have translucent reservoirs that allow you to see the level of the coolant easily. When you find the reservoir, check the level of the coolant.
If the level is below the Max line, it is time to add some more coolant. Open the cap, and pour the coolant into the reservoir until the level reaches the Max line. Avoid overfilling the reservoir, as this can be harmful to your engine.
Adding coolant to your reservoir is a simple task that can prevent costly repairs and keep your car running smoothly. Remember to check your coolant levels regularly and top up as needed.
6. Check for Air Bubbles
When adding coolant to your engine, it’s important to take note of any air bubbles that may have formed in the system. Air bubbles can cause hot spots and reduce the efficiency of your cooling system, resulting in potential engine damage. To avoid this, leave your engine running and slowly pour in the coolant, allowing it to circulate throughout the system.
As you pour, keep an eye out for any air bubbles rising to the surface. If you do see bubbles, you can release them by gently squeezing the upper radiator hose or using a tool designed for this purpose. Once you’ve added the coolant and removed any air bubbles, it’s critical to check your system’s coolant levels and ensure that there are no leaks.
By doing so, you can help keep your engine running smoothly and protect it from costly damage. So, keep an eye out for those pesky air bubbles when adding coolant to your vehicle engine and take the necessary steps to release them for optimal performance.
6.1 Turn on the Engine
When starting up your engine, it’s crucial to check for air bubbles that may have gathered in your fuel lines. These bubbles can cause issues like stalling or poor engine performance. So, what causes these pesky air bubbles to accumulate? Sometimes they can form when refueling, as the fuel rushing in displaces the air in the lines.
Other times, they may be the result of leaks or cracks in the fuel lines themselves. Whatever the cause, it’s important to take the extra time to check for air bubbles before you hit the open road. One way to do this is to prime the fuel system, which involves pumping the fuel bulb or manually opening and closing the fuel valve until all the air has been expelled.
By doing this, you can ensure that your engine is running smoothly and that you won’t encounter any issues down the line. So, next time you fire up your engine, take a few extra minutes to check for air bubbles – your engine will thank you!
6.2 Look for Bubbles
When it comes to checking for air bubbles, it’s essential to keep an eye out for any that might be present in your liquid-based mixture. Air bubbles can cause problems down the line, such as uneven drying or curing, which can ruin your project. To avoid this, take your time while mixing, and keep an eye out for any bubbles forming in the mixture.
If you happen to spot any, try tapping the container or using a tool to see if you can pop them. It’s worth noting that some materials tend to create bubbles more than others, such as resin or epoxy. So, keep this in mind while working with these materials and be extra vigilant.
If bubbles still persist, try using a heat gun to remove them by warming the surface gently. Overall, checking for air bubbles is a crucial part of any liquid-based project. By taking the time to look for bubbles, you can ensure that your final product is of the highest quality possible.
7. Dispose of Old Coolant
When adding coolant to your car’s engine, it’s essential to dispose of any old coolant that may be contaminated or no longer effective. Old coolant can lead to engine damage, so it is crucial to avoid mixing it with fresh coolant. To dispose of old coolant, you can bring it to a local recycling center where they can properly dispose of it.
Alternatively, some auto repair shops may also offer a coolant recycling service. It’s important to never pour old coolant down the drain or into the environment, as it can have harmful effects on wildlife and water sources. By properly disposing of old coolant, you can help to protect both your engine and the environment.
So, don’t forget to add “dispose of old coolant” to your list of things to do when adding new coolant to your car’s engine!
7.1 Find a Safe Disposal Site
If you’re replacing old coolant, it’s important to dispose of it properly. Coolant that’s been used in your vehicle can be harmful to the environment if not disposed of correctly. Look for a safe disposal site recommended by your local authorities, as they will have specific instructions on how to dispose of hazardous materials.
Pouring coolant down the drain or into the ground can contaminate the soil and water supply. It’s also important to wear proper protective equipment such as gloves and goggles when handling old coolant, as it can be toxic if ingested or inhaled. Don’t risk the health of yourself or the environment, find a safe disposal site for your old coolant.
By disposing of it properly, you’re doing your part in keeping our planet healthy.
7.2 Follow Local Regulations
When it comes to disposing of old coolant, it’s important to follow local regulations to avoid damaging the environment. Old coolant can contain harmful chemicals and heavy metals, so it’s important to properly dispose of it instead of pouring it down the drain or onto the ground. In certain areas, there may be specific guidelines for how to dispose of coolant, such as taking it to a designated waste facility or contacting a hazardous waste disposal service.
It’s important to research and follow these guidelines to protect both the environment and your community. Remember, even small actions can have a big impact on the world around us. So, take the extra time and effort to dispose of your old coolant in a responsible manner, and do your part to protect our planet.
8. Keep Up with Maintenance
When it comes to maintaining your vehicle, one important aspect to remember is to keep up with coolant maintenance. Adding coolant to your car can seem like a daunting task, but it’s actually quite simple. First, make sure your engine is off and cooled down.
Then, locate the coolant reservoir and check the level on the dipstick. If it’s low, fill it up with a 50/50 mixture of coolant and water. It’s important to note that adding too much coolant can be just as harmful as having too little, so be sure to check your owner’s manual for the correct amount.
Additionally, it’s a good idea to regularly check the level and condition of your coolant to ensure that your engine is properly cooled and running smoothly. By keeping up with coolant maintenance, you’ll improve the longevity and reliability of your vehicle.
8.1 Regularly Check Coolant Levels
Regularly checking coolant levels is crucial when it comes to maintaining your car. Coolant, also known as antifreeze, is responsible for keeping the engine from overheating. Without it, the engine can get too hot and cause damage to various parts.
To check the coolant levels, wait for the engine to cool down before opening the hood. Look for the coolant reservoir, which should be labeled with minimum and maximum lines. If the coolant level is too low, add more until it reaches the maximum line.
It’s recommended to check your coolant levels every few months or as often as your owner’s manual suggests. Neglecting to do so can lead to costly repairs down the road. It only takes a few minutes to check and add coolant, making it an easy but important task to keep up with on a regular basis.
8.2 Flush Your Coolant System Every Two Years
One essential aspect of car maintenance that is often overlooked is flushing your coolant system. Coolant is a vital component of your car’s engine, as it helps keep it from overheating. Over time, the coolant can become contaminated with debris and rust, causing it to lose its effectiveness.
That’s why it’s crucial to flush your coolant system every two years. Flushing the system involves draining the old coolant, flushing the system with clean water, and refilling it with fresh coolant. This process ensures that your car’s engine is running at peak performance and is less likely to overheat or experience other issues.
By keeping up with this routine maintenance, you can extend the life of your car and save yourself from costly repairs down the road. So don’t overlook your coolant system – get it flushed regularly to ensure your car is running smoothly.
Conclusion
When it comes to adding coolant to your car, the process is simple but important. Make sure the engine is cool, locate the coolant reservoir, and pour the coolant in slowly. Just like adding sugar to your coffee, take your time and be careful not to overfill.
Remember, a well-maintained car is a happy car, and keeping your coolant levels topped off will keep your engine running smoothly. So, the next time you’re adding coolant, channel your inner barista and pour with patience and precision!”
FAQs
How often should I add coolant to my car?
It’s recommended to check and add coolant every 12,000 to 15,000 miles or at least once a year.
Can I mix different types of coolant?
It’s not recommended to mix different types of coolant as it may cause chemical reactions and damage to your engine.
How do I know if my coolant needs to be changed?
You can check the color and level of your coolant. If it’s cloudy, rusty, or low in level, it’s time to get it changed.
What type of coolant should I use for my car?
Check your car’s owner manual for the recommended type of coolant. It’s usually either ethylene glycol or propylene glycol-based.
How do I add coolant to my car?
Wait until the engine is cool, locate the coolant reservoir tank, open the cap, and add coolant until it reaches the recommended level.
Can I use water instead of coolant in an emergency?
You can use water in an emergency, but it’s not recommended as it may cause corrosion in your engine.
What should I do if my car is overheating due to low coolant?
Pull over to a safe location, turn off the engine, and wait until it cools down. Then, add coolant and check for any leaks. If the problem persists, seek professional help.