

Hey there! So, you’ve noticed that your car’s engine is running hotter than usual and you’re starting to worry. One possible reason for this could be an issue with your coolant system. Specifically, it might be time to bleed the coolant from your radiator.
But what does that even mean? And how do you go about doing it? Well, think of your radiator as the heart of your car’s cooling system. It circulates coolant through the engine, helping to regulate its temperature and prevent overheating. Over time, air bubbles can get trapped in the coolant, impeding its flow and decreasing its effectiveness.
Bleeding the coolant means removing these air bubbles from the system, allowing the coolant to do its job properly. Now, you might be wondering why these air bubbles form in the first place. Think of it like a soda bottle that’s been shaken up.
When you open the bottle, you’ll notice that the carbonated bubbles rush to the surface, causing some fizz and possibly even a mess. The same principle applies to your car’s coolant system. As the engine heats up and cools down, air bubbles can develop and become trapped in the coolant, hindering its flow and potentially causing your engine to overheat.
So, how do you bleed the coolant from your radiator? Well, the process can vary slightly depending on your specific make and model, but the general steps are relatively similar. First, ensure that your engine is cold before working on the coolant system. Then, locate the radiator cap (usually found on top of the radiator) and remove it.
Next, you’ll want to locate the radiator bleeder valve. This valve is typically located near the top of the radiator and can be opened to release any trapped air in the system. Attach a small hose or container to the valve and carefully open it.
Introduction
Do you find yourself wondering how to bleed coolant from your radiator? Well, look no further because I’ve got you covered! Bleeding coolant from your radiator is an important maintenance task that helps keep your engine running smoothly and prevents overheating. So, let’s get started, shall we? First, make sure your engine is cool before you begin. Then, locate the radiator cap and remove it.
Be careful though, as the coolant inside may still be hot. Next, locate the bleed valve, which is usually located near the top of the radiator. Once you’ve found it, place a towel or bucket underneath to catch any spills.
Now, slowly turn the bleed valve counterclockwise using a wrench or pliers. You should start to hear a hissing sound, which means the air is escaping. Keep turning until coolant starts to flow out.
Once you see a steady stream of coolant, close the bleed valve tightly. Lastly, top off the radiator with coolant and replace the radiator cap. And voila! You’ve successfully bled the coolant from your radiator.
Now you can rest easy knowing your engine is well taken care of.
Why Bleed the Coolant?
bleeding the coolant, coolant system, engine cooling, overheating, air pockets, trapped air, radiator, thermostat, coolant flush, radiator cap, burp the system. Introduction: Have you ever wondered why it’s necessary to bleed the coolant in your vehicle’s coolant system? Well, the answer lies in the importance of maintaining optimal engine cooling. Without proper coolant circulation, your engine can overheat, causing serious damage.
Bleeding the coolant is a crucial step in removing any air pockets or trapped air from the system, ensuring that coolant flows uninterrupted through the radiator, engine, and other components. In this blog section, we’ll explore why bleeding the coolant is necessary, how it’s done, and the benefits it offers for your vehicle’s performance and longevity. So, let’s dive in and uncover this essential process that helps keep your engine running smoothly.
Materials Needed
In order to complete any project successfully, it’s important to have all the necessary materials on hand. When it comes to building or crafting, having the right tools and supplies can make all the difference. Whether you’re a professional or a beginner, having the right materials is essential for achieving your desired results.
So, what exactly do you need? Well, it really depends on the specific project you’re working on. For example, if you’re building a bookshelf, you’ll need wood, screws, nails, and a hammer. If you’re painting a picture, you’ll need paintbrushes, paint, and a canvas.
The specific materials needed can vary greatly from project to project, but the key is to be prepared and have everything you need before you start. This way, you won’t have to waste time and energy running back and forth to the store. So, the next time you’re starting a new project, take the time to make a list of all the materials you’ll need.
Trust me, it’ll save you a lot of hassle in the long run.
Step-by-Step Guide
If you notice that your car’s engine is running hot or your temperature gauge is creeping up, it might be time to bleed the coolant from your radiator. Bleeding the coolant is essential for maintaining the proper temperature of your engine and preventing overheating. Luckily, with a few simple steps, this is a task that you can easily do yourself.
First, make sure that your engine is cool before you begin. Pop open the hood of your car and locate the radiator. It should be a large, metal container with fins on the outside.
Look for the coolant reservoir as well, which is usually a plastic container near the radiator or the engine. Next, check your car’s owner’s manual to find the bleeding valve on your radiator. This valve is usually located near the top of the radiator and has a small screw or nut on it.
Once you’ve located the valve, place a container or towel under it to catch any coolant that may leak out. Now it’s time to start bleeding the coolant. Locate the bleeder screw or valve and slowly loosen it counterclockwise with a wrench.
As you do this, you should hear a faint hissing sound as air and coolant are released from the radiator. Continue loosening the valve until a steady stream of coolant starts to come out. Once you see a steady stream of coolant, it’s time to close the bleeding valve.
Use your wrench to tighten it back in a clockwise direction, being careful not to overtighten. Wipe up any spilled coolant and replace the coolant reservoir cap. Lastly, start your car and let it run for a few minutes to allow the coolant to circulate properly.
Step 1: Prepare the Vehicle
Before starting any road trip, it’s essential to prepare your vehicle to ensure a smooth and safe journey. Follow this step-by-step guide to get your car ready for the adventure ahead. First, make sure you check your tire pressure and tread depth.
Properly inflated tires will not only improve fuel efficiency but also enhance traction and handling. Additionally, worn-out tires can pose a significant risk on the road, so it’s crucial to replace them if needed. Next, inspect all of your fluids, including engine oil, coolant, brake fluid, and power steering fluid.
Topping up or replacing these fluids will help maintain optimal performance and prevent any potential issues. Don’t forget to also check your windshield washer fluid and ensure that your wiper blades are in good condition. Lastly, examine your lights, including headlights, taillights, turn signals, and brake lights.
These lights not only keep you visible to other drivers but also help you see the road better during nighttime driving or inclement weather conditions. By completing these simple tasks, you’ll have peace of mind knowing your vehicle is ready for the road trip ahead.
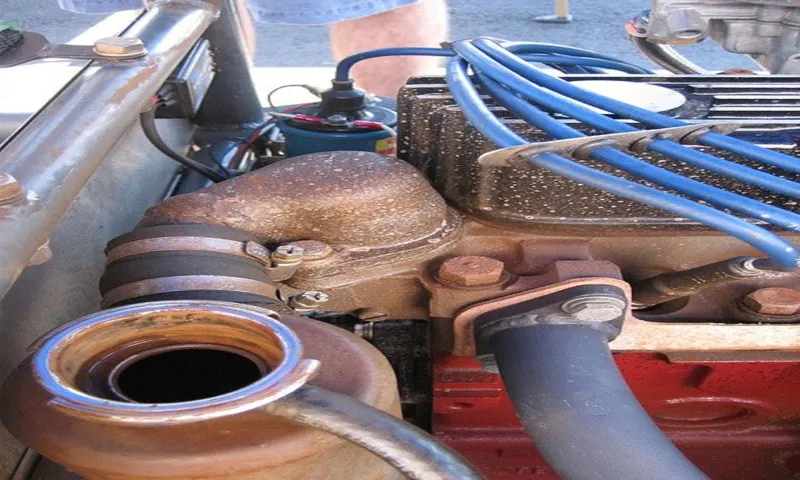
Step 2: Locate the Bleeder Valve
bleeder valve When it comes to bleeding the brakes on your car, locating the bleeder valve is a crucial step. The bleeder valve is a small valve located on each brake caliper or wheel cylinder, depending on the type of braking system your vehicle has. It’s responsible for releasing any air or trapped fluid from the brake lines, ensuring that your brakes work properly.
To locate the bleeder valve, you’ll first need to locate the brake caliper or wheel cylinder. These are the components responsible for applying pressure to the brake pads or shoes, causing the vehicle to slow down or stop. The brake caliper will be located near the brake rotor, while the wheel cylinder can be found inside the brake drum.
Once you’ve located the brake caliper or wheel cylinder, you’ll see a small valve on top of it. This is the bleeder valve. It can usually be identified by its hexagonal shape, making it easy to attach a wrench or socket to loosen or tighten it.
Some bleeder valves may also have a small rubber cap covering them, which you can simply remove to access the valve. It’s important to note that each brake caliper or wheel cylinder will have its own bleeder valve. So, if you’re bleeding all four brakes, you’ll need to locate the bleeder valve on each one individually.
This is especially important if you’re experiencing issues with a specific brake, as bleeding that individual brake may be necessary. Now that you know how to locate the bleeder valve, you’re one step closer to properly bleeding your brakes. Stay tuned for the next step in our step-by-step guide, where we’ll cover how to prepare for bleeding the brakes.
Step 3: Open the Radiator Cap
When it comes to maintaining your car’s cooling system, one of the key steps is to open the radiator cap. This might sound simple, but it’s an important task that can help prevent overheating and potential engine damage. Before you start, make sure your engine is cool to avoid any burns or injuries.
You’ll usually find the radiator cap located on top of the radiator, and it’s usually labeled with a warning sign or the word “pressurized.” To open the cap, simply turn it counterclockwise. However, don’t rush into this step right away.
It’s important to let the engine cool down for at least 30 minutes before attempting to open the radiator cap. This will ensure that there is no pressure inside the cooling system, which can cause hot coolant or steam to spray out when the cap is opened. Remember, safety first when working on your car, and always take the necessary precautions to protect yourself and your vehicle.
Step 4: Attach a Drain Pan
drain pan Installing a drain pan is an important step in any plumbing project, as it helps to prevent leaks and water damage. With just a few simple steps, you can easily attach a drain pan to your plumbing system. First, gather all the necessary materials, including a drain pan, a screwdriver, and any additional hardware that may be needed.
It’s important to choose a drain pan that is the correct size for your specific plumbing system. Next, locate the area where you want to install the drain pan. It should be placed directly under the pipes or fixtures that may potentially leak or overflow.
Once you have found the ideal location, carefully position the drain pan in place. Adjust it so that it is level and secure. Next, using the screwdriver and the supplied hardware, begin attaching the drain pan to the floor or wall.
Make sure to tighten the screws securely to ensure the drain pan stays in place. Finally, double-check all the fittings and connections to ensure everything is secure and leak-free. This will help to prevent any potential water damage in the future.
Attaching a drain pan is a simple yet important step in any plumbing project. By following these steps, you can ensure that your plumbing system is protected from leaks and potential water damage. So, don’t skip this crucial step and enjoy peace of mind knowing that your plumbing system is well-protected.
Step 5: Open the Bleeder Valve
Step 5: Open the Bleeder Valve – Step-by-Step Guide Now that we have located the bleeder valve and attached the tubing, it’s time to move on to the next step: opening the bleeder valve. This step is crucial for a successful brake bleeding process. Before you open the bleeder valve, make sure you have a clear container ready to catch the brake fluid that will be coming out.
This container should be placed directly underneath the bleeder valve to catch all the fluid without making a mess. Once you have everything set up, use your wrench to carefully open the bleeder valve. Turn it counterclockwise until you feel some resistance, and then give it a little extra push to fully open it.
As you open the bleeder valve, you will start to see brake fluid coming out through the tubing and into the container. This is a sign that the process is working correctly, and the air bubbles trapped in the brake lines are being released. It’s important to note that you should not open the bleeder valve too quickly or forcefully.
Doing so can cause the brake fluid to splatter and create a mess. Take your time and open it slowly to ensure a smooth flow of fluid. As you open the bleeder valve, you may also hear a hissing sound.
This is normal and indicates that the air is escaping from the brake lines. It’s a good sign that the brake bleeding process is working as intended. Once you have opened the bleeder valve, leave it open for a few seconds to allow the air bubbles to escape completely.
Then, use your wrench to close the bleeder valve by turning it clockwise. Make sure to close it tightly to prevent any leaks. Congratulations! You have successfully completed the fifth step of the brake bleeding process.
Step 6: Monitor Coolant Flow
monitor coolant flow, step-by-step guide, engine overheating Step 6 in our step-by-step guide on how to prevent engine overheating is to monitor the coolant flow. As we mentioned earlier, coolant plays a crucial role in keeping your engine cool and preventing it from overheating. Once you have filled the radiator with coolant, it’s important to monitor the flow of coolant to ensure that it is circulating properly.
This can be done by observing the flow of coolant through the radiator cap when the engine is running. If you notice any blockages or sluggish flow, it may indicate a problem with your cooling system, such as a clogged radiator or a malfunctioning water pump. In such cases, it is best to consult with a professional mechanic to diagnose and fix the issue.
By keeping a close eye on the coolant flow, you can catch any potential problems early on and prevent your engine from overheating.
Step 7: Close the Bleeder Valve
bleeder valve maintenance
Step 8: Check the Coolant Level
“Step 8: Check the Coolant Level” Now that we’ve covered the previous steps in our step-by-step guide on how to maintain your car’s coolant system, it’s time to move on to checking the coolant level. The coolant is a vital component of your car’s engine, as it helps regulate the temperature and prevents overheating. Without the right amount of coolant, your engine could potentially suffer from serious damage.
To check the coolant level, you’ll first need to locate the coolant reservoir. This is typically a translucent plastic container near the radiator or the side of the engine. Once you’ve found it, make sure your engine is cool to the touch before opening the reservoir cap.
Now, carefully remove the cap and check the coolant level. The coolant should be at or slightly above the “full” line indicated on the reservoir. If the coolant level is low, you’ll need to add more coolant.
However, it’s important to note that you should never open the coolant reservoir cap while the engine is hot, as the pressure could cause coolant to spray out and potentially burn you. If you need to add coolant, make sure you use the correct type for your car. Refer to your car’s manual or consult with a professional to ensure you’re using the right coolant.
Slowly pour the coolant into the reservoir until it reaches the appropriate level. Be careful not to overfill it, as this can lead to leaks and other issues. Once you’ve added the coolant, securely fasten the reservoir cap back on.
It’s also a good idea to check the condition of the cap itself, as a worn or damaged cap can cause coolant leakage. If you notice any issues with the cap, it’s best to replace it as soon as possible. Checking your car’s coolant level regularly is essential to keep your engine running smoothly and prevent any potential overheating problems.
Tips and Precautions
To ensure your engine’s cooling system is running smoothly, it’s important to know how to bleed coolant from the radiator. Bleeding the coolant helps remove any air bubbles that may have accumulated in the system, which can hinder the proper circulation of coolant and potentially lead to overheating. To begin, make sure your engine is completely cooled down before attempting to bleed the coolant.
Then, locate the bleed valve, which is usually located on the top of the radiator or on one of the radiator hoses. Place a container underneath the valve to catch any coolant that may spill out. Open the valve slowly using a wrench or a pair of pliers, and wait for the coolant to start flowing steadily.
Once all the air bubbles have been eliminated and you only see a steady stream of coolant, close the valve tightly and top off the radiator with more coolant if necessary. It’s important to remember that this process may differ depending on the make and model of your vehicle, so it’s always best to consult your owner’s manual for specific instructions. Bleeding the coolant regularly can help maintain the efficiency and longevity of your engine’s cooling system.
Tip 1: Use Safety Gloves
safety gloves, precautions, workplace safety, protective gear In any workplace, safety should always be a top priority. Whether you’re working in a construction site, a laboratory, or even in a kitchen, it’s important to take proper precautions to ensure your well-being. One simple yet effective way to protect yourself is by using safety gloves.
These gloves are specially designed to provide a barrier between your hands and potentially harmful substances or objects. They come in various materials, such as latex, nitrile, or leather, and each type offers its own level of protection. By wearing safety gloves, you can minimize the risk of cuts, burns, chemical exposures, or even the spread of germs.
They can also provide insulation against extreme temperatures or electric shocks. So, no matter what type of work you’re involved in, don’t overlook the importance of safety gloves. They are a small investment that can make a big difference in your overall well-being.
Stay safe!
Tip 2: Cooling System Pressure
cooling system pressure. In order to keep your vehicle’s cooling system running smoothly, it’s important to pay attention to the pressure levels. Maintaining the proper pressure in your cooling system is crucial for preventing overheating and keeping your engine running smoothly.
One way to check the pressure is to use a cooling system pressure tester. This handy tool allows you to test the pressure in your system and ensure that it is within the manufacturer’s recommended range. If the pressure is too low, it could indicate a leak in the system that needs to be addressed.
On the other hand, if the pressure is too high, it could be a sign of a faulty pressure relief valve or a clogged radiator. Regularly checking the pressure in your cooling system can help you catch any issues before they become major problems. If you notice that the pressure is consistently too low or too high, it’s a good idea to have your vehicle inspected by a professional mechanic.
They can diagnose the issue and make any necessary repairs to keep your cooling system working properly. In addition to checking the pressure, it’s also important to maintain the proper coolant mixture in your cooling system. The coolant helps to regulate the temperature of your engine and prevent it from overheating.
Over time, the coolant can become contaminated or lose its effectiveness, which can lead to problems with the cooling system. Regularly flushing and replacing the coolant can help to keep your cooling system running smoothly. By paying attention to the pressure levels and maintaining the proper coolant mixture, you can help to prevent costly repairs and ensure that your vehicle’s cooling system is working at its best.
So, take the time to check the pressure in your cooling system regularly and make any necessary adjustments. Your engine will thank you!
Tip 3: Dispose of Coolant Properly
“disposing of coolant properly” When it comes to working on your vehicle, it’s essential to consider not only the repairs and maintenance but also the environmental impact of the process. One often overlooked aspect is the disposal of coolant. Coolant is a vital fluid that helps regulate the temperature of your engine, but it can be harmful if not disposed of correctly.
Improper disposal can lead to contamination of water sources and harm the environment. So, what can you do to dispose of coolant properly? First and foremost, never pour coolant down the drain or onto the ground. Instead, take it to a local recycling center or an auto parts store that accepts used coolant.
These facilities have the proper equipment and processes to handle coolant disposal safely. Additionally, when transporting the coolant, be sure to use a sealed container to prevent any leakage. By taking these simple steps, you’re not only protecting the environment but also ensuring the safety of yourself and others.
Let’s do our part to dispose of coolant responsibly and keep our planet clean and healthy.
Conclusion
And that’s it, folks! You now know how to bleed coolant from your radiator like a pro. Just remember, it’s all about keeping your engine cool and your car running smoothly. So, the next time you find yourself feeling hot under the hood, don’t panic – grab your gloves, your funnel, and give that radiator a little love.
After all, a well-bleed radiator is a happy radiator, and a happy radiator means a happy car. Now go forth, my fluid-flushing friends, and keep your engines running cooler than a polar bear’s toenails!”
Summary of the Bleeding Process
bleeding process, tips and precautions. Blog Section: So, you’ve experienced a minor cut or scrape, and now you find yourself dealing with the dreaded bleeding process. Don’t worry, we’ve all been there! While bleeding can be a bit alarming, it’s a natural part of the body’s healing process.
Understanding the steps involved can help you manage the situation and promote quicker healing. First and foremost, it’s important to clean the wound thoroughly with mild soap and warm water. This helps remove any dirt or debris that may be present, reducing the risk of infection.
Once the wound is clean, you can apply gentle pressure with a clean cloth or sterile gauze to help stop the bleeding. Elevating the injured area can also help minimize blood flow to the wound. However, there are a few things to keep in mind during this process to ensure a safe and successful outcome.
Firstly, avoid using excessive force or placing too much pressure on the wound, as this can delay the clotting process. Secondly, refrain from picking at scabs or reopening the wound, as this can introduce bacteria and prolong healing. Lastly, if the bleeding persists or you notice any signs of infection, such as redness, warmth, or pus, it’s crucial to seek medical attention.
Remember, the bleeding process is a natural part of the body’s defense mechanism. By following these simple tips and precautions, you can effectively manage bleeding and promote proper healing. Stay calm, take the necessary steps to clean and treat the wound, and don’t hesitate to seek medical help if needed.
Your body has an incredible ability to heal itself, and with a little care and attention, you’ll be on your way to recovery in no time.
Importance of Regular Coolant Maintenance
coolant maintenance, regular coolant maintenance, importance of coolant maintenance, coolant system, radiator coolant, engine coolant, overheating engine, coolant flush, coolant replacement, cooling system, cooling efficiency, prevent engine damage, coolant levels, coolant leaks, cooling system maintenance, coolant additives, coolant quality, engine temperature, coolant reservoir
FAQs
Why do I need to bleed the coolant from my radiator?
Bleeding the coolant from the radiator helps to remove any trapped air pockets, ensuring optimal cooling system performance.
How often should I bleed the coolant from my radiator?
It is recommended to bleed the coolant from your radiator at least once a year or whenever you perform a cooling system flush.
What tools do I need to bleed the coolant from my radiator?
To bleed the coolant from your radiator, you will need a flathead screwdriver or a designated bleeder screw tool.
Can I bleed the coolant from my radiator by myself?
Yes, you can bleed the coolant from your radiator by yourself. However, it is always recommended to refer to your vehicle’s owner manual for specific instructions.
How long does it take to bleed the coolant from the radiator?
The time it takes to bleed the coolant from the radiator can vary depending on the vehicle and the air pockets present. On average, it can take anywhere from 15 minutes to 1 hour.
What are the signs that indicate the need to bleed the coolant from the radiator?
Signs that you may need to bleed the coolant from your radiator include overheating, fluctuating temperature gauge, and reduced heating performance.
Is it necessary to bleed the coolant from the radiator after replacing a coolant hose or radiator cap?
It is not always necessary to bleed the coolant from the radiator after replacing a coolant hose or radiator cap. However, if you suspect air pockets may be present, it is recommended to bleed the system to ensure proper coolant circulation.
Can I use a coolant flush kit to bleed the coolant from my radiator? A8. No, a coolant flush kit is used to remove old coolant from the system, not for bleeding air pockets. To bleed the coolant from the radiator, you will need to locate the bleeder screw or follow the specific instructions provided by your vehicle’s manufacturer.
What happens if I don’t bleed the coolant from my radiator?
If you don’t bleed the coolant from your radiator, air pockets can form within the cooling system, preventing proper coolant circulation. This can lead to overheating, engine damage, and reduced performance.
Can I use a funnel to bleed the coolant from my radiator?
While a funnel can be used to pour coolant into the radiator, it is not suitable for bleeding air pockets. Bleeding the coolant from the radiator typically requires accessing the bleeder screw or following the specific instructions provided by your vehicle’s manufacturer.
How do I know if I have successfully bled the coolant from my radiator?
A successful coolant bleeding process is indicated by the consistent flow of coolant without any visible air bubbles or sputtering. It is also important to monitor the temperature gauge to ensure it remains stable within the normal range.
Can I bleed the coolant from my radiator on a cold engine?
It is recommended to bleed the coolant from your radiator on a warm engine to ensure the coolant is at its optimal operating temperature. This allows for better removal of air pockets and more accurate monitoring of the system.