
Changing your coolant may seem like a daunting task, but it’s an essential part of maintaining your vehicle’s overall health and preventing overheating. Coolant, also known as antifreeze, helps regulate the temperature of your engine and prevents it from freezing or boiling. Over time, coolant can become contaminated with debris and lose its effectiveness, making it necessary to flush and replace the old coolant with fresh fluid.
In this blog post, we will guide you through the process of changing your coolant, providing step-by-step instructions and helpful tips along the way. So grab your gloves and let’s get started!
Table of Contents
What is Coolant?
If you’re wondering what coolant is and why it’s important, you’re not alone. Coolant, also known as antifreeze, is a liquid that circulates through your vehicle’s engine to regulate its temperature. It plays a crucial role in preventing your engine from overheating and freezing in extreme weather conditions.
Coolant is typically a mixture of water and ethylene glycol or propylene glycol, which helps lower the freezing point and raise the boiling point of the liquid. Without coolant, your engine could overheat and cause extensive damage. That’s why it’s essential to regularly check and change your coolant to ensure optimal engine performance and longevity.
Now, let’s dive into how to do a coolant change properly.
Understanding the Purpose of Coolant
coolant, purpose of coolant. What is coolant? Well, imagine you’re running a marathon and the sun is beating down on you, causing your body to heat up. To keep cool, you drink water or other fluids to regulate your body temperature.
Coolant works the same way for your car. It is a mixture of water and additives that help keep your engine from overheating. The purpose of coolant is to absorb heat from the engine and disperse it through the radiator, preventing any damage to the engine components.
Coolant also provides protection against freezing and corrosion, making it an essential part of your car’s overall health. So next time you see the temperature gauge rising, remember the crucial role that coolant plays in keeping your engine running smoothly.
Different Types of Coolant
coolant, types of coolant
When to Change Your Coolant
If you’re wondering about when to change your coolant, it’s important to consider a few key factors. Coolant, also known as antifreeze, is responsible for regulating the temperature of your engine and preventing it from overheating. Over time, coolant can become contaminated with dirt, debris, and rust, which can impact its effectiveness.
Additionally, coolant can break down and become less efficient at cooling your engine. As a general rule of thumb, it’s recommended to change your coolant every two to three years or every 30,000 to 50,000 miles, whichever comes first. However, it’s always a good idea to consult your vehicle’s owner’s manual for specific guidance on when to change your coolant.
If you notice any signs of coolant leaks, such as a sweet smell or visible fluid under your car, it’s important to address the issue promptly and have your coolant checked. Regularly checking and changing your coolant can help to prolong the life of your engine and keep your vehicle running smoothly.
Signs that Your Coolant Needs to be Changed
coolant needs to be changed
Recommended Coolant Change Intervals
coolant change intervals, change your coolant
Preparing for a Coolant Change
Are you ready to give your vehicle some TLC by performing a coolant change? It’s a relatively simple maintenance task that can help keep your engine running smoothly. Before you get started, make sure you have all the necessary tools and supplies. You’ll need a wrench, a drain pan, a funnel, and of course, the new coolant.
It’s also a good idea to have some gloves and safety goggles on hand to protect yourself from any spills or splashes. Once you have everything you need, find a safe and level place to work on your car. Remember, safety first! Now that you’re ready to dive in, let’s walk through the process step by step.
Gathering the Necessary Supplies
coolant change, coolant, prepare, supplies, necessary, tools, equipment, safety precautions In order to prepare for a coolant change, it is important to gather all of the necessary supplies. One of the first things you will need is the coolant itself. It is important to choose a coolant that is compatible with your vehicle’s make and model.
You will also need a coolant funnel to help you pour the coolant into the radiator without making a mess. Additionally, you will need a drain pan to catch the old coolant as it drains out of the radiator. It is important to have a large enough drain pan to hold all of the coolant without it overflowing.
You will also need a pair of safety glasses and gloves to protect yourself from any potential hazards. Finally, it is important to have the proper tools and equipment on hand, such as a socket wrench, pliers, and a hose clamp tool, to help you remove and replace the necessary components. By gathering all of these supplies ahead of time, you can ensure that you are prepared to safely and effectively change the coolant in your vehicle.
Finding the Coolant Drain Valve
coolant change, coolant drain valve
Getting the Vehicle Ready
coolant change, vehicle maintenance, prepare for coolant change
Performing the Coolant Change
Are you ready to learn how to do a coolant change for your vehicle? Well, you’re in the right place! Performing a coolant change is an essential part of vehicle maintenance that helps to keep your engine running smoothly and prevents overheating. The process may seem a bit intimidating at first, but with the right tools and a little bit of patience, you’ll be able to do it yourself in no time. Firstly, make sure you have all the necessary tools on hand, including a drain pan, a funnel, a socket wrench set, a new coolant, and a coolant flush kit (if needed).
It’s also a good idea to have some gloves and safety goggles to protect yourself from any spills or splashes. Before starting the actual coolant change, it’s important to make sure your engine is cool. This will prevent any potential burns and allow for a safer working environment.
Once the engine is cool, locate the radiator drain plug, which is usually located at the bottom of the radiator. Place the drain pan underneath and carefully remove the plug to drain the old coolant. Once the old coolant has completely drained, you can proceed with flushing the system if necessary.
This step is important if there is any build-up or debris in the cooling system. Follow the instructions provided with the coolant flush kit to properly flush the system and remove any contaminants. After the system has been flushed (if needed), it’s time to refill with fresh coolant.
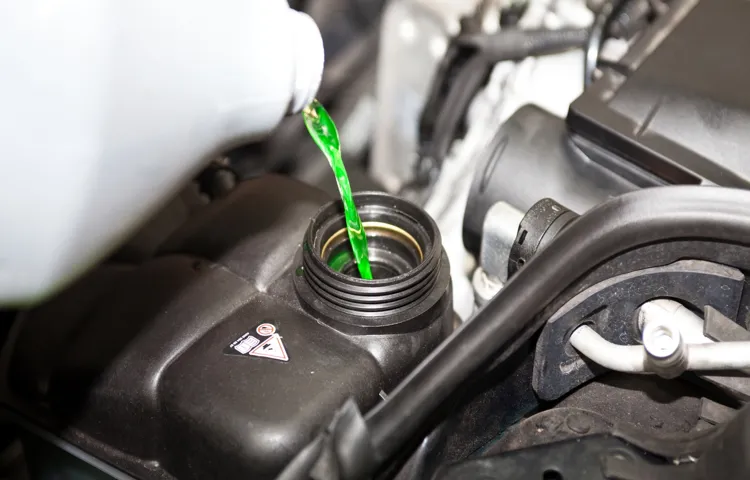
Use your funnel to pour the new coolant into the radiator until it reaches the maximum fill line. It’s important to use the correct type of coolant recommended for your specific vehicle. Once you have filled the radiator, start the engine and let it run for a few minutes.
This will allow the coolant to circulate throughout the system and remove any potential air bubbles. Keep an eye on the temperature gauge to ensure that the engine is not overheating. Lastly, double-check the coolant level once the engine has cooled down.
Draining the Old Coolant
draining the old coolant, performing the coolant change So, you’ve decided it’s time to give your vehicle a coolant change. Good call! Regularly changing the coolant in your car is important for maintaining the engine’s temperature and preventing overheating. But before you can add fresh coolant, you’ll need to drain out the old coolant first.
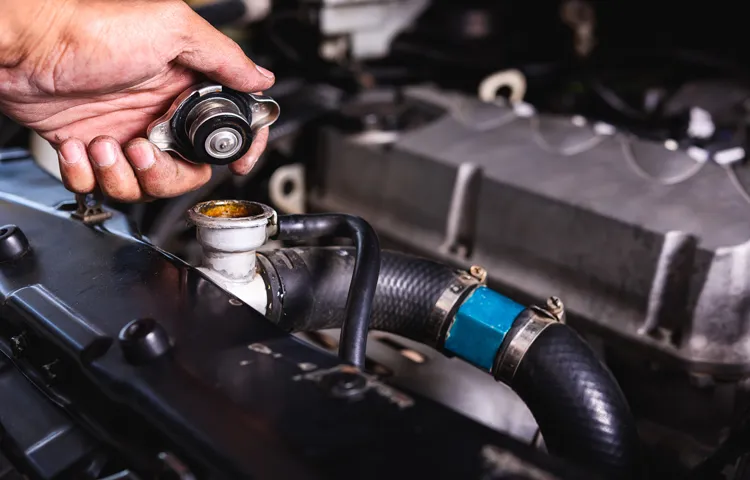
Don’t worry, it’s not as complicated as it sounds. First, make sure your engine is completely cool, as the coolant can be hot and cause burns. Then, locate the radiator drain valve.
It’s typically located at the bottom of the radiator and may require a wrench to open. Place a drain pan or bucket underneath to catch the old coolant as it drains out. Once you have everything in place, carefully open the radiator drain valve and allow the coolant to flow out into the drain pan.
Be prepared for a steady stream of coolant, so make sure your pan is large enough to hold it all. Depending on the size of your vehicle’s cooling system, it may take a few minutes for all the coolant to drain out. Once the coolant has finished draining, close the radiator drain valve tightly.
After that, you can move on to the next step in the coolant change process, which is adding fresh coolant to your vehicle. Remember to properly dispose of the old coolant at a recycling center or a designated collection point, as it contains harmful chemicals and should not be poured down the drain.
Flushing the System
“Flushing the System: Performing the Coolant Change” Hey there! So, you’ve decided it’s time to give your vehicle some TLC and perform a coolant change. Great choice! Keeping your engine’s coolant in top shape is crucial for the overall health and performance of your car. But where do you even start? Don’t worry, I’ve got you covered.
Let’s dive into the nitty-gritty of performing a coolant change. First things first, we need to flush out the old coolant from the system. Think of it as giving your car’s engine a nice, refreshing drink.
Start by locating the radiator drain plug, which is usually at the bottom of the radiator. It might be a bit tricky to find, so don’t hesitate to consult your vehicle’s manual if needed. Once you’ve located the drain plug, place a catch pan underneath it to collect the old coolant.
Open the drain plug and let the coolant flow out. Make sure to take your time with this step and allow all the coolant to drain completely. You want to ensure that you’re getting rid of all the old, dirty coolant so that the new coolant can work its magic.
Now that the old coolant is out, it’s time to give the system a good flush. Grab a hose and attach it to the top of the radiator where the coolant cap goes. Turn the hose on and let the water run through the system.
This will help remove any remaining debris or sediment that might have built up over time. Keep flushing until the water runs clear and free of any contaminants. Once you’re satisfied with the flush, it’s time to refill the system with fresh coolant.
Adding New Coolant
coolant change, adding new coolant
Tips and Tricks for a Successful Coolant Change
If you’re looking to do a coolant change on your car, it’s important to follow a few tips and tricks to ensure a successful and smooth process. Firstly, make sure you have all the necessary tools and equipment, such as a drain pan, funnel, and the right kind of coolant for your vehicle. It’s also a good idea to gather any relevant information about your car’s specific coolant needs, such as the recommended coolant type and capacity.
Before you begin the coolant change, allow your engine to cool down completely to avoid any burns or injuries. Once you’re ready to start, locate the radiator drain plug, usually located at the bottom of the radiator, and place the drain pan beneath it to catch the coolant. Slowly loosen the drain plug, being careful not to damage it, and allow the coolant to drain completely.
Once the coolant has drained, close the drain plug securely. Next, locate the radiator filler cap and remove it to allow for proper coolant flow. Use a funnel to add the new coolant to the radiator, being mindful not to overfill.
Finally, replace the radiator filler cap and check for any leaks. Starting the engine and running it for a few minutes will help distribute the coolant throughout the system. Remember to check your coolant levels regularly and top up as needed to ensure your engine stays cool and protected.
By following these tips and tricks, you can successfully perform a coolant change on your car and keep it running smoothly.
Avoiding Common Coolant Change Mistakes
coolant change, coolant, coolant system, radiator coolant, antifreeze, car maintenance, overheating, coolant flush, proper coolant change, coolant change mistakes, car engine In order to keep your car’s engine running smoothly, it’s important to regularly change the coolant in your coolant system. Coolant, also known as antifreeze, helps regulate the temperature of your engine and prevents it from overheating. However, many people make common coolant change mistakes that can lead to further issues down the line.
Here are some tips and tricks to ensure a successful coolant change. First and foremost, it’s important to use the proper coolant for your vehicle. Check your car’s manual or consult a mechanic to determine the correct type of coolant to use.
Using the wrong coolant can cause damage to your engine and reduce its overall performance. Next, make sure to properly flush out the old coolant before adding new coolant. This can be done by draining the old coolant from the radiator and running water through the system to remove any leftover residue.
It’s important to fully flush the system to prevent any contaminants from mixing with the new coolant. When adding the new coolant, make sure to mix it with the appropriate amount of water. Using straight coolant can actually be less effective at regulating temperature and can potentially damage your engine.
Typically, a 50/50 mix of coolant and water is recommended for most vehicles. Another common mistake is not properly bleeding the air from the coolant system after adding new coolant. Air pockets can form within the system, which can lead to overheating and other issues.
To prevent this, locate the bleed valve on your radiator and open it to allow any trapped air to escape. Lastly, it’s a good idea to regularly check your coolant levels and monitor the condition of your coolant. Over time, coolant can become contaminated or lose its effectiveness.
Ensuring Proper Coolant Mixture
coolant mixture, coolant change, proper coolant mixture, coolant system, engine coolant, cooling system, coolant flush, radiator coolant, antifreeze coolant, coolant levels. A coolant change is a necessary maintenance task for any vehicle to ensure the cooling system is working properly. One crucial aspect of a successful coolant change is ensuring the proper coolant mixture is used.
The coolant, also known as antifreeze, is responsible for regulating the temperature of the engine and preventing overheating. The coolant mixture is a combination of the coolant and water, in specific ratios recommended by the vehicle manufacturer. Using the correct coolant mixture is vital as it affects the performance of the coolant system and, ultimately, the engine’s lifespan.
Too much coolant can decrease the heat transfer capacity, while too little can cause corrosion and inadequate cooling. To determine the proper mixture, it is essential to refer to the vehicle’s owner’s manual or consult a professional mechanic. They will provide the recommended ratio based on the climate and environmental conditions.
Additionally, it is crucial to check the coolant levels regularly and top them up as needed. In some cases, a complete coolant flush may be necessary to remove any old or contaminated coolant and ensure a fresh mixture. By following these tips and tricks, you can be confident in maintaining a proper coolant mixture and a healthy cooling system for your vehicle.
Checking for Leaks
coolant change, tips and tricks, checking for leaks. In order to ensure a successful coolant change, it’s important to check for leaks beforehand. Leaks can cause coolant to escape from the system, leading to overheating and potential damage to your engine.
To check for leaks, start by visually inspecting the hoses and connections for any signs of cracks or damage. Additionally, you can use a pressure tester to pressurize the system and look for any drops in pressure, indicating a leak. Another tip is to check the coolant level regularly to ensure it hasn’t dropped unexpectedly, which could be a sign of a leak.
By taking the time to check for leaks, you can prevent any issues from arising during your coolant change and keep your engine running smoothly.
Conclusion
And there you have it, a step-by-step guide on how to perform a coolant change! Now, you may be wondering why you should bother with such a task. Well, let me tell you, neglecting your coolant is like neglecting your morning coffee. You wouldn’t want to start your day without that precious cup of liquid gold, would you? Just like that caffeinated elixir, coolant keeps your engine cool and functioning properly.
It circulates through the cooling system, absorbing heat and preventing your engine from overheating. So, if you want your vehicle to keep its cool, it’s essential to keep your coolant fresh and clean. Think of coolant change as giving your engine a rejuvenating spa treatment.
It’s a chance to flush out all the impurities and gunk that may have accumulated over time. By doing so, you’re ensuring optimal performance and preventing potential headaches down the road. Now, I know what you’re thinking – you’re not a mechanic.
But fear not, my friend! With this guide, you’re armed with the knowledge to be your own coolant connoisseur. You’ll be swapping out that old coolant like a true pro, impressing friends and saving money on unnecessary trips to the auto shop. So, next time you find yourself contemplating a coolant change, remember the importance of keeping your engine cool and happy.
Don’t be a chill-pill, take charge of your coolant, and let your engine purr with gratitude. And hey, if all else fails, at least you’ll have a cool story to tell at your next dinner party!
FAQs
How often should I do a coolant change?
It is recommended to do a coolant change every 2 to 5 years, depending on the manufacturer’s guidelines. However, if you notice any signs of coolant contamination or if your vehicle’s engine is overheating, it is best to do a coolant change immediately.
Can I do a coolant change myself or should I take it to a professional?
While it is possible to do a coolant change yourself, it is recommended to take your vehicle to a professional mechanic. They have the necessary tools and expertise to properly drain and flush the coolant system, ensuring that there are no air pockets or leaks.
What are the steps involved in doing a coolant change?
The steps involved in doing a coolant change include:
1. Allowing the engine to cool down completely.
2. Locating the radiator drain plug or petcock and draining the old coolant into a container.
3. Removing the radiator cap and flushing the system with water to remove any remaining coolant and contaminants.
4. Refilling the system with the appropriate coolant mixture recommended by the manufacturer.
5. Bleeding the coolant system to remove any air pockets.
6. Checking for leaks and ensuring that the coolant level is at the recommended level.
What type of coolant should I use for my vehicle?
The type of coolant you should use for your vehicle depends on the manufacturer’s specifications. There are different types of coolant available, such as ethylene glycol-based coolants or organic acid technology (OAT) coolants. It is important to consult your vehicle’s owner’s manual or seek professional advice to determine the correct type of coolant for your specific vehicle.
How do I check the coolant level in my vehicle?
To check the coolant level in your vehicle, you can follow these steps:
1. Ensure that the engine is cool.
2. Locate the coolant reservoir tank, usually transparent and labeled with “coolant.”
3. Check the coolant level against the markings on the reservoir tank.
4. If the coolant level is below the “MIN” marking, you should add coolant until it reaches the “MAX” marking.
What are the signs that indicate I need a coolant change?
The signs that indicate you need a coolant change include:
1. Overheating engine: If your engine temperature gauge is showing an abnormally high temperature or if you notice steam coming from under the hood, it is a sign that your coolant may be insufficient.
2. Coolant contamination: If you notice any discoloration or debris in your coolant, it may indicate coolant contamination, which requires a coolant change.
3. Low coolant level: If you frequently have to add coolant to your vehicle’s reservoir, it may be a sign of a coolant leak or that your coolant is reaching the end of its lifespan.
Can I use water instead of coolant in an emergency situation?
In emergency situations, you can use water as a temporary replacement for coolant. However, it is important to note that water does not have the same properties as coolant and may freeze in cold temperatures or boil at high temperatures, which can lead to engine damage. Therefore, it is recommended to have your coolant system properly filled with the appropriate coolant mixture as soon as possible.