

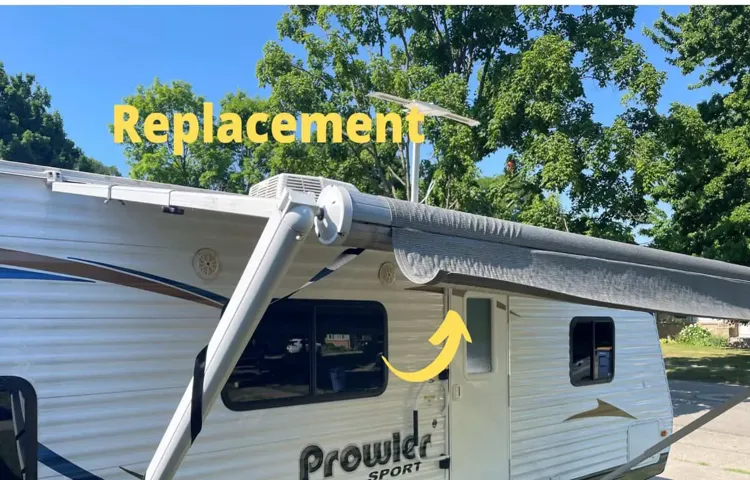
Are you tired of battling with a worn-out RV awning fabric? Picture this: you’re at a beautiful campground, ready to relax and enjoy the great outdoors. But as you try to extend your awning for some much-needed shade, you’re met with a pesky tear or frayed edges. What a buzzkill! But fear not, because replacing RV awning fabric on a Dometic electric awning is easier than you might think.
Think of your awning fabric as the superhero cape for your RV. It shields you from the scorching sun, provides a cozy shelter during a light rain, and adds a touch of style to your outdoor living space. Over time, though, even the most durable fabrics can show signs of wear and tear.
But don’t worry – this is where the magic of replacing the fabric comes in. By following a few simple steps, you can have your RV looking spiffy and ready to take on your next adventure. Just imagine unwinding under a pristine awning, watching the sunset paint the sky while sipping on your favorite beverage.
Ah, now that’s the life! But let’s get back to business. So, how exactly do you replace the fabric on your Dometic electric awning? Well, the good news is that you don’t need to be a superhero to pull it off. With a little bit of patience and some basic tools, you’ll be enjoying your brand-new awning fabric in no time.
In this blog post, we’ll guide you through the process, step by step. We’ll cover everything from gathering the necessary tools and materials to removing the old fabric and installing the shiny new one. Along the way, we’ll share some tips and tricks to ensure that the process goes as smoothly as possible.
So, whether you’re a seasoned RV owner or a newbie just dipping your toes into the world of RVing, this blog post is for you. Get ready to take your RV from drab to fab with a fresh awning fabric. Let’s dive in and get your RV looking its best!
Table of Contents
Introduction
Are you ready to replace the fabric on your Dometic electric awning? Well, you’re in the right place! In this blog post, we’re going to walk you through the steps on how to replace the RV awning fabric on a Dometic electric awning. Whether your old fabric is worn out, torn, or you just want to change up the look of your RV, we’ve got you covered. So, let’s get started and transform your awning into something fresh and fabulous!
Overview of Dometic Electric Awning
electric awning, Dometic electric awning, outdoor shade solution Introduction: Are you tired of the glaring sun ruining your outdoor activities? Is finding a shady spot a constant struggle? Look no further! The Dometic Electric Awning is the perfect solution to your outdoor shade needs. This innovative and versatile awning provides instant shade and protection from the elements, allowing you to enjoy your outdoor space comfortably. With its easy-to-use electric motor, you can effortlessly extend or retract the awning with a simple touch of a button.
Whether you want to relax on your patio, entertain guests, or simply enjoy a cup of coffee outdoors, the Dometic Electric Awning is the ideal addition to any outdoor space. Say goodbye to sunburns and hello to a cool and shaded oasis!
Signs of Damaged Awning Fabric
awning fabric, damaged awning fabric
Gathering the Necessary Tools and Materials
Replacing the fabric on your Dometic electric awning is a relatively straightforward task that can be done with the right tools and materials. First, you’ll need a replacement fabric specifically designed for your Dometic awning. These can be found at RV supply stores or online.
You’ll also need a ladder or scaffolding to reach the awning, as well as a friend to help hold the fabric while you work. Additionally, a set of screwdrivers and a socket wrench will be necessary to remove the fabric from the awning’s roller. Finally, make sure you have a clean, flat surface to lay out the new fabric and plenty of patience and determination.
With these tools and materials at your disposal, you’ll be well-equipped to successfully replace the fabric on your Dometic electric awning.
List of Tools Needed
gathering the necessary tools and materials
List of Materials Needed
When it comes to gathering the necessary tools and materials for a project, it’s important to be prepared. Some of the common tools you might need include a hammer, screwdrivers, pliers, and a tape measure. These basic tools will come in handy for various tasks throughout your project.
Additionally, you may also need specialized tools depending on the specific project you are working on. For example, if you are working on a woodworking project, you might need a saw, chisels, and a sander. If you are working on a plumbing project, you might need pipe wrenches, a plunger, and a pipe cutter.
It’s also important to gather the necessary materials for your project. This may include items such as screws, nails, wood, paint, and electrical wiring. By gathering all the tools and materials you need before you begin your project, you can save yourself time and frustration in the long run.
Preparing the RV
If you’re looking to replace the fabric on your Dometic electric awning for your RV, you’ve come to the right place. It’s a relatively simple process that you can do yourself, which can save you time and money. The first step is to prepare your RV for the replacement.
Start by retracting the awning fully and disconnecting any power sources. Next, remove the end caps and the screws holding the fabric in place. Carefully slide the old fabric out, taking note of how it is attached so you can easily install the new fabric.
Once the old fabric is removed, clean the awning frame thoroughly before installing the new fabric. This will ensure a clean and secure fit. Now you’re ready to install the new fabric and reattach any screws and end caps.
Make sure everything is tightened securely and give it a test run to make sure the new fabric is functioning properly. With these steps, you’ll have a fresh and new RV awning fabric in no time!
Ensure RV is Level and Stable
RV leveling and stability are two crucial aspects to consider before embarking on your road trip. Ensuring that your RV is level not only ensures your comfort but also prevents damage to your vehicle. Uneven surfaces can cause cabinets and drawers to become misaligned, making it difficult to close them properly.
It can also cause your refrigerator to malfunction, leading to spoiled food and drinks. Furthermore, leveling your RV is essential for a good night’s sleep. Imagine trying to sleep on a tilted bed or feeling like you’re constantly rolling downhill.
It’s not the most pleasant experience, is it? Stability is also vital when it comes to enjoying your RV journey. A stable RV means fewer vibrations and less rocking when you’re inside. This can greatly enhance your overall experience and make traveling in your RV more enjoyable.
You don’t want to feel like you’re constantly being jostled around while cooking, eating, or even just simply relaxing in your RV. It’s important to note that stability is also crucial for safety reasons. An unstable RV can lead to accidents or unexpected movements while driving, putting you and your passengers at risk.
So, how do you ensure that your RV is level and stable? The first step is finding a level surface to park your RV on. This can be a campground or a designated RV park with level pads. If you’re parking on uneven terrain, you can use leveling blocks or ramps to raise the low side of your RV.
These blocks or ramps are placed under the wheels to even out the height difference and create a level surface. Once your RV is level, it’s important to stabilize it to prevent any unwanted movement. The most common way to achieve stability is by using stabilizer jacks.
Retract the Awning
retract the awning, prepare the RV, awning maintenance When it comes to preparing your RV for a trip, one important step is retracting the awning. Not only does this help protect the awning from damage while on the road, but it also ensures that it is properly secured and won’t flap around during your journey. Retracting the awning is a simple process that can be done in just a few easy steps.
First, make sure that the area around the awning is clear of any obstacles. Then, locate the awning control panel, which is typically located inside the RV near the entry door. Press the retract button on the control panel, and the awning will start to roll up.
Keep an eye on the awning as it retracts to make sure it is rolling up evenly and not getting stuck or jammed. Once the awning is fully retracted, make sure it is latched securely in place. This will prevent it from accidentally opening while you’re on the road.
Finally, give the awning a quick visual inspection to make sure there are no tears or damage that need to be addressed before your trip. By taking the time to retract your awning properly, you can ensure that it stays in good condition and is ready to provide shade and shelter on your next adventure. So, next time you’re getting ready to hit the road in your RV, don’t forget to retract the awning!
Remove Any Water or Debris
“Preparing the RV: Remove Any Water or Debris” When it comes to getting your RV ready for your next adventure, one of the most important steps is to remove any water or debris that may have accumulated during storage. This is especially crucial if your RV has been sitting idle for an extended period of time. First, let’s talk about water.
Before you hit the road, it’s crucial to ensure that your RV’s water system is free of any stagnant or contaminated water. Start by draining and flushing both the fresh water and holding tanks. This will help remove any bacteria or other unwanted elements that may have built up over time.
Don’t forget to also drain the water heater and any other water lines or faucets before giving them a thorough cleaning. Once everything is drained, it’s a good idea to sanitize the system by using a water system cleaner or bleach solution. This will help ensure that your RV’s water supply is safe and fresh for your next trip.
Now, let’s talk about debris. When your RV sits unattended, it can become a magnet for leaves, dirt, and other outdoor elements. To start, give the exterior of your RV a good wash and scrub to remove any dirt or grime.
Pay special attention to the roof, as leaves and branches can accumulate there and cause damage if left unattended. Next, inspect all the nooks and crannies, like vents and awnings, and remove any debris that may have accumulated. This will not only make your RV look nice and clean, but it will also prevent any potential issues down the road.
Don’t forget to also check the interior of your RV for any water or debris. Take the time to vacuum and wipe down all surfaces, paying close attention to any areas where moisture may have caused mold or mildew to form. If you notice any musty odors, consider using an odor eliminator or dehumidifier to freshen up the air inside your RV.
Removing the Old Awning Fabric
Replacing the fabric on a Dometic electric awning for your RV can seem like a daunting task, but with the right steps and a little patience, it can be done. The first step in the process is to remove the old awning fabric. Start by extending the awning fully and locking it in place.
Next, locate and remove the screws that are holding the awning fabric in place. These screws are typically found along the roller tube and the awning arms. Once the screws are removed, carefully detach the awning fabric from the roller tube and slide it out from the awning arms.
Be sure to take note of how the old fabric was threaded through the awning arms as this will help when installing the new fabric. With the old fabric removed, you are now ready to proceed with installing the new fabric.
Identify Awning Roller Tube
awning roller tube, removing old awning fabric.
Release the Tension on the Awning Fabric
Release the Tension on the Awning Fabric When it’s time to replace your awning fabric, the first step is to release the tension. This is an important step that will make the entire process much easier and safer. To do this, start by locating the tension arms on both sides of your awning.
These arms are what keep the fabric tight and in place, so it’s essential to loosen them before attempting to remove the old fabric. Use a wrench or a socket wrench to loosen the bolts or screws that hold the tension arms in place. As you do this, you’ll feel the tension start to release, and the fabric will become looser.
It’s important to make sure that all the tension is released so that you can remove the fabric without any resistance or potential damage. Once you’ve loosened the tension arms, carefully roll up the fabric and secure it with straps or clips to keep it out of the way. With the tension released and the fabric secured, you’re now ready to move on to the next step of removing the old awning fabric.
Detach the Awning Fabric from the Roller Tube
awning fabric, detach, roller tube, removing, old awning fabric
Roll Up and Secure the Old Awning Fabric
Roll Up and Secure the Old Awning Fabric Now that you’ve successfully detached the old awning fabric from its frame, it’s time to roll it up and secure it properly. Start by carefully rolling the fabric, starting from one end and moving towards the other. Make sure to keep the roll tight and even, so it doesn’t unravel or get tangled up.
Once you have the fabric rolled up, you’ll want to secure it to prevent it from unrolling during the next steps of the awning replacement process. You can use bungee cords or strong ropes to tie the roll together tightly. Make sure to wrap the cords or ropes around the roll several times to ensure it stays secure.
Once the old fabric is rolled up and secured, you’re ready to move on to the next step of installing your new awning fabric.
Installing the New Awning Fabric
If you’re looking to replace the fabric on your Dometic electric awning in your RV, you’re in luck! With a few simple steps, you can have your awning looking brand new in no time. To begin, make sure you have all the necessary tools on hand, such as a ladder, screwdriver, and a helper to assist you. First, extend the awning fully and then carefully remove the screws holding the fabric in place.
Once the fabric is detached, carefully roll it up and set it aside. Next, take your new fabric and unroll it along the length of the awning, making sure it is centered and properly aligned. Then, reattach the screws to secure the fabric in place.
Finally, retract and extend the awning a few times to ensure everything is working properly. With these simple steps, your RV’s awning will have a fresh, new look that will make you the envy of the campsite. So go ahead and get started on installing that new awning fabric and enjoy the shade and protection it provides!
Unroll and Position the New Awning Fabric
“Installing the New Awning Fabric: Unroll and Position for a Perfect Fit” Now that you have your brand new awning fabric ready to go, it’s time to install it and make your outdoor space shine! Before you get started, take a moment to appreciate the beauty of your new fabric. Imagine how it will transform your patio or deck with its vibrant colors and sun-blocking abilities. Now, let’s get down to business.
First, unroll the new fabric in a clean, open area. Lay it flat on the ground, making sure it’s free from any dirt or debris. Take a moment to inspect the fabric for any tears or imperfections.
Although rare, sometimes there might be a manufacturing defect, and it’s better to catch it now rather than later. Once you’ve given it the once-over, it’s time to position the fabric onto your awning frame. Start by attaching one end of the fabric to the frame, making sure it’s securely in place.
Then, slowly work your way along the length of the frame, attaching the fabric as you go. This may require the help of a friend or family member to ensure the fabric is held taut. As you position the fabric, pay close attention to any seams or velcro attachments.
These are designed to help keep the fabric in place and maintain a smooth, wrinkle-free appearance. Take your time to make sure each attachment point is secure and properly aligned. Remember, installing new awning fabric requires precision and patience.
It’s important to take the time to position it correctly for a perfect fit. Don’t rush the process, as a hasty installation may lead to wrinkles or sagging fabric down the line. Instead, take a step back, look at your work, and make any necessary adjustments before moving forward.
Attach the Awning Fabric to the Roller Tube
Installing a new awning fabric can be a daunting task, but with the right steps, it can be a breeze. One of the crucial steps in the installation process is attaching the awning fabric to the roller tube. This step ensures that the fabric is securely in place and ready to provide shade and protection.
To begin, make sure you have the fabric aligned correctly with the roller tube. Start by inserting the awning cord into the groove on the roller tube, making sure it is securely in place. Next, slowly roll the fabric onto the roller tube, making sure it is evenly distributed and free of any wrinkles or creases.
You may need an extra set of hands to help with this step to ensure everything is aligned properly. Once the fabric is rolled up, secure it by attaching the retaining screws or bolts. These will ensure that the fabric stays in place and doesn’t unravel.
Double-check that the fabric is tensioned properly and there are no loose or sagging areas. With the awning fabric securely attached to the roller tube, you can now enjoy the benefits of a new and functional awning.
Stretch and Secure the Awning Fabric
Installing the new awning fabric can be a bit tricky, but with a few simple steps, you’ll have it done in no time. After removing the old fabric, the first step is to stretch out the new awning fabric. Lay it out flat and make sure there are no wrinkles or folds.
This will ensure an even and smooth installation. Once it’s stretched out, it’s time to secure it to the frame. Starting at one end, attach the fabric to the frame using the provided hooks or clamps.
Work your way along the length of the awning, making sure to pull the fabric tightly as you go. This will prevent sagging and ensure a neat appearance. Once the fabric is secure, give it a final check to make sure it’s evenly stretched and centered.
With the new awning fabric in place, you can now enjoy the shade and protection it provides.
Testing and Adjusting the Awning
Replacing the fabric on your Dometic electric awning can be a straightforward process with the right steps. Begin by extending the awning fully to access the fabric easily. Locate the fabric’s retaining screws or bolts on the roller tube and remove them carefully.
Once the fabric is loose, detach any hold-down straps or cords that may be keeping it in place. Gently slide the old fabric out of the roller tube, being cautious not to damage any surrounding components. Now, it’s time to install the new fabric.
Start by positioning one end of the new fabric into the roller tube, ensuring it is straight and aligned correctly. Gradually roll the fabric into the tube, making sure it remains even and wrinkle-free. Reattach the hold-down straps or cords and secure the fabric with the retaining screws or bolts.
Once everything is in place, retract and extend the awning a few times to check that it operates smoothly and the fabric is properly tensioned. With a bit of patience and attention to detail, you’ll have your Dometic electric awning looking and functioning like new in no time!
Extend the Awning
extend the awning, testing the awning, adjusting the awning So, you’ve finally decided to extend the awning on your home. Maybe you want a little extra shade during those sunny afternoons, or perhaps you’re entertaining guests and need more outdoor space. Whatever the reason, testing and adjusting the awning is an important step to ensure it functions properly and meets your needs.
Before you begin, it’s crucial to check the manufacturer’s instructions for your specific awning model. These instructions will guide you on how to test and adjust the awning safely and correctly. To test the awning, start by opening it fully and inspecting for any damage or wear.
Look for any tears, loose parts, or signs of stress. If you notice anything concerning, it may be best to consult a professional for repairs before proceeding with further testing. Next, evaluate the awning’s stability and structure.
Check that it is securely attached to your home and that the support arms and brackets are in good condition. Give the awning a gentle shake to check for any wobbling or instability. Adjusting the awning is essential to ensure it provides maximum shade and protection.
If you find that the awning isn’t extending to the desired length, you can adjust the pitch or the tension of the fabric. This will allow you to create a more suitable angle for shade and ensure the fabric remains taut. To adjust the pitch, locate the pitch adjustment mechanism, typically a screw or lever, and loosen it.
Gradually adjust the awning’s pitch until you achieve the desired angle. Tighten the adjustment mechanism securely to lock it in place. To adjust the fabric tension, locate the tension adjustment mechanism, usually found on the support arms or brackets.
Check for Proper Alignment and Tension
When it comes to awnings, proper alignment and tension are crucial for their functionality and longevity. Before you can enjoy your awning, it’s essential to conduct a thorough test and make necessary adjustments. Start by ensuring that the awning is properly aligned with the mounting brackets.
This will help prevent any unnecessary strain on the awning and ensure it opens and closes smoothly. You should also check the tension of the awning fabric. It should be taut enough to prevent sagging or flapping in the wind, but not so tight that it puts excessive stress on the frame.
By taking the time to test and adjust the alignment and tension of your awning, you can ensure that it operates effectively and lasts for years to come. So, before you relax and enjoy the shade, make sure everything is in its proper place.
Make Any Necessary Adjustments
awning adjustments
Conclusion
So there you have it, a step-by-step guide on how to replace the awning fabric on your Dometic electric awning. It may seem like a daunting task, but with a little patience and the right tools, you’ll have a brand new awning in no time. Now, I know what you’re thinking.
Why go through all the trouble of replacing the fabric when you could just buy a new awning altogether? Well, my friend, let me explain why this is the better option. Firstly, let’s talk about cost. Replacing the fabric is a fraction of the price of buying a new awning.
Plus, you get the satisfaction of knowing that you fixed the problem yourself, saving you even more money in the long run. Secondly, there’s the environmental factor. By replacing the fabric, you’re using less resources and reducing waste.
It’s a win-win situation – you get a fresh awning and Mother Earth gets a little break. Lastly, there’s the pride factor. There’s something incredibly rewarding about completing a DIY project, especially one as practical as replacing your awning fabric.
You’ll be the envy of your RV park, dazzling your neighbors with your handy skills. So, don’t be afraid to take on this challenge. With a little determination and a lot of patience, you’ll have your RV looking as good as new with a brand new awning fabric.
And who knows, maybe you’ll even start a trend amongst your fellow RVers. Happy fabric replacing!”
Enjoy Your New RV Awning Fabric
RV awning fabric is an essential component of your recreational vehicle, providing shade and protection from the elements. Once you have installed your new awning fabric, it is important to take the time to test and adjust it, ensuring that it is functioning properly and providing the coverage you need. One of the first things you should do is open and close the awning a few times to get a feel for the operation.
Check to make sure it opens and closes smoothly, without any catching or sticking. If the awning is not operating smoothly, you may need to lubricate the moving parts or make adjustments to the tension. Next, take a step back and look at the position and angle of the awning.
Is it covering the area you want to shade? Is it angled properly to provide maximum coverage? It’s important to remember that the angle of the sun changes throughout the day, so you may need to adjust the angle of your awning to ensure optimal coverage. Another important aspect to check is the tension of the awning fabric. You want the fabric to be taut, but not so tight that it puts excessive stress on the frame.
Most awnings have a tension adjustment mechanism that allows you to tighten or loosen the fabric as needed. Take the time to adjust the tension until it feels just right. Lastly, don’t forget to test the awning in different weather conditions.
Open it up on a sunny day to see how much shade it provides. If it’s a windy day, check to see how well the fabric holds up to the gusts. You want to make sure that your awning can withstand the elements and provide the protection you need.
By taking the time to test and adjust your new RV awning fabric, you can ensure that it is functioning properly and providing the coverage and protection you need. Remember, it’s better to make any necessary adjustments now, rather than discovering any issues when you’re out on the road. So grab a cold drink, pull up a chair, and enjoy the shade provided by your new awning fabric.
FAQs
How do I remove the old fabric from my Dometic electric awning?
To remove the old fabric from your Dometic electric awning, start by extending the awning fully. Then, locate the screws that secure the fabric at each end and remove them using a screwdriver. Once the screws are removed, carefully slide the fabric out of the awning rail.
What tools do I need to replace the RV awning fabric on a Dometic electric awning?
To replace the RV awning fabric on a Dometic electric awning, you will need a few basic tools including a screwdriver, pliers, a ladder or step stool, and a helper to assist with holding the fabric during installation.
Can I replace the awning fabric on my Dometic electric awning myself, or should I hire a professional?
While it is possible to replace the awning fabric on a Dometic electric awning yourself, it can be a challenging and time-consuming process. If you are not comfortable working at heights or do not have the necessary tools and experience, it is recommended to hire a professional to ensure a proper installation.
Where can I purchase replacement fabric for my Dometic electric awning?
You can purchase replacement fabric for your Dometic electric awning from various RV supply stores, both online and in-person. It is important to check the specifications and compatibility of the fabric with your specific awning model before making a purchase.
What are the steps to measure and order the correct size fabric for my Dometic electric awning?
To measure and order the correct size fabric for your Dometic electric awning, start by extending the awning fully and measuring the length of the roller tube. This measurement will help you determine the size of fabric you need to order. Additionally, take note of the fabric width and any other specific requirements or features of your awning model when placing an order.
How often should I replace the fabric on my Dometic electric awning?
The frequency of replacing the fabric on your Dometic electric awning can vary depending on various factors such as usage, weather conditions, and maintenance. However, it is generally recommended to inspect the fabric regularly for signs of wear, fading, or damage. If you notice any significant issues, it may be time to consider replacing the fabric.
Can I choose a different color or pattern for the replacement fabric on my Dometic electric awning?
Yes, you can choose a different color or pattern for the replacement fabric on your Dometic electric awning. There are various fabric options available in different colors and patterns to suit your aesthetic preferences. Just make sure to select a fabric that is compatible with your awning model and meets the necessary specifications.