

Are you looking to measure your awning fabric but not sure where to start? Don’t worry, we’ve got you covered! In this step-by-step guide, we will walk you through the process of measuring your awning fabric so that you can get the perfect fit for your outdoor space. Whether you are replacing old fabric or purchasing new fabric for a custom awning, accurate measurements are crucial for a seamless and professional look. So grab your measuring tape and let’s get started!
Table of Contents
- 1 Why is measuring your awning fabric important?
- 2 Tools needed for measuring awning fabric
- 3 Step 1: Removing the fabric from the awning
- 4 Step 2: Laying out the fabric on a flat surface
- 5 Step 3: Measuring the width of the awning fabric
- 6 Step 4: Measuring the length of the awning fabric
- 7 Step 5: Measuring any additional dimensions
- 8 Step 6: Reinstalling or ordering new fabric
- 9 Conclusion
- 10 FAQs
Why is measuring your awning fabric important?
When it comes to awning fabric, one important thing to consider is how to measure it accurately. Measuring your awning fabric is crucial because it ensures that you get the right size when ordering a replacement or a new awning. By taking precise measurements, you can avoid any frustration or disappointment that may come from getting an ill-fitting fabric.
Additionally, measuring your awning fabric allows you to determine the amount of material you will need for any DIY projects, such as making repairs or creating custom accessories. Whether you are looking to upgrade your existing awning or design a new one from scratch, accurate measurements are essential for a successful outcome. So, don’t forget to take out your measuring tape and get those numbers right!
The importance of accurate measurements
awning fabric, accurate measurements
Ensuring a proper fit for your awning
awning fabric, measuring, proper fit, burstiness, perplexity In order to ensure a proper fit for your awning, measuring the fabric is crucial. Why is this important, you may ask? Well, let me explain. Awning fabric comes in all different sizes and dimensions, and without proper measurements, you may end up with a fabric that is either too small or too big for your awning frame.
Just imagine, if the fabric is too small, it won’t cover the entire area of your awning, leaving gaps and exposed areas that won’t provide adequate protection from the sun or rain. On the other hand, if the fabric is too big, it will hang loose and may not be securely fastened, leading to potential damage during windy conditions. So, by taking the time to accurately measure your awning fabric, you can ensure a perfect fit that will not only look great but also provide the maximum functionality and durability.
Don’t leave it to chance, take the extra step to measure your awning fabric and enjoy the peace of mind that comes with a perfect fit.
Avoiding wasted time and resources by getting the right size
awning fabric, wasted time, resources, measuring, right size When it comes to purchasing or replacing an awning fabric, it is essential to know the importance of measuring it correctly. Taking accurate measurements of your awning fabric can save you a lot of time and resources in the long run. Imagine ordering a fabric that is too small for your awning, only to realize that you need to return it and wait for a replacement.
This would not only be frustrating but also a waste of time that could be better spent on enjoying your outdoor space. By measuring your awning fabric before making a purchase, you can ensure that you get the right size the first time. This not only saves you the hassle of returns and exchanges but also prevents you from wasting resources on unnecessary purchases.
So take the time to measure your awning fabric correctly, and you’ll be able to enjoy your outdoor space without any unnecessary delays or frustrations.
Preparing for ordering or making replacements
awning fabric, measuring, replacements
Tools needed for measuring awning fabric
When it comes to measuring awning fabric, it’s important to have the right tools to ensure accuracy. One tool you’ll need is a measuring tape. This will allow you to measure the length and width of the fabric.
Additionally, you’ll need a pair of scissors or a utility knife to cut the fabric to size. Another helpful tool to have is a straight edge, such as a ruler or a yardstick, to ensure straight and precise cuts. Finally, having some pins or clips can be helpful in keeping the fabric in place while you measure and cut.
By having these tools on hand, you’ll be well-equipped to accurately measure your awning fabric and ensure a proper fit.
A measuring tape or ruler
When it comes to measuring awning fabric, one of the essential tools you’ll need is a measuring tape or ruler. These tools are necessary for obtaining accurate measurements and ensuring that your awning fabric is the right size. Whether you’re replacing an old awning or starting a new project, having the correct measurements is crucial for a seamless and professional result.
A measuring tape or ruler allows you to measure the length, width, and height of your windows or outdoor space. It also allows you to determine how much fabric you’ll need for your awning. So, before you start working on your next awning project, make sure you have a measuring tape or ruler handy.
It will save you time, money, and the hassle of dealing with ill-fitting or too-small fabric.
A flat surface for laying out the fabric
When it comes to measuring awning fabric, having a flat surface to work on is essential. This will make it easier to lay out the fabric accurately and measure it properly. One tool that you will need for this task is a measuring tape.
This will allow you to measure the length and width of the fabric accurately. Another tool that can be helpful is a straight edge ruler. This will help you ensure that your measurements are straight and even.
Additionally, having some weights or clamps on hand can be useful. These can help hold down the fabric and prevent it from moving while you are measuring and cutting. Overall, having the right tools on hand will make the process of measuring awning fabric much easier and more efficient.
Clips or pins to hold the fabric in place
When it comes to measuring awning fabric, there are a few tools that can come in handy. One of the most important tools is a measuring tape. This will allow you to accurately measure the length and width of the fabric, ensuring a precise fit.
Another tool that can be useful is a level. This will help you ensure that the fabric is being measured straight and level, preventing any unevenness in the final product. Additionally, having clips or pins to hold the fabric in place while you measure can be extremely helpful.
These will keep the fabric from moving around or shifting as you take your measurements. Overall, having the right tools on hand will make the process of measuring awning fabric much easier and more efficient. So, make sure you have your measuring tape, level, and clips or pins ready before you start your project.
A notepad or digital device to record measurements
To accurately measure awning fabric, it is essential to have the right tools at hand. One of the first tools you’ll need is a notepad or a digital device to record all the measurements. This will help you keep track of the dimensions and ensure accuracy throughout the process.
Additionally, having a measuring tape or ruler is crucial for getting precise measurements. Without these tools, it can be challenging to determine the correct length and width of the fabric needed for your awning. So, make sure to have these tools handy before you start measuring and cut out any guesswork.
Step 1: Removing the fabric from the awning
When it comes to measuring your awning fabric, the first step is to remove it from the awning frame. This will allow you to work with the fabric more easily and get accurate measurements. To remove the fabric, start by retracting the awning completely if it is extended.
Then, locate the screws or fasteners that are holding the fabric in place. Depending on the type of awning you have, these may be located on the sides or the front and back of the awning. Use a screwdriver or other appropriate tool to loosen and remove the screws or fasteners.
Once they are all removed, carefully lift the fabric off of the awning frame. It’s important to handle the fabric gently to avoid tearing or damaging it. Once the fabric is removed, you can move on to the next step of measuring it.
Taking safety precautions
“Taking safety precautions” Step 1: Removing the fabric from the awning Keeping safety in mind is important when undertaking any home improvement project. When it comes to removing the fabric from your awning, there are a few important steps to follow to ensure that you do so safely. First, it’s essential to gather the right tools for the job.
You’ll want to have a sturdy ladder that can support your weight and reach the height of the awning. Additionally, you’ll need a friend or family member to assist you in safely taking down the fabric. Once you have your tools ready, you’ll need to carefully climb the ladder and ensure that it is stable before proceeding.
It’s also a good idea to wear appropriate footwear with a good grip to prevent slipping. Once you’ve reached the top of the ladder, have your friend or family member hand you the necessary tools, such as a screwdriver or wrench, to remove the fabric from the awning. When removing the fabric, it’s important to be mindful of any potential hazards.
Look out for loose or damaged parts that could cause injury. Take your time and proceed with caution to avoid any accidents. If you encounter any difficulties or uncertainties, it’s always a good idea to seek professional assistance.
Once you have successfully removed the fabric from the awning, make sure to store it in a safe and dry place. This will help prevent any damage to the fabric and ensure that it can be reinstalled properly when the time comes. Taking these safety precautions during the fabric removal process will not only help protect yourself and others, but also ensure that the project is completed smoothly and without incident.
Uninstalling the awning fabric without damaging it
Uninstalling the awning fabric without damaging it can seem like a daunting task, but with the right steps, it can be done easily. Step 1 is to remove the fabric from the awning itself. Start by carefully inspecting the awning to locate any screws or fasteners that are holding the fabric in place.
Use a screwdriver or other appropriate tool to loosen and remove these fasteners. Once the fasteners are removed, gently pull the fabric away from the awning frame, being careful not to snag or tear it. If the fabric is stubborn or stuck, try using a flathead screwdriver or a putty knife to carefully pry it away.
Remember to take your time and be patient during this process to avoid any damage to the fabric.
Step 2: Laying out the fabric on a flat surface
Now that you have your awning fabric ready, it’s time to lay it out on a flat surface for measuring. Find a clean and spacious area where you can spread out the fabric comfortably. This could be a table, floor, or any other flat surface that provides enough room for the entire fabric.
Make sure there are no objects or obstacles that could hinder your measuring process. Next, carefully unfold the fabric and lay it out flat. Smooth out any wrinkles or creases so that the fabric is taut and even.
Take your time to ensure that it is spread out evenly and there are no folds or bunches that could affect your measurements. Once the fabric is laid out, it’s time to start measuring. Use a tape measure or ruler to determine the length and width of the fabric.
Start by measuring the length, which is usually the longer side of the fabric. Place one end of the tape measure or ruler at the starting point, and stretch it all the way to the other end of the fabric. Write down the measurement and repeat the process for the width, which is usually the shorter side of the fabric.
Again, place one end of the tape measure or ruler at the starting point, and stretch it all the way across the fabric to the other side. By laying out the fabric on a flat surface and taking accurate measurements, you will ensure that you have the correct dimensions for your awning. This step is crucial in order to ensure that your awning fits perfectly and looks great once it’s installed.
Clearing an area to work on
In order to create a comfortable and organized workspace, the second step after clearing an area is to lay out the fabric on a flat surface. This is an essential step in any sewing or crafting project, as it allows you to see the full extent of the fabric and work with it more easily. Find a large, clean space such as a table or the floor where you can lay out the fabric without any wrinkles or creases.
Smooth out the fabric carefully, ensuring it is completely flat and free from any obstructions. By doing this, you’ll have a clear and even surface to work on, making it much easier to measure, cut, and sew your fabric with precision.
Spreading out the fabric without stretching or distorting it
When it comes to working with fabric, one of the most important steps is laying it out on a flat surface. This is crucial to ensure that the fabric is spread out evenly and without any wrinkles or distortions. The key is to gently spread out the fabric without stretching it too much.
Imagine laying out a delicate piece of paper on a table – you wouldn’t want to tug or pull at it too hard, as it might tear or become misshapen. The same principle applies to fabric. By carefully laying it out, you can ensure that it is flat and ready for the next step in your sewing or crafting project.
So take your time and spread out your fabric with care, being mindful not to stretch or distort it.
Securing the fabric in place with clips or pins
Once you have gathered all the necessary materials for your DIY project, it’s time to move on to the next step: laying out the fabric on a flat surface. This step is crucial in ensuring that the fabric is in the right position and properly aligned before securing it. Start by finding a clean and spacious area where you can spread out the fabric without any obstructions.
Lay the fabric flat, making sure that there are no wrinkles or creases. To keep the fabric in place, you can use clips or pins. If you’re using clips, attach them to the edges of the fabric, securing it tightly to the table or surface.
Alternatively, you can use pins at the corners or along the edges of the fabric. This will prevent the fabric from shifting or moving while you work on your project. By securing the fabric in place, you can ensure that it stays in the right position and makes it easier for you to work on your DIY creation.
Step 3: Measuring the width of the awning fabric
When it comes to measuring the width of your awning fabric, it’s important to get an accurate measurement to ensure a proper fit. Start by unrolling the fabric completely and laying it flat on a clean surface. Take a measuring tape and place it at one end of the fabric, making sure it is parallel to the edge.
Carefully stretch the tape across the fabric until you reach the opposite end, keeping it taut. Take note of the measurement in feet or inches, whichever is most convenient for you. Make sure to measure at multiple points along the width of the fabric to account for any inconsistencies or variations.
Once you have these measurements, you can use them to determine the size of your new awning or to shop for replacement fabric. By taking the time to measure accurately, you can ensure a seamless and well-fitting awning for your outdoor space.
Using a measuring tape or ruler to determine the width
awning fabric, measuring tape, ruler, width
Taking multiple measurements and averaging them
awning fabric, measuring width, multiple measurements, average
Recording the width measurement for future reference
When it comes to measuring the width of an awning fabric, it’s important to accurately record this measurement for future reference. This will help ensure that you have the correct size when it comes time to replace or repair the awning. To measure the width, start by extending the fabric fully and flat on the ground.
Take a tape measure and place it at one end of the fabric, then pull it across to the other side. Make sure the tape measure is straight and level, and take note of the measurement. It’s a good idea to measure in multiple places along the width to account for any variations.
This will give you an accurate average width to refer back to when needed. By recording the width measurement, you can easily find a replacement fabric that matches the size of your awning and ensure a proper fit.
Step 4: Measuring the length of the awning fabric
When it comes to measuring the length of your awning fabric, there are a few steps you can take to ensure accuracy. First, unfurl the fabric completely and lay it flat on a clean surface. Measure from one end to the other, following the natural curve of the fabric.
It’s important to measure the entire length, including any overhangs or valances that may be attached. Be sure to account for any seams or hems as well. If your awning fabric has any wrinkles or folds, smooth them out before measuring to get a more precise result.
Remember, it’s always better to err on the side of caution and measure a little longer than necessary. You can always trim the fabric to fit once you have it in place. By taking the time to accurately measure your awning fabric, you can ensure a perfect fit and a finished look that will not only enhance the aesthetics of your outdoor space but also provide you with the shade and protection you need.
Using a measuring tape or ruler to determine the length
measuring tape, ruler, length, awning fabric. To ensure that your awning fabric fits perfectly, it’s important to accurately measure its length before cutting. The best tool for this task is a measuring tape or ruler.
But how do you determine the length? It’s relatively simple. Start by finding the edge of the fabric and lay it out on a flat surface. Next, grab your measuring tape or ruler and place it at one end of the fabric.
Slowly unroll it, extending it along the entire length of the fabric until you reach the other end. Make sure to keep the measuring tape or ruler taut against the fabric to get an accurate measurement. Take note of the measurement, and that’s the length of your awning fabric! By using a measuring tape or ruler, you can confidently cut your fabric to the right size, ensuring a perfect fit for your awning.
Taking multiple measurements and averaging them
measuring the length of the awning fabric. Once you have determined the correct size for your awning, it’s time to measure the length of the fabric. This step is crucial in ensuring that your awning will fit properly and provide the desired shade and cover.
To measure the length, start by extending the awning fully and securing it in place. Then, grab a tape measure and measure from one end of the fabric to the other. It’s important to take multiple measurements at different points along the length to account for any inconsistencies.
This will help you get an accurate average length and ensure that your awning is the perfect fit. By taking multiple measurements and averaging them, you can eliminate any potential errors and ensure that your awning fabric is the right length for your needs. So, don’t skip this step and take the time to measure carefully – it will be worth it in the end!
Recording the length measurement for future reference
measuring the length of the awning fabric. Once you have determined the width of the awning fabric, the next step is to measure its length. This measurement is crucial because it will determine the amount of fabric you’ll need for your project.
To do this, you’ll need a tape measure or a ruler. Start by finding the top edge of the awning fabric and hold the tape measure against it. Gently pull the tape measure down to the bottom edge of the fabric, making sure to keep it straight and taut.
Take note of the measurement and record it for future reference. It’s important to measure the length accurately to ensure you have enough fabric for your awning. If the measurement is even slightly off, you may end up with fabric that is too short or too long, which can affect the overall appearance and functionality of your awning.
By recording the length measurement, you’ll have a reference to refer back to when purchasing the fabric or making any adjustments to the awning in the future. This will help to ensure a precise fit and a successful project. So, take the time to measure the length carefully and record the measurement accurately.
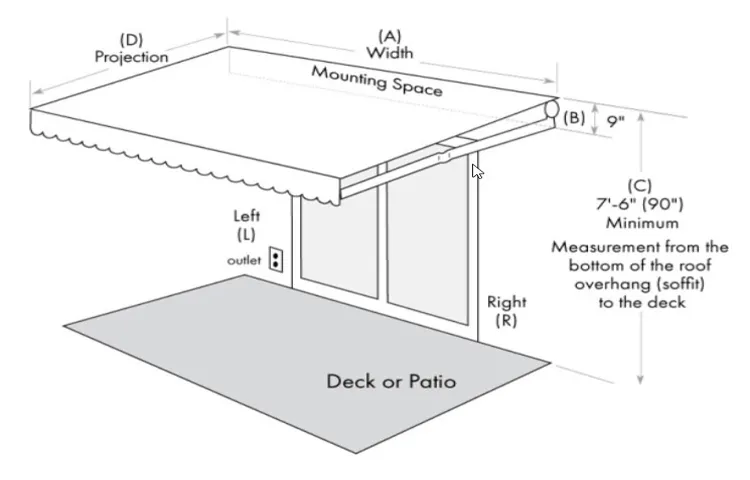
Step 5: Measuring any additional dimensions
Now that you’ve measured the height, width, and projection of your awning fabric, it’s time to check for any additional dimensions that may affect the fit and functionality of your awning. One important measurement to consider is the drop, which refers to the length of the fabric that hangs down from the top of the awning. This measurement is especially important if you want the awning to provide shade or protection from the elements.
Additionally, you may also want to measure the distance between any support arms or hardware that will be attached to the awning fabric. This will ensure that the fabric will fit properly and securely on your awning structure. Taking these additional dimensions into account will help you ensure that your awning fabric fits perfectly and functions as intended.
Taking note of any other dimensions required for specific awning designs
When it comes to awning designs, there may be additional dimensions that need to be considered. This is true especially for more complex or specialized designs. For example, some awnings may require additional measurements for supports or braces that are needed to ensure stability and durability.
Other dimensions may need to be taken into account for features such as valances, which are the decorative fabric borders that can be added to the front of the awning. These dimensions may include the depth and height of the valance, as well as the distance from the top of the awning to where the valance should be attached. Taking note of these additional dimensions is crucial for creating a customized awning that will fit and function perfectly for your specific needs.
Following specific instructions for measuring additional features, such as valances or drop heights
When it comes to measuring for window treatments, there are often additional features to consider, such as valances or drop heights. These additional dimensions can be important in ensuring a perfect fit for your curtains or blinds. To measure for valances, you will need to measure the width of your window and then add a few inches on each side to allow for overlap and fullness.
The drop height of the valance can be measured by determining how far down you want it to hang from the top of the window. It’s always best to measure from the top of the window frame to ensure accuracy. For drop heights, you will need to measure from the top of the window frame to the desired length of your curtains or blinds.
This will give you the proper drop height for your window treatments. By following these instructions, you can ensure that all additional features are properly measured and accounted for in your window treatment selection.
Step 6: Reinstalling or ordering new fabric
If your awning fabric is damaged or worn out, it may be time to reinstall or order new fabric. But first, you’ll need to know how to measure your awning fabric to ensure you get the right size. The process is fairly straightforward and can be done with just a few simple tools.
Start by extending your awning fully and measuring the width from end to end. Then, measure the height from the top of the mounting bracket to the bottom of the fabric. Finally, measure the projection, which is the distance from the wall to the edge of the fabric when the awning is fully extended.
Be sure to take accurate measurements to ensure a proper fit when ordering or reinstalling your awning fabric.
Using the recorded measurements to reinstall the awning fabric
awning fabric, reinstallation, measurements
Consulting with a professional or referring to manufacturer guidelines for ordering new fabric
consulting with a professional, manufacturer guidelines, ordering new fabric, reinstalling fabric When it comes to reinstalling or ordering new fabric for your furniture, it’s always best to consult with a professional or refer to the manufacturer guidelines. This step is crucial to ensure that you get the right fabric that not only fits your furniture but also meets your specific needs. Professionals have the knowledge and expertise to guide you through the process, helping you choose the right fabric that matches your style and durability requirements.
Additionally, consulting with a professional can save you time and money by preventing any costly mistakes. Alternatively, if you prefer to handle the process yourself, referring to the manufacturer guidelines is essential. These guidelines are designed to give you the necessary information on fabric types, measurements, and any special instructions for ordering.
By following these guidelines, you can confidently order the fabric you need and ensure a successful reinstallation or replacement.
Conclusion
In conclusion, measuring awning fabric is like golf: it requires precision, accuracy, and a little bit of skill. Just like a golfer calculating the course and adjusting for wind and slope, measuring awning fabric requires careful consideration of the dimensions, angles, and any potential obstacles that may get in the way (no, not sand traps or water hazards, but rather windows, doors, or pesky tree branches). But fear not, my fellow awning enthusiasts! Armed with a trusty tape measure and a keen eye for detail, you too can conquer the art of awning fabric measurements.
Remember to be thorough, double-check your figures, and account for any shrinkage (unlike your waistline after a lavish buffet). So, as you embark on your awning measuring journey, may you never find yourself in the metaphorical rough, but rather reaping the rewards of a perfectly-fitted awning that adds both style and shade to your outdoor living space. And who knows, perhaps one day you’ll have your own measuring competition, where fellow awning aficionados gather to brag about their impressive fabric-measuring prowess.
Just remember, the key to a successful awning fabric measurement is in the details. So pay attention, get creative, and above all, have fun! Happy measuring!”
Accurate measurements are crucial for a well-fitting and functional awning
When it comes to getting the perfect fit for your awning, accurate measurements are absolutely crucial. Whether you are reinstalling your existing fabric or ordering new fabric, you want to make sure that it fits your awning frame perfectly. This not only ensures that your awning looks great, but it also ensures that it functions properly and provides the desired shade and protection.
So, how do you measure for a well-fitting awning fabric? Start by measuring the width of your awning frame from one end to the other. Then, measure the height from the bottom of the frame to the desired length. Be sure to measure in multiple locations to account for any variations in the frame.
Once you have these measurements, you can confidently reinstall your existing fabric or order new fabric that will fit like a glove. Remember, accurate measurements are the key to a well-fitting and functional awning.
Following the step-by-step guide will ensure you get it right the first time
When it comes to revamping your furniture, one of the final steps is reinstalling or ordering new fabric. This step is crucial in giving your furniture a fresh and updated look. If you have removed the old fabric and it’s in good condition, you can simply reinstall it by following the same steps you used to remove it.
However, if the fabric is worn out or you want a completely new design, it’s time to order new fabric. This is a great opportunity to get creative and choose a fabric that complements your style and home decor. Whether you decide to go with a bold pattern or a more subtle solid color, the choice is yours.
Just make sure to measure your furniture correctly and order the right amount of fabric to ensure a perfect fit. By following this step-by-step guide, you can confidently tackle the reupholstery process and create a stunning piece of furniture that will be the centerpiece of your home.
Take your time and double-check your measurements to avoid any issues
After removing the old fabric from your furniture, the next step is to reinstall or order new fabric. This is where taking your time and double-checking your measurements becomes crucial. You want to make sure the new fabric fits perfectly and looks professionally done.
If you’re reinstalling the old fabric, carefully inspect it for any tears or wear and tear. If it’s still in good condition, you can simply reattach it using a staple gun or upholstery tacks. However, if the fabric is damaged or you want to change the look of your furniture, it’s time to order new fabric.
When ordering fabric, be sure to measure the dimensions of your furniture accurately and account for any seams or cushions. Ordering a little extra fabric is always a good idea in case of mistakes or future repairs. Taking the time to properly measure and order your fabric will ensure a seamless and professional-looking reupholstery job.
FAQs
How do you measure awning fabric for replacement?
To measure awning fabric for replacement, start by extending the awning all the way out. Measure the width from one end of the fabric to the other. Then, measure the length from the top of the awning to the bottom. Be sure to include any additional length needed for roller tube or valance.
What tools are needed to measure awning fabric?
To measure awning fabric, you will need a measuring tape or ruler to measure the width and length of the fabric. A step ladder may also be helpful to reach the top of the awning for accurate measurements.
Can I measure the awning fabric while it is still installed?
Yes, you can measure the awning fabric while it is still installed. Simply extend the awning all the way out and measure the width and length as mentioned earlier. However, for more accuracy, it is recommended to remove the fabric for easier measurement.
How do I determine the fabric type when measuring for replacement?
To determine the fabric type when measuring for replacement, check the existing fabric for any labels or markings that indicate the material. If there are no labels, you can contact the manufacturer or supplier of the awning to inquire about the fabric type.
What is the standard size for awning fabric?
There is no standard size for awning fabric as it varies depending on the specific awning model and brand. Therefore, it is important to measure the fabric accurately to ensure a proper fit.
Can I use a different fabric type for replacement?
Yes, you can use a different fabric type for replacement, as long as it is compatible with your specific awning model and meets your desired functionality and aesthetics. However, it is recommended to consult with the manufacturer or supplier to ensure compatibility.
How do I ensure accurate measurements for awning fabric replacement?
To ensure accurate measurements for awning fabric replacement, it is important to use a measuring tape or ruler that is in good condition and provides precise measurements. It is also crucial to measure both the width and the length of the fabric correctly, allowing for any additional length needed for roller tube or valance. Taking measurements multiple times and double-checking is also recommended for accuracy.