
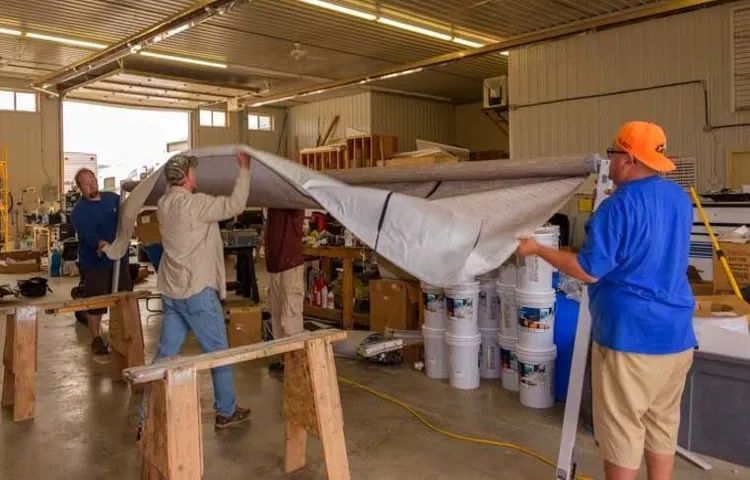
Are you frustrated with a torn or damaged awning fabric? Don’t worry, we’ve got you covered! Awning fabric is prone to wear and tear over time, but it doesn’t mean you have to replace the whole awning. With a few simple steps, you can easily repair the fabric and extend the life of your awning. In this blog post, we’ll guide you through the process of repairing awning fabric, giving you practical tips and tricks along the way.
So, let’s grab our tools and get started!
Table of Contents
Introduction
Are you tired of looking at your ripped or worn-out awning fabric? Don’t worry, repairing it is easier than you think! Whether it’s a tear, a hole, or just general wear and tear, you can easily fix it yourself without breaking the bank. One popular method is to use an awning repair tape, which is a durable and weather-resistant tape designed specifically for repairing fabric. Simply cut a piece of tape to the size of the damaged area and apply it evenly over the tear, making sure to press down firmly to ensure a good bond.
Another option is to sew the tear together using a needle and thread, which is a more traditional approach but can be just as effective. Start by inserting the needle through the fabric on one side of the tear and then back through on the other side, repeating the process until the tear is fully stitched up. Remember to tie off the thread securely at the end to prevent it from unraveling.
Whichever method you choose, make sure to clean the damaged area beforehand and allow it to fully dry before beginning repairs. With a little bit of time and effort, you’ll have your awning fabric looking good as new in no time!
What is an Awning?
Introduction: Are you tired of sitting in the scorching summer heat or getting drenched in the rain while trying to enjoy your outdoor space? If so, then an awning might just be the perfect solution for you. An awning is an overhead cover, typically made of fabric or other durable materials, that is attached to the exterior of a building. It provides shade and protection from the elements, allowing you to make the most of your outdoor space throughout the year.
Whether you have a patio, deck, or terrace, an awning can significantly enhance your outdoor experience by creating a comfortable and welcoming environment. In this article, we will delve deeper into the world of awnings and explore the various types, benefits, and considerations to keep in mind when choosing one for your home or business. So, let’s get started and discover how an awning can transform your outdoor space into something truly remarkable!
Why Repair Awning Fabric?
“Why Repair Awning Fabric?” Awning fabric can often be overlooked as a maintenance priority, but it plays a crucial role in protecting us from the sun, rain, and other elements. Over time, awning fabric can become worn, torn, or damaged, which can compromise its effectiveness and lead to costly repairs or replacements. By repairing awning fabric, we can extend its lifespan and ensure it continues to provide us with the shade and protection we need.
But why should we bother repairing it instead of just replacing it altogether? Let’s explore the benefits and reasons why repairing awning fabric is a worthwhile investment.
Assessing the Damage
If your awning fabric is damaged, don’t worry – there are ways to repair it and bring it back to its former glory. One common issue is tears or holes in the fabric. To fix this, you can use a patch kit specifically designed for awning fabric.
Simply cut the patch to size and apply it to the damaged area, making sure to smooth out any wrinkles or bubbles. Another common problem is fading or discoloration. To address this, you can try using a fabric dye specifically made for outdoor fabrics.
Follow the instructions on the dye package to ensure the best results. If your awning fabric is beyond repair, you may need to replace it altogether. In this case, it’s best to consult a professional who can help you choose a new fabric and install it correctly.
With a little effort and the right tools, you can easily repair or replace your awning fabric and get it looking as good as new.
Identifying Tears and Holes
When it comes to identifying tears and holes in your clothing, it’s important to assess the damage carefully. One of the first things you should do is examine the area where the tear or hole is located. Is it a small tear, or is it a larger hole? Is the fabric around it frayed, or does it look like it could easily unravel further? By asking yourself these questions, you can get a better idea of the severity of the damage.
Once you’ve assessed the size and condition of the tear or hole, you can then decide on the best course of action to repair it. Whether it’s simply stitching up a small tear or patching a larger hole, knowing the extent of the damage will help you make an informed decision. By taking the time to carefully assess the damage, you can ensure that your clothing remains in good condition and continues to serve you well.
Checking for Sun Damage and Fading
When it comes to checking for sun damage and fading on your furniture or other items, it’s important to assess the damage properly before taking action. The first step is to examine the surface of the item and look for any signs of discoloration or fading. This can be done by comparing the color of the item to areas that have been shielded from the sun, such as the underside of a cushion or the back of a chair.
If you notice a significant difference in color, it’s likely that sun damage has occurred. Another indicator of sun damage is the presence of cracks or dryness in the material. This can be especially common in leather furniture, where prolonged exposure to sunlight can cause the material to become brittle and prone to cracking.
By thoroughly assessing the damage, you can determine the best course of action for revitalizing and restoring your items.
Examining Stitching and Seams
seams, stitching, assessing the damage, examining
Cleaning and Preparing the Fabric
Repairing awning fabric can be a daunting task, but with the right steps, it can be a straightforward process. Before tackling any repairs, it’s essential to clean and prep the fabric properly. Start by removing any loose dirt or debris by sweeping or using a soft brush.
For stains or soiling, use a mild detergent mixed with water and gently scrub the affected areas. Rinse thoroughly with clean water and allow the fabric to dry completely before proceeding with repairs. By cleaning and preparing the fabric beforehand, you ensure that the repairs will adhere properly and provide a seamless finish.
So, take the time to give your awning fabric some TLC before beginning the repair process.
Removing Dirt and Debris
cleaning fabric, removing dirt and debris, preparing the fabric
Treating Stains
Treating Stains – Cleaning and Preparing the Fabric We’ve all been there – that moment when we accidentally spill something on our favorite shirt or pair of pants. It can be frustrating and disheartening, especially if the stain is stubborn and doesn’t seem to come off easily. But fear not! With the right approach, you can easily tackle and treat those pesky stains and have your fabric looking as good as new.
The first step in treating stains is to clean and prepare the fabric. This involves understanding the type of fabric you’re dealing with and taking the necessary precautions to avoid damaging it further. Different fabrics require different cleaning methods, so it’s important to do your research or consult the care label before proceeding.
Once you have a good understanding of the fabric, you can start the stain removal process. Before applying any cleaning solution, it’s important to test it on a small, inconspicuous area of the fabric to ensure that it doesn’t cause discoloration or damage. Once you’ve determined that the cleaning solution is safe to use, gently blot the stain with a clean cloth or paper towel to remove any excess liquid or debris.
Next, apply the cleaning solution to the stained area. The type of cleaning solution you use will depend on the type of stain you’re dealing with. For example, for oil-based stains, you can try using dish soap or a specialized stain remover.
For protein-based stains like blood or sweat, you can use a mixture of cold water and enzymatic cleaner. And for water-based stains like coffee or wine, you can try using a mixture of water, vinegar, and mild detergent. After applying the cleaning solution, carefully blot the area with a clean cloth or sponge.
Avoid rubbing or scrubbing the stain, as this can push it deeper into the fabric or cause the stain to spread. Instead, gently dab the stain until it starts to lift. If necessary, repeat the process until the stain is completely gone.
Allowing the Fabric to Dry
cleaning fabric, preparing fabric, allowing fabric to dry
Repairing Tears and Holes
If you have a tear or hole in your awning fabric, don’t worry! It’s actually quite easy to repair and extend the life of your awning. The first step is to clean the area around the tear or hole with soap and water to remove any dirt or debris. Once it’s clean, you can assess the damage and determine the best method of repair.
For smaller tears or holes, you can use a patch kit specifically designed for awning fabric. These kits typically include patches that can be ironed or sewn onto the damaged area. For larger tears, you may need to use a canvas repair tape or adhesive to secure the fabric.
Make sure to carefully follow the instructions provided with the repair product to ensure a proper and long-lasting fix. With a little bit of effort, you can have your awning looking as good as new in no time!
Gathering Necessary Tools and Materials
repairing tears and holes, necessary tools and materials, sewing kit, needle, thread, scissors, fabric patches, adhesive, iron Repairing tears and holes in clothing may seem like a daunting task, but with the right tools and materials, it can actually be quite simple. First and foremost, you will need a sewing kit that includes a needle, thread, and scissors. These basic tools will be your best friends when it comes to fixing those unsightly tears and holes.
If the tear or hole is small, you may be able to mend it with just a few simple stitches. However, for larger tears or holes, you may need to use fabric patches. These patches can be purchased at most craft or fabric stores, and they come in a variety of colors and patterns to match your clothing.
To secure the patch in place, you can use fabric adhesive or, for a more permanent solution, you can iron it on. By gathering the necessary tools and materials, repairing tears and holes in your clothing can be a quick and easy task.
Using a Repair Kit
Using a Repair Kit Repairing Tears and Holes Accidents happen, and when they do, it’s always inconvenient. Whether it’s a tear in your favorite pair of jeans or a hole in your camping gear, it can be disheartening to think that you might have to throw them away. But don’t worry! With a repair kit, you can fix those tears and holes in no time.
First, assess the damage. How big is the tear or hole? Is it a clean cut or a jagged rip? This will determine the type of repair you’ll need to do. For small tears or holes, a patch can be used to cover the area and reinforce the fabric.
If the tear is larger, you may need to sew it back together using a needle and thread. Before you begin repairing, gather all the necessary tools and materials. A repair kit typically includes patches, adhesive, scissors, and a needle and thread.
Make sure you have enough of each to complete the repair. To start, clean the area around the tear or hole to remove any dirt or debris. This will help the adhesive or thread adhere to the fabric better.
If the tear is on a delicate or expensive fabric, you may want to test the adhesive on a small, inconspicuous area first to ensure it doesn’t damage or discolor the fabric. Now it’s time to patch up that tear. Cut a patch from the material provided in the repair kit that is slightly larger than the tear.
Apply adhesive to the back of the patch and place it over the tear, smoothing out any wrinkles or air bubbles. Press firmly to ensure a strong bond. If you’re sewing the tear, carefully align the edges and begin stitching with a strong, knotless stitch.
Patching the Fabric
Patching the Fabric: Repairing Tears and Holes If you’re like me, you probably have a few favorite clothes that you’ve worn to the point of overuse. Maybe it’s that comfy pair of jeans that you refuse to retire, or that cozy sweater that’s seen better days. But no matter how much we love our clothes, wear and tear is bound to happen.
That’s where patching comes in. It’s a simple and cost-effective way to repair tears and holes, and it can give your garments new life. So how do you go about patching? First, assess the damage.
Is it a small tear or a larger hole? If it’s a tear, you can easily repair it with a simple sewing technique. Start by cleaning the area around the tear and trimming any loose threads. Then, take a small piece of fabric that matches your garment and place it behind the tear.
Using a needle and thread, sew around the tear, making small stitches that go through both the fabric and the patch. Keep stitching until the tear is fully closed, and then knot the thread on the backside of the fabric. If the damage is a larger hole, you may need to take a slightly different approach.
Start by cleaning the area around the hole and trimming any frayed edges. Then, find a patch that matches your garment and cut it into a shape slightly larger than the hole. Place the patch on the backside of the fabric and pin it in place.
Using a needle and thread, sew around the edge of the hole, catching the edges of the patch as you go. Make sure your stitches are sturdy and secure, and knot the thread on the backside of the fabric when you’re done. Patching is not only a practical way to repair your clothes, but it can also add a unique touch to your garments.
Addressing Sun Damage and Fading
One common issue that many people face with their awnings is sun damage and fading. Over time, exposure to the sun’s harmful UV rays can cause the fabric of your awning to lose its color and become weakened. But fear not, because there are ways to repair and restore your awning fabric to its former glory.
One option is to use a fabric dye specifically designed for outdoor use. This can help to bring back the vibrancy of the color and give your awning a much-needed facelift. Additionally, applying a fabric protectant can help to prevent further damage from the sun’s rays.
This will create a barrier between the fabric and the UV rays, helping to prolong the life of your awning. So don’t let sun damage and fading get you down – with a little bit of effort and the right products, you can have your awning looking as good as new.
Using UV protective spray
Using a UV protective spray is a smart and effective way to address sun damage and fading. We all love the warm rays of the sun, but prolonged exposure can wreak havoc on our skin and belongings. Sun damage can cause premature aging, wrinkles, and even skin cancer.
But it’s not just our bodies that are at risk – our furniture, clothing, and other possessions can also suffer from the damaging effects of the sun. That’s where a UV protective spray comes in. This handy product can be applied to a variety of surfaces to create a protective barrier against harmful UV rays.
By using a UV protective spray, you can enjoy the sun without worrying about the negative consequences. Think of it as sunscreen for your belongings! Just like you wouldn’t leave the house without slathering on some sunscreen, you shouldn’t leave your belongings exposed to the sun without a protective spray. So, next time you’re planning a day at the beach or spending time outside, don’t forget to give your belongings a little extra protection with a UV spray.
It’s a simple and easy way to ensure that your skin and belongings stay safe from the damaging effects of the sun.
Considering Fabric Paint or Dye
If you’ve noticed that your favorite fabric items, such as curtains or upholstery, are starting to fade or show signs of sun damage, you might be wondering what can be done to revive them. One solution to consider is using fabric paint or dye. These products offer a simple and cost-effective way to breathe new life into your fabrics.
Fabric paint or dye can help to restore color to faded areas and give your fabrics a fresh, vibrant look. Whether you choose fabric paint or dye will depend on your specific needs and preferences. Fabric paint provides more control over color and design, as it can be applied directly to the fabric with a brush or sponge.
On the other hand, fabric dye is typically used for larger projects, such as dyeing an entire piece of fabric or garment. It’s important to consider the fabric type and the instructions provided by the paint or dye manufacturer to ensure the best results. So, don’t let sun damage and fading get you down – try using fabric paint or dye to bring back the vibrancy and beauty of your fabrics!
Fixing Stitching and Seams
If you have a damaged awning fabric, there are some simple steps you can take to repair it and avoid the expense of buying a new one. One common issue with awning fabric is stitching and seams coming undone. To fix this, start by inspecting the damaged area to determine the extent of the problem.
If it’s just a small tear or loose stitching, you can use a needle and thread to sew it back together. Make sure to choose a thread that matches the color of your awning fabric. Start sewing from the inside of the fabric, making small, straight stitches along the seam or tear.
Once you’ve sewn all the way across, tie off the thread securely. If the damage is more extensive, you may need to use a patch to reinforce the area. Cut a piece of fabric slightly larger than the damaged area and use fabric glue or a sewing machine to attach it to the back of the awning fabric.
This will provide extra strength and durability. With a little bit of effort, you can easily fix stitching and seams on your awning fabric and extend its lifespan.
Replacing Damaged Stitching
Replacing damaged stitching on clothing is a common problem that many people face. Whether it’s a ripped seam or a loose thread, it’s important to fix these issues as soon as possible to prevent further damage and maintain the quality of your clothes. Luckily, fixing stitching and seams is a relatively simple process that can be done at home with just a few basic tools.
First, you’ll need a sewing kit with an assortment of needles and thread in different colors. Start by removing any old stitches that are damaged or frayed. Then, thread your needle and tie a knot at the end of the thread.
Carefully stitch along the damaged area, making sure to follow the original stitch pattern. Once you’ve finished sewing, tie a knot at the end to secure the thread. You can also reinforce the repaired area with a small dab of fabric glue for added durability.
With a little bit of time and effort, you can easily fix any stitching issues and prolong the life of your favorite garments.
Reinforcing Weak Seams
Reinforcing Weak Seams Nowadays, it’s common to buy clothes that don’t last as long as they used to. The stitching and seams on our garments seem to unravel far too quickly, leaving us with a pile of clothes that are falling apart. But fear not, there are ways to fix this problem and reinforce those weak seams.
First, take a close look at the stitching on your clothes. Are there any loose threads or areas that are starting to come undone? If so, grab a needle and thread and get to work. Start by tying a knot at the end of your thread, then carefully weave it through the loose threads, making sure to catch each one in your stitch.
Repeat this process until the seam is secure. Another option is to use a sewing machine to reinforce the seam. Simply sew a line of stitches next to the existing ones, making sure to go back and forth a few times to really lock in the seam.
This can be especially helpful for jackets or pants that experience a lot of wear and tear. By reinforcing weak seams, you can extend the life of your clothes and save yourself from having to constantly replace them. So take a few minutes to inspect your garments and give those weak seams some extra love and attention.
Your wardrobe will thank you.
Conclusion
In conclusion, repairing awning fabric is like mending a tear in a beloved pair of jeans – it requires a little bit of skill, some creative problem-solving, and a dash of confidence. With the proper tools and techniques, you can restore your awning to its former glory and extend its lifespan. So, don’t let a pesky rip or unruly hole rain on your outdoor parade.
Take matters into your own hands and show that fabric who’s boss. Whether you decide to patch it up or sew it back together, just remember, awning repair is all about being resourceful and thinking outside the box. You’ve got this, DIY aficionado!”
Maintaining and Protecting Awning Fabric
Awning fabric is a valuable investment for any home or business, providing shade and protection from the elements. However, over time, the stitching and seams can begin to wear and deteriorate, compromising the fabric’s integrity. If you notice any loose threads or unraveling stitches, it’s crucial to address them promptly to prevent further damage.
Fixing stitching and seams can be done with a few simple steps. First, carefully trim any loose threads with a pair of sharp scissors. Next, use a heavy-duty needle and UV-resistant thread to reinforce the stitching.
Start by sewing a few stitches on either side of the damaged area, gradually working your way across the seam. Make sure to pull the thread tight for a secure hold. Finally, apply a small amount of fabric glue to seal the stitches and prevent them from unraveling.
By regularly inspecting and maintaining the stitching and seams of your awning fabric, you can ensure its longevity and protect your investment.
FAQs
How can I repair a rip in my awning fabric?
To repair a rip in awning fabric, you can use a patch kit or sewing machine to stitch the fabric back together. Make sure to clean the area around the rip and apply adhesive before attaching the patch. If using a sewing machine, use a heavy-duty needle and strong thread to ensure a secure repair.
What should I do if the awning fabric is starting to fade?
If the awning fabric is starting to fade, you can try using a fabric spray or paint specifically designed to restore color to outdoor fabrics. Additionally, regularly cleaning the awning fabric and keeping it protected from prolonged sun exposure can help prevent further fading.
How do I fix a sagging awning fabric?
To fix a sagging awning fabric, you may need to adjust or replace the tensioning arms or springs that hold the fabric in place. Check for any loose or damaged components and make sure the awning is properly tensioned according to the manufacturer’s instructions.
Can I repair a small hole in my awning fabric myself?
Yes, you can repair a small hole in your awning fabric yourself. Using a patch kit specifically designed for awning fabric or a clear adhesive tape, cover the hole from both sides to create a strong bond. This will prevent further tearing and extend the lifespan of your awning.
What are some common causes of awning fabric damage?
Common causes of awning fabric damage include exposure to harsh weather conditions (such as high winds, heavy rain, or extreme temperatures), improper installation or use, lack of maintenance, and accidental tears or punctures.
How often should I inspect my awning fabric for damage?
It is recommended to inspect your awning fabric at least once every six months for any signs of damage or wear. Regular inspections can help you catch any potential issues early on and take appropriate measures to prevent further damage.
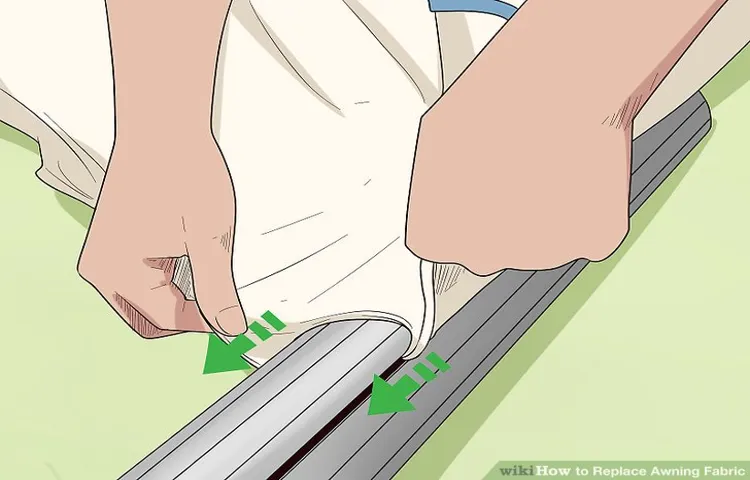
Can I replace the fabric on my awning myself?
While it is possible to replace the fabric on your awning yourself, it can be a complex and time-consuming process. It involves removing the old fabric, properly measuring and cutting the new fabric, and then attaching it securely to the frame. If you have limited experience or aren’t confident in your DIY skills, it may be best to hire a professional for this task.