
Welcome to our step-by-step guide on replacing your Dometic awning fabric! If you’re a proud owner of a Dometic awning, you know that awnings are a wonderful addition to any RV or outdoor space. They provide shade, protection from the elements, and a cozy outdoor area to relax and unwind. However, over time, the fabric on your awning may wear out or become damaged, diminishing its functionality and aesthetic appeal.
But fret not! Replacing your Dometic awning fabric is a task that can be easily accomplished with a bit of patience and the right tools. In this guide, we will walk you through each step of the process, ensuring that you are equipped with all the knowledge and confidence necessary to restore your awning to its former glory. Whether you’re a seasoned DIY enthusiast or a complete beginner, this guide is designed to be accessible and easy to follow.
We will provide detailed instructions, accompanied by helpful visuals, to make the process as straightforward as possible. So, if you’re ready to roll up your sleeves and give your outdoor space a much-needed makeover, let’s dive in and discover how to replace your Dometic awning fabric. By the end of this guide, you’ll have your awning looking as good as new and ready to provide you with endless hours of enjoyment and relaxation.
Table of Contents
Introduction
Are you tired of looking at your old and worn out Dometic awning fabric? Well, you’re in luck! In this blog post, we’re going to show you how to replace your Dometic awning fabric with a helpful video tutorial. Not only will this upgrade the look of your RV or camper, but it will also extend the lifespan of your awning. With just a few simple steps and some basic tools, you’ll be able to have a brand new awning in no time.
So grab your tools and let’s get started on this easy and rewarding DIY project!
Understanding the Importance of Replacing Your Dometic Awning Fabric
dometic awning fabric replacement, importance of replacing dometic awning fabric. Introduction: Your Dometic awning can be a valuable addition to your RV or camper, providing shade and protection from the elements. However, over time, the fabric can become worn, torn, or faded.
This is when you know it’s time for a replacement. Replacing your Dometic awning fabric is important for several reasons. Not only does it freshen up the appearance of your RV, but it also ensures that your awning continues to offer the optimal level of protection and function.
In this blog post, we will discuss the importance of replacing your Dometic awning fabric and why it should be a priority. So, let’s delve into the details and explore the benefits of a new awning fabric for your outdoor adventures!
Choosing the Right Replacement Fabric
replacement fabric, fabric choice, choosing fabric, fabric selection, fabric options, fabric types, fabric materials, fabric durability, fabric aesthetics
Preparing for the Replacement
If you’re a proud owner of a Dometic awning and notice that the fabric is starting to show signs of wear and tear, don’t worry! Replacing the Dometic awning fabric is a relatively easy task that you can do yourself with just a few basic tools and a little bit of patience. In fact, there are even helpful videos available online that can guide you through the entire process. By following these step-by-step instructions, you can have your awning looking brand new in no time.
Whether you’re a seasoned DIYer or a novice, replacing the Dometic awning fabric doesn’t have to be a daunting task. So grab your tools and get ready to give your awning a makeover!
Gathering the Necessary Tools and Materials
When it comes to replacing a damaged or old item, having the necessary tools and materials on hand is key to a successful project. Before jumping into the replacement process, it’s important to gather all the tools and materials you’ll need. Start by assessing the item that needs replacing and determine what tools will be necessary.
This could include anything from screwdrivers and wrenches to specialized tools specific to the item you’re replacing. Once you have a list of the required tools, check your toolbox to see if you already have them. If not, make a trip to the hardware store to pick up what you need.
In addition to tools, you’ll also need to gather the necessary materials for the replacement. This could be anything from replacement parts or components to adhesive or screws. Make sure you have everything you need on hand before starting the project to avoid any delays or frustration.
By gathering all the necessary tools and materials beforehand, you’ll have everything you need to complete the replacement smoothly and efficiently.
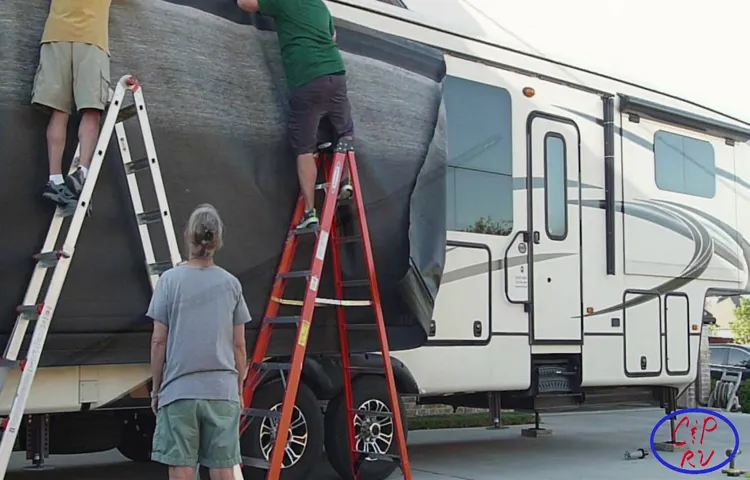
Clearing the Area and Removing the Old Fabric
Preparing for the Replacement Before you can start replacing the fabric on your furniture, you first need to clear the area and remove the old fabric. This step is crucial in ensuring a smooth and successful replacement process. Start by removing any loose pillows or cushions from the furniture.
Then, use a vacuum cleaner to thoroughly clean the surface and remove any dirt, dust, or debris. Next, carefully remove the old fabric by cutting it away with scissors or a seam ripper. Be sure to take your time and work slowly to avoid any damage to the furniture frame.
Once the old fabric is removed, take a moment to inspect the frame for any loose or broken parts that may need attention before continuing with the replacement. By properly preparing the area and removing the old fabric, you are setting yourself up for a successful and visually appealing fabric replacement project.
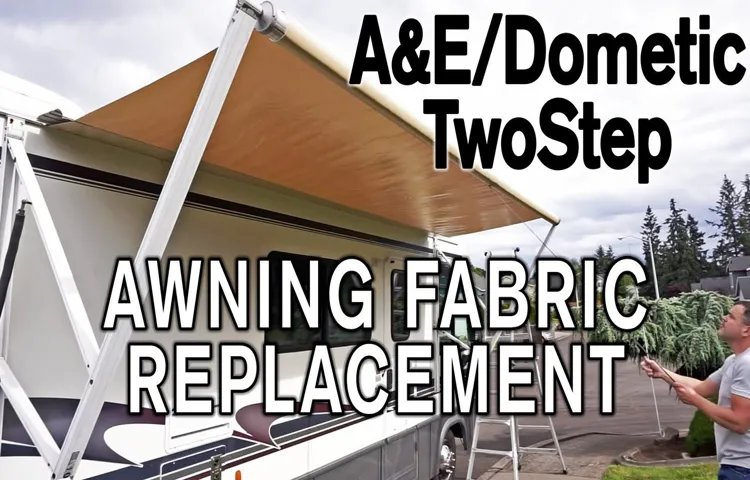
Installing the New Fabric
If you’re looking for an easy way to freshen up your RV or camper, replacing the awning fabric is a great option. Luckily, there are plenty of resources available to guide you through the process, including helpful videos. In a step-by-step tutorial, these videos will walk you through the process of removing the old fabric and installing the new one.
Whether you’re a seasoned DIY-er or just starting out, these videos offer clear and concise instructions that make the process seem almost effortless. So, if you’re wondering how to replace Dometic awning fabric, look no further than these informative and easy-to-follow videos. You’ll be enjoying your new awning in no time!
Measuring and Cutting the Replacement Fabric
installing the new fabric
Attaching the Fabric to the Awning Roller
In order to install the new fabric on your awning roller, you’ll need to follow a few simple steps. First, make sure you have all the necessary tools and materials, including the new fabric, a ladder, and any screws or fasteners that may be required. Next, carefully unroll the old fabric from the roller, being mindful of any tension or springs that may be present.
Once the old fabric is removed, lay out the new fabric next to the roller and ensure it is properly aligned and sized. Then, starting at one end, begin attaching the fabric to the roller, using the screws or fasteners provided. Be sure to keep the fabric taut as you go, ensuring a smooth and even attachment.
Once the fabric is securely attached, gently roll it up onto the roller, making any necessary adjustments along the way. With just a little bit of time and effort, you’ll have your awning looking brand new in no time!
Securing the Fabric to the Awning Arms
Securing the fabric to the awning arms is an essential step in installing your new awning fabric. This is the step that will ensure that your fabric is tight and will stay in place, providing maximum shade and protection from the sun. To begin, you will need to place the fabric on top of the awning arms, making sure that it is centered and straight.
Once in place, you can start attaching the fabric to the arms using the provided fasteners. These fasteners are typically hooks or clips that will securely hold the fabric in place. It’s important to make sure that the fabric is evenly distributed along the arms and that there are no loose or sagging areas.
Once all the fasteners are in place, give the fabric a gentle tug to make sure that it is securely attached. If there are any loose areas, simply readjust the fasteners to tighten them. With the fabric securely attached to the awning arms, you’re now ready to enjoy your new outdoor space in style and comfort.
Testing the Functionality of Your New Fabric
Testing the functionality of your new fabric is an important step to ensure that it meets your expectations and requirements. One crucial aspect of this process is installing the new fabric correctly. Installation can greatly impact the performance and durability of your fabric, so it is vital to pay attention to the details.
First, start by thoroughly inspecting the area where the fabric will be installed. Look for any signs of damage or wear that could affect the installation process. It is essential to address these issues before proceeding to ensure a smooth and successful installation.
Next, make sure you have all the necessary tools and equipment for the installation. This may include measuring tape, a level, a drill, screws, and brackets, depending on the specific requirements of your fabric. Having everything ready beforehand will save you time and prevent any unnecessary delays.
Carefully follow the manufacturer’s instructions for installing the fabric. These instructions will provide you with step-by-step guidance on how to properly secure the fabric in place. It may also include specific recommendations for any additional hardware or accessories needed for the installation.
While installing the fabric, take your time to ensure accuracy and precision. Use a level to make sure the fabric is straight and aligned correctly. Double-check all the measurements to avoid any mistakes that could compromise the functionality of the fabric.
Once the fabric is installed, give it a thorough check to ensure that it is secure and stable. Test its resilience by applying pressure or pulling on the fabric gently. If there are any signs of weakness or instability, reinforce the installation as needed.
Conclusion
And there you have it, the ultimate guide to replacing your Dometic awning fabric. You’ve now successfully conquered one of life’s great challenges, becoming a master awning technician. So, next time your awning fabric decides to tear or shows signs of wear and tear, don’t panic.
Just grab your tools, watch this video, and in no time, you’ll have a fresh, fabulous new awning. Remember, a well-dressed awning is the key to a stylish and sophisticated outdoor living space. And who knows, maybe one day you’ll be known as the Awning Whisperer, ready to save the day for fellow awning enthusiasts in need.
Happy fabric replacing!”
FAQs
How do I replace the fabric on my Dometic awning?
To replace the fabric on your Dometic awning, you can follow these steps:
1. Start by retracting the awning fully and securing it.
2. Remove the awning cover by unscrewing the end caps and sliding it out.
3. Take note of the position of the awning arms and remove the retaining bolts.
4. Carefully remove the old fabric from the roller tube.
5. Attach the new fabric to the roller tube, making sure it is centered and aligned correctly.
6. Reassemble the awning arms and secure them with the retaining bolts.
7. Slide the awning cover back into place and secure it with the end caps.
8. Extend the awning to its full length to ensure the fabric is properly tensioned.
9. Test the awning to make sure it opens and closes smoothly.
10. Enjoy your newly replaced Dometic awning fabric!
Can I replace the Dometic awning fabric myself, or do I need a professional?
It is possible to replace the Dometic awning fabric yourself, although it does require some DIY skills and basic tools. If you are comfortable with DIY projects and have experience with similar tasks, you should be able to handle the replacement process. However, if you are unsure or not confident in your abilities, it is recommended to hire a professional to ensure the job is done correctly and safely.
Where can I find a video tutorial on replacing Dometic awning fabric?
You can find video tutorials on replacing Dometic awning fabric on various online platforms. YouTube is a popular platform for DIY videos, and a simple search for “how to replace Dometic awning fabric” should yield several helpful results. Additionally, you can check the Dometic website or other RV enthusiast forums for instructional videos or step-by-step guides.
What materials do I need to replace my Dometic awning fabric?
To replace your Dometic awning fabric, you will need the following materials:
1. New Dometic awning fabric (make sure it matches the dimensions of your existing awning)
2. Basic hand tools (e.g., screwdriver, wrench)
3. Safety equipment (e.g., gloves, safety glasses)
4. Lubricant (such as silicone spray or slide-out lubricant)
How long does it take to replace the Dometic awning fabric?
The time it takes to replace your Dometic awning fabric can vary depending on your level of experience and the specific circumstances. On average, it can take anywhere from 1 to 3 hours to complete the replacement process. It is recommended to set aside enough time and work at a comfortable pace to ensure everything is done properly.
Can I reuse the old Dometic awning fabric if it is still in good condition?
Yes, if your old Dometic awning fabric is still in good condition and fits properly, you can reuse it. However, it is important to inspect the fabric for any signs of wear or damage, as a damaged fabric can lead to further issues down the line. If the fabric shows any signs of wear or is no longer in good condition, it is recommended to replace it with a new one.
Are there different fabric options available for Dometic awnings?
Yes, Dometic offers a range of fabric options for their awnings. These options can include different colors, patterns, and materials. It is recommended to check with your local RV dealer or directly with Dometic to see what fabric options are available for your specific awning model.