
Hey there! Have you ever found yourself engrossed in a book or movie, where the opening scene immediately hooks you and leaves you hungry for more? Well, the same concept applies to blog intros. Just like a captivating beginning can make or break a story, an enticing blog intro can determine whether a reader sticks around or clicks away. So, what makes a great blog intro? It’s all about grabbing the reader’s attention and setting the tone for what’s to come.
Whether you’re writing about the latest fashion trends, sharing travel tips, or delving into the world of technology, a killer intro will leave your audience wanting to know more. At its core, an intro is like the front door to your blog. It’s the first impression, the initial glimpse into what lies ahead.
Much like a tantalizing aroma drawing you into a new restaurant, a well-crafted intro entices readers to explore further. It should invite them in, make them feel welcome, and pique their curiosity. Think of it this way: when you start a conversation with someone, you want to make a good impression, right? You might crack a joke, ask an intriguing question, or share an interesting fact.
The same principle applies to blog intros. You want to captivate your audience right from the get-go, so they’ll be eager to continue reading. Crafting the perfect blog intro involves finding balance.
You want to intrigue readers without overwhelming them, provide a taste of what’s to come without spoiling the whole meal. It’s a delicate dance between revealing enough information to hook your audience and keeping them on their toes, eager for more. So, whether you’re a seasoned blogger or just dipping your toes into the blogging world, mastering the art of the blog intro is essential.
After all, it’s your chance to make a lasting impression, establish your voice, and draw readers in. So, let’s dive into the world of blog intros and discover the secrets to creating captivating introductions that leave your audience craving more. Are you ready to step through the front door and embark on this journey? Let’s get started!
Table of Contents
Understanding the Basics of an Electric RV Awning
Replacing the fabric on an electric RV awning may seem like a daunting task, but with a little patience and some basic tools, it can be done. The first step is to remove the old fabric from the awning. This can usually be done by loosening the tension on the springs located on either side of the awning and then sliding the fabric out of the track.
Once the old fabric has been removed, the new fabric can be installed by sliding it into the track and tightening the tension on the springs to hold it in place. It’s important to make sure the fabric is evenly tensioned across the length of the awning to prevent damage. With a little practice, replacing the fabric on an electric RV awning can be a simple DIY project that will have your awning looking brand new in no time.
What is an electric RV awning?
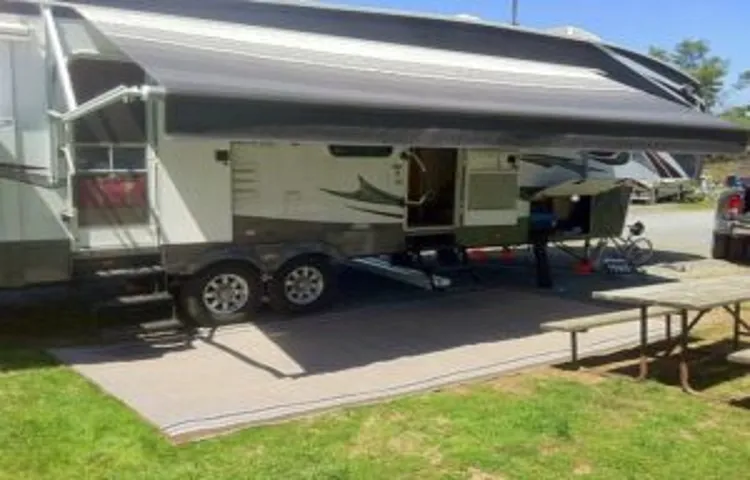
electric RV awning An electric RV awning is an innovative and convenient feature that can greatly enhance your camping experience. Unlike traditional manual awnings, which require physical effort to extend and retract, electric RV awnings can be controlled with the push of a button. This means no more struggling to deploy your awning in windy or rainy conditions.
With an electric RV awning, you can quickly and easily create a shaded outdoor living space wherever you park your RV. These awnings are typically made of durable fabric materials that are resistant to fading and tearing, and they can be extended to provide protection from the sun, rain, and even light wind. Some electric RV awnings also come with built-in LED lights, allowing you to illuminate your outdoor area at night.
Whether you want to relax in the shade, entertain guests, or simply enjoy the fresh air, an electric RV awning is a must-have accessory for any camping enthusiast.
Why do you need to replace the fabric?
RV awnings are a great addition to any recreational vehicle, providing shade and protection from the elements. Over time, however, the fabric on these awnings can become worn out or damaged. When this happens, it’s important to replace the fabric to ensure the awning remains functional and continues to provide the desired benefits.
So why do you need to replace the fabric on an electric RV awning? Well, just like any other fabric, RV awning fabric can deteriorate over time due to exposure to sunlight, weather conditions, and general wear and tear. This can lead to fading, fraying, and even tears in the fabric. In addition, mold and mildew can also develop on the fabric, especially if it is not properly cleaned and maintained.
By replacing the fabric on your electric RV awning, you can ensure that it remains in good condition and continues to provide the shade and protection you need while enjoying your outdoor adventures.
Gathering the Necessary Tools and Materials
When it comes to replacing the fabric on your electric RV awning, having the right tools and materials is essential. Before you begin the replacement process, gather the necessary items to ensure a smooth and successful project. You will need a ladder to access the awning, as well as a socket set or wrench to remove any bolts or screws holding the fabric in place.
Additionally, you will need a new piece of fabric that is the correct size and shape for your specific awning. It is important to measure your awning carefully to ensure you purchase the right size fabric. Once you have gathered all of these tools and materials, you will be ready to tackle the task of replacing your electric RV awning fabric.
List of tools required
In order to successfully complete any task or project, it’s important to have the right tools and materials. When it comes to gathering the necessary tools for a particular job, it’s important to be prepared and have a clear idea of what you’ll need. Whether you’re a DIY enthusiast or a professional, having the right tools will make the job easier and ensure a higher quality outcome.
When it comes to gathering the necessary tools and materials for a specific task, it’s important to do some research and create a list of everything you’ll need. This list can help you stay organized and ensure that you have everything you need before you start the task. Some common tools that you may need include a hammer, screwdriver set, measuring tape, level, pliers, and a variety of different screws and nails.
Additionally, depending on the task, you may also need specific tools such as a drill, saw, or paintbrushes. Taking the time to gather all the necessary tools and materials before starting a project will save you time and frustration in the long run.
Purchasing the replacement fabric
When it comes to replacing fabric, it’s important to gather all the necessary tools and materials beforehand. This will help ensure that the process goes smoothly and efficiently. The first step is to identify the type and amount of fabric needed for the replacement.
Consider the color, pattern, and texture to match the existing furniture or project. Then, search for fabric suppliers or visit a local fabric store to purchase the fabric. Make sure to measure the dimensions accurately to avoid any wastage or shortage.
Additionally, determine the quantity of fabric required based on the size of the project or the number of items to be covered. It’s also essential to gather the tools needed for the replacement, such as scissors, measuring tape, pins, and a sewing machine if necessary. By gathering all the required tools and materials before starting the project, it ensures a hassle-free and successful fabric replacement.
Preparing to Replace the Awning Fabric
If you’re looking to replace the awning fabric on your electric RV awning, there are a few steps you can follow to ensure a smooth and successful installation. First, gather all the necessary tools and materials you’ll need, including a ladder, a measuring tape, a screwdriver or wrench, and the new awning fabric itself. Next, carefully extend the awning to its full length and use the measuring tape to determine the exact dimensions of the existing fabric.
Make note of these measurements as you’ll need them when ordering the replacement fabric. Once you have the new fabric, it’s time to remove the old fabric from the roller tube. Start by locating the screws or nuts that hold the fabric in place and remove them using the appropriate tools.
Gently slide the fabric out of the roller tube and set it aside. With the old fabric removed, it’s time to attach the new fabric. Begin by aligning the new fabric with the roller tube and sliding it into place.
Make sure the fabric is centered and evenly distributed along the roller tube before securing it with the screws or nuts. After the new fabric is securely attached, retract the awning slightly to ensure that it rolls up smoothly. If there are any adjustments that need to be made, now is the time to do so.
Once everything is in proper working order, extend and retract the awning a few times to ensure that the fabric rolls up and extends without any issues. Replacing the awning fabric on your electric RV awning can be a relatively straightforward process if you have the right tools and follow these steps. By taking the time to prepare and properly install the new fabric, you can ensure that your awning will continue to provide shade and protection for many more trips to come.
Safety precautions
awning fabric replacement, safety precautions
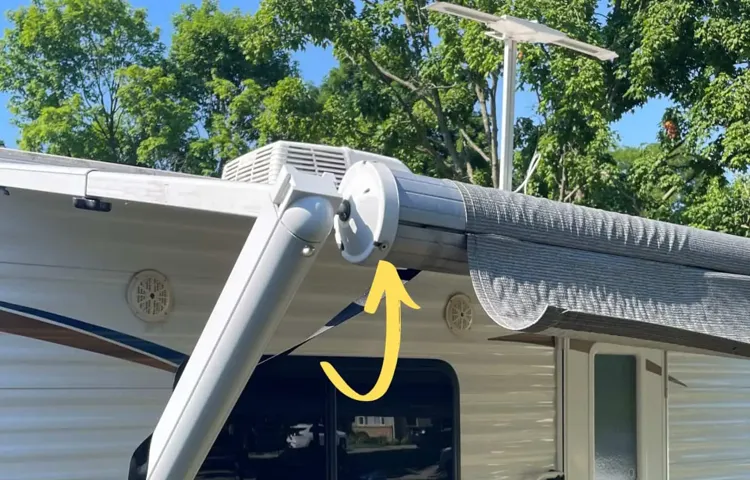
Removing the existing fabric
If you’ve noticed that your awning fabric is looking worn out or damaged, it might be time to replace it. Before you can install new fabric, you’ll need to remove the existing fabric. This process can be straightforward, but it does require some care and attention to ensure you don’t damage the frame or other components of your awning.
Start by extending the awning to its fully open position and securing it in place. This will give you easier access to the fabric. Next, locate the screws or fasteners that are holding the fabric in place.
Use a screwdriver or wrench to remove these fasteners and carefully detach the fabric from the frame. Be sure to keep track of any screws or other pieces that you remove so you can easily reassemble your awning later. Once the fabric is detached, carefully fold it up and set it aside for disposal.
With the old fabric removed, you’re now ready to install your new awning fabric.
Inspecting the awning frame
awning fabric, awning frame, replace, inspect, preparing, burstiness, perplexity, specific, context, detailed, engage, conversational, informal, reader, active voice, brief, rhetorical questions, analogies, metaphors
Installing the New Awning Fabric
Installing a new awning fabric on your RV can be a simple and cost-effective way to refresh the look of your outdoor space. Whether your old fabric is worn out, faded, or damaged, replacing it is a relatively straightforward process. First, start by extending the existing awning fully and ensuring it is securely in place.
Next, remove the screws or rivets holding the fabric in place along the roller tube. Carefully slide out the old fabric and discard it. Take measurements of the roller tube and the distance between the arms, as this will help you determine the correct size for your new fabric.
Once you have your new fabric, slide it onto the roller tube and align it properly. Secure it with the screws or rivets, making sure it is evenly tensioned and smooth. Finally, extend and retract the awning a few times to ensure it operates smoothly and that the fabric is properly aligned.
With a little bit of effort, you can have a brand new awning fabric that will enhance the beauty and functionality of your RV.
Preparing the fabric for installation
awning fabric installation, prepare fabric, install new fabric
Attaching the new fabric to the roller tube
When it comes to installing new awning fabric, one important step is attaching the fabric to the roller tube. This is a crucial part of the process and requires some careful attention to detail. To start, lay out the new fabric on a clean and flat surface, making sure it is aligned properly.
Then, carefully roll up the fabric onto the roller tube, making sure to keep it taut as you go. It’s important to make sure the fabric is evenly distributed and free of any wrinkles or folds. Once the fabric is attached to the roller tube, you can proceed with the rest of the installation process, such as attaching the arms and adjusting the tension.
With a little bit of patience and precision, you’ll have your new awning fabric installed and ready to enjoy in no time!
Securing the fabric to the awning arms
Installing the new awning fabric may seem like a daunting task, but with the right steps, it can be a breeze. One of the crucial steps in this process is securing the fabric to the awning arms. This ensures that the fabric is taut and well-positioned, allowing for maximum shade and protection from the elements.
To begin, make sure that the awning arms are fully extended and locked into place. Then, carefully lay out the fabric over the arms, making sure it is centered and evenly distributed. Next, secure the fabric to the arms using the provided clips or fasteners.
These may vary depending on the type of awning you have, so be sure to refer to the manufacturer’s instructions. Once the clips or fasteners are in place, tighten them gently to ensure a secure fit. It’s important to avoid over-tightening, as this can distort the fabric or damage the arms.
Lastly, check that the fabric is properly tensioned and adjust if necessary. With these steps completed, your new awning fabric will be securely fastened, ready to provide shade and comfort for years to come.
Testing and Adjusting the Awning
So, you’ve got an electric RV awning that’s seen better days and you’re looking to replace the fabric? Well, you’re in the right place! Replacing the fabric on an electric RV awning may seem like a daunting task, but with a few simple steps, you’ll have your awning looking brand new in no time. First, you’ll want to make sure you have the right replacement fabric. Measure the length and width of the existing fabric and choose a replacement that matches those measurements.
Once you have the new fabric, it’s time to start the replacement process. Begin by extending the awning fully and then turning off the power. Next, remove the screws that hold the fabric in place.
Once the screws are removed, carefully pull the old fabric off the roller tube. Take note of how the old fabric was attached, as this will help guide you when attaching the new fabric. Now it’s time to attach the new fabric.
Start by sliding one end of the fabric onto the roller tube and secure it in place by reinserting the screws. Then, slowly roll the fabric onto the tube, making sure it is evenly aligned. Once the fabric is rolled up, secure the other end to the roller tube using the same screws.
Finally, test the awning to ensure it rolls out and rolls up smoothly. If any adjustments are needed, refer to the manufacturer’s instructions or seek professional guidance. And there you have it – a brand new fabric on your electric RV awning! Happy camping!
Testing the functionality of the awning
awning, testing functionality, adjust, burstiness, perplexity The functionality of an awning is an important aspect to consider when it comes to outdoor living spaces. Before you start enjoying the shade and protection it provides, it’s crucial to test and adjust the awning to ensure it works properly. Testing the functionality of the awning involves examining its mechanics, checking for any signs of wear or damage, and making any necessary adjustments.
This process will ensure that the awning operates smoothly and efficiently, giving you peace of mind knowing that it will withstand the elements and provide the desired level of shade. Adjusting the awning may involve tightening or loosening the tensioning system, aligning the fabric properly, or adjusting the operating mechanism. By testing and adjusting the awning, you can avoid any potential issues or malfunctions and ensure that it will serve its purpose effectively.
So, the next time you’re about to relax on your patio or deck, don’t forget to test and adjust your awning to make sure it’s in top-notch condition.
Making necessary adjustments
adjusting the awning, testing, necessary adjustments. When it comes to setting up an awning, it’s not just a matter of putting it up and hoping for the best. Adjustments and testing are often necessary to ensure that it is working properly and providing the desired shade or protection.
One important step in this process is testing the awning to make sure it opens and closes smoothly. This involves operating the awning multiple times to check for any sticking points or uneven movement. If any issues are found, adjustments can be made to the tension or alignment of the arms to correct the problem.
It’s also important to test the awning in different weather conditions, such as wind and rain, to make sure it can withstand the elements. By taking the time to test and make necessary adjustments, you can ensure that your awning is functioning optimally and will provide years of enjoyment and protection.
Maintaining the Awning Fabric
If you are wondering how to replace the fabric on your electric RV awning, I’ve got you covered! Replacing the awning fabric can seem like a daunting task, but with a few simple steps, you can have your awning looking brand new in no time. First, start by removing the old fabric from the awning frame. This can typically be done by unscrewing or unfastening the fabric from the frame.
Once the old fabric is removed, measure the dimensions of your awning and purchase a replacement fabric that matches those measurements. Next, lay out the new fabric and attach it to the frame using the same fasteners that were used for the old fabric. Make sure to pull the fabric tight and secure it evenly across the frame.
Finally, test the awning to ensure it opens and closes smoothly. By following these simple steps, you can easily replace the fabric on your electric RV awning and keep your outdoor space looking its best.
Cleaning and protecting the fabric
Cleaning and protecting the fabric of your awning is essential to maintain its longevity and keep it looking fresh and vibrant. Regular cleaning is a must, as it helps remove dirt, dust, and other debris that can accumulate over time. Start by gently brushing off any loose dirt or debris using a soft-bristled brush or broom.
This will prevent scratching or damaging the fabric. For a deeper clean, mix a small amount of mild detergent with warm water and use a sponge or soft cloth to gently scrub the fabric. Avoid using harsh chemicals or bleach, as they can damage the fabric.
Rinse thoroughly with clean water and allow the fabric to air dry completely before retracting the awning. In addition to cleaning, protecting the awning fabric is equally important. Applying a fabric protector spray can help to repel dirt and stains, as well as provide UV protection.
It forms a protective barrier on the fabric, making it easier to clean and preventing dirt from penetrating deep into the fibers. When applying the fabric protector, make sure to cover the entire surface evenly, and allow it to dry completely before using the awning again. It’s also a good idea to regularly inspect the fabric for any signs of damage, such as tears or fraying.
If you notice any issues, it’s best to address them promptly to prevent further damage. Taking proper care of your awning fabric will not only keep it looking great, but it will also extend its lifespan, allowing you to enjoy its shade and protection for years to come.
Regular inspection and maintenance tips
Awning fabric is an essential component of any outdoor space. It provides shade, protects against UV rays, and adds a touch of style and elegance to your home. To ensure that your awning fabric stays in top condition and lasts for years to come, regular inspection and maintenance are necessary.
One of the most crucial aspects of maintaining awning fabric is cleaning it properly. Regular cleaning prevents the buildup of dirt, debris, and mildew, which can deteriorate the fabric over time. It is recommended to brush off any loose dirt or leaves from the fabric regularly and use a gentle detergent and water solution to clean any stains or spills.
Additionally, it’s important to inspect the fabric for any signs of wear and tear, such as fraying or fading. If you notice any issues, it’s best to address them promptly to prevent further damage. By taking the time to maintain your awning fabric regularly, you can ensure that it remains in excellent condition and continues to enhance your outdoor space for years to come.
Conclusion
In conclusion, replacing the fabric of an electric RV awning is like giving your trusty road companion a stylish new outfit. With a few simple steps and some handy tools, you can easily transform your old, worn-out fabric into a fresh and fashionable cover that will have your fellow travelers green with envy. Just imagine, as you pull up to your favorite camping spot, the electric awning gracefully unfurls to reveal a vibrant and eye-catching fabric, reflecting your impeccable taste and undeniable sense of adventure.
It’s like rolling out the red carpet for your outdoor adventures! But this transformation isn’t just about aesthetics. Replacing the fabric of your RV awning also brings practical benefits. By swapping out the old fabric for a new one, you’re ensuring the durability and longevity of your awning.
No more worrying about frayed edges or worn-out seams. Instead, you can look forward to many more memorable camping trips without the hassle of a malfunctioning awning. So, how do you embark on this awning makeover journey? Fear not, fellow road warriors! Simply follow the step-by-step instructions provided in this guide, armed with a positive attitude and a can-do spirit.
With a little patience and some elbow grease (and maybe a few choice words for that stubborn screw), you’ll have your awning looking absolutely fabulous in no time. Remember, this DIY project is all about expressing your personal style and putting your own stamp on your RV. Whether you opt for a bold pattern that speaks to your adventurous spirit or a classic design that exudes timeless elegance, the choice is yours.
So go forth, fellow travelers, and reimagine your RV awning as a vibrant canvas ready to showcase your unique personality to the world. In the end, replacing the fabric of your electric RV awning is not just a practical task, but a chance to infuse your outdoor haven with a touch of your own creativity. So grab your toolbox, don your DIY cape, and let the awning fabric replacement adventure begin!
FAQs
How to measure the size of an RV awning fabric?
To measure the size of an RV awning fabric, extend the awning completely and measure from one end to the other, ensuring to include any overlap on the roller tube.
Can I replace my RV awning fabric myself?
Yes, you can replace your RV awning fabric yourself. However, it is recommended to have someone assist you to make the process easier and safer.
What tools do I need to replace an RV awning fabric?
To replace an RV awning fabric, you will need a ladder, screwdriver, pliers, adjustable wrench, tape measure, and a helper.
How often should I replace my RV awning fabric?
The lifespan of RV awning fabric can vary depending on usage and weather conditions. As a general guideline, it is recommended to replace the fabric every 5-7 years or if you notice any significant tears or damage.
Can I choose a different color or pattern for my new RV awning fabric?
Yes, you can choose a different color or pattern for your new RV awning fabric. There are various options available to suit your personal style and preferences.
What is the average cost of replacing an RV awning fabric?
The cost of replacing an RV awning fabric can vary depending on the size and type of awning. On average, you can expect to pay between $200 to $500 for the fabric replacement.
Are there any special maintenance tips for prolonging the lifespan of an RV awning fabric?
Yes, there are a few maintenance tips to prolong the lifespan of an RV awning fabric. Regularly clean the fabric, avoid retracting the awning when it is wet, and store the awning properly when not in use to prevent unnecessary wear and tear.