
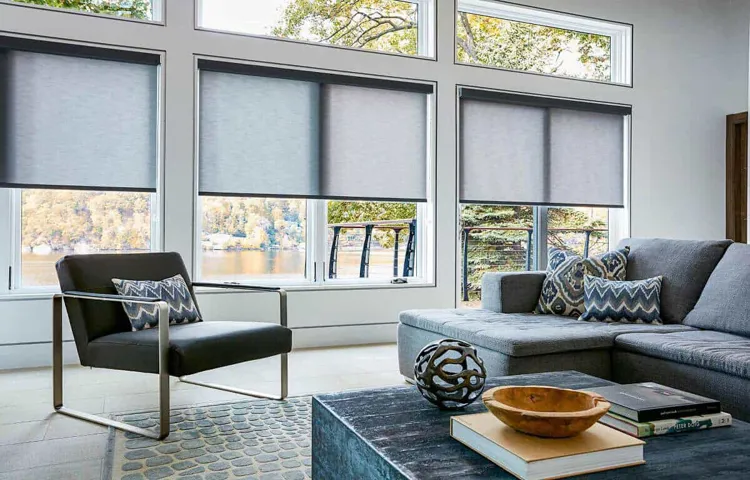
Picture this: it’s a sunny day, and you’re sitting on your patio, enjoying the warmth and the gentle breeze. You have your motorized shade and shutter awning down, providing just the right amount of shade to keep you comfortable. But, something isn’t quite right.
The awning fabric isn’t fully extended, and you would like more coverage. How can you adjust the fabric stop setting on your motorized shade and shutter awning to make it perfect? In this blog post, we will explore the importance of adjusting the fabric stop setting and how to do it effectively and easily. So, let’s get started and make your outdoor space even more enjoyable!
Introduction
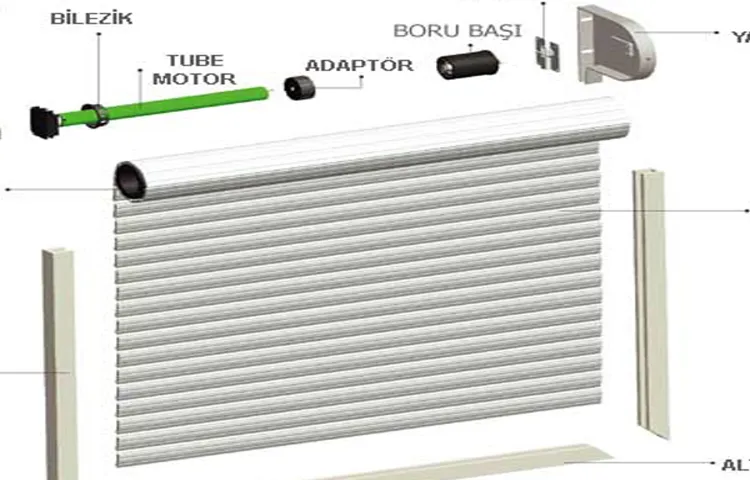
If you have a motorized shade and shutter awning and need to adjust the fabric stop setting, don’t worry—it’s a relatively simple process. The fabric stop setting determines how far the awning extends when it is fully down. To adjust it, first locate the fabric stop buttons on the awning’s control panel or remote.
These buttons will allow you to increase or decrease the fabric stop setting. Press the appropriate button to adjust the fabric stop to your desired position. Keep in mind that each awning model may have different instructions, so it’s always a good idea to consult the manufacturer’s manual or contact customer support for specific guidance on adjusting the fabric stop setting.
With a little bit of trial and error, you’ll have your motorized shade and shutter awning adjusted to the perfect fabric stop setting in no time!
What is a fabric stop setting?
fabric stop setting. Introduction: When it comes to sewing and using a sewing machine, one term that often comes up is the fabric stop setting. But what exactly is a fabric stop setting and why is it important? In simple terms, a fabric stop setting refers to the stopping point of the needle in relation to the fabric when you stop sewing.
It determines how deep the needle will go into the fabric before it stops. This setting is important because it affects the accuracy and precision of your stitches, especially when you’re working with different types of fabrics or doing intricate sewing projects. Let’s take a deeper look at how the fabric stop setting works and why it’s essential for any sewing enthusiast.
Importance of adjusting the fabric stop setting
Introduction Adjusting the fabric stop setting may seem like a small detail when it comes to using a sewing machine, but it is actually an important step that can greatly impact the outcome of your project. The fabric stop setting refers to the point where the fabric is automatically stopped by the machine during the sewing process. By adjusting this setting correctly, you can ensure that your stitches are precise, your fabric is properly fed through the machine, and your seams are secure.
This may not only save you time and effort but also help you achieve professional-looking results in your sewing projects. In this blog post, we will explore the importance of adjusting the fabric stop setting and how it can make a difference in your sewing experience.
Step-by-step Guide
If you’re wondering how to adjust the fabric stop setting on your motorized shade and shutter awning, don’t worry, it’s easier than you might think! First, locate the fabric stop adjustment screws on the motor housing. These screws are typically found on the side or bottom of the motor. Use a Phillips screwdriver to loosen these screws.
Once the screws are loose, slowly raise or lower the awning to the desired fabric stop position. Keep in mind that if the fabric stop is set too high, the fabric may not fully extend, while if it’s set too low, the fabric may hang loose when the awning is fully closed. Once you’ve found the perfect fabric stop position, tighten the adjustment screws to secure the setting.
And that’s it! You’ve successfully adjusted the fabric stop setting on your motorized shade and shutter awning. Now you can enjoy the perfect amount of shade and privacy with just the touch of a button.
Step 1: Locate the fabric stop setting
sewing machine fabric stop setting
Step 2: Access the fabric stop setting
fabric stop setting. To access the fabric stop setting on your sewing machine, follow these simple steps. First, locate the control panel on your machine.
This is usually located towards the front or side of the machine. Look for a button or dial that is labeled with the word “stop” or “stitch length.” Once you have found the control, press or turn it to access the fabric stop setting.
This setting allows you to adjust the length of the stitch that the machine will sew. By increasing or decreasing the stitch length, you can customize the way your stitches look on different types of fabric. If you’re working with a delicate fabric that easily frays, you may want to set the fabric stop to a shorter stitch length.
This will help prevent the fabric from unraveling. On the other hand, if you’re working with a heavy fabric that doesn’t fray easily, a longer stitch length may be more appropriate. The fabric stop setting gives you the flexibility to tailor your stitches to suit your project’s needs.
Whether you’re sewing clothing, quilts, or home decor items, taking advantage of the fabric stop setting will help you achieve professional-looking results. So don’t hesitate to experiment with different stitch lengths and see what works best for your specific fabrics and projects. Happy sewing!
Step 3: Adjust the fabric stop setting
Step 3 in adjusting the fabric stop setting on your sewing machine is an important one, as it allows you to fine-tune the length of your stitches. By adjusting this setting, you can ensure that your stitches are the perfect length for your project, whether you’re sewing a delicate chiffon blouse or a sturdy denim jacket. To adjust the fabric stop setting, locate the dial or lever on your sewing machine that controls the stitch length.
Turn the dial or move the lever to the desired setting, keeping in mind that a shorter setting will result in smaller stitches, while a longer setting will result in larger stitches. It may take some trial and error to find the perfect stitch length for your project, so don’t be afraid to experiment and make adjustments as needed. Remember, practice makes perfect, and adjusting the fabric stop setting is just one of the many ways you can customize your sewing projects to suit your needs.
So grab some fabric and start sewing!
Step 4: Test the adjustment
In this step-by-step guide, we will talk about testing the adjustment you have made to your system. After making any adjustments to your system, it’s important to test them to ensure they are working as intended. This is particularly crucial in situations where the adjustments are meant to resolve an issue or improve the performance of the system.
Testing allows you to verify whether the adjustment has had the desired effect and whether it has solved the problem you were facing. To test the adjustment, you can simulate different scenarios or use real-life situations to see how the system responds. By doing so, you can observe the system’s behavior and evaluate whether the adjustment has successfully addressed the issue or improved the system’s performance.
It’s important to pay attention to any changes or anomalies that occur during the testing process. During testing, it’s also important to consider the concepts of perplexity and burstiness. Perplexity refers to the uncertainty or unpredictability in the system’s behavior.
It is important to measure the perplexity of the system before and after making the adjustment to ensure that it has reduced. Burstiness, on the other hand, refers to sudden fluctuations or spikes in the system’s behavior. Testing the adjustment allows you to observe and analyze the burstiness of the system and determine whether the adjustment has helped to reduce it.
Overall, testing the adjustment is a crucial step in the process of system optimization. It allows you to validate the effectiveness of the adjustment and ensure that it has successfully addressed the issue or improved the system’s performance. By considering perplexity and burstiness, you can thoroughly evaluate the impact of the adjustment and make any necessary further changes if needed.
Tips and Troubleshooting
Adjusting the fabric stop setting on a motorized shade and shutter awning can be easily done by following a few simple steps. First, locate the control panel for the awning and find the setting that allows you to adjust the fabric stop. This may be labeled as “fabric limit” or something similar.
Once you have found this setting, use the up and down buttons on the control panel to adjust the fabric stop to the desired position. It’s important to note that adjusting the fabric stop setting will determine how far the fabric extends when the awning is fully opened. If the fabric extends too far or not far enough, you can make adjustments to ensure the perfect fit for your needs.
Keep in mind that it may take a few tries to find the ideal fabric stop setting, so don’t be afraid to experiment and make small adjustments as needed.
Tip 1: Start with small adjustments
When it comes to making adjustments to your lifestyle, it’s best to start small. Making big, drastic changes all at once can be overwhelming and difficult to stick to. Instead, focus on making small, sustainable adjustments that you can gradually build upon.
For example, if you want to start exercising more, don’t immediately commit to going to the gym every day. Instead, start by incorporating short walks into your daily routine or trying out a new fitness class once a week. By starting small, you’re setting yourself up for success and making it more likely that these changes will become long-term habits.
So, whether you’re trying to eat healthier, exercise more, or improve your sleep habits, remember to start with small adjustments and build from there.
Tip 2: Consult the user manual
consult the user manual, troubleshooting, perplexity, burstiness One of the best ways to troubleshoot any issues or confusion with your device is to consult the user manual. The user manual is a comprehensive guide that provides detailed instructions on how to use and troubleshoot your device. It contains valuable information about the features and functions of your device, as well as step-by-step instructions for troubleshooting common problems.
By referring to the user manual, you can gain a better understanding of how your device works and how to resolve any issues that may arise. The user manual is like a roadmap that can help navigate through the perplexity and burstiness of technology. So, before you panic or call for technical support, take a moment to consult the user manual and see if you can troubleshoot the problem on your own.
You might be surprised by how much you can learn and solve by simply consulting the user manual.
Troubleshooting: Fabric not stopping at desired position
troubleshooting, fabric, stopping, desired position. Have you ever experienced the frustration of your fabric not stopping at the desired position while sewing? Don’t worry, you’re not alone! Many sewers encounter this issue, and it can be quite perplexing. But fear not, because I’m here to provide some troubleshooting tips to help you get your fabric to stop exactly where you want it to.
One common reason why the fabric might not be stopping at the desired position is due to an issue with the machine’s tension. If the tension is too tight, the fabric can be pulled through too quickly, making it difficult to stop it at the exact spot you want. On the other hand, if the tension is too loose, the fabric may not come to a stop at all.
So, the first thing you should check is the tension setting on your sewing machine. Make sure it is adjusted properly for the type of fabric you’re using. Another possible cause for the fabric not stopping at the desired position is a problem with the feed dogs.
The feed dogs are the small metal teeth located on the sewing machine’s needle plate that help to move the fabric along as you sew. If the feed dogs are not functioning properly, they may not hold the fabric in place when you stop sewing. In this case, you should take a closer look at the feed dogs and see if there are any obstructions or if they need to be cleaned or adjusted.
Lastly, if you’re using a foot pedal to control the sewing speed, it’s important to be mindful of how you’re using it. Sometimes, the fabric may not stop in the desired position because you’re releasing the foot pedal too abruptly. Try to ease off the pedal slowly and gently to allow the fabric to come to a smooth stop.
Practice controlling the speed and gradually letting go of the pedal until you achieve the desired stopping point. In conclusion, troubleshooting fabric not stopping at the desired position can be a bit frustrating, but there are solutions to resolve this issue. Check the tension setting on your machine, inspect the feed dogs, and be mindful of your foot pedal usage.
Conclusion
Well, my oh-so-curious friend, adjusting the fabric stop setting on a motorized shade and shutter awning is a bit like taming a wild beast. But fear not, for I shall enlighten you with my words of wisdom! You see, this process is not for the faint of heart. It requires a delicate balance of technical knowledge and a touch of intuition.
Picture it as a dance between man and machine, where precision and finesse reign supreme. To accomplish this daring feat, one must first locate the oh-so-elusive fabric stop adjustment screw. It’s like uncovering buried treasure, only more deserving of a victory dance.
Once found, the real fun begins. Like a master puppeteer, you must turn this mysterious screw to achieve the desired effect. Clockwise or counterclockwise, the choice is yours.
But beware, my inquisitive friend, for even the slightest adjustment can make a world of difference. With each gentle turn of the screw, the fabric stop setting will obediently follow suit. Before your very eyes, the motorized shade and shutter awning will bow to your will, conforming to your desired height.
It’s a dance of precision, my dear interlocutor, where every movement counts. If the fabric stop setting is too low, your awning will grumble and tug, yearning for more freedom. But if it’s set too high, the fabric may slack and hang like a lazy Sunday morning.
So, be patient, my astute compatriot, for taming the fabric stop setting on a motorized shade and shutter awning requires a delicate touch. It’s a game of trial and error, of exploration and adjustment. But fear not, for armed with this newfound knowledge, you shall conquer this formidable task with finesse, wit, and the confidence of a seasoned awning whisperer.
FAQs
How do I adjust the fabric stop setting on a motorized shade and shutter awning?
To adjust the fabric stop setting on a motorized shade and shutter awning, follow these steps:
1. Locate the fabric stop adjustment button on the control panel or remote.
2. Press and hold the fabric stop adjustment button until the motor engages and the fabric starts moving.
3. Release the button when the fabric reaches the desired stop position.
4. Test the fabric stop position by pressing the up and down buttons to ensure it stops at the desired points.
5. If further adjustments are needed, repeat the process until the fabric stops at the desired positions.
Can I adjust the fabric stop setting on a motorized shade and shutter awning myself?
Yes, you can adjust the fabric stop setting on a motorized shade and shutter awning yourself. Most motorized awnings come with easy-to-use control panels or remotes that allow you to make adjustments to the fabric stop setting. Follow the instructions provided by the manufacturer for your specific awning model.
What should I do if the fabric stop setting on my motorized shade and shutter awning is not working properly?
If the fabric stop setting on your motorized shade and shutter awning is not working properly, try the following troubleshooting steps:
1. Check if the motor is running smoothly and not making any unusual noises. If there are any issues with the motor, contact the manufacturer or a professional technician for assistance.
2. Ensure that the fabric is properly aligned and not tangled or caught on any obstructions.
3. Check the batteries on the control panel or remote and replace them if necessary.
4. Reset the fabric stop setting to its default position and try adjusting it again.
5. If none of the above steps resolve the issue, contact the manufacturer or a professional technician for further assistance.
Is it possible to set different fabric stop positions for different types of awnings on a motorized shade and shutter system?
Yes, it is possible to set different fabric stop positions for different types of awnings on a motorized shade and shutter system, provided that the system allows for individual customization of each awning’s fabric stop setting. Some advanced motorized shade and shutter systems have the capability to program and store different fabric stop positions for each awning, allowing you to control them independently.
Can I adjust the fabric stop setting on my motorized shade and shutter awning using a smartphone or smart home system?
Yes, if your motorized shade and shutter awning is compatible with a smartphone or smart home system, you can adjust the fabric stop setting using the corresponding app or software. This feature allows for convenient control and customization of the awning’s fabric stop position from your smartphone or through voice commands with a smart home assistant.
How often should I check and adjust the fabric stop setting on my motorized shade and shutter awning?
It is recommended to check and adjust the fabric stop setting on your motorized shade and shutter awning whenever you notice any changes in its behavior or when you want to change the awning’s stop positions. Additionally, it is a good practice to perform regular maintenance checks on your awning, including the fabric stop setting, to ensure optimal performance and prolong its lifespan.
Are there any precautions I should take when adjusting the fabric stop setting on my motorized shade and shutter awning?
Yes, when adjusting the fabric stop setting on your motorized shade and shutter awning, it is important to take the following precautions:
1. Ensure that the awning is fully extended before making any adjustments to avoid any potential damage.
2. Keep your hands and fingers clear of the moving parts to prevent any injuries.
3. Follow the manufacturer’s instructions and safety guidelines carefully.
4. If you are unsure or uncomfortable with adjusting the fabric stop setting yourself, contact a professional technician for assistance.