
Hey there! Are you ready to dive into the fascinating world of introductions? Well, you’ve come to the right place! In this blog post, we’ll be exploring the ins and outs of introductions – what they are, why they matter, and how to make them captivating. Think about it – introductions are everywhere in our daily lives. Whenever we meet someone new, whether it’s at a party or a business meeting, we typically start with an introduction.
It’s the first impression we make, setting the tone for the rest of the interaction. The same principle applies to writing. Whether you’re crafting an essay, a blog post, or even a novel, the introduction plays a crucial role in grabbing the reader’s attention and drawing them in.
It’s like the opening act of a concert – if it’s lackluster, the audience might lose interest before the main event even begins. So, why do introductions matter? Well, for starters, they provide context and set expectations for what’s to come. They give readers a sneak peek into the meat of the content and help them decide whether it’s worth their time.
A well-crafted introduction can make the difference between someone clicking away from your blog post or sticking around to read the whole thing. But how do you make an introduction captivating? How do you hook your readers from the very beginning? These are the questions we’ll be exploring in this blog post. We’ll delve into techniques like asking rhetorical questions, using analogies and metaphors, and incorporating personal experiences to create a connection with your audience.
So, whether you’re a seasoned writer looking to take your intros to the next level or a beginner just dipping your toes into the world of writing, this blog post is for you. Get ready to learn the art of captivating introductions and keep your readers coming back for more. Buckle up, because it’s going to be an exciting ride!
Table of Contents
- 1 What is a Dometic Power Awning?
- 2 Why replace the awning fabric?
- 3 Materials needed for the replacement
- 4 Step 1: Prepare the area
- 5 Step 2: Remove the old fabric
- 6 Step 3: Install the new fabric
- 7 Step 4: Test the new fabric
- 8 Enjoy your new Dometic Power Awning fabric!
- 9 Additional tips and precautions
- 10 Conclusion
- 11 FAQs
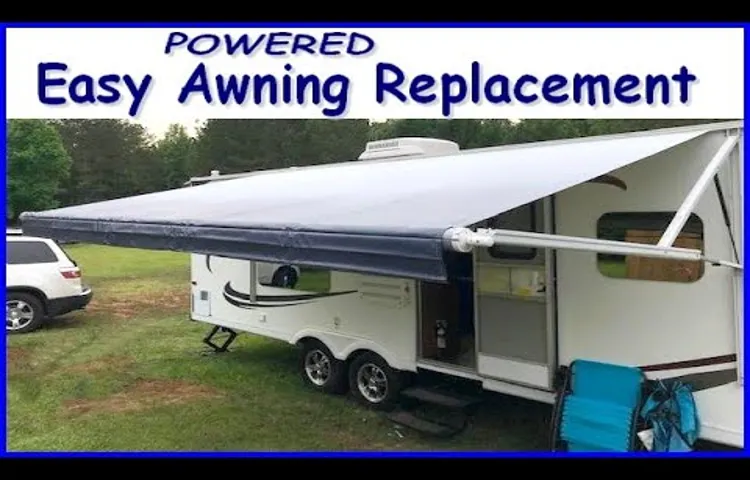
What is a Dometic Power Awning?
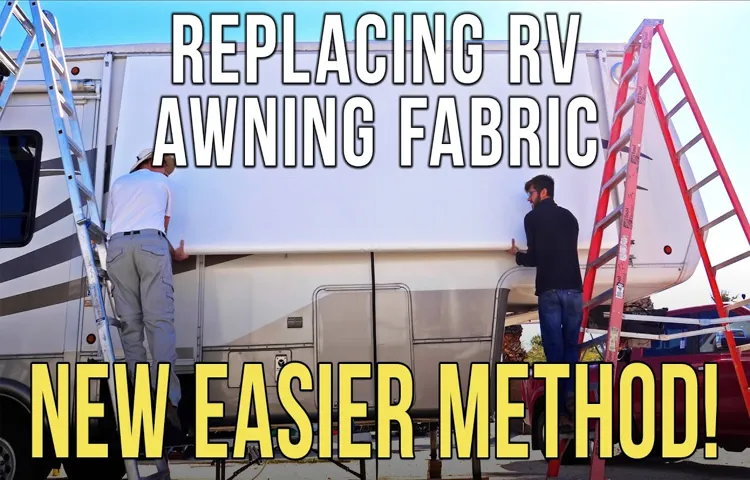
If you’re looking to replace the fabric on your Dometic power awning, you’ve come to the right place. A Dometic Power Awning is a convenient and versatile addition to any RV or camper. It provides shade and protection from the elements at the push of a button.
The fabric on the awning can become worn or damaged over time, and replacing it is a simple process that you can do yourself. To help you out, we’ve created a step-by-step video tutorial on how to replace Dometic power awning fabric. In the video, we walk you through each step, from removing the old fabric to installing the new one.
We also provide tips and tricks to make the process go smoothly. So whether you’re a seasoned DIYer or a beginner, you’ll be able to successfully replace the fabric on your Dometic power awning with our video guide.
Why replace the awning fabric?
If you’re looking to spruce up your outdoor space or if your awning fabric is showing signs of wear and tear, replacing the fabric is a great option. A Dometic power awning provides excellent shade and protection from the elements, but over time, the fabric can become faded, torn, or damaged. Luckily, replacing the fabric on a Dometic power awning is a fairly simple process, especially if you have a handy step-by-step video guide to follow.
In the video, you’ll be able to see exactly how to measure and remove the old fabric, as well as how to install the new fabric securely. Having a new awning fabric not only enhances the aesthetic appeal of your outdoor space, but it also ensures that your power awning continues to function properly and provide the desired amount of shade and protection. So why not give your outdoor area a refreshed look and learn how to replace the Dometic power awning fabric with a helpful video tutorial? With just a little bit of time and effort, your awning will be looking good as new in no time.
Materials needed for the replacement
If you’re looking to replace the fabric on your Dometic power awning, you may be wondering what materials you’ll need for the job. Don’t worry, we’ve got you covered! To start, you’ll need a replacement fabric specifically designed for Dometic power awnings. This fabric should be durable and able to withstand outdoor conditions.
Additionally, you’ll need a few basic tools such as a ladder, a wrench or socket set, and possibly a drill. It’s always a good idea to have some extra hands to help with the installation, so gather a friend or family member to assist you. Lastly, be sure to have some sealant or adhesive on hand to secure the fabric to the awning.
Having these materials ready will make the replacement process much easier and ensure that your awning will be functional and looking its best in no time.
Are you someone who loves learning new skills and trying your hand at different activities? If so, then you’re in the right place! In this step-by-step guide, we will walk you through the process of mastering a new skill or completing a project, from start to finish. Think of this guide as your personal roadmap to success. Whether you want to learn how to cook a delicious meal, build your own website, or even create a piece of art, we’ve got you covered.
No matter your skill level or previous experience, we believe that anyone can learn something new with the right guidance. Our step-by-step approach is designed to make learning enjoyable and accessible. We break down complex tasks into smaller, more manageable steps, so you can easily follow along and track your progress.
We also provide helpful tips and tricks along the way to ensure you stay motivated and engaged throughout the process. By the end of this guide, you’ll have the confidence and knowledge to tackle any new skill or project that comes your way. So, why wait? Let’s dive in and start learning together!
Step 1: Prepare the area
So you want to replace the fabric on your Dometic power awning? Well, you’ve come to the right place! In this step-by-step guide, we’ll walk you through the process and even provide a video tutorial to make it as easy as possible. The first step in replacing your Dometic power awning fabric is to prepare the area. This involves extending the awning fully to provide enough space to work comfortably.
Make sure the awning is securely locked in place before you begin. Next, you’ll want to gather the necessary tools and materials. Some common items you’ll need include a ladder, a screwdriver, pliers, a tape measure, a marker or pen, safety goggles, and the new fabric.
It’s important to double-check that you have everything you need before you start the project. Once you have your tools and materials ready, it’s time to remove the old fabric. Start by loosening the screws on the awning arms to release the tension.
Carefully remove the pins or clips holding the fabric in place and gently roll it up. Be cautious of any springs or mechanisms that may be attached to the fabric. With the old fabric removed, it’s time to measure and cut the new fabric.
Lay the old fabric flat and use it as a template to ensure the new fabric is the correct size. Mark the measurements with a marker or pen and then carefully cut along the lines using a sharp pair of scissors. Once you have the new fabric cut to size, it’s time to attach it to the awning.
Start by aligning the fabric with the slots on the roller tube and slide it in. Make sure the fabric is centered and then secure it in place using the pins or clips. Double-check that everything is secure and then tighten the screws on the awning arms to create tension.
Measure the size of the fabric needed
In order to create a perfectly fitted outfit or customize your home decors, it’s important to measure the size of the fabric you’ll need. This step is crucial to ensure that you have enough fabric for your project and to avoid any unnecessary waste. But how do you measure the fabric? Well, it’s not as difficult as it may seem.
First, you’ll need to prepare the area where you’ll be working. Clear any clutter and make sure you have a clean and flat surface to lay out the fabric. This will ensure accurate measurements and make your cutting process much easier.
It’s also important to have the necessary tools on hand, such as a measuring tape and a ruler, to ensure precise measurements. So, take a few moments to get your workspace ready and gather your tools, and you’ll be well-prepared to measure the size of the fabric needed for your project.
Remove any accessories attached to the awning
When preparing to clean or repair your awning, it’s essential to remove any accessories that may be attached to it. These can include things like lights, curtains, or wind sensors. Taking these accessories off will not only make the cleaning process easier but also help protect them from any potential damage.
Imagine trying to clean your awning with all these things in the way – it would be like trying to paint a room with furniture still in it! So, take the time to remove any attachments before starting your cleaning or repair project. Your awning will thank you for it!
Clean the area where the fabric will be replaced
When replacing fabric on furniture or other items, it’s important to start by preparing the area where the new fabric will be applied. This involves cleaning the area thoroughly to ensure a smooth and professional-looking result. Dust, dirt, and debris can prevent the new fabric from adhering properly or cause it to appear uneven or bumpy.
To clean the area, start by removing any loose dirt or debris with a vacuum cleaner or brush. Then, use a mild cleaning solution and a soft cloth or sponge to gently wipe down the surface. Pay special attention to any stains or discoloration, as these may need to be treated before replacing the fabric.
By taking the time to clean the area properly, you’ll ensure that the new fabric adheres correctly and that the final result looks professional and polished.
Step 2: Remove the old fabric
When it comes to replacing the fabric on your Dometic power awning, the first step is to remove the old fabric. This can sometimes be a bit tricky, but with the right tools and a little patience, you’ll have it off in no time. Start by retracting the awning fully, making sure the arms are secure.
Then, locate the screws that are holding the fabric in place. Carefully remove these screws, being sure not to strip them in the process. Once the screws are removed, you can gently lift the fabric off of the roller tube.
It may be helpful to have a friend assist you with this step to ensure that the fabric doesn’t tear or get caught on any obstructions. Once the fabric is fully removed, you can move on to the next step of replacing it with a new one. By following these steps and watching a helpful video guide on how to replace Dometic power awning fabric, you’ll have your awning looking as good as new in no time.
Disconnect the power supply to the awning
When it comes to replacing the fabric on your awning, the first step is to disconnect the power supply. This ensures your safety and allows you to work freely without any electrical hazards. You don’t want to risk any accidents while handling the awning fabric, so make sure to turn off the power and unplug any cords before proceeding.
This step may seem simple, but it’s an important one that shouldn’t be overlooked. Once you’ve disconnected the power supply, you can move on to the next step of removing the old fabric.
Carefully remove the fabric from the roller tube
To begin the process of replacing the fabric on your roller tube, the first step is to carefully remove the old fabric. This may seem like a daunting task, but with a little patience and some basic tools, it can be done in no time. Start by locating the end of the fabric on the roller tube.
You may need to unroll the fabric slightly to find it. Once you have located the end, use a pair of sharp scissors or a utility knife to carefully cut the fabric away from the tube. Be sure to cut as close to the tube as possible to avoid leaving any excess fabric behind.
Once the fabric is cut, you can begin to peel it away from the roller tube. Take your time and be gentle to avoid tearing the fabric or damaging the tube. If the fabric is stubborn and doesn’t want to come off, you can use a heat gun or a hair dryer to soften the adhesive and make it easier to remove.
Simply apply heat to the fabric as you peel it away from the tube. Once all of the fabric has been removed, you can move on to the next step in the process.
Remove any remaining clips or attachments
When it comes to reupholstering furniture, one of the first steps is removing the old fabric. This can be a tedious task, but it’s necessary to ensure a clean and professional-looking end result. After removing any remaining clips or attachments, you can start by carefully cutting away the old fabric using a seam ripper or sharp scissors.
It’s important to be gentle and take your time to avoid damaging the underlying padding or structure. Once the old fabric is removed, you’ll have a blank canvas to work with and can move on to the next step of reupholstering your furniture.
Step 3: Install the new fabric
Replacing the fabric on your Dometic power awning may seem like a daunting task, but with the right instructions and a little bit of patience, it can be done. In this step-by-step guide, we will walk you through the process of installing the new fabric so that you can enjoy your awning for years to come. Before you begin, make sure you have all the necessary tools and materials, including the new fabric, a ladder, and a helper if needed.
Start by extending your awning fully and turning off the power to the motor. Then, remove the retaining screws or pins from the roller tube and carefully roll up the old fabric. Once the fabric is removed, unroll the new fabric and position it on the roller tube, making sure it is centered and aligned properly.
Using the retaining screws or pins, secure the new fabric in place. Finally, retract the awning partially to ensure that the fabric rolls up smoothly and evenly. With just a few simple steps, you can replace the fabric on your Dometic power awning and have it looking good as new.
Attach the new fabric to the roller tube
“roller tube,” “new fabric,” “install,” “attach,” “step 3,” “curtain repair” In step 3 of curtain repair, you will need to attach the new fabric to the roller tube. This is an important and exciting step in the process, as it means you are one step closer to having your curtains looking as good as new. To start, make sure you have the necessary tools handy, such as a screwdriver or a drill.
Next, carefully unroll the old fabric from the roller tube, taking note of how it was attached. Once the old fabric is removed, lay the new fabric flat and align it with the roller tube. Start rolling the fabric onto the tube, making sure it is straight and even.
You may need to enlist the help of a friend or family member to hold the fabric in place as you roll. Once the fabric is completely rolled onto the tube, secure it with screws or clips, depending on the specific design of your curtains. Take your time with this step, ensuring that the fabric is taut and evenly distributed along the roller tube.
Finally, give your curtains a test run to make sure they operate smoothly. Congratulations, you have successfully installed the new fabric onto the roller tube!
Secure the fabric using clips or attachments
Now that you have prepared your new fabric, it’s time to install it onto your furniture. The third step in this process is to secure the fabric using clips or attachments. These clips or attachments are essential in ensuring that the fabric stays in place and doesn’t shift or wrinkle over time.
They are typically made of durable materials like metal or plastic and can be easily attached to the frame of your furniture. By securing the fabric tightly to the frame, you can achieve a clean and professional look. Additionally, these clips or attachments help to distribute the tension evenly along the edges of the fabric, preventing it from tearing or fraying.
So make sure to take your time and use enough clips or attachments to secure the fabric properly.
Connect the power supply back to the awning
Now that you have disconnected the power supply from the awning in Step 2, it’s time to move on to installing the new fabric. This is the fun part where you get to update the look of your awning! To start, lay out the new fabric on a clean and flat surface. Make sure it is aligned correctly and there are no wrinkles or creases.
Take your time with this step to ensure a smooth installation. Next, carefully attach the new fabric to the awning frame. Begin by lining up the top edge of the fabric with the top of the frame.
Use clips or pins to hold it in place temporarily while you work on attaching the rest of the fabric. Now, work your way down each side of the awning, securing the fabric to the frame. Use a ladder if necessary to reach higher points.
Make sure to pull the fabric taut as you go along to avoid any sagging or looseness. As you reach the bottom of the awning, double-check that the fabric is aligned properly and adjust if needed. Once you are satisfied with the placement, secure the fabric in place by using the appropriate fasteners recommended by the manufacturer.
Once the new fabric is securely attached, step back and admire your handiwork! The new fabric will freshen up the look of your awning and give it a whole new appearance. Now, all that’s left to do is to reconnect the power supply and enjoy your newly updated awning. Installing new fabric on your awning can be a relatively easy and satisfying DIY project.
With a little bit of time and patience, you can transform the look of your outdoor space. So go ahead and give it a try!
Step 4: Test the new fabric
If you’re looking to replace the fabric on your Dometic power awning, you’re in the right place! In this blog section, we’ll walk you through step 4 of the process – testing the new fabric. Once you have installed the new fabric onto your awning, it’s important to check that everything is working as it should before fully extending the awning. This can be done by using the control panel or switch to extend and retract the awning slightly.
Take note of any unusual sounds or movements. If everything looks and sounds good, you can then fully extend the awning to ensure it operates smoothly. It’s also a good idea to check for any leaks or gaps where water could potentially enter.
So, take your time, test the new fabric thoroughly, and enjoy your refreshed Dometic power awning!
Extend and retract the awning to ensure proper functioning
When replacing the fabric on your awning, it’s important to test the new fabric to ensure it functions properly. To do this, start by extending the awning completely to its maximum length. This will allow you to see if the fabric moves smoothly and without any hitches.
Pay attention to any areas where the fabric may get caught or snagged, as this could indicate a problem. Once the awning is fully extended, retract it back in to see if the fabric rolls up evenly and without any issues. If you notice any problems during this test, it’s best to address them before fully installing the new fabric.
By testing the fabric before completing the replacement process, you can ensure that your awning will function properly and provide the shade and protection you desire.
Hey there! Are you struggling with writing conclusions for your blog posts? Don’t worry, we’ve got you covered! In this blog post, we will delve into the art of crafting a powerful conclusion that leaves a lasting impression on your readers. Think of a conclusion as the cherry on top of your blog post sundae. It’s the final opportunity to wrap up your ideas, leave your readers with something to think about, and ultimately persuade them to take action.
But how do you make it memorable? Well, crafting a compelling conclusion is all about summarizing your main points in a concise and impactful way. It should tie everything together and leave your readers with a sense of satisfaction. But it shouldn’t just be a regurgitation of what you’ve already said; it should offer a fresh perspective or a new angle that leaves a lasting impression.
One powerful technique is to end your conclusion with a thought-provoking question. This engages your readers and encourages them to reflect on what they’ve just read. By leaving them with an unanswered question, you’re opening up a dialogue and inviting them to continue the conversation.
Another effective strategy is to use analogies or metaphors to drive your point home. These literary devices can help simplify complex ideas and make your conclusion more relatable. They create a vivid image in your readers’ minds and make your conclusion more memorable.
Remember, a conclusion is your chance to leave a lasting impression on your readers. So make it count! Use these tips to craft a conclusion that packs a punch and keeps your readers coming back for more. So what are you waiting for? Start perfecting those conclusions and watch your blog posts soar to new heights!
Enjoy your new Dometic Power Awning fabric!
So you’ve decided to replace the fabric on your Dometic Power Awning, and you’re ready to enjoy your new and improved outdoor space. In this blog section, we’ll walk you through the process and even provide you with a helpful video tutorial on how to replace Dometic Power Awning fabric. First, gather all the necessary materials, including a ladder, safety glasses, a socket wrench, and of course, the new fabric for your awning.
Then, start by retracting the awning completely and ensuring it is securely locked in place. Next, locate the awning’s mounting brackets and carefully remove the bolts using the socket wrench. Once the bolts are removed, you’ll be able to slide the awning out of the brackets.
With the awning removed, lay it flat on a clean, flat surface. Using a screwdriver or a similar tool, carefully remove any staples or screws holding the old fabric in place. Once all the fasteners are removed, you can gently pull off the old fabric.
Now it’s time to install the new fabric. Lay it out flat and ensure it’s the correct size for your awning. Starting at one end, carefully slide the fabric onto the awning roller, making sure it’s centered and aligned properly.
Once the fabric is in place, use a staple gun or screws to secure it to the awning roller. Make sure to evenly distribute the fasteners to ensure a secure fit. Now, carefully roll the awning back into the housing, being mindful not to pinch or damage the fabric.
Finally, reattach the awning to the mounting brackets by inserting the bolts and tightening them using the socket wrench. Once everything is securely fastened, take a step back and admire your new Dometic Power Awning fabric. Remember, it’s always a good idea to refer to the manufacturer’s instructions and guidelines for your specific awning model.
Additional tips and precautions
Replacing the fabric on your Dometic power awning can seem intimidating, but with the right instructions and a little bit of patience, it can be a straightforward process. One helpful resource is a video tutorial that provides step-by-step instructions on how to replace Dometic power awning fabric. By watching this video, you can see exactly how to remove the old fabric and attach the new fabric, ensuring a smooth and successful replacement.
It’s important to follow the directions carefully and take your time to avoid any mistakes or damage to your awning. Additionally, it’s a good idea to have a friend or family member assist you during the process to make it easier and safer. By taking these precautions and utilizing the helpful video tutorial, you can confidently replace the fabric on your Dometic power awning and enjoy a fresh and updated look for your outdoor space.
Conclusion
So there you have it, folks! Now you know the ins and outs of replacing your Dometic power awning fabric. It may seem daunting at first, but with a little patience and a few handy tools, you’ll have your awning looking good as new in no time. Just remember to take your time, follow the step-by-step instructions, and keep a sense of humor along the way.
After all, why not make the most out of a potentially frustrating situation and turn it into a fun DIY project? Now you can impress your friends and family with your awning repair skills, and maybe even start your own side hustle as an amateur awning fabric replacement expert (hey, it’s a niche market!). But most importantly, enjoy the shade and protection your newly installed fabric provides. Whether you’re lounging by the pool, having a backyard BBQ, or simply taking a much-needed break from the scorching sun, your Dometic power awning will have you covered – literally.
So go forth, my friends, and conquer the world of awning repairs! And remember, if all else fails, there’s always YouTube tutorials to guide you along the way. Happy fabric replacing!”
FAQs
Can I replace the fabric on my Dometic power awning?
Yes, you can replace the fabric on your Dometic power awning. There are replacement fabrics available that you can purchase.
How often should I replace the fabric on my Dometic power awning?
The fabric on your Dometic power awning should be replaced when it becomes worn, torn, or damaged. This can vary depending on factors such as usage and weather conditions.
What tools do I need to replace the fabric on my Dometic power awning?
To replace the fabric on your Dometic power awning, you will need a ladder, a screwdriver, a tape measure, and a helper to assist you in removing and installing the fabric.
Are there any instructional videos available for replacing the fabric on a Dometic power awning?
Yes, there are instructional videos available online that can guide you through the process of replacing the fabric on your Dometic power awning. These videos can provide visual step-by-step instructions.
Can I replace the fabric on my Dometic power awning myself, or do I need to hire a professional?
It is possible to replace the fabric on your Dometic power awning yourself if you are comfortable with DIY projects. However, if you are unsure or not confident in your abilities, it may be best to hire a professional to ensure the job is done correctly.
How long does it take to replace the fabric on a Dometic power awning?
The time it takes to replace the fabric on a Dometic power awning can vary depending on your level of experience and the specific awning model. Generally, it can take a few hours to complete the replacement.
Where can I purchase replacement fabric for my Dometic power awning?
Replacement fabric for Dometic power awnings can be purchased from RV parts and accessories stores, online retailers, or directly from Dometic. It is important to ensure you are purchasing the correct size and model for your awning.