
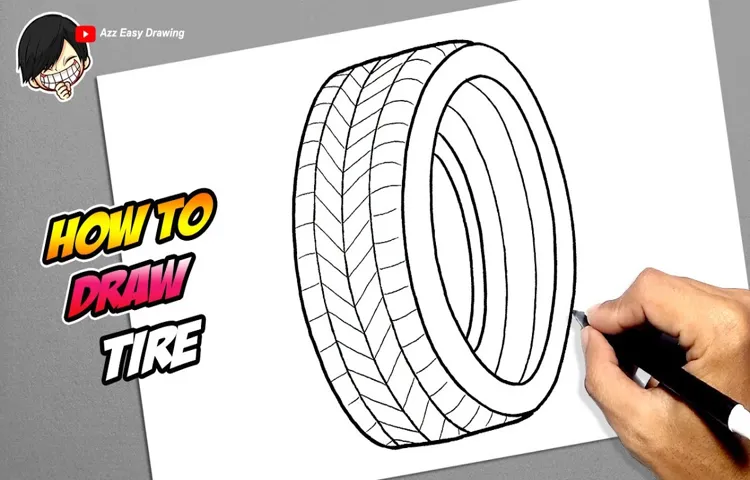
If you have ever tried to draw a tire, you know that it can be an intimidating task. It involves intricate details, precise shading, and a strong understanding of perspective. But fear not, as we have put together a step-by-step guide that will help you draw a tire with ease.
Whether you are an aspiring artist or just looking for a fun DIY project, this guide has got you covered. In this blog post, we will take you through each step of the process with detailed instructions and helpful tips along the way. So, grab your pencils and let’s get started!
Table of Contents
Materials You’ll Need
When it comes to drawing a tire, there are a few materials you’ll need to have on hand. First and foremost, you’ll need a good quality graphite pencil, preferably with a range of lead hardness options from soft to hard. This will allow you to create the various shades and textures needed to accurately depict the tire.
You’ll also need an eraser, which is essential for correcting any mistakes you might make along the way. A ruler or straightedge will come in handy as well, helping you to create straight lines and ensure proper proportions. Finally, it’s recommended that you use a reference image to guide your drawing and ensure accuracy.
Whether you find an image online or take a photo of your own tire, having a reference will greatly improve the quality of your final drawing. With these materials in hand, you’ll be well-equipped to successfully draw a tire and bring your artwork to life!
Pencil, eraser, ruler, compass
If you’re planning to start a new project or even just a simple activity that requires drawing or measuring, there are a few essential tools you’ll need – a pencil, eraser, ruler, and compass. These small items are crucial in ensuring that your lines are straight, your circles are perfectly round, and your mistakes are easily correctable. The pencil is the most basic tool, allowing you to create dark lines or lighter ones, depending on the pressure you apply.
The eraser comes in handy when you make mistakes or when you need to remove some lines to clean up your drawing. A ruler is necessary for measuring both horizontal and vertical lines, and making sure they are accurately aligned. And finally, a compass is used for creating perfect circles or arcs with a fixed diameter.
With these four simple tools, you’ll be able to take on a wide range of projects with ease and confidence. Don’t be discouraged if you’re just starting out – remember that practice makes perfect, and with these tools by your side, you’re on your way to creating amazing art or designs in no time!
Step 1: Draw the Circle
When it comes to drawing a tire, step one is always to draw the circle. This may seem obvious, but a perfect circle is the foundation of any good tire drawing. You can start by using a compass or tracing a circular object to ensure the circle is symmetrical and smooth.
If you’re drawing a front view of the tire, the circle will be more flattened at the bottom than the top to show the weight of the vehicle. Drawing the circle accurately will also make it easier to add the treads and other details later on. So take the time to get the circle just right, and your tire drawing will be off to a great start.
Use your compass to draw a large, even circle
Drawing a large, even circle is essential for a lot of projects, from designing logos to creating mandalas. To start, you’ll need a compass – a simple tool that consists of two legs that open and close on a pivot point. Once you have your compass, set the width of the legs to the size of the circle you want to draw and fix it in place by tightening the screw.
Next, place the point of the compass on the paper where you want the center of the circle to be. With a firm grip on the tool, rotate it around the pivot while keeping the other leg firmly on the paper. This will create a perfect circle with crisp edges and even width.
Remember, if you’re struggling to draw a circle, you can always practice with a pencil, and it’s best to start with a small one before moving onto larger circles. With a bit of patience and practice, you’ll be drawing perfect circles in no time!
Step 2: Add the Tread
Now that you have the basic outline of your tire, it’s time to add the tread. This is what gives your tire traction on the road or terrain. Start by drawing a series of lines in the center of your tire.
These lines should be parallel and evenly spaced. You can make them as long or short as you want, depending on the style of tire you’re going for. Next, draw curved lines connecting each of the parallel lines.
These should create a pattern that looks like a series of connected horseshoes. This is the basic tread pattern. You can add more detail by drawing smaller curves or lines within each horseshoe shape.
Remember to keep the tread symmetrical on both sides of your tire. With a little practice, you’ll have a realistic looking tire in no time. And that’s it, you’ve learned how to draw a tire with proper tread.
Draw small circles or lines around the perimeter of the tire
Adding tread to your tire is an essential step in ensuring your vehicle can grip the road in wet or snowy conditions. To start, draw small circles or lines around the perimeter of the tire with a white grease pencil. Next, using a tire tread tool, create the tread design you want by dragging it along the pencil marks you made earlier.
There are many different tread patterns you can choose from, each with its own benefits depending on the conditions you’ll be driving in. For example, a directional tread pattern is optimal for wet conditions because it helps channel water out from under the tire. A symmetric tread pattern is more versatile and can perform well in both wet and dry conditions.
By taking the time to add tread to your tire, you can help prevent dangerous hydroplaning or sliding. So, be sure to stay safe on the road by giving your tires the attention they need.
Step 3: Draw the Sidewall
Now that we have successfully drawn the tread pattern of our tire, it’s time to move on to the next crucial step: drawing the sidewall. The sidewall is the part of the tire that connects the tread to the rim and contains important information about the tire, such as the brand, size, and recommended tire pressure. To draw the sidewall, we need to first determine the thickness and shape of the sidewall.
Generally, the sidewall of the tire is thicker than the tread to provide extra support and protection. We can use our reference image or an actual tire to guide us in drawing the exact shape of the sidewall. Once we have the basic shape, we can add any necessary details, such as the brand name, tire size, and recommended tire pressure.
By following these steps, we can successfully draw an accurate and detailed tire.
Use your ruler to add a thick line around the circle’s edge
Now that we have drawn the circle for our wheel, it’s time to add some depth and draw the sidewall. This is the third step in our wheel drawing tutorial. Using your ruler, add a thick line around the edge of the circle.
This line will represent the lip of the wheel. It is important to make sure the thickness of the line is consistent all the way around the circle. You can adjust the thickness to make it look more or less pronounced, depending on the design you want to achieve.
Once you have the lip of the wheel defined, draw a vertical line downwards from the inside of the lip. This line will represent the sidewall of the tire. The length of this line will depend on what type of tire you want to create.
For example, a low profile tire will have a shorter sidewall than a larger off-road tire. Make sure the sidewall is parallel to the lip of the wheel, giving it a straight and professional look. And there you have it, you have successfully drawn the sidewall of your wheel!
Step 4: Add Details
Now that you’ve got the basic outline of the tire, it’s time to add some details. One important detail to include is the tread pattern on the tire. This adds depth and texture to your drawing.
To create the tread pattern, start by lightly drawing diagonal lines across the tire. Then, add smaller lines to the diagonals in a zigzag pattern to create the texture of the tread. Don’t forget to add the sidewall of the tire as well.
This is the part of the tire that connects the tread to the wheel. The sidewall can vary in thickness and design, so make sure to reference a real tire or a reference photo to see how it should look. By adding these details, your drawing will begin to look more realistic and three-dimensional.
Congratulations, you now know how to draw a tire!
Draw tire branding or other features
When adding details to your tire drawing, don’t forget to include any tire branding or other unique features. This can include the tire manufacturer’s logo, the model number or size of the tire, and any other distinguishing marks. Additionally, you may want to add in any sidewall features such as raised letters or designs.
These details can really make your tire drawing look more authentic and realistic. Just be sure to pay attention to the scale of your drawing and make sure that all of the details are proportionate to the size of the tire you are drawing. With a little attention to detail, you can create a tire drawing that looks like it’s ready to hit the road!
Step 5: Shade and Color
Once you have successfully drawn the basic outline and details of your tire, it’s time to add some depth and dimension to your drawing. One way to achieve this is by shading and coloring. First, determine the light source in your drawing and shade accordingly.
The areas closest to the light source should be the lightest and gradually get darker as you move away from it. Use a blending tool or your finger to smooth out any harsh lines and create a more realistic look. Next, choose the color or colors you want to use for your tire.
You can use shades of black, gray, or even brown to add some realism and texture to your drawing. Consider using different shades or hues to create highlights and shadows. Don’t be afraid to experiment and play with colors until you achieve the desired effect.
Remember, creating a realistic tire takes practice, patience, and attention to detail, but with time and dedication, you’ll be able to master this skill.
Add shading and color to make tire look realistic
Now that we have all the basic shapes of the tire in place, it’s time to add some shading and color to make it look more realistic. We’ll start with shading. Shading will give the tire depth and dimension so that it doesn’t look flat.
For shading, we need to decide where our light source is coming from. Let’s say our light source is coming from the top left. To shade the tire, we need to add darker shades to the areas that are furthest away from the light source.
This will give it a three-dimensional look. Next, we’ll move on to color. We can’t forget that a tire isn’t just black – it has a lot of different colors in it, especially if it’s a used tire.
Let’s add some shades of brown, gray, and even some green to make it look more realistic. By adding shading and color, we’ve turned our flat tire into a realistic looking one.
Final Thoughts
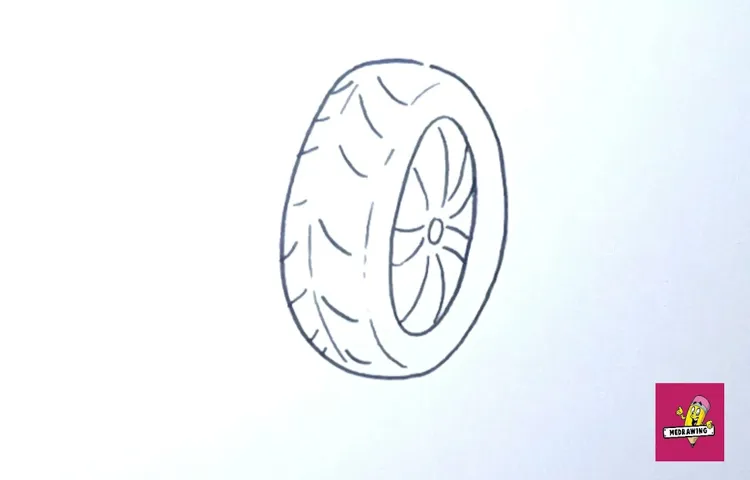
To draw a tire, it’s crucial to study its patterns and details closely. Start by sketching a circle, which will serve as the tire’s outline. Then, draw a smaller circle inside the larger one and connect them with curved lines that will form the tire’s outer edge.
Fill in the tread pattern, which will give the tire its characteristic look. Add highlights and shadows to create depth and dimension. To make your tire look more realistic, make sure to blend the lines and shades smoothly.
Lastly, don’t forget to add a hubcap or rim if desired. Learning how to draw a tire takes practice and patience, but with a bit of effort, you’ll be able to create a stunning tire drawing that’ll wow all your friends and family.
Practice and don’t be afraid to make mistakes!
The key to improving your skills is practice and not being afraid to make mistakes. It’s normal to make mistakes, and it’s how we learn and grow. The best way to improve is to practice regularly and consistently.
Set aside a specific time each day to work on your skills and commit to it. Don’t worry about getting everything right the first time. Instead, focus on progress and improvement.
Keep practicing and pushing yourself out of your comfort zone. With time, you will see yourself improving and becoming more confident. Remember, the most successful people have all failed and made mistakes along the way.
It’s part of the learning process. Don’t let fear of failure hold you back. Embrace the process and keep practicing to reach your goals.
Conclusion
In conclusion, drawing a tire may seem like a daunting task at first, but with the right techniques and a little bit of patience, it can be a wheel-y great experience. Remember to pay attention to the details, such as the treads and the rim, to give your tire that extra bit of realism. And if all else fails, you can always just draw a circle and call it a day.
After all, if life gives you flat tires, you might as well make some artwork out of them!”
FAQs
What are the basic steps to draw a tire?
The basic steps to draw a tire include drawing a circular outline, adding treads and patterns, shading for depth and dimension, and highlighting to create a metallic effect.
What materials do I need to draw a tire?
You will need a drawing pencil, eraser, paper, and shading tools like graphite sticks or charcoal to draw a tire.
Can I draw a tire by hand or do I need a computer program?
You can draw a tire by hand using traditional drawing tools or on a computer program like Adobe Illustrator or CorelDRAW.
Do I need to be an expert artist to draw a tire?
No, you don’t need to be an expert artist to draw a tire. With practice and patience, anyone can learn to draw a tire.
How can I make my tire drawing look more realistic?
You can make your tire drawing look more realistic by paying attention to details like shading, highlights, and surface textures. Adding shadows and reflections can also enhance its realism.
Are there any tips for drawing radial tires?
Some tips for drawing radial tires include focusing on the centerline and allowing the treads to curve evenly around it, breaking up the patterns of the treads to avoid a repetitive look, and paying attention to the angle of the treads.
Are there any free resources available to help me learn how to draw a tire?
Yes, there are free online tutorials and video demonstrations available to help you learn how to draw a tire. You can also find helpful tips and advice on drawing websites and forums.