
Ready to replace your RV awning but not sure where to start? Don’t worry, we’ve got you covered! In this blog post, we’ll walk you through the steps on how to measure your RV awning for replacement, ensuring a perfect fit every time. Your RV awning is a crucial component of your outdoor living space, providing shade and protection from the elements. Over time, however, wear and tear can take its toll, and you may find yourself in need of a new awning.
But how do you know what size to order? Measuring your RV awning is easier than you might think. All you need is a tape measure and a little bit of time. First, extend your awning fully to its open position.
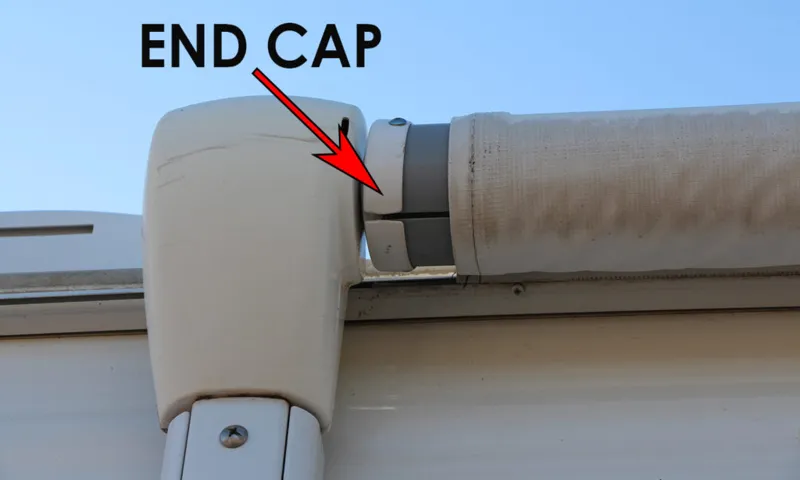
Next, measure the distance from one end of the roller tube to the other. Make sure to include any brackets or end caps in your measurement. This will give you the width of your awning.
Next, measure the length of your awning by measuring from the top of the roller tube to the ground. Again, be sure to include any brackets or end caps in your measurement. This will give you the height of your awning.
Once you have your measurements, you can begin the exciting process of selecting your new RV awning. With so many options available, from fabric colors to add-ons like LED lights, you can truly make it your own. So why wait? Start measuring your RV awning today and get one step closer to enjoying your outdoor space in style.
Whether you’re replacing a worn-out awning or simply looking for an upgrade, measuring is the first step to a successful installation. So grab that tape measure and get started!
Table of Contents
Introduction
If you are in need of replacing your RV awning, one of the first steps is to measure your awning accurately. This will ensure that you get the right size replacement and avoid any unnecessary expenses or frustrations. Here’s a step-by-step guide on how to measure your RV awning for replacement.
First, make sure your awning is fully extended before taking any measurements. This will give you the most accurate measurement of the awning’s length. Next, measure the length of the fabric from end to end, including any additional length that may be hidden in the roller tube.
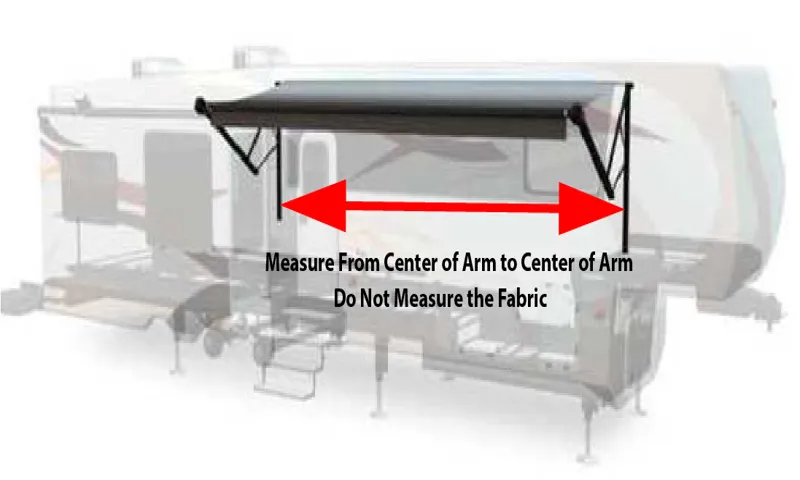
Be sure to measure from the center of the arm to the center of the arm on the opposite side. Once you have the length measurement, you can move on to measuring the width. Measure the width of the fabric from the outermost end to the outermost end.
Again, be sure to measure from the center of the arm to the center of the arm on the opposite side. This will give you the most accurate measurement of the awning’s width. It’s also important to measure the projection of your awning.
The projection refers to how far the awning extends out from the side of your RV. Measure from the outer edge of the mounting bracket to the outer edge of the roller tube. This measurement will help you determine the size of replacement fabric you need.
In addition to these measurements, it’s also a good idea to take note of any special features or accessories on your awning. This could include things like awning lights, slide-out topper, or a wind sensor. These features may impact the size or type of replacement fabric you need.
Why Replace Your RV Awning?
RV awnings are a great addition to any recreational vehicle, providing shade and protection from the elements. However, there may come a time when you need to replace your awning. Whether it’s due to wear and tear, damage from a storm, or simply wanting to upgrade to a newer model, there are several reasons why replacing your RV awning can be a smart choice.
In this blog post, we’ll explore the benefits of replacing your RV awning and how it can improve your overall camping experience. So, if you’re wondering if it’s time to replace your old awning, read on to find out why it might be a good idea.
Importance of Accurate Measurements
Importance of Accurate Measurements Introduction: Accurate measurements are crucial in various fields, ranging from science and engineering to everyday tasks like cooking and DIY projects. Measurements provide us with precise information about the size, weight, volume, or any other aspect of an object or a phenomenon. They help us quantify and compare different entities, enabling us to make informed decisions and predictions.
Without accurate measurements, we would be left in a realm of uncertainty, making it difficult to understand the world around us and make reliable judgments. In this blog section, we will explore why accurate measurements are important and how they impact different areas of our lives.
Tools Needed
If you’re looking to replace the awning on your RV, one of the first steps is to measure it properly. This may seem like a daunting task, but with the right tools and a little know-how, it can be done easily. The tools you’ll need include a measuring tape, a ladder (if your awning is high off the ground), and a pen and paper to record your measurements.
Start by extending your awning fully, making sure it is secure and stable. Then, using your measuring tape, measure the length of the awning from end to end. Next, measure the width of the awning, from the top to the bottom.
It’s essential to measure both the length and width accurately to ensure you get the correct size when ordering a replacement awning. Once you have your measurements, write them down and keep them handy for when you’re ready to purchase your new awning.
Measuring Tape
measuring tape One of the most essential tools in any DIY kit is a measuring tape. It’s a simple yet incredibly versatile tool that is used to accurately measure lengths and distances. Whether you’re working on a home improvement project, sewing a new garment, or designing a piece of furniture, a measuring tape is an absolute must-have.
But what exactly do you need to look for when shopping for a measuring tape? Well, the first thing to consider is the length of the tape. Most measuring tapes come in lengths ranging from 16 feet to 25 feet, with some extending up to 100 feet for more specialized applications. It’s also important to consider the width of the tape.
A wider tape is generally easier to handle and less prone to bending, while a narrower tape is more suitable for measuring tight spaces. Another important factor to consider is the material of the tape. Most modern measuring tapes are made from a combination of metal and plastic, which provides a good balance of durability and flexibility.
However, if you need a tape that is resistant to water or chemicals, you may want to opt for a more specialized material like fiberglass. Lastly, it’s important to consider the accuracy of the tape. Most measuring tapes are accurate to within 1/16 of an inch, which is more than sufficient for most DIY projects.
However, if you require a higher level of precision, you may want to look for a tape that is accurate to 1/32 or even 1/64 of an inch.
Ladder
When it comes to using a ladder, having the right tools is essential for your safety and convenience. While a ladder itself is the main tool needed, there are a few additional tools that can make your ladder experience even better. One such tool is a ladder stabilizer, which can help prevent the ladder from wobbling or tipping over while you’re on it.
This is especially useful if you’re working on uneven ground or on a slippery surface. Another tool that you may find helpful is a ladder standoff, which is used to keep the ladder away from the surface you’re working on. This can be particularly useful when working on a wall or other vertical surface, as it allows you to lean the ladder against the surface without causing damage.
Lastly, having a ladder accessory tray can make your work more efficient by providing a place to hold your tools and materials while you’re on the ladder. Overall, investing in these additional tools can greatly enhance your ladder experience and make your tasks easier and safer. So, the next time you’re planning on using a ladder, make sure to have these tools on hand for a more productive and enjoyable experience.
Pen and Paper
When it comes to pen and paper, there are a few essential tools that you’ll need to get started. First and foremost, you’ll need a good quality pen. While there are many options available, I recommend choosing a pen that feels comfortable in your hand and writes smoothly.
Some popular choices include gel pens, ballpoint pens, and fountain pens. Next, you’ll need paper. Again, the type of paper you choose will depend on your personal preferences.
Some people prefer plain white paper, while others prefer lined or graph paper. It’s important to choose a paper that won’t bleed or smudge when you write on it. Finally, you may want to invest in some additional tools such as rulers, erasers, and pencil sharpeners.
These tools can come in handy when you need to make precise measurements or make corrections to your work. So, make sure you have a reliable pen, choose the right kind of paper, and have the necessary tools on hand, and you’ll be ready to start writing!
Step-by-Step Guide
If you’re looking to replace the awning on your RV, it’s essential to measure it correctly to ensure you get the right size replacement. Here’s a step-by-step guide on how to measure your RV awning for replacement. First, extend the awning fully and secure it in place.
Measure the distance between the centerline of the left arm to the centerline of the right arm. This will give you the width measurement. Next, measure the height of the awning fabric by starting at the bottom edge and measuring all the way to the top edge.
Take note of any obstructions, such as lights or brackets, that may affect the measurements. Finally, measure the depth of the awning by starting at the outer edge of the fabric and measuring all the way to the wall of your RV. Make sure to measure from the highest point of the awning at the centerline to account for any sagging.
By following these steps, you’ll be able to accurately measure your RV awning for replacement and find the perfect fit.
Step 1: Prepare the Awning
“awning preparation” Step 1 in installing an awning is to properly prepare the area where it will be installed. This is crucial to ensuring that the awning is securely fastened and will provide maximum protection from the sun and rain. First, you will need to measure the width of the space where the awning will be placed.
This will help you determine the size of the awning you need to purchase. Next, you will need to check for any obstructions or obstacles that may hinder the installation process, such as tree branches or wires. It is important to clear these out of the way to avoid any potential damage to the awning.
Once the area is cleared, you can then mark the positions where the brackets will be installed. These brackets will hold the awning in place, so it is important to measure and mark their positions accurately. Finally, make sure that the surface where the brackets will be mounted is sturdy and can support the weight of the awning.
This may require reinforcing the area with additional support if necessary. By meticulously preparing the awning installation area, you can ensure a proper and secure installation that will provide long-lasting protection and enjoyment.
Step 2: Measure the Width
In Step 2 of our step-by-step guide to measuring curtains, we will focus on determining the width. This is an important step, as it will ensure that your curtains fit properly on your windows and provide the desired level of coverage. To measure the width, you will need a measuring tape and a pencil.
Start by measuring the width of your window frame from one side to the other. If you want your curtains to cover the entire window when closed, add a few inches to this measurement to account for the curtain rod and any extra fabric you want for fullness. However, if you prefer a more tailored look with the curtains just covering the window frame, then you can simply use the window frame width as your measurement.
Once you have determined the width, write it down and proceed to the next step to measure the length of the curtains.
Step 3: Measure the Projection
In the previous steps of our guide on how to project revenue growth for your business, we covered analyzing historical data and forecasting future trends. Now, it’s time to measure the projection and see how accurate it is. This step is crucial because it will determine if your projections are on track or if adjustments need to be made.
To measure the projection, you will compare your actual revenue with the projected revenue. If the actual revenue matches or exceeds the projected revenue, then your projection was successful. However, if the actual revenue falls short of the projected revenue, then you may need to reassess your assumptions and make necessary changes to your strategy.
Keep in mind that projections are not set in stone and should be constantly monitored and adjusted as needed.
Step 4: Measure the Roller Tube
Measuring the roller tube is a crucial step in replacing or repairing your roller blinds. To ensure a perfect fit, it’s important to measure the length and diameter of the roller tube accurately. Start by extending the blinds fully, so you have a clear view of the entire tube.
Take a tape measure or a ruler and place it directly against the roller tube. Measure from one end to the other to determine the length. Next, measure the diameter of the tube.
This can be a bit tricky since roller tubes are often covered with fabric or other materials. In that case, gently press down on the material to feel the edges of the tube and measure its diameter. Be precise in your measurements to avoid any issues when replacing the roller tube.
Once you have the measurements, you can move on to the next step in repairing or replacing your roller blinds.
Step 5: Take note of Additional Features
In this step-by-step guide, it’s important to take note of additional features when choosing a tool for your needs. While the basics of a tool are important, there may be additional features that can enhance your experience and make your work easier. These additional features will vary depending on the tool you’re considering, but they can include things like collaboration options, advanced reporting and analytics, integration with other software or platforms, and customization options.
Think about what features are important to you and your specific needs. Are you looking for a tool that allows you to work collaboratively with others? Do you need advanced reporting features for tracking your progress? Or are you looking for a tool that integrates seamlessly with your existing software? By considering these additional features, you can ensure that you find a tool that meets all of your needs and helps you achieve your goals. So don’t forget to take note of these extra features as you make your decision.
Common Mistakes to Avoid
When it comes to measuring your RV awning for replacement, there are a few common mistakes that you’ll want to avoid. One common mistake is not measuring the awning properly. It’s important to measure the width of the awning fabric, as well as the length of the awning arms.
Another mistake to avoid is not considering the type of awning you have. There are different types of awnings, such as manual and electric, and they may require different measurements. It’s also important to double-check your measurements to ensure accuracy.
Taking the time to measure your RV awning correctly will ensure that you get the right replacement and avoid any headaches down the line.
Failing to Measure the Projection Correctly
When it comes to project management, one of the common mistakes that many people make is failing to measure the projection correctly. This can have major consequences on the success of the project. In order to effectively manage a project, it is important to have accurate measurements in place.
This means not only measuring the progress of the project, but also measuring the resources being used, the timeline, and the overall goals of the project. By measuring these aspects correctly, project managers can easily determine if the project is on track and make any necessary adjustments. Failing to measure the projection correctly can result in delays, cost overruns, and a failure to achieve the desired outcome.
It is therefore crucial for project managers to ensure that they have the proper tools and systems in place to accurately measure the progress and success of their projects.
Ignoring Additional Features
When it comes to purchasing a new product or service, it’s easy to get caught up in all the bells and whistles and ignore the additional features that may be available. This is a common mistake that many people make, and it can lead to disappointment down the road. By ignoring additional features, you may miss out on important functionalities that could greatly enhance your experience.
For example, let’s say you’re looking to buy a new smartphone. You might be focused on things like the camera quality and the storage capacity, but what about other features like waterproofing or facial recognition? These additional features could make a big difference in how you use your phone on a daily basis. So, the next time you’re in the market for a new product or service, be sure to take the time to consider all the additional features that are available.
You might find that they add a lot of value to your purchase and make it even more worthwhile.
Not Double-Checking the Measurements
One of the most common mistakes people make when taking on a DIY project is not double-checking their measurements. It might seem like a simple task, but it can make a huge difference in the outcome of your project. Imagine spending hours cutting and sanding wood only to find that it’s too big or too small for your intended purpose.
By double-checking your measurements before you start, you can save yourself a lot of time, frustration, and wasted materials. It’s as simple as grabbing a tape measure and verifying that your dimensions are correct. It may take a few extra minutes, but it will save you from a lot of headaches down the line.
So remember, always double-check your measurements before starting any DIY project!
Conclusion
So, you’ve decided it’s time to replace your RV awning. But before you rush off to make a purchase, it’s important to know how to measure it correctly. Otherwise, you might end up with a replacement that’s too short, too long, or just not quite right.
And nobody wants an awning that’s a little off-kilter, like an unbalanced set of tires on a clown car. So grab your measuring tape and let’s get started! First, find the starting point of your awning – usually the middle of the roller tube. Then, extend the awning fully, just like you would when you’re trying to impress your camping neighbors with your decked-out outdoor living space.
Make sure it’s locked in place so it doesn’t go flying off into the sunset like a runaway kite. Now, take a deep breath and begin measuring. Hold your tape measure at the starting point and extend it to the furthest end of the roller tube.
Write down this magical number – this is the width of your awning and the key to finding your perfect replacement. Just be careful not to accidentally trip over your tape measure and fall into a neighboring campsite. That might not end well for your measurement accuracy or your dignity.
Next, it’s time to measure the projection of your awning – aka the distance it extends from your RV. Find the arm or support nearest to you and measure from the top of the roller tube to where it connects. If your awning has a metal weather guard, measure from that instead.
Write down this number as well, and make sure not to confuse it with any other measurements. Measuring the distance between your camping chair and the nearest beer cooler won’t help you find the right awning replacement, no matter how tempting it may be. Finally, cross your fingers, toes, and any other body parts you can manage, and hope for the best.
Measure Twice, Order Once
When it comes to online shopping, it’s easy to get caught up in the excitement and rush of purchasing a new item. However, it’s important to slow down and take the time to measure before placing an order. One of the most common mistakes people make when shopping online is not accurately measuring the space or item they are looking to purchase.
Whether it’s a piece of furniture, a piece of clothing, or even something as simple as a picture frame, taking accurate measurements can save you a lot of time, money, and frustration in the long run. So next time you find yourself browsing through online stores, remember to measure twice and order once.
Replacing Your RV Awning
Replacing your RV awning can be a daunting task, but with a little bit of knowledge and preparation, you can avoid some common mistakes. One of the biggest mistakes people make is not properly measuring their awning before purchasing a replacement. It may seem like a simple task, but getting the measurements wrong can lead to a lot of frustration and wasted time.
Another common mistake is not considering the material of the replacement awning. Different materials have different properties and durability, so it’s important to choose one that will withstand the elements and last for years to come. Additionally, not following the manufacturer’s instructions when installing the new awning can lead to problems down the road.
It’s important to carefully read and follow the instructions to ensure a proper installation. By avoiding these common mistakes, you can ensure a smooth and successful RV awning replacement.
FAQs
How do I measure my RV awning for replacement?
To measure your RV awning for replacement, first extend the awning fully. Then measure the distance from one end of the roller tube to the other. This will give you the size of your current awning and help you find a suitable replacement.
Can I replace my RV awning fabric myself?
Yes, you can replace your RV awning fabric yourself. It requires some basic tools and DIY skills. There are also video tutorials available online that can guide you through the process step-by-step.
What material should I choose for my new RV awning fabric?
When choosing a material for your new RV awning fabric, consider factors such as durability, UV resistance, and ease of maintenance. Popular options include vinyl, acrylic, and polyester. Each has its own pros and cons, so do some research to find the best one for your needs.
Are there standard sizes for RV awnings?
RV awnings come in various sizes, but there are also standard sizes that are commonly available. These sizes typically range from 8 to 21 feet in length. It’s important to measure your awning carefully to ensure you get the right size replacement.
How often should I replace my RV awning?
The lifespan of an RV awning can vary depending on usage and environmental conditions. However, as a general guideline, it’s recommended to replace your RV awning fabric every 5-7 years to ensure optimal performance and appearance.
Can I install an awning on my RV if it didn’t come with one?
Yes, you can install an awning on your RV even if it didn’t come with one originally. There are aftermarket awning kits available that are designed for easy installation. However, it’s important to consider factors such as the awning’s size, compatibility with your RV, and any necessary modifications.
How much does it cost to replace an RV awning?
The cost of replacing an RV awning can vary depending on factors such as the size, material, and brand. On average, the cost can range from $200 to $800. It’s recommended to get quotes from different suppliers and consider your budget and needs before making a purchase.