
Are you tired of dealing with a worn-out or damaged RV awning? Removing an RV awning may seem like a daunting task, but with the right knowledge and tools, it can be a straightforward process. Whether you’re looking to replace your awning or just want to remove it temporarily, this blog post will guide you through the steps. Think of it as giving your RV a much-needed makeover, shedding the old and making room for the new.
So, if you’re ready to take on the challenge and learn how to remove an RV awning, let’s get started!
Table of Contents
Introduction
Removing an RV awning might seem like a daunting task, but with a few simple steps, it can be done easily. The first thing you’ll want to do is gather the necessary tools and equipment, such as a ladder, screwdriver, and an extra set of hands to help you out. Next, locate the awning’s mounting brackets, which are typically located on the exterior side of the RV.
Once you’ve found them, use the screwdriver to remove the screws that secure the brackets in place. Be sure to hold onto these screws, as you’ll need them later when reinstalling the awning. After the brackets have been removed, carefully slide the awning off of the track, making sure to support its weight to prevent any damage.
Finally, store the awning in a safe and secure location until you’re ready to reinstall it. By following these simple steps, you can easily remove your RV awning without any hassle. So, what are you waiting for? Get started on your awning removal project today!
Understanding the RV Awning
RV awnings are an essential component of any recreational vehicle (RV). These awnings provide shade and protection from the elements, allowing RV owners to enjoy their outdoor living space comfortably. They can be extended and retracted easily, providing flexibility and convenience.
RV awnings are typically made from durable materials such as vinyl or polyester, which are designed to withstand wind, rain, and UV rays. They are available in various sizes and styles to suit different RV models and personal preferences. Whether you are camping in the wilderness or parked at an RV park, having an awning can greatly enhance your overall camping experience.
Safety Precautions
safety precautions, protection, personal safety, safety measures, safety guidelines. Introduction: Safety precautions are essential in every aspect of our lives. Whether it’s at work, at home, or even when we’re out enjoying leisure activities, taking the necessary steps to protect ourselves is paramount.
These precautions not only ensure our personal safety but also help prevent accidents and minimize potential risks. By following safety measures and guidelines, we can significantly reduce the chances of injury, illness, or any other harm that could occur. Just like wearing a seatbelt in a car or a helmet while riding a bike, safety precautions are like a shield that keeps us protected from unexpected dangers.
Let’s explore some of the most important safety precautions that we should all be aware of and practice in our daily lives.
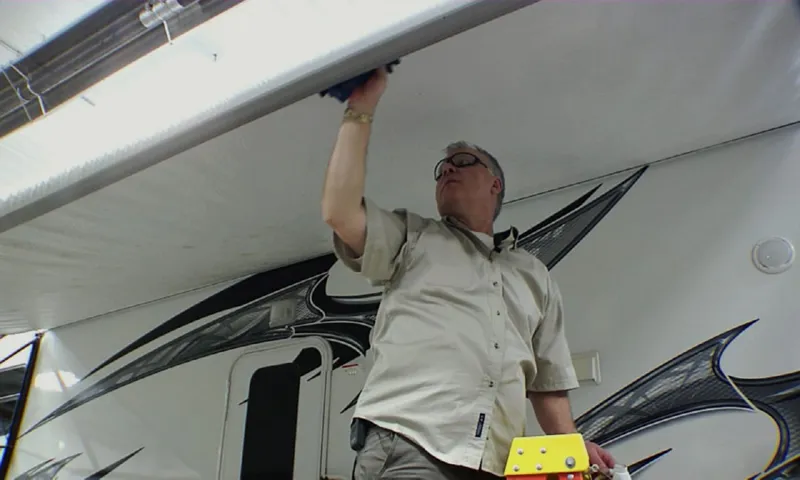
Removing the RV Awning
Removing an RV awning may seem like a daunting task, but with the right tools and a little know-how, you can tackle it with ease. The first step is to locate the awning roll tube, which is usually located on the side of the RV. Once you’ve found it, you’ll need to release the tension on the awning by opening it partially.
This can be done by releasing the strap or lever that holds the awning in place. Next, you’ll want to remove any bolts or screws that are securing the awning to the RV. Be sure to keep track of these as you’ll need them to reattach the awning later on.
Once the awning is loose, carefully slide it out of the awning rail and set it aside. It’s important to note that RV awnings can be heavy, so it’s best to have a second person help you with this task. With the awning removed, you’ll have a clear canvas to work with for any repairs or maintenance that may be needed.
Remember to take your time and be cautious throughout the process to avoid any accidents or damage to your RV.
Step 1: Gather necessary tools and materials
Removing the RV awning can seem like a daunting task, but with the right tools and materials, it can be done easily and efficiently. First, make sure you have all the necessary tools on hand. You will need a ladder or step stool to reach the awning, as well as a screwdriver or wrench to loosen any screws or bolts.
Additionally, you may need a rubber mallet or hammer to gently tap parts into place. It’s important to have all these tools readily available before you begin the process to avoid any delays or frustrations. Before starting the awning removal process, gather all the necessary materials.
You will need a large tarp or drop cloth to protect the ground underneath the awning from any dirt or debris that may fall during the removal process. It’s also a good idea to have a couple of buckets or containers on hand to hold any screws, bolts, or other small parts that may need to be removed. This will help keep everything organized and prevent any lost pieces.
Having all the necessary tools and materials ready will make the process of removing the RV awning much smoother and easier. So take a few minutes to gather everything you need before you dive into the project. With the right preparation, you’ll be well on your way to a successful awning removal and any further maintenance or repairs that may be needed.
Step 2: Extend the awning to assess the condition
Removing the RV awning can be a daunting task, but it’s an important step in maintaining and repairing your recreational vehicle. The second step in the process is to extend the awning and assess its condition. This is necessary to determine if any repairs or replacements are needed.
When you extend the awning, take note of any tears, holes, or fraying in the fabric. These issues can lead to further damage if not addressed promptly. Check the awning arms and hardware for any signs of rust or corrosion, as this can weaken the structure and compromise its functionality.
Additionally, inspect the awning roller and spring assembly. These components can wear out over time, causing the awning to roll unevenly or not retract properly. Look for any signs of damage or malfunction and make a note of any repairs that may be necessary.
Assessing the condition of your RV awning is a crucial step in the removal process. It will help you identify any issues that need attention and ensure that your awning is in good working order. By taking the time to inspect the fabric, arms, hardware, roller, and spring assembly, you can address any problems before they become bigger and more costly.
So, make sure to carefully extend the awning and thoroughly assess its condition before moving on to the next step in removing it.
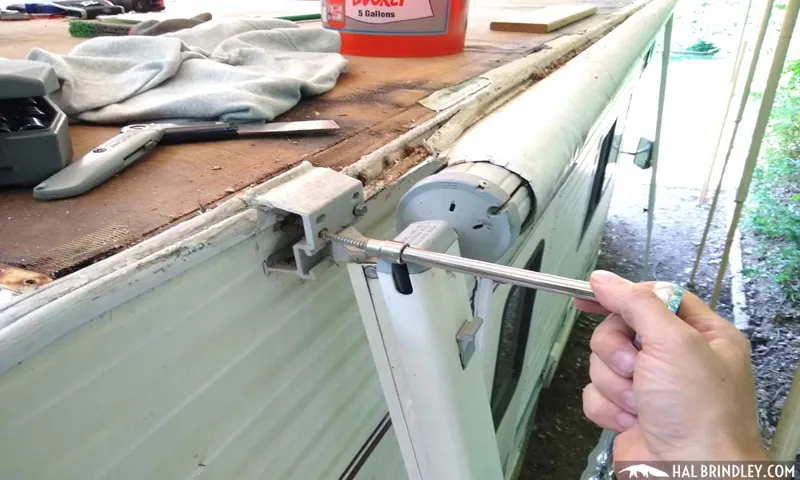
Step 3: Detach the awning from the RV
detach RV awning, removing RV awning. Removing an RV awning may seem like a daunting task, but with a few simple steps, you can have it off in no time. The first step is to detach the awning from the RV.
Start by fully extending the awning to its maximum length. This will make it easier to access the attachment points. Next, locate the awning arms on both sides of the RV.
These are typically located near the top of the RV and are connected to the main body of the awning. Look for any screws or bolts that are securing the awning arms to the RV and carefully remove them. Once the screws or bolts are removed, you can gently pull the awning arms away from the RV.
Be cautious as you do this, as the awning may be heavy and could potentially fall. It may be helpful to have an extra set of hands to assist you. Once the awning arms are detached, carefully lower the awning down to the ground.
Be sure to have a soft surface, such as a blanket, to protect the awning from any damage. With the awning detached from the RV, you can now move on to the next step in the process of removing the RV awning.
Step 4: Carefully roll up the awning
RV awnings are a great addition to any recreational vehicle, providing shade and protection from the elements. However, there may come a time when you need to remove the awning for maintenance or repair. The process of removing an RV awning can seem daunting, but it can be done with a few simple steps.
One important step is carefully rolling up the awning before removing it. This ensures that the awning is properly secured and prevents any damage or tangling during removal. To roll up the awning, start by loosening the tension on the fabric by releasing the awning arms.
Then, use the hand crank or electric motor to roll up the awning evenly. It’s important to take your time and make sure that the fabric is rolling up straight and evenly to avoid any kinks or wrinkles. Once the awning is fully rolled up, it can be safely removed from the mounting bracket.
By following these steps, you can successfully remove your RV awning and address any maintenance or repair needs.
Step 5: Remove the awning from the RV
RV awnings are a great feature to have on your recreational vehicle, providing shade and protection from the elements. However, there may come a time when you need to remove the awning for maintenance or repairs. The process of removing an RV awning can seem daunting, but with a few simple steps, you’ll have it off in no time.
First, start by retracting the awning fully to make it easier to work with. Next, locate the screws or bolts that secure the awning to the RV. Using a screwdriver or wrench, remove these fasteners carefully, making sure to keep them in a safe place.
Once the awning is no longer attached to the RV, carefully slide it out of the awning rail and set it aside. It’s important to take your time and be cautious during this step to avoid damaging the awning or the RV. With the awning removed, you can now proceed with any necessary repairs or maintenance.
Whether you’re replacing the fabric or fixing a mechanical issue, having the awning removed will make the process much easier. Keeping your RV awning in good condition is essential for enjoying your outdoor adventures to the fullest. So if the time comes for any repairs or maintenance, don’t be intimidated by the thought of removing the awning from your RV.
Just follow these simple steps, and you’ll have it off in no time.
Step 6: Clean and store the awning properly
When it comes to properly cleaning and storing your RV awning, it’s important to start with the first step: removing the awning from your RV. The process of removing the awning can vary depending on the type of RV you have and the type of awning system you’ve installed. But no matter the type, there are a few general steps to follow.
First, start by retracting the awning fully, making sure it is completely closed. This will help protect the fabric during the removal process. Next, locate the pins or clips that hold the awning in place on the RV.
These may be located on the roller tube or the arms of the awning. Carefully remove these pins or clips, making sure to keep a firm grip on the awning as you do so. Once the awning is free from the RV, carefully lower it to the ground, making sure to avoid any obstacles or sharp objects that may cause damage.
Now that your awning is removed, you can move on to the next steps of cleaning and storing it properly.
Conclusion
So, there you have it – the foolproof guide to removing your RV awning. It may seem like a daunting task, but armed with the right knowledge and a few simple tools, you’ll be able to tackle this DIY project with ease. Remember, safety always comes first, so don’t forget to use a sturdy ladder and enlist the help of a friend if needed.
Take your time and follow the steps carefully to avoid any mishaps or unwanted surprises. By removing your awning, you’ll not only have the opportunity to give it a good clean or repair, but you’ll also get a chance to flaunt your handyman skills and impress your camping buddies. Just imagine their awe and envy as they witness you effortlessly maneuvering your RV awning, like a magician performing a mind-boggling trick.
They’ll be left wondering how on earth you managed to make such a complex task look like child’s play. Of course, you can let them in on the secret or keep it to yourself, leaving them in awe of your RV wizardry. Either way, you’ll be the talk of the campsite, a legend among RV enthusiasts, and the go-to person for all things awning-related.
So, go forth, my fellow RV adventurer, and conquer that awning like a true champion. With this guide by your side, nothing can stand in your way. Happy RVing, and may your awning removal be as smooth and effortless as a summer breeze.
Tips for reinstalling the awning in the future
Awning removal process. If you’re planning to reinstall your RV awning in the future, it’s important to know how to remove it properly. The first step is to ensure that the awning is fully retracted and that the tension on the fabric is released.
Next, you’ll need to remove the end caps from the roller tube by unscrewing them. Once the end caps are removed, you can then slide the fabric out of the awning rail, being careful not to damage it. After the fabric is removed, you can detach the roller tube from the awning arms by unscrewing the bolts.
Finally, you can detach the awning arms from the RV by unscrewing the bolts that hold them in place. By following these steps, you’ll be able to remove your awning safely and ensure that it’s ready for reinstalling in the future.
Final thoughts
removing the RV awning
FAQs
How do I remove an RV awning?
To remove an RV awning, first, ensure that the awning is fully retracted and the tension has been released. Then, locate the awning arms and disconnect them from the RV. Carefully undo any fasteners or clips that are holding the awning in place. Once everything is disconnected, gently lift the awning out of its track or brackets. It is important to follow the manufacturer’s instructions and take necessary safety precautions when removing an RV awning.
Can I remove an RV awning by myself or do I need assistance?
While it is possible to remove an RV awning by yourself, it is recommended to have someone assist you, especially if the awning is large or heavy. The process of removing an awning can be cumbersome and having an extra set of hands can make it easier and safer. If you are unsure about removing the awning alone, it is best to seek help to avoid any accidents or damage.
Are there any specific tools required to remove an RV awning?
The tools required to remove an RV awning may vary depending on the type and model of the awning. However, some common tools that may be needed include a ladder, adjustable wrench, screwdrivers, pliers, and possibly a drill with the appropriate bits. It is important to refer to the manufacturer’s instructions or consult a professional to ensure you have the necessary tools for removing your specific RV awning.
Can removing an RV awning cause any damage to the RV?
While removing an RV awning, if not done properly, there is a possibility of causing damage to the RV. This can include scratches, dents, or even structural damage. To minimize these risks, it is essential to follow the manufacturer’s instructions carefully, take necessary safety precautions, and seek professional help if needed. Additionally, it is recommended to inspect the RV before and after removing the awning to ensure no accidental damage has occurred.
How long does it usually take to remove an RV awning?
The time required to remove an RV awning can vary depending on factors such as the type of awning, size, and experience level of the person removing it. On average, it can take anywhere from 30 minutes to a couple of hours to remove an RV awning. It is important not to rush the process and to take the necessary time to ensure the awning is disconnected safely and without causing any damage.
Can I reuse an RV awning once it has been removed?
In most cases, if the awning is still in good condition and has been removed properly, it can be reused. However, it is important to inspect the awning for any signs of wear or damage before reinstalling it. If there are any issues, it is best to address them or consider replacing the awning to avoid any potential future problems. Proper storage of the awning during the off-season can also help prolong its lifespan.
Are there any precautions I should take while removing an RV awning?
Yes, there are several precautions to keep in mind when removing an RV awning. Firstly, make sure to disconnect any power sources or turn off any electrical systems that may be connected to the awning. This will help prevent any accidental damage or injury. Secondly, use appropriate safety equipment like gloves and safety glasses to protect yourself during the removal process. Lastly, if you are unsure about any step or face any difficulties, consult the awning’s manufacturer instructions or consider seeking professional assistance.