
Are you a proud owner of a manual RV awning? If so, you may find yourself in a situation where you need to extend it manually. Whether it’s because your RV is parked in a spot where the awning can’t fully extend on its own or you simply prefer to do it by hand, learning how to extend a manual RV awning can be a valuable skill. In this blog post, we’ll guide you through the process step-by-step, so you can enjoy the shade and protection offered by your awning with ease.
So, grab a cup of coffee, get comfortable, and let’s dive in!
Table of Contents
Introduction
If you own an RV, you know just how important having a reliable awning can be. It provides much-needed shade and protection from the elements, allowing you to enjoy the great outdoors without worrying about getting too hot or getting wet. However, there may be times when you want to extend your manual RV awning beyond its usual limits.
Whether you need some extra shade or want to create a larger outdoor living space, extending your manual RV awning is possible with a few simple steps. In this blog post, we will walk you through how to extend your manual RV awning to maximize your outdoor enjoyment. With just a bit of effort, you can create a comfortable and spacious area for relaxation and entertainment.
– Importance of extending an RV awning
Campers and RV enthusiasts know the importance of making the most out of their outdoor living space. One way to do that is by extending the RV awning. An awning provides shade and protection from the elements, allowing campers to enjoy their time outside even during the hottest parts of the day or a light rain shower.
But the benefits of extending an RV awning go beyond just providing shade. It also helps to create a more comfortable and functional outdoor living space. Whether you want to relax with a book, entertain friends, or cook a meal, having an extended awning gives you the extra space you need.
So let’s dive into why extending an RV awning is so important and how it can enhance your camping experience.
Step 1: Preparing the Awning
So you want to know how to extend your manual RV awning? Well, the first step is to make sure you have everything you need. Before you even think about extending the awning, you’ll need a ladder, a broom or brush, and some mild soap or detergent. Oh, and don’t forget your muscles! This isn’t a task for the weak, as you’ll need to use some strength to extend the awning properly.
Once you have all your supplies ready, it’s time to move on to actually preparing the awning. Start by making sure the awning fabric is clean and free of any dirt or debris. Use the broom or brush to gently sweep off any leaves or other debris that may have gathered on the fabric.
If the fabric is dirty, mix some mild soap or detergent with water and use a soft brush to scrub away any stains or dirt. Rinse thoroughly and allow it to dry completely before proceeding. Now it’s time to get up that ladder.
Carefully climb up and locate the awning roller. This is where the fabric is stored when it’s retracted. Check for any obstructions or debris that may prevent the awning from extending properly.
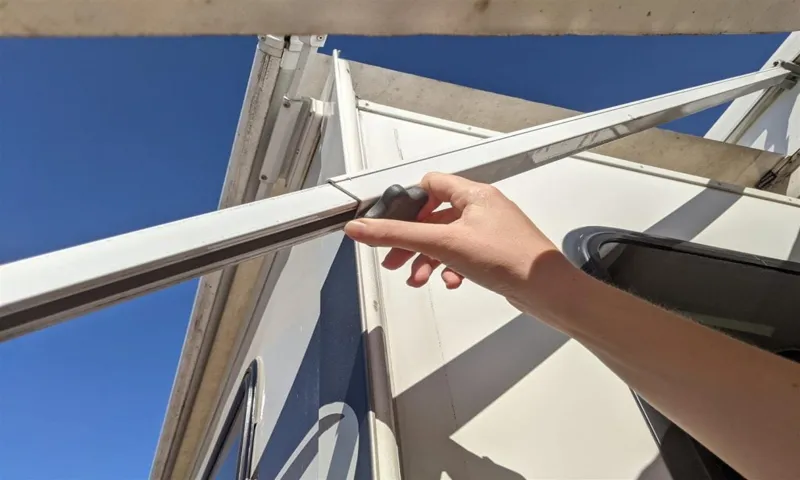
If everything looks clear, you’re ready to extend the awning. Using both hands, firmly grasp the awning arms and pull them apart. You may need to use some force, especially if the awning hasn’t been extended in a while.
As you pull the arms apart, the awning fabric should begin to unfurl. Continue pulling until the fabric is fully extended and the arms are locked in place. Congratulations, you’ve successfully extended your manual RV awning! Now you can sit back, relax, and enjoy some shade from the sun or protection from the rain.
– Checking for any obstructions or damages
awnings, preparing the awning, checking for obstructions, checking for damages, awning maintenance. In order to ensure that your awning is in optimal condition and ready for use, it is important to properly prepare it before setting it up. The first step in preparing your awning is to check for any obstructions or damages that may have occurred during storage or transportation.
This includes looking for any debris or objects that may be blocking the awning or its mechanisms. It is also important to inspect the fabric or material of the awning for any tears, holes, or other signs of damage. By addressing these issues before setting up your awning, you can prevent further damage and ensure that it functions properly.
Taking the time to prepare your awning will not only prolong its lifespan but also enhance your overall outdoor experience.
– Ensuring the area is clear and safe
awning preparation. When it comes to setting up an awning, the first step is to ensure the area is clear and safe. Before you begin, take a good look at the space where you plan to install the awning.
Are there any obstacles such as furniture, plants, or other objects that could be in the way? It’s important to clear this area to avoid any accidents or damage to the awning. Move any furniture or objects to a safe spot away from the installation area. Additionally, check for any overhead obstructions such as tree branches or power lines.
These can interfere with the installation process and could pose a safety hazard. By ensuring the area is clear and safe, you can proceed with confidence and avoid any unnecessary complications.
– Gathering necessary materials (awning pole, crank handle, etc.)
awning, preparing, materials, pole, crank handle
Step 2: Unlocking the Awning
So you’re ready to extend your manual RV awning, but you’re not quite sure where to start? Don’t worry, it’s easier than you think! The first step is to locate the awning crank handle. This is usually stored inside the RV or in an exterior compartment. Once you’ve found it, make sure to securely attach it to the awning mechanism.
Now it’s time to unlock the awning. Begin by turning the crank handle in a clockwise direction. This will release the locking mechanism and allow the awning to extend.
You may need to apply a bit of pressure to overcome the initial resistance, but be careful not to force it too hard. As you continue to crank, you’ll notice the awning unfurling and extending outwards. Keep cranking until the desired length is reached.
It’s important to note that you should always extend the awning fully to its maximum length, as leaving it partially extended can cause unnecessary stress on the awning fabric. Once the awning is fully extended, you can stop cranking. Take a moment to admire your handiwork and enjoy the shade and protection your awning provides.
Remember, extending the awning is just the first step in setting up your outdoor living space. You’ll also want to secure the awning legs and consider adding some awning accessories like lights or a sunshade for added comfort. But for now, sit back, relax, and enjoy the great outdoors!
– Locating the awning lock mechanism
awning lock mechanism, unlock the awning When it comes to enjoying the great outdoors, an awning can be a lifesaver. But what happens when you can’t unlock it? If you’re faced with this frustrating situation, fear not! Unlocking an awning is easier than you might think. The first step is locating the awning lock mechanism.
This can vary depending on the type of awning you have. Some awnings will have a lock located on the outside, while others may require you to access the lock from inside the awning. Take a look around your awning and see if you can spot any locks or mechanisms.
They can sometimes be tucked away or hidden, so it might take a bit of searching. Once you’ve located the lock, you’re ready to move on to the next step: unlocking the awning.
– Releasing the lock to allow extension
“unlocking the awning.” Step 2 in the process of extending an awning involves releasing the lock to allow for easy extension. This step is crucial in ensuring a smooth and hassle-free awning operation.
The lock is typically located on one side of the awning, either near the top or the bottom. To unlock the awning, all you need to do is locate the lock and disengage it. This can be done by either turning a knob or pressing a button, depending on the type of lock mechanism.
Once the lock is released, you can start extending the awning to the desired position. It’s important to make sure that the lock is fully disengaged before attempting to extend the awning, as trying to force it open can cause damage. So take your time to ensure that the lock is completely unlocked before proceeding with the extension.
By following this simple step, you’ll be able to unlock your awning and enjoy the shade and protection it provides in no time.
Step 3: Opening the Awning
When it’s time to enjoy the great outdoors and soak up the fresh air, extending your manual RV awning is a crucial step. But if you’re new to the world of RVs, you might be wondering how to go about it. Don’t worry, it’s easier than you think! The first thing you’ll need to do is locate the awning on your RV.
Typically, it is attached to the side of the vehicle and can be rolled up when not in use. Once you’ve found it, you can start by unlocking the awning arms. These are usually secured in place with a locking knob or lever.
Then, grab hold of the awning fabric and gently pull it downwards to unroll it. As you do so, make sure to keep an eye on the sliding arm that connects to the rail on the side of your RV. This arm will extend as you unroll the awning.
Once the awning is fully extended, you can use the awning rod to lock it into place. Simply insert the rod into the designated slot on the arm and turn it clockwise until it tightens and secures the awning. Now you’re all set to enjoy some shade and protection from the elements! Just remember to take the necessary precautions and follow the manufacturer’s instructions to ensure a safe and successful awning extension.
– Using a crank handle to turn the awning mechanism
crank handle, awning mechanism, opening the awning
– Slowly extending the awning outwards
“Slowly extending the awning outwards” is an important step in opening your awning. Once you have unlocked the awning and released the safety latch, it’s time to start extending it. This process should be done carefully and slowly to ensure that the awning doesn’t become damaged or cause any accidents.
You want to make sure that the awning extends smoothly and evenly, without any jerky movements. Imagine you are stretching a delicate piece of fabric – you wouldn’t want to pull too hard and risk tearing it. Similarly, gently extending the awning outwards will ensure that it unfurls properly and provides you with the shade and coverage that you desire.
So take your time, enjoy the process, and soon you’ll have a fully open awning ready to enhance your outdoor space.
– Applying steady pressure while cranking
opening the awning
Step 4: Adjusting the Awning
If you’re looking to extend your manual RV awning, you’re in the right place. Adjusting the awning on your RV can provide you with shade and protection from the elements, making your outdoor space more enjoyable. To extend your awning, start by unlocking the arms on both sides of the awning.
Once the arms are unlocked, simply pull the awning out to the desired length. Make sure to keep an eye on the tension of the arms as you extend the awning, as you don’t want them to snap back unexpectedly. Once the awning is fully extended, lock the arms into place to secure it.
With just a few simple steps, you can have your manual RV awning extended and ready for use in no time.
– Ensuring the awning is fully extended
When it comes to adjusting the awning, it’s important to ensure that it is fully extended. This step is crucial in ensuring that the awning provides maximum shade and protection from the sun. By fully extending the awning, you can create a larger shaded area and prevent any gaps where the sun can sneak through.
This not only keeps you cooler and more comfortable, but it also helps to protect your skin from harmful UV rays. Adjusting the awning may also involve making sure that it is level and properly secured, so that it doesn’t sag or collapse under its own weight. By taking the time to adjust the awning properly, you can make the most of your outdoor space and enjoy it to the fullest.
So, the next time you’re setting up your awning, make sure to extend it fully and create a shady oasis for yourself and your loved ones.
– Locking the awning in place
locking the awning in place, adjusting the awning Locking the awning in place is an essential step in ensuring that it remains stable and secure. Once you have extended the awning to your desired position, you will need to lock it in place to prevent it from retracting or shifting. This step is particularly important on windy days or if you plan on leaving the awning extended for an extended period.
The method of locking the awning will vary depending on the type of awning you have. Some awnings may have a lock or latch mechanism that you can engage to keep it in place. Others may have a series of knobs or levers that you need to tighten or fasten.
Regardless of the method, make sure to follow the manufacturer’s instructions to ensure proper locking and prevent any potential damage or accidents. By locking the awning in place, you can enjoy your outdoor space without worrying about the awning shifting or retracting unexpectedly.
– Adjusting the angle of the awning for optimal shade
awning, adjust, shade, angle Are you tired of the glaring sun beating down on your patio? Well, adjusting the angle of your awning can provide you with optimal shade and make your outdoor space much more comfortable. Taking this step is crucial in ensuring that you can enjoy your time outside without getting too hot or risking sunburn. Luckily, adjusting the angle of your awning is usually a straightforward process.
First, locate the adjustment mechanism on your awning. This can usually be found near the base of the support arms. Next, loosen the adjustment mechanism and gently push or pull the awning to the desired angle.
When you have achieved the desired shade, tighten the adjustment mechanism to secure the awning in place. Keep in mind that the optimal angle will depend on the time of day and the direction of the sun. Experiment with different angles until you find the one that provides the most shade for your patio.
So go ahead, grab a cold drink, and enjoy the outdoors in cool comfort!
Step 5: Securing the Awning
Now that you’ve successfully extended your manual RV awning, the next step is to secure it in place. This is an important step to ensure that your awning stays in place and doesn’t get damaged by strong winds or other weather conditions. One way to secure your awning is by using awning stakes or anchors.
These are typically made of steel and can be driven into the ground to provide stability. Another option is to use tension straps or ropes to secure the awning to nearby trees or structures. Make sure to tighten the straps or ropes securely to prevent any movement.
Additionally, you can use adjustable support poles to add extra stability to your awning. These poles can be adjusted to the height you need and are placed under the awning to provide additional support. By securing your awning properly, you can enjoy your outdoor space without worrying about it getting damaged or blown away.
– Using awning straps or clamps to secure the awning
“Now that you’ve successfully extended your awning, it’s time to make sure it’s securely in place. One of the best ways to do this is by using awning straps or clamps. These handy tools allow you to fasten the awning to your RV or camper, providing extra stability and preventing it from being blown away by strong winds.
Awning straps are typically made from a durable material like nylon or polyester, and they come with sturdy buckles that can be tightened to keep the awning in place. To secure the awning, simply wrap the strap around the awning roller and attach it to a stable anchor point on your RV. Make sure to tighten the strap as much as possible to ensure a snug fit.
Alternatively, you can use awning clamps, which attach directly to the support arms of the awning and anchor it to your RV. These clamps are adjustable and can be tightened to provide a secure grip. Whichever method you choose, using awning straps or clamps will give you peace of mind knowing that your awning is firmly secured and ready to withstand whatever nature throws at it.
“
– Checking for any loose areas or flapping
In order to secure your awning properly, it’s important to check for any loose areas or flapping. This is especially crucial if you live in an area that experiences strong winds or heavy rain. Loose areas or flapping can not only cause damage to your awning, but it can also create a safety hazard.
One way to check for loose areas is to give your awning a gentle tug to see if it moves or if it feels secure. If you notice any areas that are loose or flapping, you may need to adjust the tension or tighten any fasteners. Additionally, you can use bungee cords or straps to secure your awning to the ground or to nearby structures.
This will help to prevent any movement or flapping during inclement weather. By taking the time to properly secure your awning, you can ensure that it will stay in place and provide you with the shade and protection you need.
Step 6: Retracting the Awning
So, you’ve got your manual RV awning extended and enjoying some much-needed shade and protection from the elements. But now, it’s time to retract the awning and pack up for the day. Don’t worry, retracting a manual RV awning is just as simple as extending it.
First, locate the tension knob or lever near the roller tube. This will be used to disengage the awning and release the tension. Gently turn or pull the knob or lever to loosen the tension.
Next, look for the straps or loops near the awning’s roller tube. These are used to secure the awning in place when it’s retracted. Grab onto these straps and carefully pull them down and towards the ground.
This will start the retraction process. As you pull down on the straps, you will notice the awning starting to fold up. Keep pulling the straps until the awning is completely retracted and securely in place against the side of your RV.
Now, with the awning retracted, it’s important to secure it in place. Many RV awnings come with a locking mechanism that will hold the awning in place. Simply engage this mechanism to ensure the awning doesn’t accidentally open while you’re on the road.
And just like that, you’ve successfully retracted your manual RV awning. It may take a few tries to get the hang of it, but with a little practice, you’ll become a pro at extending and retracting your awning in no time. So go ahead, pack up, hit the road, and enjoy your next adventure!
– Unlocking the awning lock mechanism
retracting the awning, awning lock mechanism, unlocking the awning lock, retracting process, awning maintenance Once you have unlocked the awning lock mechanism, it’s time to retract your awning. This is the process of bringing your awning back in and securing it in its closed position. Before you start retracting, make sure there are no obstructions in the way and that the area is clear.
Begin by using the hand crank or motorized mechanism, depending on the type of awning you have. Slowly and steadily turn the crank or press the retract button to bring the awning back in. Be sure to keep your hands clear of the moving parts to avoid any accidents.
Once the awning is fully retracted, you can secure it in place using the straps or fasteners provided. This will prevent it from unfurling unexpectedly and protect it from damage during high winds or storms. Remember to always follow the manufacturer’s instructions for retracting your awning and perform regular maintenance to ensure its smooth operation.
– Using the crank handle to retract the awning
retracting the awning, crank handle, retract the awning Retracting the awning is a breeze with the help of a crank handle. Once you’re ready to pack up your outdoor space and head inside, simply locate the crank handle and begin turning it in a clockwise direction. As you turn the handle, you’ll start to see the awning folding up and retracting back into its casing.
This is where the burstiness of the process comes into play, as the awning quickly folds and rolls up, neatly tucking itself away. It’s like watching a magic trick unfold before your eyes! The crank handle allows for easy control and maneuverability, giving you the power to retract the awning smoothly and effortlessly. So, the next time you’re ready to call it a day and protect your outdoor space from the elements, just grab that crank handle and give it a spin.
In no time at all, your awning will be safely tucked away, ready for your next outdoor adventure.
– Slowly retracting the awning to avoid damage
Retracting the awning is an essential step to take when you’re done enjoying the shade it provides. To avoid any potential damage, it’s important to do this slowly and carefully. Start by making sure the awning is completely dry and free of any debris.
Then, locate the retraction lever or button and begin slowly retracting the awning. Pay close attention to any resistance or unusual noises during this process, as these could be signs of a problem. If you encounter any issues, it’s best to stop and seek professional assistance.
By taking your time and being cautious, you can safely retract your awning and protect it from any potential harm.
Conclusion
In conclusion, extending a manual RV awning is like finding the secret entrance to a hidden treasure cave – it requires a little bit of skill, a touch of finesse, and maybe even a dash of luck. But fear not, fellow adventurers! We have uncovered the not-so-secret map to success. First, remember to gather all the necessary tools – your trusty awning rod, a ladder (preferably not one made of dandelion stems), and maybe even an extra set of hands (although not literally – that would be uncomfortable for everyone involved).
Next, locate the elusive awning strap and give it a gentle tug, like coaxing a reluctant toddler out of bed in the morning. Slowly but surely, the awning will start to unfold, revealing its magnificent, shade-casting glory. But hold on tight! Just like a mischievous wind trying to snatch away your precious treasure, the awning might try to retract on its own.
Don’t panic, adventurer! Simply use your awning rod to secure the awning in place, adding an extra layer of protection against unexpected gusts of air. And there you have it – you’ve successfully extended your manual RV awning! Take a moment to bask in the triumphant glow of your accomplishment. Sure, it may have required a bit of effort, but the reward of a shaded oasis awaits you.
So go forth, intrepid explorer, and enjoy your newfound outdoor haven. Whether you’re sipping a refreshing beverage or napping in a hammock, your extended awning will be your steadfast companion, providing shelter and comfort in the great outdoors. Happy adventuring!”
– Importance of properly extending and retracting an RV awning
properly retracting an RV awning. Retracting the awning of an RV is an essential step that should not be taken lightly. Just like extending the awning, retracting it also requires some careful attention to avoid any mishaps.
First and foremost, it is important to make sure that the awning fabric is completely dry before retracting it. Wet fabric can lead to mildew and damage the material over time. Additionally, you should double-check that all items such as chairs, tables, and decorations are cleared from underneath the awning to avoid any accidents.
Once you have ensured the area is clear, make sure to retract the awning slowly and steadily. Rushing the process may cause damage to the awning mechanism or even lead to the fabric tearing. Lastly, it is crucial to secure the awning properly once it is fully retracted.
This will prevent it from unfurling during travel, which can cause severe damage to your RV or pose a safety risk to other vehicles on the road. By following these steps and taking the time to retract your RV awning properly, you can ensure its longevity and continue to enjoy its shade and protection for many adventures to come.
– Tips for maintaining and caring for your awning
Retracting your awning properly is essential to ensure its longevity and functionality. To retract the awning, start by loosening any tension on the fabric by using the retracting mechanism. This will prevent any strain or damage to the fabric.
Next, gently guide the awning back into its housing, being careful not to force it or let it slam shut. It’s important to make sure the fabric is evenly distributed and free from any wrinkles or folds as you retract it. Finally, secure the awning in place by locking it securely.
By following these steps, you’ll be able to retract your awning safely and effortlessly, ensuring that it stays in optimal condition for years to come.
FAQs
How do I extend a manual RV awning?
To extend a manual RV awning, locate the awning control mechanism, usually located on the side of the RV near the awning. Turn the control mechanism clockwise until the awning fully extends.
What if my manual RV awning is stuck and won’t extend?
If your manual RV awning is stuck and won’t extend, check for any obstructions or debris that may be preventing it from fully extending. Clear any obstructions and try again. If the issue persists, it may be a mechanical problem that requires professional assistance.
Can I extend my manual RV awning partially?
Yes, you can extend your manual RV awning partially. Simply turn the awning control mechanism clockwise until it reaches your desired extension length.
How do I retract a manual RV awning?
To retract a manual RV awning, locate the awning control mechanism and turn it counterclockwise until the awning is fully retracted.
What if my manual RV awning is stuck and won’t retract?
If your manual RV awning is stuck and won’t retract, check for any obstructions or debris that may be preventing it from fully retracting. Clear any obstructions and try again. If the issue persists, it may be a mechanical problem that requires professional assistance.
Can I partially retract my manual RV awning?
No, manual RV awnings are designed to be fully retracted or fully extended. You cannot partially retract a manual RV awning.
How often should I inspect and maintain my manual RV awning?
It is recommended to inspect and maintain your manual RV awning at least once a year. Check for any signs of damage, tears, or wear and tear. Clean the awning fabric and lubricate any moving parts as needed.
What should I do if my manual RV awning fabric is damaged or torn? A8. If your manual RV awning fabric is damaged or torn, it is best to replace it. Measure the dimensions of your awning and purchase a replacement fabric. Follow the manufacturer’s instructions for installation.
Can I use my manual RV awning during windy conditions?
It is not recommended to use your manual RV awning during windy conditions as strong winds can damage the awning. Always retract the awning when the wind speed exceeds the manufacturer’s recommended limit.
How do I clean my manual RV awning?
To clean your manual RV awning, use a mild soap or detergent and a soft brush or cloth. Gently scrub the fabric, paying extra attention to any stains or dirt spots. Rinse thoroughly with water and allow the awning to air dry completely before retracting.
Can I install a motorized system on my manual RV awning?
Yes, it is possible to install a motorized system on a manual RV awning. However, it is recommended to consult a professional for installation as it may require electrical wiring and specific tools.
How do I maintain the hardware of my manual RV awning?
To maintain the hardware of your manual RV awning, regularly lubricate any moving parts with a silicone-based lubricant. Check for any loose screws or bolts and tighten them as needed. Inspect the springs and other components for signs of damage or wear and replace if necessary.