
Are you a proud RV owner who loves hitting the open road and exploring new destinations? If so, then you know the importance of having a reliable RV awning to provide shade and protection from the elements. But what do you do when it starts to rain? How do you adjust your RV awning to ensure that it doesn’t get damaged or create a pool of water on top? In this blog post, we’ll walk you through some simple steps on how to adjust your RV awning for rain, so you can continue to enjoy your outdoor space, even in wet weather. So grab a cup of coffee and let’s dive in!
Table of Contents
Understanding the Importance of Adjusting Your RV Awning
Adjusting your RV awning is an essential task that every RV owner should know how to do, especially when it comes to preparing for rain. Rain can quickly turn a relaxing camping trip into a wet and uncomfortable experience. By adjusting your RV awning properly, you can ensure that rainwater is directed away from your RV and the area underneath the awning remains dry.
To adjust your RV awning for rain, start by tilting one end of the awning slightly lower than the other, allowing rainwater to slide off easily. You may also want to consider investing in awning deflappers or awning covers, which can help prevent water from pooling on the awning fabric. Additionally, make sure to use tie-downs or stakes to secure your awning in place, as strong winds or heavy rain can cause the awning to collapse.
Taking these simple steps to adjust your RV awning for rain will ensure that you can continue to enjoy your outdoor space, even when the weather doesn’t cooperate.
Protecting Your RV from Rain Damage
RV awnings are not only an excellent way to provide shade and protection from the sun but also an essential component for safeguarding your RV during rainstorms. Adjusting your RV awning is a critical step in preventing rain damage and potential leaks. Just like a sturdy umbrella, the awning acts as a shield, diverting rainwater away from the RV’s exterior and keeping it dry inside.
Picture this: you’re sitting inside your RV, cozy and dry, while the rain pours outside. Your awning is set at the perfect angle to allow the rainwater to roll off smoothly, ensuring your RV remains protected. However, if the awning is not properly adjusted, rainwater can accumulate, creating pooling and increasing the risk of leakage and water damage.
By taking the time to adjust your RV awning correctly, you are giving your recreational vehicle the best chance at weathering any storm that may come its way. So, before the rain starts to pour, make sure to adjust your awning properly and give your RV the protection it deserves.
Preventing Water Pooling on Your RV Awning
RV awnings are a great addition to your outdoor space, providing shade and protection from the elements. However, without proper adjustments, water pooling can become a frustrating issue. Understanding the importance of adjusting your RV awning is essential to prevent this problem.
When your awning is not adjusted correctly, it can hold water, which not only puts strain on the fabric but can also lead to leaks and damage to your RV. To avoid this, make sure to adjust the pitch of your awning so that it is slightly sloping. This will allow water to run off instead of pooling.
Additionally, regularly inspect your awning for any signs of water pooling and make adjustments as needed. By taking these simple steps, you can ensure that your RV awning stays in great condition and provides you with the shade and protection you need.
Step-by-Step Guide to Adjusting Your RV Awning for Rain
If you’re an RV owner, you know how important it is to make sure your awning is secure during rainy weather. Rain can quickly turn a peaceful camping trip into a soggy mess if your awning isn’t adjusted properly. Luckily, adjusting your RV awning for rain is a simple task that can help keep you dry and comfortable.
The first step is to lower one side of the awning slightly so that water can run off easily. You can do this by loosening the nuts or bolts that hold the awning arms in place and sliding them down to a lower position. Once the awning is slightly lower on one side, you can secure it by tightening the nuts or bolts back up.
This will create a slight slope on the awning, allowing rainwater to flow off instead of accumulating and causing damage. Remember to also secure the tension of your awning fabric, as this will help prevent water from pooling and sagging. By following these simple steps, you can ensure that your RV awning is ready to handle rainy weather and keep you dry during your camping adventures.
1. Check the Weather Forecast
RV awnings provide shade and protection from the elements while enjoying the great outdoors. However, when it starts to rain, it’s important to adjust your awning properly to prevent any damage or water pooling. The first step in this process is to check the weather forecast.
By knowing the expected weather conditions, you can determine whether you need to adjust your awning or not. If rain is in the forecast, it’s a good idea to make the necessary adjustments to ensure your awning can handle the rain without any issues.
2. Lower One Side of the Awning
RV awnings are a great addition to any camping or outdoor adventure. They provide shade and protection from the elements, allowing you to enjoy the outdoors in comfort. However, when the rain starts to fall, it’s important to know how to adjust your awning to prevent water from pooling on top and potentially causing damage.
One way to do this is by lowering one side of the awning. This can be done by loosening the tension knobs on the support arms and gently guiding the awning down on one side. By doing this, the rainwater will run off the awning instead of collecting and potentially causing damage.
It’s a simple and effective way to ensure your awning stays in good condition, even in rainy weather. So, next time the rain starts to pour, remember to lower one side of your awning and keep your outdoor space dry and protected.
3. Secure the Lowered Side
RV awnings are a great addition to any camping trip, providing shade and protection from the elements. However, when it starts to rain, it’s important to adjust your awning to prevent water from pooling and potentially damaging your RV. One crucial step in this process is securing the lowered side of the awning.
This is the side that is closest to the ground when the awning is fully extended. By securing this side, you can ensure that rainwater will run off and not collect on the material. To do this, you can use a variety of methods, such as using bungee cords or straps to hold the lowered side down.
Additionally, you can adjust the pitch of the awning to create a slight slope, allowing water to run off more easily. This simple step can go a long way in protecting your awning and your RV from potential water damage during a rainstorm. So, the next time you’re camping and it starts to rain, be sure to secure the lowered side of your RV awning to keep your campsite dry and comfortable.
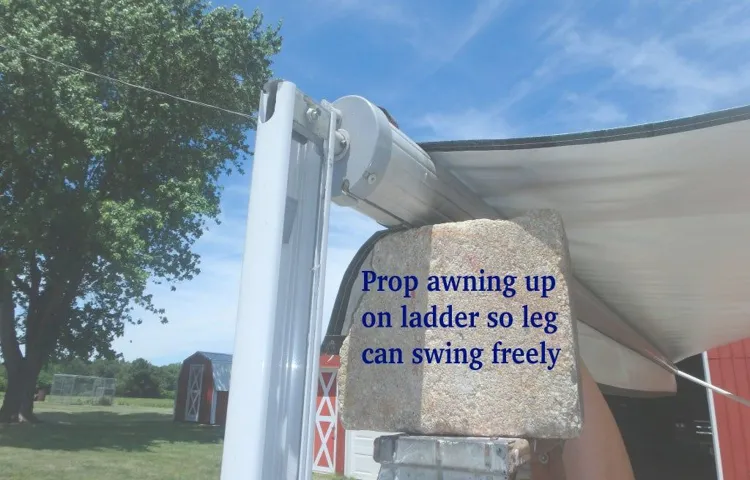
4. Use Support Poles or Braces
RV awnings are a great feature that provide shade and protection from the elements while enjoying the outdoors. However, it’s important to properly adjust your awning to ensure it can withstand rain without getting damaged. One step you can take is to use support poles or braces.
These can help add stability and prevent your awning from sagging or collapsing under the weight of rainwater. The support poles or braces can be easily attached to the arms of your awning and adjusted to the desired height. This will help create a slight slope, allowing rainwater to run off instead of collecting on the fabric.
It’s a simple and effective way to protect your awning from rain and extend its lifespan. So the next time you’re preparing for a rainy day, don’t forget to use support poles or braces to keep your RV awning in top shape.
5. Consider Adding Awning Extenders
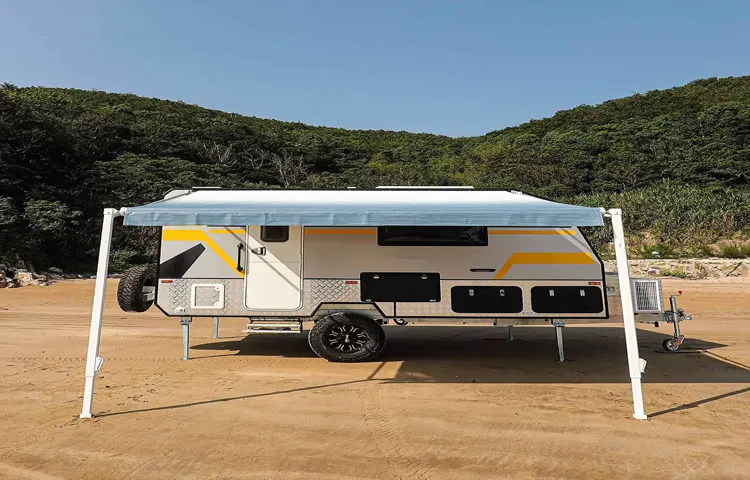
RV awnings are a fantastic feature to have on your recreational vehicle, providing shade and protection from the sun during hot days. However, when it starts to rain, it’s important to adjust your awning properly to prevent any damage or water pooling. Adjusting your RV awning for rain is a simple process that can be done in a few easy steps.
First, make sure your awning is fully extended to its maximum length. This will allow the rainwater to run off easily without pooling and potentially causing damage. Next, lower one end of the awning slightly to create a gentle slope.
This slope will help the rainwater flow off the awning and prevent it from accumulating in one spot. You can use the adjustable arm on the awning to lower one end and create the desired slope. Another great tip is to consider adding awning extenders to your RV.
Awning extenders are additional pieces that can be attached to your existing awning to increase its length. This will provide additional coverage and prevent rainwater from dripping down the sides of your RV. Overall, adjusting your RV awning for rain is a crucial step to ensure the longevity and functionality of your awning.
By following these simple steps, you can enjoy the rain while staying dry and comfortable in your RV.
Additional Tips for RV Awning Maintenance
If you’re an RV owner, you know that unpredictable weather can often catch you off guard. One essential aspect of managing rain while on the road is knowing how to adjust your RV awning. When faced with rain, it’s crucial to angle your awning to prevent water from pooling on the fabric.
To do this, start by loosening the awning arms at the base of your RV, allowing you to tilt the awning. Next, gently push one side of the awning upwards while keeping the other side level. This angle will allow rainwater to run off instead of collecting and potentially damaging the fabric.
Finally, once the rain has stopped, return the awning to its original position. Remember, proper maintenance and adjustments can ensure your awning stays in excellent condition and provide you with a comfortable outdoor space during your RV adventures.
Regularly Clean and Inspect Your Awning
RV awnings can provide shade and protection from the elements while you’re enjoying the great outdoors. However, just like any other part of your RV, awnings require regular maintenance to keep them in good condition. One important aspect of awning maintenance is cleaning.
Over time, dirt, pollen, bird droppings, and other debris can accumulate on the fabric, which can not only make the awning look dirty but also cause damage to the material. To clean your awning, start by brushing off any loose debris with a broom or soft brush. Then, mix a solution of mild detergent and water and use a sponge or soft cloth to scrub the awning.
Rinse thoroughly with water and allow the awning to dry completely before retracting it. In addition to regular cleaning, it’s also important to inspect your awning for any signs of damage. Look for tears, fraying, or loose stitching, as these can worsen over time if left untreated.
If you notice any issues, it’s best to address them as soon as possible to prevent further damage. By regularly cleaning and inspecting your awning, you can ensure that it stays in good condition for years to come.
Invest in Waterproofing Products
RV awnings are a great addition to any outdoor adventure. They provide shade and protection from the elements, allowing you to enjoy the outdoors in comfort. However, like any part of your RV, awnings require regular maintenance to keep them in good condition.
One important aspect of awning maintenance is ensuring that they are waterproof. Investing in waterproofing products can help to prolong the life of your awning and protect it from water damage. There are many different types of waterproofing products available, including sprays, coatings, and sealants.
These can be applied to the fabric of your awning to create a barrier that repels water. By using a waterproofing product on your RV awning, you can prevent water from seeping through the fabric and causing damage. This is particularly important if you plan on using your awning during rainy weather.
Waterproofing products can also help to prevent mold and mildew from forming on the fabric, which can be both unsightly and unhealthy. Overall, investing in waterproofing products is a simple and cost-effective way to protect your RV awning and ensure that it lasts for many years to come.
Conclusion
So there you have it, dear readers. The art of adjusting your RV awning for rain is not as daunting as it may seem. With a few simple adjustments and a little bit of know-how, you can ensure that your outdoor space remains dry and comfortable even during the most torrential downpour.
Remember, the key is to find the perfect balance between keeping the rain out and still allowing for adequate ventilation. By slightly tilting your awning, adding some tension to the fabric, and using accessories like awning deflappers and gutter extensions, you can create a veritable fortress against the rain. Just imagine, while other campers are scrambling to put away their wet chairs and fold up their dripping tablecloths, you’ll be sipping a hot cup of tea under the protective canopy of your expertly adjusted RV awning.
Your friends will marvel at your foresight and envy your dry and cozy setup. So don’t let the rain dampen your camping spirits. Embrace the challenge, master the art of adjusting your RV awning, and bask in the glory of staying dry in even the most inclement weather.
Happy camping, my friends!”
FAQs
Why is it important to adjust your RV awning for rain?
It is important to adjust your RV awning for rain to prevent water accumulation and potential damage to the awning and the RV itself.
How can you adjust your RV awning for rain?
To adjust your RV awning for rain, you can lower one side of the awning slightly to create a slope, allowing rainwater to run off easily.
What are the signs that your RV awning needs adjustment for rain?
Signs that your RV awning needs adjustment for rain include pooling of water on the awning fabric, sagging or tilting of the awning, or water dripping down into the RV.
Can a manual RV awning be adjusted for rain?
Yes, a manual RV awning can be adjusted for rain by simply lowering one side slightly to create a slope for water runoff.
Are there any specific tools required to adjust an RV awning for rain?
No, there are no specific tools required to adjust an RV awning for rain. It can be done manually by adjusting the awning arms or using a crank if applicable.
Is it necessary to adjust the RV awning for rain if it has a protective cover?
Yes, even if your RV awning has a protective cover, it is still necessary to adjust it for rain to prevent water accumulation and potential damage.
Can adjusting an RV awning for rain help prevent leaks inside the RV?
Yes, adjusting an RV awning for rain can help prevent leaks inside the RV by ensuring that water does not accumulate or seep into the RV through the awning fabric.
How often should I adjust my RV awning for rain? A8. It is recommended to check and adjust your RV awning for rain before and during any rainy weather or storms to ensure proper water runoff.
What should I do if my RV awning gets damaged due to rain?
If your RV awning gets damaged due to rain, you may need to repair or replace it depending on the extent of the damage. Consult a professional or RV awning specialist for guidance.
Are there any specific care and maintenance tips for RV awnings to prevent rain damage?
Yes, regularly cleaning your RV awning, ensuring it is properly tensioned, and keeping it free from debris can help prevent rain damage and prolong its lifespan.
Can I adjust my RV awning for rain while it is already raining?
It is not recommended to adjust your RV awning for rain while it is already raining, as it may be difficult and potentially dangerous to do so due to slippery surfaces.
How long does it take to adjust an RV awning for rain?
The time it takes to adjust an RV awning for rain can vary depending on the type of awning and the person’s familiarity with the process. It can range from a few minutes to 15-20 minutes.