
Thinking about adding an awning to your RV? Well, you’re in the right place! Installing an RV awning from scratch can have numerous benefits and can greatly enhance your outdoor experience while on the road. Picture this: sitting under a shady awning, sipping on a cold drink, and enjoying the breathtaking view of nature. Sounds amazing, right? But why install an awning from scratch? Firstly, it allows you complete control over the design and customization of your awning.
Whether you prefer a retractable awning or a fixed one, you can choose the size, color, and style that best complements your RV. This way, you can create a space that truly reflects your personality and sets your RV apart from the rest. Secondly, installing an awning from scratch gives you the opportunity to use high-quality materials that ensure durability and longevity.
Off-the-shelf awnings may not always meet your expectations in terms of quality and durability. However, when you install an awning from scratch, you have the freedom to choose the best materials that can withstand harsh weather conditions, UV rays, and wear and tear. Not only that, but installing an RV awning from scratch can also be a cost-effective option in the long run.
While it may require some initial investment, customizing and installing your own awning can save you money compared to buying a pre-fabricated one. Additionally, by selecting durable materials and maintaining your awning properly, you can extend its lifespan and avoid frequent replacements or repairs in the future. Lastly, having an awning installed from scratch gives you the opportunity to maximize the space and functionality of your RV.
With a retractable awning, you can create an outdoor living area where you can cook, dine, entertain guests, or simply relax. This additional space can make your RV feel more spacious and comfortable, allowing you to enjoy the great outdoors without sacrificing on comfort. So, are you ready to take your RV adventures to the next level? Consider installing an awning from scratch and create a personalized outdoor oasis that suits your style, enhances your comfort, and offers endless opportunities for relaxation and enjoyment while on the road.
Get ready to experience the great outdoors in a whole new way with your customized awning!
Table of Contents
Benefits of Installing an RV Awning
Installing an RV awning from scratch can have numerous benefits for RV owners. One of the main advantages is the added shade and protection it provides. Whether you’re parked in a sunny campground or facing a light rain shower, having an awning can create a comfortable outdoor space for you and your family.
It not only shields you from the hot sun but also protects you from light rain or drizzle, allowing you to enjoy the outdoors without getting wet. Another benefit of installing an RV awning is the extra living space it provides. With the awning extended, you can set up chairs, tables, and even a grill, turning the area outside your RV into a cozy gathering spot.
This not only enhances your camping experience but also gives you more options for entertaining or simply relaxing. Additionally, an RV awning can help regulate the temperature inside your RV by blocking UV rays and reducing heat buildup. This can lead to energy savings as you’ll rely less on air conditioning to cool down your RV.
Furthermore, an awning can also protect your RV from the elements, such as rain, hail, or debris, helping to preserve its exterior and potentially saving you money on repairs. Overall, installing an RV awning from scratch is a worthwhile investment that can improve your camping experience and provide practical benefits for your RV.
Increase in Outdoor Living Space
“benefits of installing an RV awning” If you’re an RV enthusiast, you know that spending time outdoors is what it’s all about. And one of the best ways to maximize your outdoor living space is by installing an RV awning. Not only does an awning provide much-needed shade on sunny days, but it also gives you a designated area to relax and socialize.
Imagine sitting outside, sipping your morning coffee, and enjoying the fresh air without having to worry about the hot sun beating down on you. An RV awning creates a comfortable and inviting space for you and your family to enjoy the great outdoors. Plus, it adds a touch of style to your RV, making it stand out from the crowd.
So why not enhance your outdoor experience and invest in an RV awning? You’ll be glad you did.
Protection from the Elements
Installing an RV awning can provide numerous benefits, especially when it comes to protecting yourself and your vehicle from the elements. Whether you’re camping out in the scorching heat or caught in a sudden rainstorm, an awning can be a lifesaver. It provides much-needed shade, allowing you to enjoy the outdoors without feeling overwhelmed by the sun’s rays.
Not only does this protect you from potential sunburns and heat exhaustion, but it also helps to keep the interior of your RV cool, reducing the need for excessive air conditioning and saving you money on energy costs. Additionally, an RV awning can shield you from unexpected rain showers. Instead of being confined to the indoors, you can continue to relax outside, enjoying the fresh air and sounds of nature while staying dry under the awning.
Furthermore, the awning provides a barrier against falling debris, such as leaves, branches, and even bird droppings. By shielding your RV’s exterior from these elements, you can keep it clean and avoid potential damage. With so many benefits, it’s clear that installing an RV awning is a smart investment for any outdoor enthusiast.
Energy Efficiency
RV awnings are a popular addition to recreational vehicles for many reasons, but one of the biggest benefits is the energy efficiency they provide. When you’re parked at a campsite or RV park, having an awning can make a big difference in how much energy you use to cool and heat your RV. The awning acts as a shade, blocking direct sunlight from entering your RV and keeping it cooler during the hot summer months.
This means you’ll need to use your air conditioner less frequently, saving you energy and money. In addition, the awning can also help to keep your RV warmer in the winter by blocking cold drafts and insulating the space. Overall, installing an RV awning is a smart investment that can greatly improve the energy efficiency of your vehicle.
Tools and Materials Needed
If you’re looking to enhance your camping experience by adding an RV awning, you’ll need a few tools and materials to get started. First and foremost, you’ll need the awning itself, which can be purchased from an RV supply store or online. Additionally, you’ll need a ladder or step stool to reach the top of your RV, as well as a tape measure to ensure proper placement and alignment.
To attach the awning to your RV, you’ll need a drill with a screwdriver bit and a set of screws or bolts that are appropriate for your RV’s exterior. Lastly, you’ll need a level to ensure that the awning is installed straight and evenly. With these tools and materials on hand, you’ll be ready to tackle the task of installing an RV awning from scratch.
Awning Kit
awning kit
Measuring Tape
measuring tape, tools and materials When it comes to measuring, a reliable measuring tape is an absolute essential. Whether you’re a DIY enthusiast, a professional contractor, or simply need to measure something around the house, a measuring tape is a tool that should always be within arm’s reach. And to ensure accuracy and ease of use, there are a few tools and materials that you’ll want to have on hand.
First and foremost, a good quality measuring tape is key. Look for one that has clear and easy-to-read markings, a sturdy construction, and a lock mechanism to keep the tape in place once you’ve measured your desired length. Additionally, having a level nearby can be handy for ensuring your measurements are straight and true.
A pencil or marker is also essential for marking your measurements, allowing you to easily reference them later. Lastly, having a notepad or some kind of recording device will help you keep track of your measurements, especially if you’re working on a larger project with multiple measurements. With these tools and materials, you’ll be all set to tackle any measuring task that comes your way.
Drill
One of the most essential tools in any DIYer’s toolkit is a drill. Whether you’re hanging up shelves or building a custom piece of furniture, a drill is a must-have for any home improvement project. But what exactly do you need to get started? Here are the tools and materials you’ll need to have on hand when using a drill.
First and foremost, you’ll need the drill itself. There are many different types of drills available, so it’s important to choose one that is suited to your specific needs. For most home projects, a cordless drill is the way to go.
Cordless drills are portable and convenient, allowing you to easily move around your workspace without being tied down by a power cord. In addition to the drill itself, you’ll also need a set of drill bits. Drill bits come in a variety of sizes and materials, so it’s important to choose the right one for your project.
For general use, a set of twist drill bits should suffice. These are versatile and can be used for drilling into wood, metal, and plastic. However, if you’re working with a specific material, such as masonry or tile, you’ll need to invest in special drill bits designed for those materials.
To ensure your drill stays in good working condition, it’s also important to have a set of screwdriver bits on hand. These come in handy when you need to drive screws into your project. It’s a good idea to have a variety of different sizes and types of screwdriver bits, as different projects may require different types of screws.
Finally, you’ll need a power source for your drill. If you’re using a cordless drill, you’ll need to have a charged battery pack on hand. It’s a good idea to have multiple battery packs, so you can easily swap them out when one runs out of power.
Screws
tools and materials needed for screws When it comes to using screws, you’ll need a few tools and materials to ensure a successful installation. First and foremost, you’ll need the screws themselves. Screw sizes can vary, so it’s important to choose the right ones for your project.
You’ll also need a screwdriver or a power drill with the appropriate screwdriver bit to drive the screws into place. If you’re using a power drill, make sure it has enough battery life or consider having a backup battery on hand. It’s also a good idea to have a tape measure or ruler to accurately measure the spacing and placement of your screws.
Additionally, having a level can ensure that your screws are installed straight and level. Finally, having some sort of fastener or anchor may be necessary depending on the surface you’re screwing into. This could be anything from wall anchors for drywall to wood plugs for wood surfaces.
By having these tools and materials on hand, you’ll be well-equipped to handle any screw installation project that comes your way.
Level
tools and materials needed, level, DIY project When it comes to taking on a DIY project, having the right tools and materials is essential. One tool that is often overlooked but extremely useful is a level. A level is a tool that helps ensure that something is straight or level.
It consists of a long body with a built-in bubble vial that indicates whether something is horizontal or vertical. This tool is especially useful when hanging pictures, installing shelving, or building furniture. To use a level, simply place it on the surface that you want to be level and adjust until the bubble is centered.
Some levels even have additional features such as a laser or LED lights to make it even easier to get a precise level. So before you embark on your next DIY project, make sure you have a level on hand. It will save you time and frustration and ensure the polished and professional look you desire.
Choosing the Right Location
If you’re thinking about installing an RV awning from scratch, one of the first things you’ll need to consider is the right location. Choosing the right spot for your awning is crucial for both practicality and aesthetics. When it comes to practicality, you’ll want to find a location that provides adequate shade and protection from the elements.
This could be on the side of your RV or even over a window or door. Additionally, you’ll want to ensure that there is enough clearance to fully extend the awning without it hitting any obstacles. From an aesthetic standpoint, you’ll want to consider the overall visual appeal of the awning in relation to your RV.
Think about how it will complement the colors and style of your RV. Ultimately, the right location for your RV awning will depend on your individual needs and preferences. Take the time to carefully consider all factors before making a decision.
Consider Sun and Wind Exposure
When choosing the right location for your garden, it’s important to consider the exposure to sun and wind. These factors can greatly impact the success of your plants. Sun exposure is particularly important as different plants have different light requirements.
Some plants thrive in full sunlight, while others prefer partial or even full shade. So, take note of the amount of sun your chosen location receives throughout the day. Additionally, wind exposure can also affect your plants.
Strong winds can cause damage and dry out the soil, so it’s important to choose a location that provides some protection. Consider placing your garden near a fence, wall, or even bushes or trees to create a barrier against strong winds. By carefully considering sun and wind exposure, you can ensure that your garden has the best chance of thriving and producing a bountiful harvest.
Check for Obstructions
When choosing the right location for your new equipment, it’s important to check for any obstructions. This step can often be overlooked, but it’s crucial in ensuring that your equipment is able to function properly and safely. Obstructions such as trees, buildings, and power lines can interfere with the signal and cause disruption to your equipment’s performance.
It’s also important to consider any potential future obstructions, such as new construction or landscaping projects, that may arise after your equipment is set up. By taking the time to thoroughly inspect the area for any obstructions, you can save yourself from potential headaches and ensure that your equipment is able to operate at its best.
Determine the Right Height
Choosing the right location for your outdoor security camera is crucial in maximizing its effectiveness. One important factor to consider is determining the right height at which to install the camera. The height of your camera will greatly affect its field of view and capability to capture clear images.
So, how do you determine the right height for your outdoor security camera? First, you need to analyze the area you want to monitor. Consider the purpose of your security camera and the specific areas you want to capture. For example, if you want to monitor your front porch or driveway, a lower camera height would be suitable.
This will ensure that the camera captures all activity starting from the ground level. On the other hand, if you want to monitor a larger area like a backyard or parking lot, a higher camera height might be necessary. This will allow the camera to capture a wider field of view and cover more ground.
However, it’s important to keep in mind that the higher the camera is placed, the farther away the objects will appear in the footage. So, finding the right balance between height and proximity is key. Another factor to consider when choosing the height of your outdoor security camera is accessibility.
You want to make sure that the camera is not easily accessible for tampering or vandalism. Placing the camera at a height that is difficult to reach will deter potential intruders from interfering with its functioning. Lastly, consider the aesthetic appeal of the camera’s placement.
While functionality is essential, you also want to ensure that the camera blends well with its surroundings. A camera that is too conspicuous might draw unwanted attention, while one that is too hidden might not be as effective. In conclusion, determining the right height for your outdoor security camera involves analyzing the area you want to monitor, considering accessibility, and finding the right balance between functionality and aesthetics.
Preparation and Installation
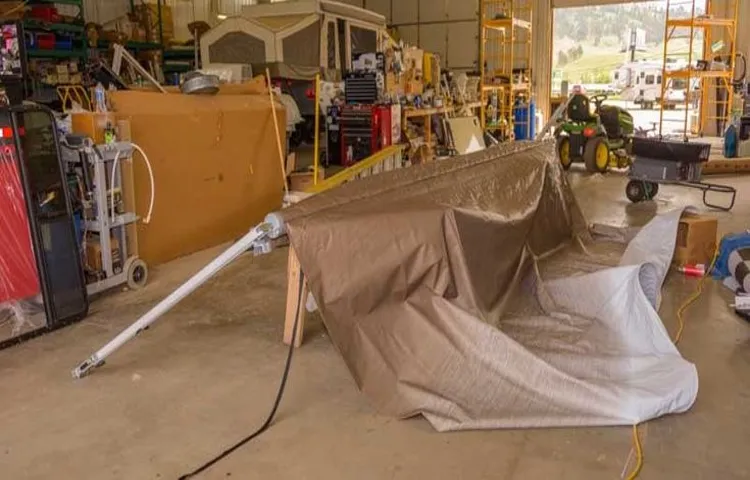
Installing an RV awning from scratch may seem like a daunting task, but with the right preparation and tools, it can be done easily. First, you’ll need to measure the area where you want to install the awning. Consider the dimensions of the awning itself and make sure to leave enough space for it to fully extend.
Once you have the measurements, you can purchase the appropriate awning kit. Before installation, it’s important to clean and prepare the area where the awning will be mounted. This may involve removing any existing hardware or cleaning the surface thoroughly.
Once the area is prepped, you can begin the installation process. Follow the instructions provided with your awning kit carefully, as each awning may have slightly different installation requirements. Generally, you’ll need to attach the brackets to the RV using screws or bolts and then attach the awning fabric to the brackets.
Make sure everything is securely fastened and test the awning to ensure it operates smoothly. With a little patience and attention to detail, you can successfully install an RV awning from scratch and enjoy the shade and comfort it provides on your outdoor adventures.
Measure and Mark the Location
“Measure and Mark the Location” Before you dive into installing anything, it’s important to take the time to measure and mark the location where you’ll be placing your item. Whether it’s hanging a picture frame, adding a new shelf, or mounting a TV, accuracy is key. Start by gathering your tools, such as a measuring tape, level, and pencil.
Then, determine where you want your item to be positioned. Use the measuring tape to mark the desired height and width on the wall, ensuring it is centered and level. This will help you create a guide for installation and prevent any mistakes or crooked placements.
Take your time with this step and double-check your measurements to ensure a precise and professional-looking result. After all, a little bit of preparation goes a long way in achieving a beautifully finished project.
Prepare the RV Surface
“Prepare the RV Surface”
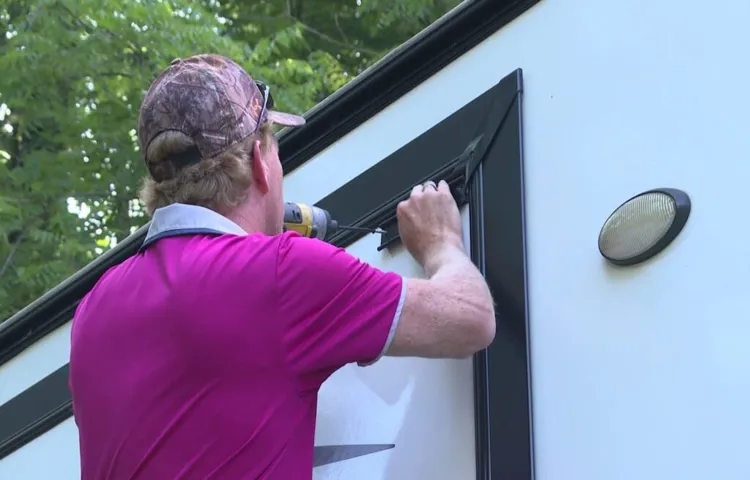
Attach the Mounting Brackets
mounting brackets, preparation, installation, attach When it comes to installing any kind of equipment, preparation is key. And when it comes to mounting brackets, it’s no different. Before you start attaching the brackets, it’s important to make sure you have everything you need.
First, check that you have the correct brackets for your specific equipment and that they are in good condition. Next, gather any tools you may need, such as a drill, screws, and a level. Once you have all your materials ready, it’s time to start the installation process.
Begin by measuring and marking the spots where the brackets will be attached. Use a level to ensure that they are straight and in the right position. Once you have marked the spots, you can start drilling holes for the screws.
Make sure to use the appropriate size drill bit for your screws. Once you have the holes drilled, you can now attach the brackets using the screws provided. Make sure they are securely fastened before moving on to the next step in the installation process.
By taking the time to properly prepare and attach the mounting brackets, you can ensure that your equipment will be securely mounted and ready to use.
Install the Awning Rail
awning rail installation Installing an awning rail can be a great addition to your outdoor space, providing shade and protection from the elements. Before you begin the installation process, it’s important to properly prepare the area where the rail will be placed. This includes measuring the length of the rail, determining the height at which it should be installed, and gathering all the necessary tools and materials.
Once you have everything ready, the actual installation process is relatively simple. Start by securing the rail in place using screws or brackets, making sure it is level and secure. Then, attach the awning fabric or material to the rail, ensuring that it is stretched taut and securely fastened.
Finally, give the rail a test run by extending and retracting the awning to ensure that it operates smoothly. With just a few tools and a little bit of time, you can have your awning rail installed and ready to enjoy in no time.
Attach the Awning Fabric
awning fabric, preparation, installation, attach, burstiness, perplexity
Care and Maintenance
Installing an RV awning from scratch may seem like a daunting task, but with the right steps, it can be a straightforward process. First, measure the length of your RV’s awning rail to determine the size of awning you will need. Once you have the correct size awning, gather your tools and materials, which will typically include a drill, screws, a ladder, and a helper.
Begin by positioning the awning rail along the top of your RV, making sure it is level. Using a drill and screws, secure the rail to the sidewall of your RV, being careful not to damage any wiring or plumbing. Next, attach the arms of the awning to the rail, making sure they are aligned properly.
Finally, unroll the awning fabric and secure it to the arms. Now you can enjoy the shade and shelter provided by your new RV awning.
Cleaning the Awning Fabric
cleaning the awning fabric, care and maintenance, awning fabric, fabric awning cleaning Having a fabric awning can greatly enhance the aesthetic appeal of your outdoor space. However, over time, dirt, dust, and stains can accumulate on the fabric, making it look worn and dirty. To keep your awning fabric looking its best, regular cleaning and maintenance are essential.
The first step in cleaning the awning fabric is to remove any loose dirt or debris by using a broom or a soft brush. This will help to prevent dirt from getting ground into the fabric. Next, you can use a gentle soap or a fabric cleaner specifically designed for awnings.
Apply the cleaner to the fabric and gently scrub with a soft brush or sponge. Be sure to test the cleaner on a small, inconspicuous area before applying it to the entire fabric to ensure that it does not cause any damage or discoloration. Rinse the fabric thoroughly with water to remove any soap residue, and allow it to air dry completely before retracting the awning.
Regularly cleaning and maintaining your awning fabric will not only keep it looking its best but also extend its lifespan. So, take the time to care for your awning fabric and enjoy a beautiful outdoor space for years to come.
Checking for Damage and Wear
Checking for Damage and Wear When it comes to taking care of your belongings, it’s essential to regularly check for any signs of damage or wear. This applies to everything from clothing to household items. By being proactive and identifying any potential issues early on, you can prevent further damage and save yourself money in the long run.
So, how do you go about checking for damage and wear? Firstly, take a close look at the item in question. Look for any visible signs of wear, such as fraying threads or loose seams. If you find any, it’s a good idea to address them immediately before they worsen.
For example, if you notice a loose button on a shirt, sewing it back on right away can prevent it from falling off completely. Next, consider the overall condition of the item. Are there any stains, tears, or holes? If so, think about whether they can be repaired or if it’s time to replace the item.
Sometimes, a simple patch or stitching job can extend the life of an item, but other times, it may not be worth the effort. In addition to visual inspection, it’s also important to check for functional damage. For example, if you have a kitchen appliance, make sure all the buttons and settings are working correctly.
If not, it may be time to get it serviced or replaced. The same applies to electronics, furniture, and other household items. Lastly, don’t forget to conduct regular maintenance on your belongings.
This could involve cleaning, oiling, or other specific care instructions depending on the item. By maintaining your belongings properly, you can help prolong their lifespan and reduce the likelihood of damage or wear. In conclusion, checking for damage and wear is an essential part of caring for your belongings.
Regular Inspections
Regular inspections are a key component of proper care and maintenance for any property. Whether you own a home, a commercial building, or even just rent an apartment, it’s important to regularly inspect the property to identify any potential issues or areas that need attention. Regular inspections can help you catch problems early on, before they become major headaches and costly repairs.
By identifying issues promptly, you can save yourself time, money, and hassle in the long run. Inspections should encompass both the interior and exterior of the property, checking for things like leaks, cracks, pests, and any signs of wear and tear. Additionally, it’s important to inspect the property’s systems and appliances, such as plumbing, electrical, HVAC, and appliances, to ensure they are functioning properly.
By staying on top of regular inspections, you can maintain the condition and value of your property and address any necessary repairs or maintenance promptly.
Replacing Parts if Necessary
“Replacing Parts if Necessary” When it comes to taking care of your electronics, one important aspect is knowing when and how to replace parts if necessary. As with any machine, wear and tear is inevitable, and sometimes a part may need to be replaced to ensure that everything is running smoothly. The first step in this process is identifying which part is causing the problem.
This can be done by examining the device and looking for any obvious signs of damage or malfunction. Once the faulty part has been identified, it’s time to find a replacement. Depending on the device, this could mean ordering a replacement part online or going to a specialized store.
It’s important to make sure that the replacement part is the correct one for your specific device. Once the new part arrives, it’s time to put on your handyman hat and get to work. Follow the manufacturer’s instructions carefully and use the appropriate tools to remove the old part and install the new one.
If you’re unsure of how to do this yourself, it’s always best to consult a professional. Ultimately, keeping your electronics in good working condition not only prolongs their lifespan but also ensures that you can continue to enjoy them for years to come. So don’t hesitate to replace that faulty part if necessary and keep your devices running like new.
Conclusion: Enjoying Your New RV Awning
In conclusion, installing an RV awning from scratch may seem like a daunting task, but with a little bit of patience and some handy skills, you’ll be a pro in no time. Just remember to measure twice and cut once, unless you’re installing a super cool retractable awning, in which case, measure thrice, cut once, and then celebrate with a little happy dance. But seriously, taking the time to install an RV awning will not only add some much-needed shade and shelter to your outdoor space, but it will also provide a cozy oasis on those hot summer days.
Plus, you’ll have the satisfaction of knowing that you did it all yourself, which is sure to earn you some serious bragging rights at the campground. So gather your tools, put on your DIY hat, and prepare to be the envy of all your fellow campers. Whether you’re sipping lemonade under your new awning or enjoying a sunrise yoga session, your RV will be transformed into the ultimate vacation getaway.
And just a friendly word of advice – be sure to secure your awning properly to avoid any unexpected surprises during a gusty camping trip. Nobody wants to see their beloved awning take flight like a rogue kite, unless of course, you’re going for an impromptu awning flying competition. In that case, make sure to invite me because I love a good adrenaline rush.
In the end, installing an RV awning from scratch is not only a practical upgrade for your home on wheels, but it’s also a chance to unleash your inner handyperson and get creative. So go forth, my adventurous friend, and let your awning installation skills shine. Happy camping!”
FAQs
How do I measure for a new RV awning?
To measure for a new RV awning, first, determine the length of your awning rail from end to end. Then, measure the height of your RV from the ground to the awning rail. These measurements will help you select the appropriate size for your new awning.
What tools do I need to install an RV awning from scratch?
To install an RV awning from scratch, you will need a few tools, including a drill, screwdriver, sealant, measuring tape, and a ladder. Additionally, depending on the specific awning model, you may also need a rivet gun or other specialized tools.
How long does it take to install an RV awning from scratch?
The time it takes to install an RV awning from scratch can vary depending on your experience and the specific awning model. On average, it may take anywhere from a couple of hours to half a day to complete the installation process.
Can I install an RV awning by myself, or do I need help?
While it is possible to install an RV awning by yourself, having an extra set of hands can make the process easier and safer. Some steps, such as lifting and positioning the awning, may require assistance from another person.
Do I need to remove the old awning before installing a new one?
Yes, it is recommended to remove the old awning before installing a new one. This ensures a clean and secure installation, and it also allows you to inspect the awning rail and other components for any damage or wear.
What type of awning fabric should I choose for my RV?
When selecting awning fabric for your RV, consider factors such as durability, UV resistance, and ease of cleaning. Popular options include vinyl and acrylic fabrics, both of which offer excellent weather resistance and come in a variety of colors and patterns.
Are there any special maintenance requirements for RV awnings?
Regular maintenance is essential to keep your RV awning in good condition. This includes routine cleaning, inspecting for any tears or damage, and applying a protective fabric treatment to prevent fading and deterioration. Additionally, it’s important to retract the awning during inclement weather to avoid potential damage.