
Have you been thinking about removing the awning from your RV? Perhaps it’s old and worn out, or maybe you simply want to change the look of your vehicle. Whatever your reasons may be, removing the awning from your RV can be a straightforward process if you know what steps to follow. In this step-by-step guide, we will walk you through the process of removing the awning from your RV, making it a hassle-free task.
So get ready to roll up your sleeves (figuratively, of course) and let’s dive in!
Table of Contents
Introduction
Removing the awning from an RV may seem like a daunting task, but with the right tools and a little know-how, it can be a relatively simple process. Start by preparing the area by removing any accessories or items that may be attached to the awning. It’s also crucial to ensure that the awning is fully retracted and secured in place before beginning the removal process.
To remove the awning, locate the awning rail on the side of the RV and carefully slide the awning fabric out of the rail. Once the fabric is removed, you can then detach the awning arms from the mounting brackets using a set of wrenches or a drill. Finally, remove the mounting brackets themselves by unscrewing them from the side of the RV.
With a little patience and careful attention to detail, you can easily remove an awning from your RV and even potentially replace it with a new one if desired.
Why do you need to remove your RV awning?
“Why do you need to remove your RV awning?” Introduction: Your RV awning serves as a valuable protection against the elements, providing shade and shelter during your outdoor adventures. However, there may be times when it becomes necessary to remove your RV awning. Whether you’re preparing for a storm, experiencing strong winds, or hitting the road for an extended period, taking down your awning ensures its safety and longevity.
In this article, we will explore why it is essential to remove your RV awning in certain situations, and the benefits it brings for your overall RV maintenance. So, let’s dive in and find out why removing your RV awning is a wise decision.
Importance of following proper steps
steps to follow, importance of following, proper steps
Tools and Materials Needed
When it comes to removing an awning from your RV, there are a few tools and materials that you will need. First and foremost, you will need a ladder to reach the awning and safely remove it. It’s important to have a sturdy and stable ladder to ensure your safety while working at heights.
Additionally, you will need some basic hand tools such as a screwdriver or wrench, depending on the type of fasteners used to attach the awning to your RV. It’s also a good idea to have a helper to assist you in the process, as awnings can be quite heavy and cumbersome to handle alone. Finally, you may want to have some protective gear such as gloves and eye protection to ensure your safety while removing the awning.
By having these tools and materials on hand, you will be well-prepared to successfully remove the awning from your RV.
List of necessary tools
A List of Necessary Tools and Materials Needed for the Job To ensure a successful completion of your project, having the right tools and materials is crucial. Here is a list of essential items you’ll need: Measuring Tape: Measuring accurately is the first step towards any project.
A reliable measuring tape will help you get those precise measurements you need. Screwdriver Set: A set of different screwdrivers is a must-have for any project.
Whether it’s flat head or Phillips head screws, having the right screwdriver will make the job much easier. Hammer: From nailing down boards to removing nails, a quality hammer is an indispensable tool.
Make sure to choose one that feels comfortable in your hand. Level: A level is essential for ensuring your work is straight and even.
It will save you from the frustrations of a crooked table or shelving unit. Power Drill: A power drill will make your life so much easier.
Choose one with variable speed and a variety of drill bits for different materials. Safety Equipment: Safety should always come first.
Recommended materials for safe removal
When it comes to safely removing materials, it’s important to have the right tools and materials on hand. You don’t want to end up causing damage or injuries because you didn’t have the proper equipment. So, what do you need to safely remove materials? Let’s take a look.
First and foremost, you’ll need protective gear. This includes gloves, goggles, and a mask. These items will help protect you from any hazardous materials, dust, or fumes that may be present during the removal process.
Next, you’ll need the right tools for the job. Depending on the type of material you’re removing, you may need items such as a pry bar, hammer, screwdriver, or chisel. These tools will help you to safely and effectively remove the material without causing any damage.
Additionally, you may need other materials such as plastic sheeting or drop cloths to protect the surrounding area. This will help to prevent any mess or debris from spreading and causing further issues. Lastly, it’s always a good idea to have a disposal plan in place.
Make sure you know how to properly dispose of the materials you’re removing. This may involve contacting a waste management company or taking the materials to a designated facility. By having the right tools and materials on hand, you can ensure a safe and successful removal process.
So, before you begin any removal project, make sure you have everything you need to get the job done properly.
Preparation Steps
Removing an awning from an RV may seem like a daunting task, but with the right preparation steps, it can be a fairly straightforward process. Before you begin, it’s important to gather all the necessary tools and equipment. You’ll need a ladder to reach the awning, as well as a socket or wrench to remove any bolts or screws holding it in place.
It’s also a good idea to have someone else to help you, as awnings can be heavy and awkward to handle on your own. Once you’re prepared, start by retracting the awning fully to relieve any tension. Then, identify the bolts or screws securing the awning to the RV, and carefully remove them.
With the help of your assistant, slowly guide the awning off the RV, being mindful of any obstructions or obstacles in your path. Finally, make sure to store the awning in a safe and dry location, where it won’t be damaged or get in your way. With these simple steps, you’ll be able to remove the awning from your RV efficiently and safely.
Park your RV in a safe and stable location
When it comes to parking your RV, it’s important to find a safe and stable location. After all, your RV is like your home on wheels, and you want to make sure it is secure and protected. One of the first steps in finding the right parking spot is to do your research.
Look for RV parks or campgrounds that have good reviews and a reputation for being safe and secure. You should also consider the location of the park or campground. Is it in a safe neighborhood or area? Are there any security measures in place, such as gates or security guards? Another important factor to consider is the stability of the parking spot.
Look for level ground and avoid parking on slopes or uneven surfaces. This will help prevent your RV from tipping or sliding. It’s also a good idea to park in an area that is sheltered from strong winds or severe weather.
By taking these preparation steps, you can ensure that your RV is parked in a safe and stable location.
Secure the awning arms to prevent accidental opening
awning arms, secure, accidental opening, preparation steps. When it comes to setting up your awning, one important step that often gets overlooked is securing the awning arms to prevent accidental opening. This may not seem like a big deal at first, but it can prevent a lot of headaches down the line.
Imagine a gust of wind coming along and suddenly your awning is fully extended, putting strain on the fabric and potentially causing damage. To avoid this, it’s important to take the necessary precautions before setting up your awning. First, make sure the awning arms are fully closed and locked in place.
This will prevent them from accidentally opening when you least expect it. You can also use straps or clamps to further secure the awning arms, providing an extra layer of protection. By taking these simple preparation steps, you can ensure that your awning stays securely in place, even during unexpected weather conditions.
Clear the area around the awning
One important step in preparing your awning for use is to clear the area around it. This is crucial for a few reasons. First, clearing the area ensures that there are no obstacles or obstructions that could potentially damage your awning or cause it to become unstable.
These could include items such as furniture, plants, or even low-hanging branches. By removing these objects, you can prevent any accidents or mishaps from occurring. Secondly, clearing the area creates a clean and open space for you to enjoy your awning.
It allows you to fully utilize the space underneath the awning without any clutter or distractions. You can set up comfortable chairs, tables, or even a small outdoor living area without worrying about tripping over objects or feeling cramped. Lastly, clearing the area around the awning can also enhance the overall appearance of your outdoor space.
By removing any unsightly or unnecessary items, you can create a visually pleasing and inviting area for you and your guests to enjoy. So, take a few moments to clear the area around your awning before using it – you’ll be glad you did!
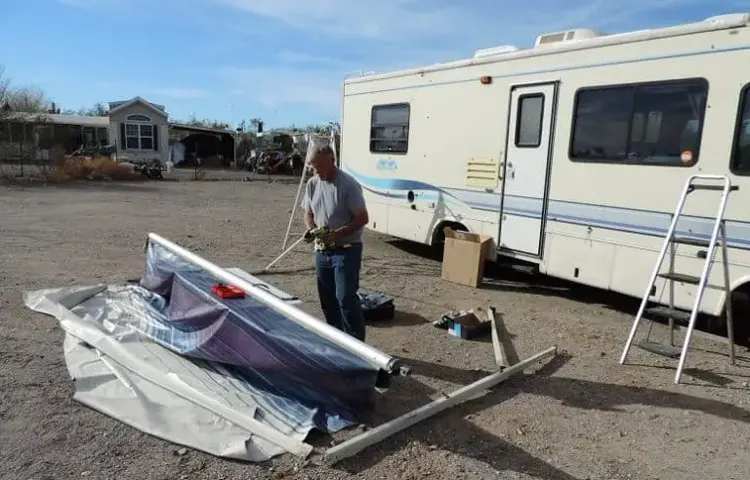
Step-by-Step Removal Process
Removing an awning from an RV may seem like a daunting task, but with the right steps, it can be done easily. First, make sure you have all the necessary tools, such as a ladder, a screwdriver, and a helper for added safety. Start by retracting the awning fully, so it is not in the way during the removal process.
Then, locate the awning’s mounting brackets, which are typically located on the RV’s sidewall. Use the screwdriver to remove the screws holding the awning to the brackets. Take your time and be careful not to strip the screws.
Once the screws are removed, gently slide the awning out of the brackets. It may be slightly heavy, so having a helper to support the weight can be beneficial. Once the awning is out of the brackets, carefully fold it up and store it in a safe place.
Remember to keep track of any screws or other hardware you removed, as you will need them when reinstalling the awning in the future. With these steps, you can easily remove the awning from your RV and prepare for any repairs or upgrades.
Step 1: Release tension on the awning fabric
When it comes to removing an awning, it’s important to take it slow and follow a step-by-step process. The first step in this process is to release the tension on the awning fabric. This is crucial because if you try to remove the awning while it is still under tension, it can cause damage to the fabric or even snap back and cause injury.
To release the tension, start by lowering the awning to its fully extended position. Next, locate the tensioning knob or lever on the awning assembly. This knob or lever is responsible for tightening or loosening the tension on the fabric.
Turn the knob or lever counterclockwise to release the tension. You should feel the fabric become looser as you do this. Once the tension is fully released, you can move on to the next step in the removal process.
By taking the time to release the tension on the awning fabric, you ensure a safe and smooth removal process.
Step 2: Remove the awning support arm bolts
In the second step of removing an awning, you will need to tackle the awning support arm bolts. These bolts are what hold the awning in place and keep it secure. To remove them, you will first need to locate the bolts on each support arm.
They are usually found at the end of the arm where it attaches to the wall or the frame. Once you have located the bolts, you will need to use a wrench or a socket set to loosen and remove them. It’s important to make sure you have the right size tool for the job to avoid damaging the bolts or the arms.
Take your time to carefully loosen and remove each bolt, making sure to place them in a safe location where you won’t lose them. Keep in mind that these bolts may be tight and require some extra force to loosen. Don’t be afraid to use a bit of muscle, but be careful not to overdo it and strip the bolts.
Once you have removed all of the awning support arm bolts, you will be ready to move on to the next step in the removal process.
Step 3: Disconnect the awning from the RV
“disconnect awning from RV” When it comes to taking down your RV’s awning, the first step is disconnecting it from the RV itself. This is an important step to ensure that the awning is safely removed without causing any damage to your RV or the awning itself. To disconnect the awning, start by retracting it fully so that it is in the closed position.
Next, locate the hardware that connects the awning to the RV. This may include screws, bolts, or brackets. Carefully remove these fasteners, being sure to keep track of them so they don’t get lost.
Once the hardware is removed, gently pull the awning away from the RV, being mindful of any electrical connections or cables that may be attached. With the awning fully disconnected, you can move on to the next step in the removal process.
Step 4: Lower and remove the awning roller tube
When it comes to removing the awning roller tube, there are a few steps you need to follow. Step 4 in the process is to lower and remove the awning roller tube. This may sound daunting, but with the right instructions, you’ll be able to tackle this task easily.
Lowering the roller tube is important because it will make it easier to remove it from the awning assembly. To do this, you’ll need to first locate the awning controls and lower the awning to its lowest position. Once the awning is fully extended, you’ll need to support the roller tube to prevent it from falling.
This can be done by using a ladder or having someone else hold it for you. Once the roller tube is secure, you can then begin the process of removing it from the awning assembly. This may involve using a screwdriver or other tools to disconnect the roller tube from the assembly.
It’s important to follow the manufacturer’s instructions carefully to avoid any damage or injury. Once the roller tube is fully detached, you can then carefully remove it from the awning assembly. Keep in mind that the roller tube may be heavy, so it’s important to have someone assist you with this step.
By following these steps, you’ll be able to lower and remove the awning roller tube successfully.
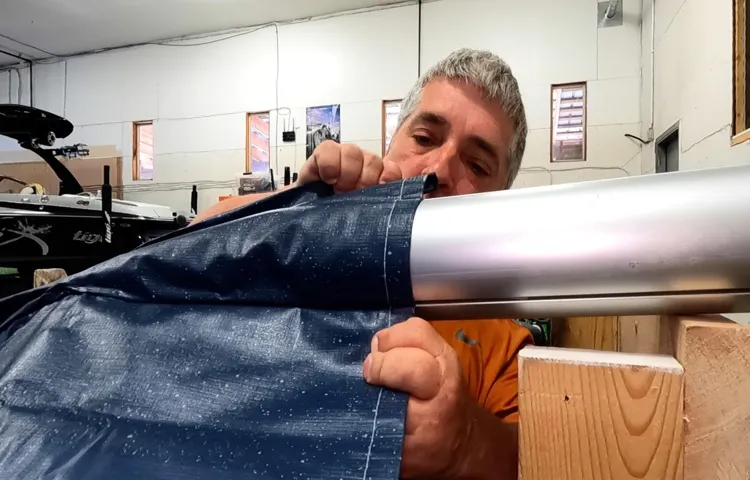
Step 5: Remove the awning fabric from the roller tube
Now that you’ve removed the tension from the awning, it’s time to take off the awning fabric from the roller tube. This step is crucial in the process of replacing or repairing your awning. So, let’s dive into the step-by-step removal process.
First, locate the screws that hold the fabric in place on the roller tube. These screws are usually found at the ends of the awning fabric. Use a screwdriver to loosen and remove these screws.
Be sure to keep track of them, as you’ll need them later. Next, carefully slide the awning fabric off the roller tube. This may require some maneuvering and gentle tugging.
Be patient and take your time to avoid tearing or damaging the fabric. Once the awning fabric is off the roller tube, inspect it for any signs of wear or damage. This is a good opportunity to assess if the fabric needs to be repaired or replaced.
Look for any tears, fraying, or fading. If the fabric is in good condition, you can proceed with cleaning it before reinstalling. If you need to replace the awning fabric, now is the time to measure it for a new one.
Lay the fabric on a flat surface and use a tape measure to determine its dimensions. This will ensure that you order the correct size when purchasing a new fabric. To summarize, removing the awning fabric from the roller tube involves unscrewing it from the ends, sliding it off the tube, and inspecting it for any damage.
Frequent Mistakes to Avoid
Removing the awning from your RV may seem like a daunting task, but with the right steps, it can be done easily and efficiently. One of the most frequent mistakes that people make when attempting to remove their awning is not taking proper precautions. Before starting the removal process, it is important to make sure that the awning is fully retracted and secured.
This will prevent any accidents or damage from occurring. Another common mistake is not following the manufacturer’s instructions. Each RV awning may have specific steps for removal, so it is crucial to read and understand the instructions before starting.
Lastly, many people forget to disconnect the awning from the RV’s power source. This can lead to electrical issues and potential damage to the awning. By avoiding these frequent mistakes, you can safely and effectively remove the awning from your RV.
Not releasing tension before removing bolts
One common mistake that people often make when it comes to removing bolts is not releasing the tension before attempting to loosen them. This can lead to problems and frustration, as trying to remove a bolt that is still tightly secured can be extremely difficult. So, before you start trying to unscrew that stubborn bolt, take a moment to check if there is any tension or pressure holding it in place.
This could be due to a variety of factors, such as rust or debris, or even the nature of the object the bolt is attached to. By releasing the tension first, you’ll make your job much easier and reduce the risk of damaging the bolt or surrounding components. So, remember to always release the tension before attempting to remove bolts, and save yourself time and hassle in the process.
Forgetting to secure the awning fabric while removing
One common mistake that many people make when removing their awning fabric is forgetting to secure it properly. It can be easy to get caught up in the task of taking down the awning and overlook the importance of securing the fabric. But without proper securement, the fabric can become loose and flap in the wind, potentially causing damage to the awning or surrounding objects.
To avoid this mistake, it’s important to take the time to properly secure the fabric before removing it. This can be done by using bungee cords or straps to tightly secure the fabric to the awning frame. By taking this extra step, you can ensure that your awning fabric stays in place and is ready to be easily reinstalled when the time comes.
So, the next time you’re taking down your awning, don’t forget to secure the fabric properly to avoid any unnecessary damage.
Using excessive force on delicate parts
Using excessive force on delicate parts One of the most common mistakes people make when handling delicate objects is applying too much force. Whether it’s trying to open a stubborn jar lid or untightening a tiny screw, using excessive force can lead to damage. Delicate parts are designed to be handled with care, and applying too much pressure can result in the components breaking or becoming misaligned.
It’s essential to approach delicate objects with a gentle touch and use the appropriate tools and techniques to avoid unnecessary force. By taking the time to handle delicate parts with care, you can prevent costly and time-consuming repairs or replacements. So next time you encounter a delicate item, remember to be patient and gentle, and you’ll be sure to keep it in one piece.
Tips for Easier Removal
Removing an awning from an RV can be a daunting task, but with a few tips, you can make the process much easier. First, it’s essential to gather the necessary tools before attempting to remove the awning. These tools may include a ladder, a screwdriver, pliers, and a helper to assist with holding the awning.
Next, it’s crucial to follow the manufacturer’s instructions or consult the owner’s manual to ensure you are removing the awning correctly. Generally, the process involves loosening the screws or bolts that hold the awning in place and disconnecting any electrical connections. It may be helpful to have someone hold the awning while you remove the fasteners to prevent any accidental damage or injury.
Finally, once all the fasteners are removed, carefully slide the awning out of its track and set it aside. Remember to take caution and go slowly to avoid any mishaps. With these tips in mind, you can confidently remove the awning from your RV without any hassle.
Enlist a helper to assist with the process
One of the best ways to make the removal process easier is by enlisting the help of a trusted helper. Whether it’s a friend, family member, or professional organizer, having someone by your side can make the task less daunting. They can provide extra hands and help you stay motivated throughout the process.
Your helper can also offer a fresh perspective and help you make decisions on what to keep, donate, or discard. Additionally, having someone to talk to can make the process more enjoyable and less overwhelming. So, don’t hesitate to reach out to someone for assistance when it’s time to remove items from your space.
Use lubricant on bolts and screws for easier removal
When it comes to removing bolts and screws, sometimes they can be stubborn and difficult to loosen. But there’s a simple trick you can use to make the process much easier: lubricant. By applying a lubricant to the bolts and screws before attempting to remove them, you can reduce friction and make them slide out smoothly.
This can save you time and frustration, especially if you’re dealing with rusty or stuck fasteners. Additionally, using a lubricant can help prevent damage to the threads of the bolts and screws, making it easier to reuse them in the future. So, the next time you’re faced with a tricky fastener, reach for some lubricant and watch how effortlessly it comes out.
Keep track of removed parts and bolts for reassembly
When disassembling any kind of machinery or equipment, whether it’s a car engine or a piece of furniture, it can be easy to lose track of the small parts and bolts that are removed. This can lead to frustration and delays when it comes time to reassemble everything. One tip for easier removal is to keep track of all the parts and bolts that are removed.
You can do this by placing them in a designated container or grouping them together in a labeled baggie. This way, you’ll know exactly where everything is when it’s time to put everything back together. Another tip is to take pictures or make notes as you go along.
This will help you remember the order in which things were removed and how they all fit together. It can also be helpful to have a diagram or reference guide on hand for more complex projects. By following these tips, you’ll save yourself time and frustration when it comes time to reassemble everything.
So remember, keep track of those removed parts and bolts for a smoother reassembly process!
Conclusion
Removing an awning from an RV is like untangling a web of camping confoundment. It requires equal parts patience, cunning, and a touch of mechanical ingenuity. Just when you think you’ve got it all figured out, a stray bolt or stubborn latch will test your resolve.
But fear not, intrepid adventurer! With this guide as your trusty sidekick, you’ll be able to wield the power of awning removal with ease. First things first, make sure you’ve got all the necessary tools at your disposal. A ladder, a ratchet set, and a healthy dose of determination will be your best friends in this endeavor.
Once you’ve gathered your gear, take a deep breath and dive into the depths of the awning’s inner workings. Start by releasing the tension on the awning arms, using your newfound ratchet skills to loosen the bolts holding them in place. Once they’ve been liberated, carefully lower the arms to the ground, like a folding origami crane descending gracefully.
Next, it’s time to tackle the main event: the awning fabric itself. This formidable foe may seem daunting, but with a little finesse and a fair amount of elbow grease, you’ll prevail. Begin by unrolling the awning, being mindful of any potential snags or surprises lurking within.
With each unraveling, you’ll feel a sense of triumph, like unwrapping a well-earned victory. As you make your way along the awning, detach it from its tracks and remove any pesky retaining screws that dare to impede your progress. Don’t be discouraged if it feels like a never-ending battle; remember, the journey is just as important as the destination.
Once you’ve successfully conquered the fabric, it’s time to bid adieu to the awning poles. Unfasten any remaining bolts or clips, and watch as the poles surrender to your indomitable will. Like a defeated rival vanquished in an epic duel, they’ll bow their heads in silent respect.
Safe removal of your RV awning is essential for maintenance and repairs
RV awnings are a great addition to any recreational vehicle, providing shade and protection from the elements. However, there may come a time when you need to remove your awning for maintenance or repairs. While this may seem like a daunting task, with a little knowledge and preparation, it can be a relatively simple process.
Here are a few tips to help make the removal of your RV awning easier. Firstly, it’s important to familiarize yourself with your awning system and understand how it is attached to your RV. Different models may have slightly different mechanisms for attaching the awning, so make sure you consult your owner’s manual for specific instructions.
Once you understand how it is attached, gather the necessary tools and equipment you will need for the removal process. Before you begin the removal process, always ensure that your awning is fully retracted and secure. This will prevent any unnecessary damage or accidents during the removal process.
It is also a good idea to clean the awning thoroughly before removal to ensure that no dirt or debris gets trapped and causes damage. When removing the awning, it is important to do so in a controlled and careful manner. Start by disconnecting the arms and support poles from the RV.
This can usually be done by releasing the locking mechanisms or unscrewing bolts. Once the arms and support poles are detached, carefully lower the awning fabric to the ground. To make the process easier, it can be helpful to enlist the help of a friend or family member.
They can assist by holding the fabric and supporting the weight as you detach the awning from the RV. Working together will help prevent any accidents or damage to the awning or RV. Once the awning fabric is fully detached, carefully roll it up and secure it with straps or bungee cords.
Follow the step-by-step guide to ensure a successful removal
When it comes to removing a heavy object from your home, proper planning and preparation are key to ensuring a successful removal. Here are some helpful tips to make the process easier and less stressful. First, it’s important to assess the size and weight of the object and determine the best method of removal.
This may involve enlisting the help of friends or family, or hiring professional movers if necessary. Next, gather all the necessary tools and equipment needed for the removal, such as straps, dollies, and furniture sliders. These tools can make the job much easier and help prevent any damage to your home or the object itself.
It’s also a good idea to clear a path from the object’s current location to the exit point, removing any obstacles or tripping hazards along the way. Finally, take your time and use proper lifting techniques when moving the object. Lift with your legs, not your back, and take breaks as needed to avoid strain or injury.
By following these steps, you can ensure a successful and stress-free removal of any heavy object from your home.
FAQs
How do I remove the awning from my RV?
To remove the awning from your RV, first, make sure it is fully retracted and secured in place. Loosen any screws or bolts holding the awning arms to the RV. Gently pull the awning fabric out of its track, starting from one end and working your way to the other. Once the fabric is removed, unscrew any remaining hardware and detach the awning arms from the RV. Be sure to store the awning and its components properly to prevent damage.
What tools do I need to remove an awning from my RV?
To remove an awning from your RV, you may need the following tools: a screwdriver or drill with the appropriate bits, a ladder or step stool for accessing the awning, a rubber mallet or hammer for loosening tight bolts, and a tape measure for ensuring proper reinstallation if needed. Additionally, it is recommended to have a helper to assist with handling the awning and to ensure safety.
Can I remove the awning from my RV by myself?
While it is possible to remove the awning from your RV by yourself, it is generally recommended to have a helper for safety and to assist with handling the awning. The awning and its components can be heavy and awkward to maneuver, and having an extra set of hands can make the process easier. If you choose to remove the awning alone, be sure to take necessary precautions and use proper lifting techniques to avoid injury.
Are there any specific instructions for removing an electric awning from an RV?
Removing an electric awning from an RV may require additional steps compared to a manual awning. Before attempting to remove an electric awning, it is crucial to disconnect the power source to prevent any accidental opening or closing of the awning. Refer to the manufacturer’s instructions for your specific electric awning model, as the process may vary. It is recommended to consult a professional or your RV dealership for assistance, especially if you are unfamiliar with working on electric awnings.
How long does it typically take to remove an awning from an RV?
The time it takes to remove an awning from an RV can vary depending on various factors, such as the type of awning, accessibility, and your experience with the process. On average, it may take anywhere from 30 minutes to an hour to remove an awning from an RV. It is important to take your time and ensure that all necessary steps are followed correctly for a safe and successful removal.
What should I do if I encounter any difficulties or challenges when removing the awning from my RV?
If you encounter any difficulties or challenges when removing the awning from your RV, it is recommended to stop and assess the situation. Make sure you are following the correct steps and using the appropriate tools. If you are unsure or feel overwhelmed, it is best to seek professional assistance from an RV technician or dealership. Attempting to force or rush the removal process can lead to damage or injury.
Can I reuse the awning fabric after removing it from my RV?
In many cases, the awning fabric can be reused after removing it from an RV, provided it is still in good condition. Inspect the fabric for any signs of wear, tears, or other damage. If the fabric appears to be in good shape, you can clean it, if necessary, and store it properly for future use. However, if the fabric is damaged or worn out, it is recommended to replace it with a new one to ensure proper functionality and aesthetics.