
Have you ever found yourself struggling to open a manual RV awning? It can be quite frustrating, especially if you’re in need of shade or protection from the elements. But fear not! In this blog post, I’m going to walk you through the process step by step, so you’ll be able to open your awning with ease. Think of opening a manual RV awning like unraveling a tightly coiled spring.
You’ll want to start by locating the awning mechanism, usually located on the side of your RV. Once you’ve found it, grab the awning wand or crank handle that’s typically provided with your RV. Now, picture yourself unlocking a treasure chest.
Insert the awning wand or crank handle into the mechanism and give it a gentle twist to unlock it. This will release the tension on the awning, allowing you to begin opening it. Next, it’s time to use your muscles.
Slowly and steadily rotate the awning wand or crank handle in a clockwise motion. Keep going until your awning is fully extended and your desired level of shade or coverage is achieved. Remember to take your time and be mindful of any obstacles or obstructions that may be in your way.
Congratulations! You’ve successfully opened your manual RV awning. Now it’s time to sit back, relax, and enjoy the shade. Just remember, when it’s time to close your awning, simply follow the same steps in reverse.
Twist the awning wand or crank handle counterclockwise to retract the awning, lock it back into place, and you’re good to go. Opening a manual RV awning may seem daunting at first, but with a little practice and patience, it becomes second nature. And once you’ve mastered this skill, you’ll never have to worry about struggling to find shade on a hot summer day or shelter from the rain.
Table of Contents
Introduction
Are you ready to embark on your next RV adventure but need to learn how to open your manual RV awning? Don’t worry, we’ve got you covered! Opening your awning can seem like a daunting task at first, but with a little practice, it becomes second nature. The first step is to locate the awning crank, typically located near the awning itself or in a storage compartment. Insert the crank into the awning and begin turning it clockwise to unwind the awning fabric.
As you turn, you will start to feel the tension increase, and eventually, the fabric will begin to extend. Continue cranking until the awning is fully extended to your desired length. Finally, secure any locking mechanisms in place to keep the awning from retracting unexpectedly.
And just like that, you’re ready to enjoy the shade and protection of your RV awning!
What is a manual RV awning?
manual RV awning Introduction: Have you ever seen those RVs with a retractable shade that extends from the side of the vehicle? That’s what we call a manual RV awning. It’s a popular feature among outdoor enthusiasts who want to create a comfortable outdoor space while on the road. But what exactly is a manual RV awning, and how does it work? In this blog post, we’ll explore the ins and outs of manual RV awnings, from their construction to their benefits and drawbacks.
Whether you’re a seasoned RV owner or just curious about the world of recreational vehicles, this article will provide you with all the information you need to know about manual RV awnings. So let’s dive in!
Benefits of a manual RV awning
manual RV awning
Step 1: Gather the necessary tools and equipment
Have you ever wondered how to open a manual RV awning? Well, you’re in luck because I’m here to guide you through the process step by step. The first thing you’ll need to do is gather the necessary tools and equipment. You’ll need a ladder to reach the awning, as well as a long pole or rod to help extend the awning.
Additionally, you’ll need a friend or family member to assist you, as opening a manual RV awning can be a two-person job. Once you have all the tools and equipment ready, you can move on to the next step of the process.
List of tools and equipment needed
When it comes to any DIY project, having the right tools and equipment is essential. As you embark on your project, the first step is to gather all the necessary tools and equipment you’ll need. This step is crucial because it ensures that you have everything you need at hand, saving you from unnecessary delays and trips to the store.
The specific tools and equipment you’ll need may vary depending on the nature of your project, but there are a few essentials that every DIY enthusiast should have in their tool collection. A good set of screwdrivers, both flathead and Phillips head, is a must-have for any project. Additionally, a set of wrenches in various sizes, a hammer, pliers, a tape measure, and a level are all essential tools that will come in handy for a wide range of projects.
It’s also a good idea to have safety equipment such as safety goggles and gloves to protect yourself while working. With these tools at your disposal, you’ll be well-equipped to tackle any DIY project that comes your way.
Importance of having the right tools
tools and equipment for project success, gathering the necessary tools and equipment. When it comes to tackling any project, whether it’s a DIY home renovation or a professional construction job, having the right tools is essential for success. After all, you wouldn’t try to hammer a nail with a screwdriver, would you? The same concept applies to any project you take on.
That’s why step one in any project should always be gathering the necessary tools and equipment. Having the right tools not only makes the job easier, but it also ensures that the end result is of the highest quality. Imagine trying to paint a room without a paintbrush or trying to cut a piece of wood without a saw.
It just wouldn’t work. By taking the time to gather the necessary tools and equipment before starting a project, you are setting yourself up for success from the very beginning. So, whether it’s a simple task or a complex undertaking, make sure you have the right tools for the job.
Your project will thank you.
Step 2: Locate the awning on your RV
When it comes to opening a manual RV awning, the first step is locating it on your vehicle. RV awnings can be found either on the side of the RV or on the roof. If your awning is on the side, it will usually be above one of the windows or doors.
Look for a long, rectangular box or tube that contains the awning fabric. If your awning is on the roof, it may be a bit more difficult to locate. You might need to climb on top of your RV and search for the awning mechanism.
Once you have found the awning, you can move on to the next step in opening it.
Different types of RV awnings
RV awnings come in various types, and the first step in using them effectively is to locate where they are on your RV. This may seem like a simple task, but with the different types of RVs available, the placement of the awning can vary. So, the first thing you need to do is familiarize yourself with your RV and identify where the awning is located.
This could be on the side of the RV, above a slide-out, or even on the roof. Once you have located the awning, you can move on to the next steps of setting it up and enjoying the shade and protection it provides.
How to identify the manual awning on your RV
manual awning, locate the awning on your RV
Step 3: Prepare the awning for opening
So, you’ve decided to finally open up your manual RV awning and enjoy some shade and relaxation outside. Congratulations! But before you can kick back and relax, there are a few important steps you need to take to prepare the awning for opening. First off, you’ll want to make sure the area around the awning is clear of any obstacles such as branches or other objects that could potentially damage the awning or hinder its opening.
It’s also a good idea to check the weather forecast to make sure there are no strong winds or storms that could make opening the awning dangerous. Next, you’ll want to locate the awning’s support arms. These are the two metal arms that extend from the RV and hold up the awning.
Make sure they are securely attached to the RV and in good working condition. If you notice any damage or wear and tear, it’s best to have them repaired or replaced before attempting to open the awning. Once you’ve checked the area and the support arms, you’re ready to start opening the awning.
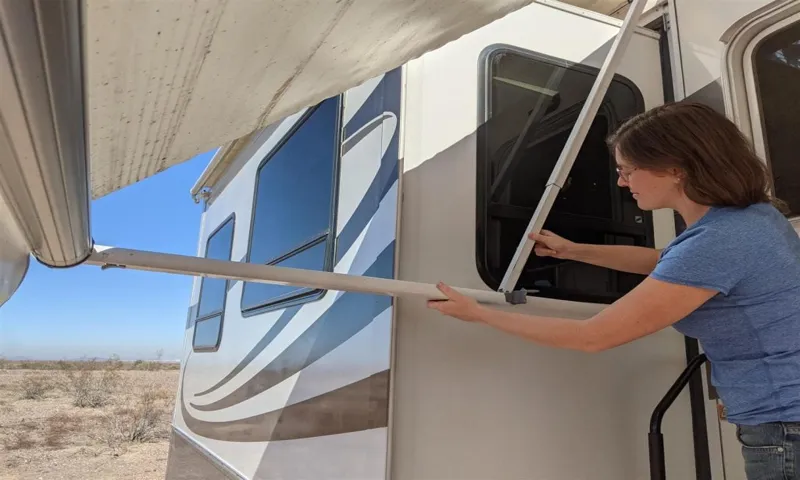
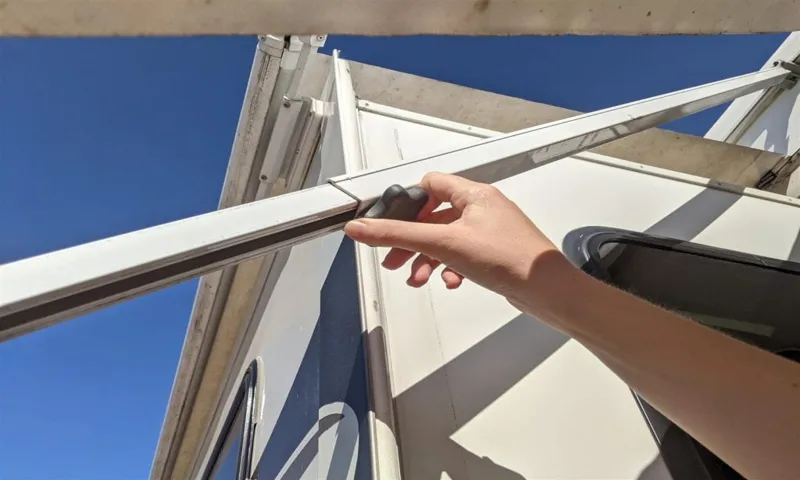
Begin by releasing the travel locks on both support arms. These locks are typically located near the top of each arm and need to be disengaged to allow the awning to extend. Next, locate the awning rod or wand.
This is a long pole with a hook or knob on the end that you’ll use to open the awning. Insert the rod into the designated opening on the roll tube, which is the part of the awning that houses the fabric. With the rod in place, start turning it in a clockwise motion.
This will begin to unwind the fabric from the roll tube and extend the awning. Keep turning the rod until the awning is fully extended and the fabric is taut. Once the awning is fully extended, you can secure it in place by using the awning straps or tie-downs.
Check for any obstructions or debris
awning, opening, obstructions, debris, prepare, burstiness
Inspect the awning fabric and hardware for any damage
When preparing to open your awning after a long period of being closed, it’s important to inspect both the awning fabric and hardware for any potential damage. This is an essential step to ensure that your awning operates smoothly and efficiently. Start by giving the fabric a thorough examination, checking for any signs of tears, rips, or fraying.
These can occur over time due to wear and weather exposure. If you notice any damage, it’s best to have it repaired before opening the awning to prevent further complications. Additionally, inspect the hardware, such as the brackets, screws, and pulleys, to make sure they are secure and in good condition.
Look for any signs of rust, looseness, or wear. Remember, a thorough inspection of the fabric and hardware will help to extend the lifespan of your awning and ensure its functionality when you’re ready to enjoy the outdoors.
Step 4: Unlock and extend the awning
Opening a manual RV awning may seem like a daunting task at first, but with a few simple steps, you’ll be able to enjoy the shade and protection it provides in no time. To begin, locate the awning crank handle, usually found on one end of the awning. Insert the handle into the designated slot and start rotating it clockwise.
As you do this, you’ll notice the awning fabric starting to roll out. Keep cranking until you reach your desired extension length. Once fully extended, secure the awning arms in place by locking them into position.
This will prevent the awning from retracting unexpectedly. Remember to also lower the support legs to provide additional stability. Now you can sit back and relax under your fully extended RV awning!
Identify the awning locking mechanism
awning locking mechanism
Release the awning lock
When it comes to setting up your awning, unlocking and extending it may seem like a daunting task. But fear not, it’s actually quite simple! The fourth step you’ll need to take is to release the awning lock. This lock is what keeps the awning securely in place during transport.
To release it, you’ll need to locate the lock mechanism, which is usually a lever or button located near the base of the awning. Once you’ve found it, simply flip the lever or press the button to unlock the awning. With the lock released, you can now begin to extend the awning.
This is where the real fun begins, as you get to watch your awning go from a compact bundle to a spacious and shaded outdoor oasis. Just remember to take it slow and steady, making sure the awning is fully extended before locking it into position. And there you have it, step four complete! You’re well on your way to enjoying your fully extended awning and all the benefits it brings.
Extend the awning to the desired position
extend the awning, unlock and extend the awning When it comes to enjoying the great outdoors, few things beat relaxing under the shade of an awning. But before you can start reaping the benefits of your outdoor oasis, you need to know how to properly unlock and extend the awning. Thankfully, this process is fairly straightforward and can be done in just a few simple steps.
First, locate the locking mechanism on your awning. This is usually located near the end of the awning arm and will need to be released before you can extend the awning. Depending on the type of awning you have, this may be done by either pressing a button, pulling a lever, or using a crank handle.
Refer to your awning’s instruction manual for specific instructions on how to unlock the awning. Once the awning is unlocked, you can begin to extend it to the desired position. Begin by gently pulling on the awning arm, being careful not to force it or apply too much pressure.
The awning should extend smoothly and evenly, allowing you to find the perfect balance between shade and sun. If you encounter any resistance while extending the awning, stop and evaluate the situation. It’s possible that there may be an obstruction or a mechanical issue that needs to be addressed before proceeding.
If you’re unsure or uncomfortable with troubleshooting the issue yourself, it’s best to consult a professional for assistance. In conclusion, unlocking and extending your awning is an essential step in enjoying your outdoor space. By following these simple steps, you can ensure that your awning extends smoothly and provides the shade and comfort you desire.
So go ahead, unlock that awning and start enjoying your outdoor oasis today!
Step 5: Secure the awning in place
So, you’ve made it to step 5 of opening your manual RV awning, and now it’s time to secure it in place. This step is important to ensure that your awning stays in position and doesn’t become loose or damaged while you’re enjoying the great outdoors. To secure your awning, you’ll need to locate the tension knobs or handles on each end of the awning.
These knobs or handles are typically located on the support arms of the awning. Once you’ve found them, simply tighten them by turning them clockwise. This will create tension in the fabric of the awning and hold it securely in place.
It’s important to note that you don’t want to overtighten the tension knobs or handles. Doing so can put unnecessary strain on the awning and potentially damage it. Instead, tighten them until you feel some resistance, but not so much that you can’t easily turn them any further.
Once you’ve secured the tension knobs or handles, give the awning a gentle tug to make sure it’s firmly in place. If it feels secure and doesn’t budge, then congratulations, you’ve successfully opened and secured your manual RV awning! Now it’s time to sit back, relax, and enjoy the shade and protection that your awning provides. Whether you’re camping, tailgating, or simply spending some time in your RV, having a properly secured awning will add to your outdoor enjoyment.
Remember, always follow the manufacturer’s instructions when opening and securing your manual RV awning. Each awning may have slightly different features and methods for securing it in place. So take your time, be careful, and enjoy the benefits of having a functional and secure awning on your RV.
Adjust the awning arms and legs
After confirming that the awning fabric is properly aligned and symmetrical, it’s time to secure the awning in place by adjusting the awning arms and legs. This step ensures the stability and durability of your awning, preventing it from being blown away by strong winds or collapsing under heavy rain. First, locate the knobs or bolts on the arms and legs of the awning.
Loosen them and adjust the length or angle of the arms and legs according to your desired position. Once you’ve achieved the desired angle and position, tighten the knobs or bolts to secure the awning in place. It’s essential to make sure that all the arms and legs are properly tightened to prevent any wobbling or swaying, which could compromise the stability of the awning.
By adjusting and securing the awning arms and legs, you’ll have peace of mind knowing that your awning is securely in place, ready to provide shade and protection whenever you need it.
Lock the awning in place
awning, secure, lock in place, steps, instructions So you’ve successfully set up your awning and it’s looking great, but now you need to make sure it stays in place. Locking the awning securely is important to prevent any accidents or damage caused by strong winds or unexpected movements. To secure your awning, follow these steps: First, locate the locking mechanism on your awning.
This can usually be found near the base of the support arms. Once you’ve found it, make sure it is in the unlocked position before proceeding. Next, grab the tension knob or lever and tighten it to increase the tension on the support arms.
This will help keep the awning in place and prevent any movement. Once the tension is adjusted, lock the awning in place by engaging the locking mechanism. This can be done by either twisting the knob or lever into the locked position or by sliding a pin or latch into a designated hole or slot.
Check that the awning is securely locked by giving it a gentle tug. If it doesn’t budge, then you’ve successfully locked it in place. If it moves or feels loose, double-check that the locking mechanism is properly engaged and tighten the tension knob if necessary.
Remember, securing your awning is crucial for its stability and your safety. By following these steps and locking your awning in place, you can relax and enjoy your outdoor space without worrying about sudden gusts of wind or unexpected accidents.
Step 6: Test the awning
So you’ve got your manual RV awning set up and ready to go, but now comes the moment of truth: testing it out. Opening a manual RV awning may seem straightforward, but there are a few key steps to follow to ensure everything goes smoothly. First, make sure you have cleared the area around the awning of any obstacles like branches or furniture.
Then, locate the awning strap and give it a gentle tug to unfurl the awning. As you do this, keep an eye on the awning arms to make sure they are extending properly and not getting stuck. Once the awning is fully extended, give it a firm shake to make sure it is securely in place.
Finally, take a step back and admire your handiwork. Your manual RV awning is now ready to provide you with shade and shelter during your travels.
Ensure the awning is stable and secure
stability, secure, testing, awning
Check for any issues or problems
awning, test, issues, problems, functionality. In the final step of installing an awning, it is crucial to thoroughly test it for any potential issues or problems. This step ensures that the awning is functioning properly and ready to be used.
Start by operating the awning in both the fully extended and retracted positions. Pay attention to any strange noises, jerky movements, or resistance while operating the awning. Check the fabric for tears, loose stitching, or any signs of wear and tear.
Verify that the awning is securely installed and there are no loose or damaged components. It is also important to inspect the motor or manual operation mechanism for any malfunctions. Test the awning several times to confirm its smooth operation and ease of use.
Taking the time to test the awning thoroughly will help prevent any potential problems and ensure that it will provide shade and protection for years to come.
Conclusion
In conclusion, opening a manual RV awning is like performing a synchronized dance between you and your trusty recreational vehicle. It requires a delicate balance of strength, finesse, and a touch of cleverness. First, you must locate the awning control panel, which can sometimes be as elusive as a hidden treasure.
Once you’ve tracked it down, you’ll need to release the latches with the grace of a magician, carefully avoiding any misplaced fingers or accidental disappearing acts. Next comes the arm exercise portion of our program, where you’ll exert the perfect amount of force to extend the awning. It’s a bit like weightlifting, but with the added challenge of keeping your balance on uneven terrain.
Now you’re getting the hang of it – we’re turning you into an RV awning-opening pro! As you continue to extend the awning, it’s crucial to keep an eye out for any unexpected gusts of wind. This is where your witty and clever instincts will come into play. You’ll need to channel your inner weatherperson and make split-second decisions on whether to proceed or seek shelter.
It’s like playing a game of RV awning roulette, where you don’t want to land on “unplanned flight to Oz.” Finally, with a triumphant flourish, your manual RV awning will be fully extended, providing shade and shelter for all your outdoor adventures. As you stand back and admire your handiwork, you can bask in the glory of your successful awning-opening performance.
So, my friends, may your RV awning adventures be filled with cleverness, wit, and a touch of showmanship. Remember, opening a manual RV awning is not just a task; it’s an art form. Embrace the challenge, embrace the dance, and let your awning unfurl like a colorful flag, announcing your arrival at the campsite.
Summary of the steps to open a manual RV awning
In order to ensure that your newly opened manual RV awning is functioning properly, it’s essential to test it before using it. Testing the awning will not only give you peace of mind but will also help identify any potential issues or malfunctions before you hit the road. To test the awning, start by extending it fully and inspecting it for any visible damage or defects.
Next, gently pull on the awning fabric to make sure it is securely attached and won’t easily come loose. Then, try retracting and extending the awning a few times to ensure that it moves smoothly and without any hitches. Pay attention to any unusual sounds or resistance during the operation.
Finally, check that the awning is able to lock securely in both the fully extended and fully retracted positions. If everything checks out, congratulations! Your manual RV awning is ready to provide shade and protection on your next adventure.
Tips for maintaining and caring for your RV awning
Now that you’ve gone through all the steps to maintain and care for your RV awning, it’s time to put it to the test. Testing your awning is an essential step in ensuring its functionality and durability. Start by extending the awning fully and inspecting it for any signs of damage or wear.
Look for any tears, frayed edges, or loose stitching. Next, gently shake the awning to see if it feels secure and stable. If it wobbles or feels loose, it may need some adjustments or repairs.
Finally, retract the awning slowly and observe if it goes back smoothly without any hitches or difficulties. If you encounter any issues during the testing process, it’s best to address them promptly to prevent further damage. By testing your awning regularly, you can catch any problems early on and maintain the longevity of your RV awning.
Enjoying the benefits of an open RV awning
open RV awning Enjoying the benefits of an open RV awning is one of the greatest pleasures of camping. Not only does it provide shelter from the sun and rain, but it also creates a comfortable outdoor space for relaxation and entertainment. But before you can fully enjoy your awning, it’s important to test it to ensure it’s working properly.
To test your open RV awning, start by extending it all the way out. This will allow you to check for any mechanical issues or obstructions that may prevent it from fully opening. Once it’s fully extended, take a step back and observe the awning’s position.
Is it level? Does it sag in any areas? These are important things to look out for as they can impact the awning’s functionality and lifespan. Next, give the awning a gentle shake to see if it feels sturdy and secure. This will help you determine if the awning is properly installed and if the support arms are in good condition.
If there is any wobbling or instability, it may be a sign that further adjustments or repairs are needed. Lastly, test the awning’s ability to retract smoothly. Slowly and carefully roll up the awning, making sure it doesn’t get stuck or jammed at any point.
If you encounter any issues, such as the awning not retracting evenly or making unusual sounds, it’s best to have it checked by a professional. Testing your open RV awning is an essential step in ensuring its functionality and longevity. By taking the time to assess its position, stability, and retractability, you can address any potential issues before they become major problems.
This will allow you to fully enjoy the benefits of your awning and make the most of your camping experience. So, before you hit the road, don’t forget to test your awning and make sure it’s in tip-top shape.
FAQs
How do I manually open an RV awning?
To manually open an RV awning, start by locating the awning’s manual crank. Insert the crank into the hole provided on the awning’s roller tube and rotate it in the required direction to extend the awning. Keep cranking until the awning is fully extended and then secure it in place using the provided awning locks or straps.
What should I do if my RV awning won’t open manually?
If your RV awning won’t open manually, make sure to check if there is any obstruction preventing it from extending fully. Look for any dirt, debris, or branches that may be tangled in the awning. If the awning is clear, try checking the tension on the awning fabric to ensure it is not too tight. If the issue persists, it is recommended to consult a professional RV technician.
Can I manually open my RV awning if the motor is not working?
Yes, you can manually open your RV awning even if the motor is not working. Most RV awnings come with a manual crank that allows you to extend or retract the awning manually. Locate the manual crank, usually stored inside your RV, and follow the instructions provided in the owner’s manual to manually open the awning.
How long does it take to manually open an RV awning?
The time it takes to manually open an RV awning can vary depending on the size and type of awning you have. On average, it may take around 5 to 10 minutes to manually extend the awning fully. However, this time can vary depending on your familiarity with the process and any potential obstacles or complications that may arise.
Are there any safety precautions to keep in mind when manually opening an RV awning?
Yes, there are a few safety precautions to keep in mind when manually opening an RV awning. First, ensure that the area around the awning is clear of any obstructions or people to avoid accidents or injuries. Second, take care not to overextend the awning or apply excessive force when cranking it open. Lastly, always follow the manufacturer’s instructions and guidelines to ensure proper and safe operation of your RV awning.
Can I manually open my RV awning if it is wet or has been exposed to rain?
It is generally not recommended to manually open a wet or rain-exposed RV awning. Wet fabric can become heavier and more difficult to handle, increasing the risk of damage or injury during the manual operation. It is best to allow the awning to dry completely before attempting to open it manually or use the motorized function if available.
How often should I manually open and close my RV awning?
It is recommended to manually open and close your RV awning periodically, especially if it is not being used frequently. This helps to keep the awning in good condition and prevents it from becoming stuck or difficult to operate. A general rule of thumb is to open and close the awning at least once every few weeks, depending on the weather conditions and usage frequency.