
Are you ready to give your RV a fresh new look? One of the easiest ways to do this is by replacing the awning cover. Whether you want to update the style, fix a tear, or simply refresh the overall appearance, a new RV awning cover can make a big difference. But how do you go about replacing it? Don’t worry, we’ve got you covered! In this blog post, we will walk you through the step-by-step process of replacing an RV awning cover, making it a simple and straightforward DIY project.
So, grab your tools and let’s get started on giving your RV a stunning new awning cover!
Table of Contents
Introduction
Are you tired of looking at your old and worn-out RV awning cover? It’s time to give your RV a fresh new look by replacing the awning cover. Replacing an RV awning cover may seem like a daunting task, but with the right tools and a little bit of patience, it can be done easily. First, you need to measure your existing awning to determine the size of the replacement cover you need.
Next, remove the old awning fabric by unscrewing the nuts and bolts that hold it in place. Once the old fabric is removed, simply attach the new cover by following the manufacturer’s instructions. Make sure to tighten all the nuts and bolts securely to ensure a snug fit.
And there you have it – a brand new awning cover for your RV that will make it look as good as new. So why wait? Give your RV a makeover and replace that old awning cover today. Your RV will thank you for it!
What is an RV awning cover?
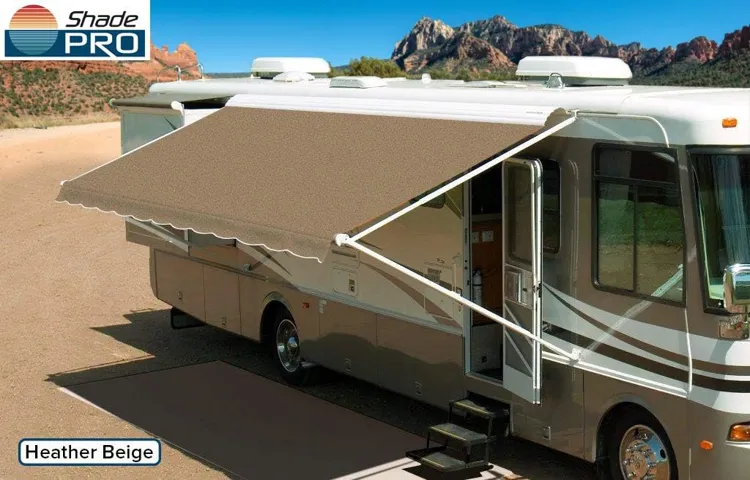
An RV awning cover is a protective accessory that is designed to fit over an RV awning when it is not in use. Just like a cover for your outdoor furniture or grill, an RV awning cover helps to protect your awning from the elements, such as rain, snow, and UV rays. It acts as a barrier, preventing dirt, debris, and bird droppings from accumulating on your awning fabric, which can cause stains and damage over time.
Think of it as a shield for your awning, keeping it clean and extending its lifespan. Plus, an RV awning cover can also make it easier to clean your awning when you are ready to use it again. Rather than having to scrub away months of buildup, you can simply remove the cover and enjoy a clean, ready-to-use awning.
Reasons to replace your RV awning cover
RV awnings can provide shade and protection from the elements, making them a valuable addition to any recreational vehicle. However, over time, the awning cover can become worn, torn, or faded, affecting its functionality and appearance. In such cases, it may be necessary to replace the RV awning cover.
In this blog section, we will discuss the reasons why replacing your RV awning cover can be beneficial and enhance your overall camping experience. Whether it’s to improve aesthetics, ensure proper protection, or increase durability, replacing the awning cover can have numerous advantages that every RV owner should consider.
Tools and Materials Needed
When it comes to replacing a RV awning cover, there are a few tools and materials that you will need to have on hand. First and foremost, you will need a replacement awning cover that is the correct size for your RV. It’s important to measure your existing awning to ensure that you purchase the right size.
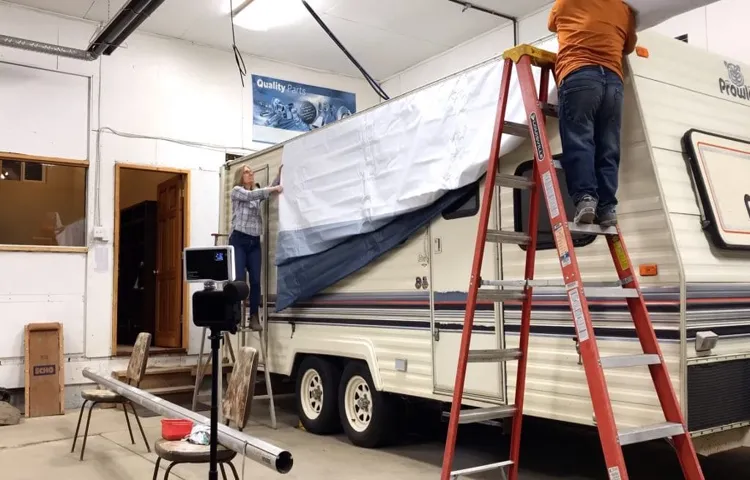
In addition to the replacement cover, you will also need a ladder to reach the top of your RV and remove the old cover. Depending on the type of awning you have, you may also need some basic hand tools such as a screwdriver or wrench to remove any screws or bolts holding the old cover in place. Finally, it’s always a good idea to have an extra set of hands to help with the installation process.
Replacing a RV awning cover can be a bit tricky, especially if you’ve never done it before, so having someone to assist you can make the job much easier.
List of tools required for the job
tools required for the job
Types of replacement awning covers available
replacement awning covers, types of replacement awning covers, tools and materials needed for replacement awning covers
Step-by-Step Instructions
Replacing an RV awning cover may seem like a daunting task, but with the right tools and instructions, it can be a straightforward process. Here is a step-by-step guide on how to replace a RV awning cover. First, make sure to extend the awning fully and lock it in place.
This will provide you with enough space to work with. Next, locate the roller tube and remove the end cap by unscrewing the screws or bolts holding it in place. Once the end cap is removed, you can now access the awning fabric.
Inspect the fabric for any damage or wear and tear. If the fabric needs to be replaced, carefully remove it from the roller tube by unrolling it until it is completely detached. Next, measure the width and length of the old fabric to ensure that you purchase the correct size for the replacement.
Once you have the new fabric, lay it out on a clean and flat surface. Now, take the roller tube and slide it into the hem pocket of the new awning fabric. Make sure that the fabric is evenly distributed along the length of the roller tube.
With the help of an assistant, carefully roll up the awning fabric onto the roller tube, making sure that it is taut and straight. Take your time to ensure that the fabric is evenly rolled up. Once the fabric is rolled up, slide the end cap back onto the roller tube and secure it with the screws or bolts.
Make sure that the end cap is tightly secured to prevent any movement. Finally, retract the awning back into its housing and test it to ensure that it is working properly. If everything looks good, you have successfully replaced your RV awning cover.
Preparation and Safety Measures
“mountain climbing safety tips” The first and most crucial step when preparing for a mountain climbing adventure is to ensure you have the right gear and equipment. This includes a sturdy pair of hiking boots, proper clothing layers to protect against changing weather conditions, a well-fitted backpack, and essential safety gear such as a helmet, harness, and ropes. Additionally, it is important to research and understand the route you will be taking, including any potential hazards or difficult sections.
Familiarize yourself with the terrain and weather conditions to better prepare for the climb. Furthermore, ensure that you have the necessary training and experience before attempting challenging climbs. Taking the time to increase your fitness levels and practice climbing techniques will greatly enhance your safety and enjoyment during the expedition.
Lastly, inform someone about your climbing plans and expected return time, so they can raise an alarm if needed. Remember, safety should always be your top priority when embarking on a mountain climbing adventure.
Removing the old awning cover
Removing the old awning cover can be a daunting task, but with a little patience and the right tools, it can be done easily. The first step is to secure a ladder sturdy enough to reach the awning. Safety is key, so make sure the ladder is on even ground and someone is there to hold it steady.
Once you’re up on the ladder, carefully examine the awning cover for any screws or bolts that may be holding it in place. Use a screwdriver or wrench to loosen and remove these fasteners, being careful to keep them in a safe place. Once all the fasteners are removed, gently pull on the awning cover to release it from any remaining clips or hooks.
It may take some maneuvering, but with a little patience it should come free. Now that the old awning cover is removed, you can move on to installing the new one.
Measuring for the new awning cover
Measuring for the new awning cover is an essential step in ensuring a perfect fit and optimal functionality. By following these step-by-step instructions, you’ll be well on your way to enjoying your new awning cover in no time. First, gather your measuring tools, including a tape measure and a level.
Begin by determining the size of the area you want to cover with the awning. Measure the width and height of the space, taking note of any obstructions or uneven surfaces that may affect the installation. Next, consider the style of awning cover you prefer and take measurements accordingly.
Whether you opt for a fixed frame or a retractable design, be sure to account for any additional space needed for brackets or supports. It’s also important to consider the fabric type and thickness when taking measurements, as this will affect the final dimensions of your awning cover. Lastly, double-check your measurements to ensure accuracy and make any necessary adjustments before ordering or cutting the fabric.
By taking the time to measure properly, you’ll be able to enjoy a functional and aesthetically pleasing awning cover that adds value and beauty to your outdoor space.
Attaching the new awning cover
awning cover installation
Maintenance and Care Tips
Replacing a RV awning cover may seem like a daunting task, but with the right tools and knowledge, it can actually be quite simple. The first step is to measure your existing awning to ensure you purchase the correct size cover. Once you have the new cover, start by extending your awning fully and securing it in place.
Next, remove any screws or fasteners that are holding the old cover in place. Carefully remove the old cover, being mindful of any clips or brackets that may be attached. Once the old cover is off, clean the awning frame thoroughly and allow it to dry completely.
Now it’s time to install the new cover. Start by aligning it with the frame, making sure it is centered and straight. Use a ladder or step stool to reach the top of the awning and secure the cover in place with screws or other fasteners.
Finally, retract the awning and check for any wrinkles or imperfections. If needed, adjust the tension or position of the cover to ensure a smooth and even appearance. With a little patience and attention to detail, you can easily replace your RV awning cover and keep your outdoor space looking fresh and stylish.
Cleaning and protecting your awning cover
Maintaining and caring for your awning cover is essential to ensure its longevity and keep it looking its best. Regular cleaning is the key to preventing dirt, stains, and mold from building up on the fabric. You can start by removing any loose debris, such as leaves or twigs, with a broom or soft brush.
Then, using a mixture of mild soap and water, gently scrub the cover with a soft cloth or sponge. Rinse thoroughly with clean water and allow it to air dry before retracting or folding it back up. It’s important to note that harsh chemicals or abrasive cleaners should be avoided, as they can damage the fabric.
Additionally, consider applying a protective coating or treatment to the cover to help repel dirt and water. This will make future cleanings easier and extend the life of the fabric. By following these maintenance and care tips, you can ensure that your awning cover remains in excellent condition for years to come.
Regular inspection and repairs
maintenance and care tips for regular inspection and repairs.
Conclusion
In conclusion, replacing a RV awning cover is a task that requires just the right amount of finesse, determination, and maybe a splash of luck. It’s a bit like a well-choreographed dance, where you gracefully navigate the intricate steps of removing the old cover, unraveling the new one, and attaching it securely to your awning arms. Just like a superhero changing into a new costume, your RV undergoes a fantastic transformation as well.
With a fresh new cover, your awning becomes a beacon of style and protection, ready to shield you from the harsh elements of nature while turning heads as you roll into the campsite. But replacing an awning cover isn’t just about aesthetics – it’s also about functionality. As you carefully follow the steps outlined in this guide, you’ll not only improve the overall appearance of your RV but also extend the lifespan of your awning.
By taking the time to give your awning the TLC it deserves, you’ll ensure many more years of happy camping adventures ahead. So, the next time you find yourself in need of an awning cover replacement, don’t fret! Armed with the knowledge and skill to tackle this task head-on, you now possess the secret to becoming the envy of all RVers at the campground. Embrace the challenge, flex those DIY muscles, and show that old cover the door – it’s time for your awning to shine like a star! Remember, though, if it all feels a bit overwhelming, don’t hesitate to call on the professionals.
After all, even the most experienced superheroes sometimes need a little backup. Happy camping, my fearless awning enthusiasts!”
FAQs
How do I replace a RV awning cover?
To replace a RV awning cover, start by retracting the awning fully. Remove any tension from the springs or arms by bracing them securely. Locate the screws or fasteners that attach the fabric to the awning roller. You may need to remove a protective cover to access them. Carefully remove the screws or fasteners and slide the old fabric off the roller. Align the new awning cover with the roller and use the screws or fasteners to secure it in place. Make sure the fabric is evenly stretched and taut before extending the awning again.
What tools do I need to replace a RV awning cover?
The tools you will need to replace a RV awning cover include a screwdriver or drill with the appropriate bit for removing screws or fasteners, a ladder or step stool for reaching the awning, and possibly a protective cover removal tool, depending on the design of your awning.
Can I replace a RV awning cover myself or do I need professional help?
Replacing a RV awning cover can usually be done by the owner with basic DIY skills. However, if you are unsure or uncomfortable working at heights, it is always best to consult a professional to ensure the job is done safely and correctly.
How often should I replace my RV awning cover?
The frequency of replacing a RV awning cover depends on various factors such as the quality of the fabric, exposure to weather conditions, and frequency of use. On average, a RV awning cover lasts for about 5-7 years. However, if you notice significant wear and tear, fading, or damage, it may be necessary to replace it sooner.
Can I choose a different color or design for my new RV awning cover?
Yes, you can choose a different color or design for your new RV awning cover. Many manufacturers offer a variety of options to match your personal style or the aesthetics of your RV. Just make sure to select a fabric that is suitable for outdoor use and can withstand the elements.
Are RV awning covers universal or do I need to find a specific size for my RV?
RV awning covers come in a range of sizes to fit different awning types and models. It is important to measure your existing awning or consult the manufacturer’s specifications to ensure you select the correct size for replacement. Using a cover that does not fit properly can lead to issues with functionality and durability.
Can I repair a small tear or hole in my RV awning cover instead of replacing the entire fabric?
In some cases, small tears or holes in a RV awning cover can be repaired using a patch kit specifically designed for awning fabrics. However, the success of the repair depends on the extent of the damage and the quality of the fabric. If the tear is too large or the fabric is severely worn, it may be more cost-effective to replace the entire cover.