
Welcome to our blog on the topic of “Introduction”! Whether you’re a beginner or an expert, understanding the importance and art of introductions is crucial in various aspects of life. From writing an engaging essay to making a lasting first impression, introductions pave the way for successful interactions and experiences. In this blog, we will explore the significance of introductions, provide tips on how to create captivating intros, and highlight real-life examples that demonstrate the power of a well-crafted opening.
So, if you’re ready to unlock the secrets of effective introductions, let’s dive right in!
Table of Contents
- 1 What is an RV slide out awning?
- 2 Why install an RV slide out awning?
- 3 Tools
- 4 Materials
- 5 Step 1: Measure and prepare
- 6 Step 2: Install the mounting brackets
- 7 Step 3: Attach the awning fabric
- 8 Step 4: Secure the arms and tension the fabric
- 9 Step 5: Test the awning
- 10 Regularly clean the awning fabric
- 11 Inspect the mounting brackets and hardware
- 12 Keep the awning fabric properly tensioned
- 13 Conclusion
- 14 FAQs
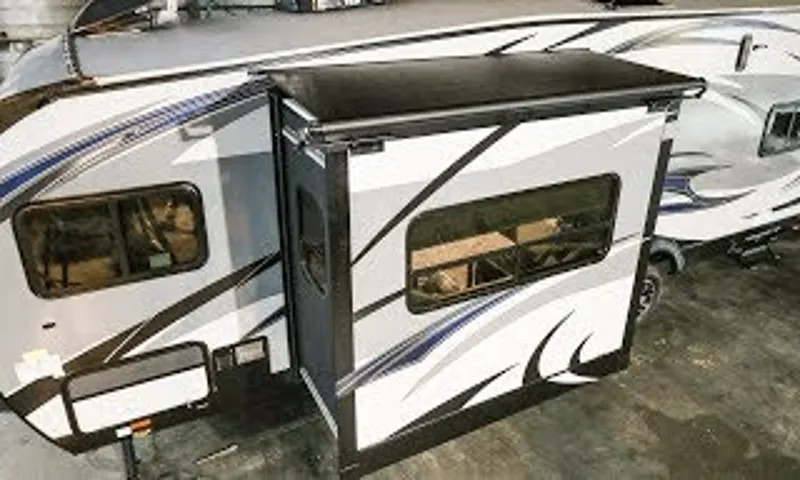
What is an RV slide out awning?
If you’re an avid RV camper, you know how important it is to have sufficient space inside your vehicle. One way to maximize your living area is to install an RV slide out awning. This awning is specifically designed to cover the slide-out area of your RV, providing extra shade and protection from the elements.
The installation process may seem daunting at first, but with a few basic tools and some patience, it can be done. First, measure the length and width of your slide-out and purchase an awning that matches those dimensions. Then, carefully remove the slide-out trim and attach the awning to the top of the slide-out using the provided hardware.
Make sure the awning is centered and securely fastened. Finally, replace the trim and test the awning to ensure it extends and retracts smoothly. With a properly installed RV slide out awning, you’ll have an additional outdoor living space to enjoy during your camping adventures.
Why install an RV slide out awning?
If you’re an RV owner, you know that having an awning can greatly enhance your outdoor experience. But have you considered installing a slide out awning for your RV? This addition can provide several benefits that make it well worth the investment. First and foremost, a slide out awning helps to protect your RV’s slide out room from the elements.
It acts as a barrier against rain, snow, and debris, preventing them from seeping into your living space and causing damage. Additionally, a slide out awning can help to regulate the temperature inside your RV. It provides shade, keeping the sun’s rays from directly hitting your slide out room and heating it up.
This can help to keep your RV cooler and more comfortable, especially during hot summer months. Installing a slide out awning is relatively simple, but it does require some basic tools and DIY skills. The process typically involves attaching the awning brackets to the slide out room and then extending the awning fabric over the brackets.
It’s important to follow the manufacturer’s instructions carefully to ensure a secure and proper installation. So, if you’re looking to protect your slide out room and improve your RVing experience, installing a slide out awning is definitely a worthwhile investment.
Have you ever wanted to take on a DIY project but felt overwhelmed by the number of tools and materials needed? Whether you’re a beginner or a seasoned DIY enthusiast, knowing what tools and materials are necessary for your project can make a world of difference. In this blog post, we will discuss the essential tools and materials needed for various DIY projects, from woodworking to home improvement. So, grab a cup of coffee and get ready to discover the must-have items that will help you bring your DIY dreams to life.
Tools
Are you looking to install an RV slide-out awning but not sure where to start? Don’t worry, we’ve got you covered! Installing an awning for your RV’s slide-out is a fairly straightforward process that you can do yourself with a few basic tools. The first step is to gather all the necessary tools, which include a ladder, screwdriver, tape measure, drill, and silicone sealant. Once you have all your tools ready, you can start by measuring the width of your slide-out and purchasing the appropriate size awning.
Next, you will need to attach the awning’s mounting brackets to the slide-out, making sure they are level and secure. After that, you can slide the awning fabric into the awning rail and secure it in place using the provided screws. Finally, don’t forget to apply silicone sealant to all the screw holes to prevent any water from seeping in.
With these simple steps, you’ll have a new slide-out awning ready to provide shade and protection for your RV in no time!
Materials
Are you tired of the sun glaring into your RV and making the temperature inside unbearable? Installing an RV slide out awning can provide much-needed shade and protection from the elements. To get started, you’ll need a few materials. First, you’ll want to measure the length of your slide out and purchase an awning that matches those dimensions.
You’ll also need a drill, screws, a tape measure, and a level. Once you have all your materials, it’s time to begin the installation process. Start by placing the awning rail onto the top of the slide out.
Use the tape measure and level to ensure it is straight and centered. Then, mark where the screw holes should be drilled. Once the holes are drilled, secure the awning rail with the screws.
Finally, attach the awning fabric to the rail by sliding it into the groove and securing it with the provided hardware. With these simple steps, you’ll have a beautiful, functional slide out awning in no time.
Ready to install that new software or app you’ve been eagerly waiting to try out? It can be exciting to have something new to explore, but the installation process can sometimes be a bit daunting. Don’t worry! We’ve got you covered with this step-by-step installation guide that will walk you through every detail of the process. Whether you’re a tech whiz or a newbie, this guide is designed to make installing software a breeze.
So let’s dive in and get that new program up and running in no time!
Step 1: Measure and prepare
When it comes to installing an RV slide-out awning, the first step is to measure and prepare. Before you can even think about installing the awning, you need to know the proper measurements for your RV. Measure the width of the slide-out, making sure to account for any obstructions such as handles or vents.
Once you have the measurements, you can purchase the appropriate size awning for your RV. It’s important to make sure you have all the necessary tools and materials before you begin the installation process. This may include a tape measure, drill, screws, and a ladder.
Take the time to gather everything you need and lay it out in an organized manner. This will make the installation process much smoother and more efficient. By properly measuring and preparing, you’ll be well on your way to installing a beautiful and functional slide-out awning for your RV.
Measure the length and width of your RV slide out
“RV slide outs are a great feature that can provide extra space and comfort in your mobile home. But before you can install or replace a slide out, it’s important to make sure you have the correct measurements. Step one is to measure the length and width of your RV slide out.
This will ensure that you purchase the right size slide out and avoid any installation or fitting issues. To measure the length, start by extending the slide out fully and measuring from one end to the other. For the width, measure from the inside edge of the slide out wall to the outside edge.
It’s important to be as precise as possible when taking these measurements, as even a small discrepancy can lead to problems down the line. Once you have the measurements, you can move on to step two, which is selecting the right slide out for your RV.”
Clean the area where the awning will be installed
awning installation, clean the area, measure and prepare,
– Step 1: Measure and Prepare Before installing an awning, it’s important to measure the area where it will be installed and make sure it’s properly prepared.
Start by measuring the width and height of the space where the awning will be placed. This will help determine the size of the awning you’ll need to purchase. Once you have the measurements, clear the area of any debris or obstacles that might interfere with the installation process.
This includes removing any plants, outdoor furniture, or other items that are in the way. It’s also a good idea to sweep or hose down the surface to make sure it’s clean and free of dirt or dust. If there are any existing structures in the area, such as a porch or deck, make sure they are in good condition and able to support the weight of the awning.
Step 2: Install the mounting brackets
Before installing an RV slide out awning, it’s important to have the necessary mounting brackets in place. These brackets will provide the support needed to hold the awning securely in place. To install the mounting brackets, start by determining the ideal location for them on the side of your RV.
This will depend on the size of your awning and the width of your slide out. Once you have determined the placement, mark the spots where the brackets will be installed. Next, use a drill to create pilot holes at these marks.
Make sure the holes are sized appropriately for the screws that will be used to secure the brackets. With the pilot holes in place, position the brackets over them and align them properly. Then, using a screwdriver or drill, insert the screws through the brackets and into the pilot holes.
Tighten the screws securely, but be careful not to overtighten and strip the holes. Repeat this process for each bracket until all are securely attached to the side of your RV. Once the brackets are installed, you’ll be ready to move on to the next step of installing your RV slide out awning.
Determine the placement of the mounting brackets
mounting brackets, installation process, placement of brackets
Secure the mounting brackets to the RV slide out
In this step-by-step guide, we’ll walk you through how to securely install the mounting brackets for your RV slide out. These brackets are crucial for providing stability and support to your slide out, so it’s important to ensure they are installed correctly. To begin, gather all the necessary tools and materials for the installation.
You’ll need the mounting brackets, screws, a drill, and a level. Start by positioning the mounting brackets on the appropriate spots on the RV slide out. The exact placement will vary depending on the specific model of your RV, so refer to the manufacturer’s instructions for guidance.
Once you have determined the correct placement, use a level to ensure the brackets are perfectly horizontal. A level will help you avoid any unwanted tilt or imbalance, which could compromise the stability of your slide out. Next, using a drill, carefully screw the brackets onto the slide out.
Make sure to use the appropriate screws that are recommended for your specific brackets. As you screw in the brackets, make sure they are firmly attached to the slide out without any wobbling or movement. This will ensure that they can effectively support the weight of the slide out when it is extended.
Finally, give the brackets a gentle shake to confirm that they are securely attached. If you notice any looseness or instability, double-check the screws and make any necessary adjustments. By following these steps and securely installing the mounting brackets, you can ensure that your RV slide out is properly supported and protected.
This will not only enhance the functionality and convenience of your RV but also provide you with peace of mind knowing that your slide out is secure and stable.
Step 3: Attach the awning fabric
In this third step of installing an RV slide out awning, we will be attaching the awning fabric. This is an important step as it is what will provide shade and protection to your slide out area. To begin, make sure you have the correct fabric size for your awning.
Lay the fabric out and attach the grommets or hooks to the ends of the fabric. Next, slide the awning rail into place on your RV, ensuring that it is level. Once the rail is in place, insert the fabric into the rail, starting at one end and working your way across.
Make sure the fabric is evenly distributed and not wrinkled or bunched up. Finally, secure the fabric in place using the screws or snaps provided. And there you have it, your RV slide out awning fabric is now attached and ready to provide shade and protection for your slide out area.
Unroll the awning fabric
awning fabric, attach When it comes to setting up an awning, attaching the fabric is a crucial step that will determine the overall appearance and functionality of your awning. After you have assembled the frame and pulled it out to the desired position, it’s time to unroll the awning fabric. This step requires a bit of caution, as you want to avoid any tears or tangles.
Start by locating the end of the fabric and gently pulling it outwards, allowing the entire length of the fabric to gradually unfold. Take your time and make sure that the fabric is evenly spread out, with no folds or creases. Once the fabric is fully unrolled, you can move on to attaching it to the awning frame.
Depending on the type of awning you have, there may be different attachment methods. Some awnings have hooks or loops that you can easily slide the fabric into, while others require you to use a screw or fastener to secure the fabric in place. Follow the manufacturer’s instructions carefully to ensure a secure and proper attachment.
This step is crucial, as it will ensure that the fabric stays in place and provides the desired shade and protection. Once the fabric is attached, take a step back and admire your work. Your awning is now ready to provide you with a comfortable outdoor space where you can relax and enjoy the shade.
Align the fabric with the slide out and mounting brackets
In Step 3 of attaching an awning fabric, it is important to align the fabric with the slide out and mounting brackets. This ensures that the fabric is properly positioned and secured for optimal functionality. By aligning the fabric with the slide out, you can ensure that the awning extends and retracts smoothly without any obstructions.
Similarly, aligning the fabric with the mounting brackets ensures that the fabric is securely attached to the structure of the awning. This is important because it prevents the fabric from sagging or coming loose, especially during strong winds or heavy rain. By taking the time to align the fabric correctly, you can ensure that you have a sturdy and durable awning that will provide shade and protection for years to come.
Secure the awning fabric to the mounting brackets
In this step, we will secure the awning fabric to the mounting brackets. This is a crucial part of the installation process as it ensures that the fabric stays in place and provides the necessary shade and protection. To attach the awning fabric, you will need to align the fabric with the mounting brackets and slide it into place.
Most awning fabrics have a pocket or channel along the top edge where the mounting brackets can be inserted. Make sure to double-check the alignment and make any necessary adjustments before proceeding. Once the fabric is in position, you can tighten the brackets to secure it in place.
It’s important to ensure that the fabric is taut and free of any wrinkles or sagging. This will not only improve the appearance of your awning but also ensure its longevity and durability. So take your time and make sure to properly secure the awning fabric to the mounting brackets for a sturdy and functional installation.
Step 4: Secure the arms and tension the fabric
Once you have successfully attached the fabric roller to your RV’s slide-out, it’s time to secure the arms and tension the fabric. This step is crucial to ensure that your slide-out awning is properly installed and functions effectively. Start by extending the slide-out completely to expose the arms.
Then, align the arms with the mounting brackets on the side of your RV and insert the locking pins to hold them in place. Make sure the arms are straight and parallel to the ground. After securing the arms, it’s time to tension the fabric.
Locate the tension knobs or screws on the arms and turn them clockwise to tighten the fabric. Keep turning until the fabric is taut and there are no wrinkles or sagging. Be careful not to over-tighten the fabric as it may cause damage.
Once you’re satisfied with the tension, lock the knobs or screws in place. Congratulations, you have now successfully installed and tensioned your RV slide-out awning! It’s time to sit back, relax, and enjoy the shade and protection it provides.
Attach the arms to the mounting brackets
awning arms, mounting brackets, secure, tension fabric
Adjust the tension on the fabric
When it comes to installing a fabric awning, adjusting the tension on the fabric is a crucial step. This ensures that the awning is properly stretched and secure, preventing any sagging or flapping in the wind. To adjust the tension, start by securing the arms of the awning in their desired position.
Use the provided hardware to attach the arms firmly to the wall or support structure. Once the arms are secure, you can begin tensioning the fabric. This is typically done using a crank or a lever system.
Gradually tighten the tension, making sure to keep the fabric evenly stretched across the frame. You want the fabric to be taut but not overly tight, as this could damage the awning or put unnecessary strain on the support structure. Take your time with this step, making small adjustments as needed until the fabric is just right.
By properly tensioning the fabric, you’ll not only ensure a neat and tidy appearance, but also increase the lifespan of your awning. So, take the time to get it right and enjoy the shade and protection your fabric awning provides.
Step 5: Test the awning
Now that you’ve successfully installed your RV slide out awning, it’s time to test it out. Testing the awning is an important step to ensure that it is properly installed and functions correctly. To test the awning, start by extending the slide out all the way.
This will allow you to see the full range of motion of the awning. Next, retract the slide out and observe how the awning retracts along with it. Make sure the awning rolls up smoothly and evenly without any obstructions.
Check for any signs of sagging or misalignment. If everything looks good, extend the slide out again and inspect the awning for any gaps or areas that are not properly sealed. This is important to prevent water from seeping into your RV when it rains.
Lastly, test the awning by extending and retracting it a few times to make sure it operates smoothly. If you notice any issues during the testing process, it’s important to address them before hitting the road. Overall, testing the awning is a crucial step in ensuring that it functions properly and provides the shade and protection you need during your RV adventures.
Extend and retract the awning to ensure smooth operation
When it comes to testing your awning, one crucial step is to extend and retract it to ensure smooth operation. This is important because you want your awning to function properly and easily in any situation. So, how do you do it? First, locate the switch or mechanism that controls the extension and retraction of the awning.
Once you’ve found it, simply press the button or turn the handle to extend the awning fully. Take note of how smoothly it moves and if there are any areas where it’s sticking or making unusual sounds. Then, retract the awning back to its original position, again paying attention to any issues or irregularities.
By testing the awning in this way, you can identify any potential problems before they become larger and more expensive to fix. Remember, a smooth and well-functioning awning will provide you with years of enjoyment and protection, so it’s worth taking the time to ensure everything is in working order.
Having a reliable and well-maintained vehicle is essential for ensuring a smooth and hassle-free driving experience. Maintenance and care are key factors in prolonging the life of your vehicle and avoiding costly repairs. But where do you start? With so many different aspects to consider, it can be overwhelming to know what exactly needs to be done.
From changing the oil to checking the tire pressure, there are various tasks that need to be regularly addressed. But don’t worry, we’ve got you covered! In this blog, we will provide you with some valuable maintenance and care tips to keep your car running like new. So buckle up and get ready to learn how to become a responsible car owner!
Regularly clean the awning fabric
Installing an RV slide-out awning is a great way to protect your RV’s slide-out room from the elements and keep debris from getting inside. To install an RV slide-out awning, start by measuring the length of your slide-out room and selecting an awning that matches those dimensions. Next, attach the awning’s mounting brackets to the side of your RV, making sure they are secure.
Then, slide the awning assembly into the roller tube and secure it with the included screws. Finally, extend the awning all the way out and adjust the tension to ensure it is properly secured. With your RV slide-out awning installed, you can enjoy the benefits of added protection and peace of mind on your RV adventures.
Inspect the mounting brackets and hardware
Hey there! So, you’re ready to install an RV slide-out awning, huh? Well, one of the most important steps in the installation process is inspecting the mounting brackets and hardware. This is crucial to ensure the awning is properly secured and won’t come loose while you’re out on the road. Start by checking the brackets for any signs of damage or wear.
Look for cracks, rust, or any other issues that could compromise the stability of the awning. If everything looks good, move on to the hardware. Ensure that all the screws, bolts, and nuts are tightened securely.
If you notice any loose or missing hardware, now’s the time to replace it. You don’t want any surprises when you extend your awning for the first time! So take the time to inspect those mounting brackets and hardware before moving on to the next step. Happy installing!
Keep the awning fabric properly tensioned
One important aspect of installing an RV slide out awning is properly tensioning the fabric. This is crucial for preventing the fabric from flapping in the wind or sagging, which can lead to damage over time. To ensure proper tension, start by extending the slide out completely.
Then, adjust the tension screws on both ends of the awning roller to tighten the fabric. It’s essential to strike the right balance – the fabric should be tight enough to resist flapping but not so tight that it puts strain on the hardware or causes the fabric to pucker. Adjusting the tension may require some trial and error, but taking the time to get it right will help extend the lifespan of your RV slide out awning and keep it looking and functioning its best.
Have you ever wondered how to write a compelling conclusion for your blog post? The conclusion is an essential part of your content, as it ties together all the main points you’ve made and leaves a lasting impression on your readers. It’s your final chance to leave them with a strong takeaway or call to action. But how do you create a conclusion that is both engaging and impactful? In this blog post, we will explore some tips and strategies for writing a powerful conclusion that will leave your audience wanting more.
So, let’s dive in and discover how to craft an effective conclusion that will make your blog post shine!
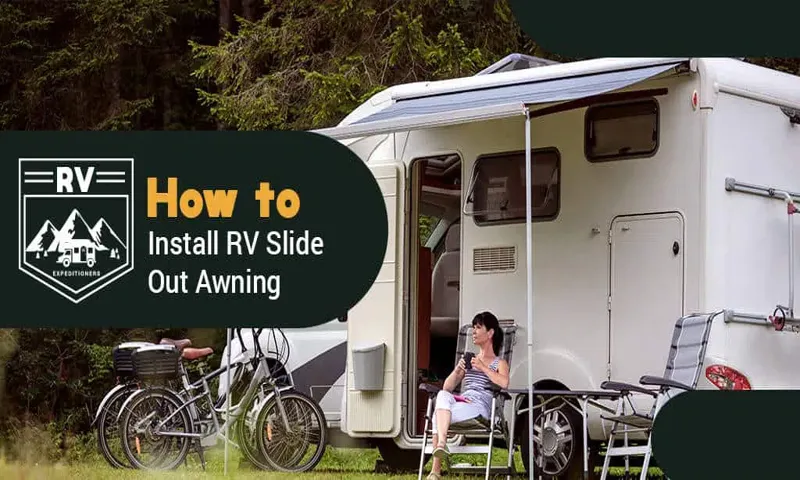
Conclusion
And there you have it, the foolproof guide on how to install an RV slide out awning. With these steps and a little bit of patience, you’ll have your awning up and running in no time. So say goodbye to those pesky sun rays that shine directly into your RV, and hello to a cool and shaded oasis.
Remember, safety first, and don’t forget to recruit a helper or two. Now go forth, my fellow RV enthusiasts, and slide out into the world with style and shade!”
FAQs
How do I install an RV slide out awning?
To install an RV slide out awning, first, measure the width of your slide out. Then, select an awning that is the appropriate size. Next, attach the awning rail to the top of the slide out using screws or adhesive. Once the rail is secure, carefully unroll the awning fabric and slide it into the rail, making sure it is centered. Finally, secure the fabric to the bottom of the slide out with the provided hardware or straps.
Can I install an RV slide out awning myself, or do I need professional help?
Installing an RV slide out awning can be done by a DIYer, but it does require some mechanical and technical skills. If you are confident in your abilities and have the necessary tools, you can install the awning yourself. However, if you are unsure or uncomfortable with the process, it is recommended to hire a professional to ensure proper installation.
What tools do I need to install an RV slide out awning?
To install an RV slide out awning, you will need a few basic tools. These include a measuring tape, drill with appropriate bits, screwdriver, level, and a ladder or step stool. Additionally, some awning kits may require specific tools or hardware, which will be included in the package.
How long does it take to install an RV slide out awning?
The installation time for an RV slide out awning can vary depending on your experience and the specific awning model. On average, it can take anywhere from 1-3 hours to complete the installation. Factors such as weather conditions, access to the slide out, and any unforeseen complications may also impact the installation time.
Can I install an RV slide out awning on any type of RV?
Most RV slide out awnings are designed to be compatible with various sizes and styles of RVs. However, it is important to check the manufacturer’s specifications and recommendations to ensure proper fit and installation. Some RVs may have unique slide out configurations that require specific awning models or modifications.
Do I need to remove the RV slide out awning during travel?
Generally, it is not necessary to remove the RV slide out awning during travel. These awnings are designed to be securely attached and can withstand highway speeds. However, it is recommended to retract the awning during high winds or severe weather conditions to prevent potential damage.
How do I maintain and clean my RV slide out awning?
Regular maintenance and cleaning are essential to prolong the lifespan of your RV slide out awning. To clean the fabric, use a mild soap or detergent mixed with water and a soft bristle brush or sponge. Avoid using harsh chemicals or abrasive materials as they can damage the fabric. Additionally, inspect the awning hardware and components regularly for any signs of wear or damage, and lubricate the moving parts if necessary.