
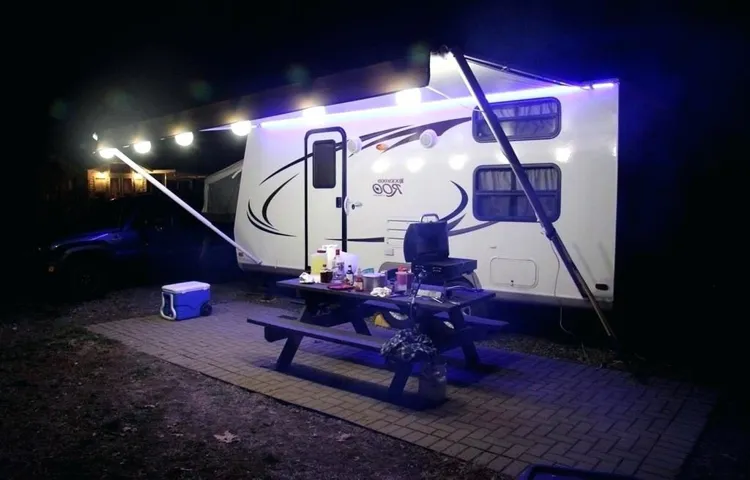
Have you ever driven by an RV park at night and been captivated by the colorful and twinkling lights adorning the awnings of the motorhomes? It’s a sight that instantly creates a cozy and festive atmosphere, whether you’re camping in the middle of nowhere or at a bustling RV resort. But how do RV owners achieve this magical effect? How do they hang lights on their RV awning without causing any damage or risking their safety? In this blog, we will dive into the world of RV awning lights and uncover the secrets to effortlessly creating a dazzling and inviting outdoor space for your home on wheels. So grab your favorite beverage, settle into your camping chair, and let’s get started on transforming your RV into a portable wonderland of light.
Table of Contents
Introduction
If you’re looking to add a festive touch to your RV camping experience, hanging lights on your awning is a great way to do it. Not only do lights add ambiance to your outdoor space, but they also provide practical lighting during the evening hours. So, how do you go about hanging lights on your RV awning? First, you’ll need to decide what type of lights you want to use.
There are a variety of options available, from string lights to LED strips. Once you’ve chosen the type of lights, you’ll need to ensure that they are safe to use with your RV’s electrical system. It’s important to follow the manufacturer’s instructions and consult with a professional if you’re unsure.
Once you have your lights and have checked their compatibility with your RV, you can start the installation process. Typically, this involves attaching clips or hooks to your awning and then hanging the lights from them. Be sure to test the lights before securing them in place to avoid any frustration later on.
With a little bit of planning and preparation, you can easily hang lights on your RV awning and create a cozy and inviting outdoor space for your camping adventures.
Why hang lights on an RV awning?
RV awnings can provide shade and protection from the elements, but they can also be a blank canvas for creativity. One popular way to add a touch of personality and festive spirit to your RV is by hanging lights on the awning. This simple addition can transform your outdoor space into a cozy and inviting haven.
But why should you bother hanging lights on your RV awning? Well, there are several reasons why it’s a great idea. For starters, lights add a warm and welcoming ambiance to your campsite. They create a cozy atmosphere that is perfect for relaxing and enjoying the great outdoors.
Furthermore, lights can also serve a practical purpose by providing additional lighting in the evening. Whether you’re enjoying a late-night dinner or just sitting outside chatting with friends, having well-placed lights can make all the difference. So, if you want to enhance your camping experience and make your RV stand out from the crowd, hanging lights on your awning is a fantastic idea.
Benefits of hanging lights on RV awning
RV awnings provide a great space for outdoor lounging and entertaining, but they can often feel dark and uninspiring. That’s where hanging lights come in. By installing lights on your RV awning, you can instantly transform the space into a welcoming and cozy oasis.
Not only do the lights add a touch of ambiance, but they also provide functional lighting for nighttime activities. Whether you’re enjoying a meal with friends or simply relaxing with a good book, having lights on your awning can make the experience much more enjoyable. So why not make the most of your outdoor living space and hang some lights on your RV awning?
Step 1: Gather the necessary supplies
So, you want to deck out your RV awning with some twinkling lights to add a touch of magic to your camping experience? Well, you’re in luck! Hanging lights on your RV awning is a relatively straightforward process that will bring a cozy ambiance to your outdoor space. Before you start, gather your supplies. You’ll need a set of string lights designed for outdoor use, extension cords if necessary, clips or hooks to hang the lights, and a ladder or step stool if you can’t reach the top of your awning easily.
Once you have all your materials ready, it’s time to move on to the next step: hanging those beautiful lights!
String lights or lanterns
In this blog section, we will explore the two popular options for outdoor lighting: string lights and lanterns. These two choices not only add a whimsical touch to any outdoor space but also provide much-needed illumination when the sun goes down. So, let’s get started on how to create a magical outdoor ambiance with either string lights or lanterns.
To begin, you will need a few essential supplies. For string lights, you will need a string of lights, extension cords if necessary, and hooks or clips to hang them. Lanterns, on the other hand, require lanterns themselves, candles or battery-operated LED lights, and a place to hang or set them.
Additionally, consider the power source for both options. String lights may need access to an electrical outlet, while lanterns can run on batteries or candles. It’s important to gather all these supplies before you start decorating your outdoor space for the best results.
Hooks or clips
Hooks or clips are versatile and handy accessories that can be used for a wide variety of purposes. Whether you need to hang up clothes, organize your belongings, or secure items in place, hooks or clips can come to your rescue. So, how do you go about choosing the right hooks or clips for your needs? Well, the first step is to gather the necessary supplies.
You’ll need to determine what specific tasks you’ll be using the hooks or clips for. Are you looking to hang up curtains? Keep your cables organized? Hang up pictures? Once you have a clear idea of what you need them for, you can start looking for the appropriate hooks or clips. There are different types available, such as adhesive hooks, suction cup hooks, magnetic clips, and binder clips, just to name a few.
Make sure you choose the type that is best suited for the task at hand.
Extension cord
“extension cord” Step 1: Gather the necessary supplies Before you start making your own extension cord, make sure you have all the supplies you’ll need. The first thing you’ll need is a power cord. Now, you can either buy a power cord or repurpose an old one that you no longer need.
Just make sure it’s in good condition and can handle the amount of power you’ll be using. Next, you’ll need a plug and socket. These are the components that will allow you to connect your devices to the extension cord.
You can find these at your local hardware store or online. Finally, you’ll also need some electrical tape and wire strippers. These will help you properly connect the wires and insulate them for safety.
Once you have all these supplies gathered, you’ll be ready to move on to the next step in making your own extension cord.
Step 2: Measure and plan
If you want to add some festive flair to your RV camping experience, hanging lights on your awning is a great way to do it. But before you start stringing lights, there are a few steps you should take. First, you’ll want to measure your awning to determine how many lights you’ll need and how long the strands should be.
This will help ensure you have enough lights and prevent any gaps in coverage. Once you have your measurements, you can start planning where to hang the lights. Consider the layout of your campsite and how you want the lights to look.
Do you want them evenly spaced or clustered in certain areas? Take some time to visualize your desired outcome before you begin hanging the lights. This will help you create a plan and ensure that the end result is exactly what you envisioned. So, take those measurements and start planning your awning light display for a fun and festive camping experience.
Determine the length of lights needed
When it comes to installing lights, one important step is determining the length of lights needed. This can be done by measuring and planning ahead of time. First, you’ll want to take measurements of the area where you’ll be placing the lights.
Consider factors such as the size of the space, the height at which you’ll be hanging the lights, and any obstacles or corners that may affect the length needed. Once you have these measurements, you can determine the length of lights that will be required. It’s also important to consider the type of lights you’ll be using.
For example, if you’ll be using string lights, you’ll need to account for the length of the cord as well. By taking the time to measure and plan ahead, you can ensure that you have the right length of lights for your space and avoid any potential issues later on.
Decide on the placement of lights
When it comes to lighting your space, deciding on the placement of lights is a crucial step to ensure the desired ambiance and functionality. There are a few key factors to consider when measuring and planning the placement of lights. First, think about the purpose of the room and how the lighting will be used.
Is it a workspace that requires bright, focused lighting, or is it a cozy living area that calls for soft, ambient lighting? Next, consider the layout and size of the room. Take measurements and map out where the lights should be positioned for optimal coverage. Think about any specific areas that may need extra lighting, such as a reading nook or a kitchen counter.
Additionally, consider the positioning of furniture and other fixtures in the room. You want to avoid casting harsh shadows or creating glare, so take note of any potential obstructions that may affect the placement of lights. By measuring and planning the placement of lights, you can ensure that your space is well-lit and visually appealing for any occasion.
Step 3: Install hooks or clips
So you’ve got your RV all decked out with festive lights, and now it’s time to hang them up on your awning. But how do you do it? Don’t worry, it’s easier than you might think! One option is to install hooks or clips directly onto your awning. These hooks or clips can be found at most RV accessory stores and are designed specifically for hanging lights on your awning.
To install them, simply slide the hook or clip onto the edge of your awning fabric, making sure it’s secure and won’t easily come off. Once you’ve installed the hooks or clips, you can easily attach your lights by sliding the wire through the hook or clip. This method is great because it allows you to easily hang your lights without causing any damage to your RV or awning.
So go ahead, get creative with your outdoor lighting and make your RV stand out from the rest!
Choose the type of hooks or clips suitable for your awning
When it comes to installing hooks or clips for your awning, it’s essential to choose the right type for the job. There are several options available, each designed to attach to different types of surfaces or materials. For example, if you have a wooden deck or patio, you may want to consider using deck hooks or screw-in clips.
These are specifically designed to provide a secure attachment to wood and can withstand the weight of your awning without damaging the surface. On the other hand, if you have a concrete or brick wall, you may opt for concrete anchors or wall clips. These are designed to securely attach to these surfaces and provide a stable foundation for your awning.
Whatever type of hooks or clips you choose, it’s important to ensure that they are strong enough to support the weight of your awning and properly installed to prevent any accidents or damage.
Attach the hooks or clips to your RV awning
RV awnings can provide much-needed shade and protection from the elements when you’re out camping or just enjoying some time outdoors. And to make the most of your awning, you’ll want to attach hooks or clips to it. These hooks or clips serve as a convenient way to hang lights, decorations, or other accessories from your awning.
So, how do you go about installing them? Well, it’s actually quite simple. Start by identifying the type of awning you have. Some awnings come with built-in attachment points, while others may require you to purchase and install separate hooks or clips.
Once you have the appropriate hooks or clips, you can easily attach them to your awning using the provided instructions or guidelines. Make sure to securely fasten the hooks or clips to ensure they can hold the weight of whatever you plan to hang. With the hooks or clips in place, you can easily add a touch of personality and flair to your RV awning.
Whether you want to hang some fairy lights for a cozy ambiance or showcase your favorite flags or banners, these hooks or clips will come in handy. So, go ahead and get creative with how you decorate your RV awning. Just remember to choose hooks or clips that are appropriate for your awning type and weight requirements.
Ensure the hooks or clips are secure
In order to ensure that your hooks or clips are secure, there are a few steps you can follow. First, make sure that the surface you are attaching the hooks or clips to is clean and dry. This will help to ensure that the adhesive or screw will stick properly.
If you are using adhesive hooks, carefully remove the backing and press the hook firmly onto the surface. Hold it in place for a few seconds to allow the adhesive to bond. If you are using clips that require screws, use a drill or screwdriver to attach them to the surface.
Make sure to tighten the screws securely so that the clips will not come loose. Additionally, it may be helpful to use a level to ensure that the hooks or clips are installed straight. Once the hooks or clips are in place, give them a gentle tug to make sure that they are secure.
If they feel loose, try reapplying the adhesive or tightening the screws. Taking the time to install your hooks or clips properly will help to ensure that they stay in place and can support the weight of the items you hang on them.
Step 4: String the lights
So you’ve gathered all the necessary materials and you’re ready to start hanging lights on your RV awning. The first thing you’ll want to do is find the perfect place to string the lights. Measure the length of your awning and the string of lights to ensure you have enough length to cover the entire area.
Start by attaching one end of the lights to a sturdy point on the awning, such as a hook or bracket. Then, carefully string the lights along the edge of the awning, securing them with zip ties or clips every few inches. Be sure to space the lights evenly and keep them taut to prevent them from sagging or tangling.
As you work your way to the other end of the awning, make adjustments as needed to ensure the lights are straight and evenly distributed. Once you reach the other end, secure the lights in place and plug them in to test that they are working properly. With a little patience and careful attention to detail, you’ll have a beautifully illuminated awning that’s perfect for those cozy nights under the stars.
Start at one end of the awning
In this fourth step of setting up an outdoor awning, we’ll be focusing on stringing the lights. This is where the magic happens and your awning transforms into a cozy and inviting space. To begin, start at one end of the awning and secure the first light strand with clips or hooks.
Make sure to leave a bit of slack between each light, as this will allow for a more even distribution of light. As you move along the awning, continue to attach each strand of lights, making sure to secure them tightly. If you’re using multiple strands, be sure to connect them together using the provided connectors.
And remember, don’t rush this step. Take your time to ensure each light is properly positioned and secure. Once all the lights are in place, step back and admire your handiwork.
Your awning is now ready to be enjoyed day or night!
Secure the lights to the hooks or clips
In step four of stringing your lights, it’s time to secure them to the hooks or clips. This is crucial to ensuring that your lights stay in place and don’t come crashing down. Start by attaching the end of the light string to the first hook or clip.
Make sure it’s firmly fastened so it won’t slip or loosen. Then, carefully stretch the lights to the next hook or clip and secure them in the same way. Repeat this process until you have all the lights evenly strung and secured.
It’s important to take your time and be cautious during this step to avoid any accidents or tangled messes. So, grab your hooks or clips and get to work! Your beautifully lit space is just a few steps away.
Continue stringing the lights along the awning
In this step, we will continue stringing the lights along the awning to create a beautiful and inviting outdoor space. One of the best ways to enhance the ambiance of any outdoor area is by adding some festive string lights. These lights not only provide illumination but also add a cozy and warm feel to the space.
To begin, make sure you have enough lights to cover the length of your awning. Start by attaching the lights to one end of the awning using adhesive clips or hooks. Then, carefully string the lights along the edge of the awning, making sure to keep them evenly spaced.
You can also use zip ties or twist ties to secure the lights in place. As you go along, keep in mind the overall look you want to achieve. You can create a straight line of lights or create a cascading effect by hanging the lights at different heights.
Remember to plug in the lights as you go to check for any gaps or areas that need to be adjusted. Keep stringing the lights until you reach the other end of the awning, making sure to secure them in place as you go. Once you’re done, step back and admire your handiwork.
Your awning will now be transformed into a cozy and inviting space, perfect for relaxing or entertaining guests. So go ahead, grab a cup of hot cocoa, and enjoy the twinkle of your new outdoor lights.
Step 5: Connect the lights
One of the best ways to add some ambiance and flair to your RV campsite is by hanging lights on your awning. Not only do they create a cozy and inviting atmosphere, but they also provide practical lighting when the sun goes down. Hanging lights on your RV awning is a relatively straightforward process that can be done in just a few simple steps.
First, you’ll need to gather your supplies, including string lights, zip ties, and an extension cord. Next, determine where you want to hang the lights on your awning, and make sure there is a nearby power source. Once you have everything ready, begin by attaching the lights to the awning with the zip ties.
Be sure to space them evenly to create a balanced look. Finally, connect the lights to the extension cord and plug it into the power source. And voila! You now have a beautifully lit RV campsite that is sure to impress your fellow campers.
So why not bring some extra cheer to your outdoor adventures and add some lights to your RV awning?
Plug the lights into an extension cord
One crucial step in setting up your outdoor lights is connecting them. To do this, you’ll need an extension cord. Extension cords are an essential tool for connecting your lights to a power source that may be farther away.
When choosing an extension cord, make sure it is rated for outdoor use and can handle the wattage of your lights. Once you have your extension cord, simply plug one end into your power source and the other end into the first light in your string. This will create a continuous connection, allowing electricity to flow from the power source to all the lights in your display.
If you have a large display with multiple strings of lights, you may need to use multiple extension cords to reach all the lights. Just make sure to plug each cord securely into the previous one and double-check that each connection is tight. By following these steps, you’ll be well on your way to creating a stunning outdoor light display.
Route the extension cord to a power source
In order to connect the lights, you first need to route the extension cord to a nearby power source. This step is important to ensure that your lights have a steady supply of electricity. Start by determining the closest power outlet or switchboard to where you want to hang your lights.
If the power source is not conveniently located, you may need to use an extension cord to bridge the gap. Carefully lay the extension cord along the ground or secure it to walls and ceilings, making sure it is out of the way and won’t be tripped over. Once you have successfully connected the extension cord to the power source, you can move on to the next step of connecting your lights.
Ensure the extension cord is safely secured
Once you have positioned your Christmas lights, it’s important to ensure that the extension cord is safely secured. You don’t want any tripping hazards or accidental disconnections ruining your festive display! Start by finding a suitable outdoor-rated extension cord that is long enough to reach your power source without needing to stretch or strain. Make sure the cord is in good condition, with no frayed wires or exposed areas.
Next, carefully plug the Christmas lights into the end of the extension cord, making sure the connections are secure. If necessary, use electrical tape or cable ties to hold the cords together and prevent them from separating. Finally, find a safe and inconspicuous place to plug in the extension cord, such as an outdoor outlet or a specially designed weatherproof cover.
By taking these precautions, you can enjoy your beautifully lit Christmas display without any worries or mishaps.
Step 6: Test the lights
In order to create the perfect ambiance for your RV awning, you’ll want to hang some lights. But before you start stringing them up, it’s important to test them out first. There’s nothing worse than spending time getting the lights in place, only to realize they don’t work.
So here’s what you need to do to test the lights before you hang them up. First, plug the lights into a power source and make sure they turn on. Check for any loose or frayed wires that could cause a safety hazard.
Next, check that all the bulbs are working by turning the lights on and off. It’s a good idea to have extra bulbs on hand in case any need to be replaced. Finally, take a step back and look at the lights from a distance.
Make sure they are bright enough and that the color is what you were expecting. By taking the time to test the lights before hanging them, you can ensure that your RV awning will be the envy of the campground.
Turn on the lights to check if they are working
In order to ensure that your lights are working properly, it’s important to test them once they are installed. This step is often overlooked, but it is essential to make sure that the lights are functioning as intended. To test the lights, simply turn them on and see if they illuminate.
This may seem like a simple task, but it is important to check each individual light to ensure that they are all working. Sometimes, one or two lights may be faulty and not turn on, so it’s important to test each one individually. By doing this, you can quickly identify any issues and address them before moving forward with the installation process.
Adjust and arrange the lights as desired
In the final step of setting up your lights, it’s time to test them out to make sure they’re working properly and arranged to your liking. This is an important step because you want to ensure that the lights are casting the right amount of light and creating the desired ambiance in your space. Start by turning on all the lights and observing how they look.
Are they too bright or too dim? Do they illuminate the room evenly or do you notice any dark spots? Adjust the brightness and angle of the lights as needed to achieve the desired effect. Think of your lights as a stage production, where each light has a specific role to play. You want to make sure that every detail is just right, from the intensity of the light to the direction it’s pointing in.
So take your time to test and tweak the lights until they’re perfect. And remember, lighting is subjective, so what may look great to one person may not appeal to another. Trust your instincts and go with what feels right for you and your space.
Now sit back, relax, and enjoy the ambience that your well-placed lights create.
Step 7: Enjoy your illuminated RV awning
So you’ve successfully installed your RV awning and now you’re ready to add some extra flair with some illuminated lights. Hanging lights on your RV awning can create a cozy and inviting atmosphere, perfect for outdoor gatherings or simply enjoying a peaceful evening outdoors. To begin, gather your desired lights such as string lights, rope lights, or even LED tape lights.
Make sure these lights are suitable for outdoor use to ensure their durability and safety. Next, carefully measure the length and width of your awning to determine how many lights you will need. Once you have your lights ready, start attaching them to your awning.
There are a few different methods you can use, such as using clips or hooks specifically designed for hanging lights or simply securing them with zip ties. Whichever method you choose, make sure the lights are securely fastened to the awning to prevent them from falling or getting damaged. Finally, connect your lights to a power source such as an outdoor extension cord or a battery pack.
Test the lights to ensure they are working properly and admire the warm and inviting glow that now illuminates your RV awning. Sit back, relax, and enjoy the magical ambiance that your illuminated awning brings to your outdoor space.
Create a cozy and inviting atmosphere
Creating a cozy and inviting atmosphere in your RV is essential for a comfortable and enjoyable experience. One way to achieve this is by adding lights to your awning. When you have your illuminated RV awning setup, you can sit outside and relax in the soft glow of the lights.
It creates a warm and inviting ambiance that is perfect for spending time with family and friends. Imagine sitting under the awning, sipping a cup of hot cocoa, and watching the stars above. The gentle illumination from your awning lights adds a touch of magic to your RV camping experience.
So, go ahead and enjoy the cozy and inviting atmosphere that an illuminated RV awning brings.
Host fun outdoor gatherings
RV awnings are not only functional, but they can also be a stylish addition to your outdoor space. Once you have installed your illuminated RV awning, it’s time to enjoy it! One great way to do this is by hosting fun outdoor gatherings with family and friends. Imagine having a cozy and well-lit space where everyone can gather and enjoy each other’s company.
You can set up some comfortable seating under the awning and create a welcoming atmosphere with some string lights or lanterns. You can even add some outdoor games like cornhole or ladder toss to keep everyone entertained. With the soft glow of the awning lights and the laughter of your loved ones, your outdoor gathering will be a night to remember.
So, why not invite your friends over for a barbecue or a casual get-together and make the most of your illuminated RV awning? It’s the perfect way to enjoy the outdoors and create lasting memories.
Experiment with different light patterns
experiment with different light patterns, illuminated RV awning Now that you’ve successfully installed LED lights on your RV awning, it’s time to have some fun and experiment with different light patterns. This is where you can really let your creativity shine (pun intended)! With LED lights, you have the ability to choose from a wide range of colors and patterns, so don’t be afraid to get adventurous. Try flashing lights for a party atmosphere, or go for a soothing fade-in and fade-out effect for a more relaxed ambiance.
You can even synchronize the lights to music for a truly immersive experience. The possibilities are endless, so don’t be afraid to play around and find the light pattern that best suits your style and mood. Enjoy the mesmerizing glow of your illuminated RV awning and impress your fellow campers with your unique light displays.
Happy experimenting!
Conclusion
In conclusion, hanging lights on your RV awning is like creating a magical portal to a whimsical wonderland. With a little bit of creativity and a touch of DIY know-how, your awning can transform into a dazzling display of enchantment that will make your fellow campers green with envy. So go forth, my friends, and let your creativity soar as you hang lights on your RV awning.
Just remember to use caution and check your surroundings before you embark on this illuminating adventure. Happy camping and may the lights be ever in your favor!”
Hanging lights on your RV awning can enhance your camping experience
RV awning lights are a fantastic addition to any camping trip. Not only do they provide much-needed illumination during the evening hours, but they also create a fun and festive atmosphere. Once you have completed all the steps to hang your lights, it’s time to sit back and enjoy the fruits of your labor.
Imaging sitting under your awning, surrounded by the soft glow of the lights as you roast marshmallows over the campfire. The warm ambiance created by the lights will make you feel like you are in your own little oasis, even in the middle of a crowded campground. Whether you are enjoying a quiet night in or hosting a lively gathering with friends, the addition of awning lights will take your camping experience to the next level.
So grab a chair, pour yourself a drink, and revel in the beauty of your illuminated RV awning. It’s a sight that is sure to bring a smile to your face and make your camping trip one for the books.
Follow these steps to safely and securely hang lights on your RV awning
RV awning lights are a popular way to add ambiance and a little extra sparkle to your outdoor living space. Now that you’ve successfully hung your lights and made sure everything is secure, it’s time to sit back, relax, and enjoy your illuminated RV awning. Picture yourself on a warm summer night, sitting under your awning with the soft glow of the lights casting a warm and inviting ambiance.
It’s the perfect setting for a cozy evening with friends or a romantic night under the stars with your significant other. Whether you’re hosting a campfire cookout or simply enjoying some quiet time alone, the twinkling lights will create a magical atmosphere that will make any moment memorable. So grab your favorite beverage, kick back in your favorite camping chair, and bask in the glow of your beautifully lit RV awning.
You’ve worked hard to create this inviting space, and now it’s time to enjoy the fruits of your labor.
FAQs
How do I hang lights on my RV awning?
To hang lights on your RV awning, first, make sure the awning is fully extended. Then, use zip ties or hooks to secure the lights along the awning’s edge. Finally, connect the lights to a power source, such as an outdoor extension cord, and test to ensure they are working properly.
What type of lights should I use for my RV awning?
When choosing lights for your RV awning, it is best to opt for LED string lights. These are energy-efficient, durable, and provide a bright and vibrant illumination. Additionally, make sure to select lights that are designed for outdoor use and are suited for the weather conditions in which you will be traveling.
Can I leave the lights on my RV awning overnight?
It is generally recommended to turn off the lights on your RV awning when you go to bed or when you leave the campsite. Leaving the lights on overnight can drain your RV’s battery, especially if they are not LED lights. It is also considerate to other campers who may prefer a darker and quieter environment during nighttime.
How do I secure the lights on my RV awning without damaging it?
To prevent damage to your RV awning, it is important to use non-intrusive methods to secure the lights. Avoid drilling holes or using screws directly into the awning material. Instead, utilize zip ties, hooks, or adhesive clips specifically designed for awning attachment. Be sure to follow the manufacturer’s instructions and not exceed the weight capacity of your awning.
How can I protect the lights on my RV awning from harsh weather?
To protect your lights from harsh weather conditions, consider getting waterproof or weather-resistant LED lights. These lights are designed to withstand rain, wind, and other outdoor elements. Additionally, you can purchase light covers or install a fabric or vinyl awning protector that offers an extra layer of protection for the lights.
Can I use solar-powered lights for my RV awning?
Yes, you can use solar-powered lights for your RV awning. Solar-powered lights are a great eco-friendly option as they charge during the day using sunlight and automatically turn on at night. Make sure to position the solar panel in a spot that receives ample sunlight for optimal charging.
How do I remove the lights from my RV awning?
To remove the lights from your RV awning, simply detach the zip ties, hooks, or clips that are securing them. Gently coil the lights and place them in a storage bag or container to prevent tangling or damage. It is important to remove the lights carefully to avoid any potential strain or damage to the awning fabric.