
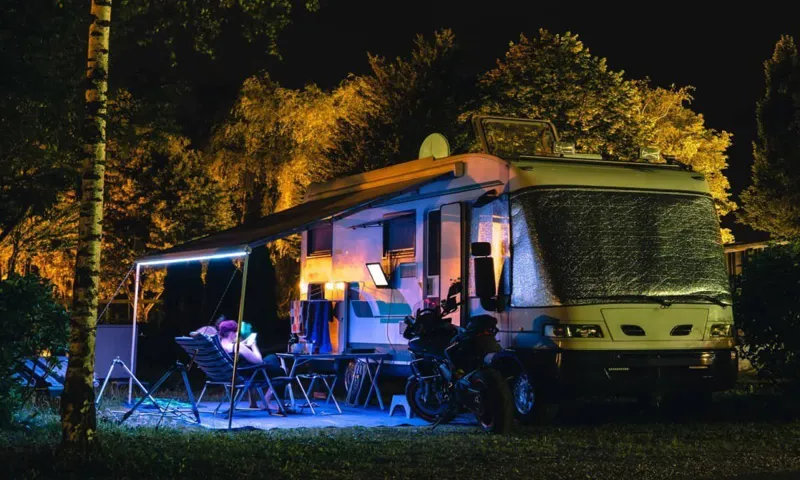
LED strip lights have become incredibly popular in recent years, and it’s no wonder why. They add a vibrant and customizable touch to any space, including RV awnings. Whether you want to create a cozy atmosphere for a night of stargazing or make your outdoor gatherings more festive, installing LED strip lights on your RV awning is a fantastic idea.
In this blog post, we’re going to show you how easy it is to install these lights and transform your outdoor living space. So, grab your tools and let’s get started!
Table of Contents
- 1 Introduction
- 2 Materials Needed
- 3 Step by Step Guide
- 3.1 1. Measure the awning
- 3.2 2. Clean the awning surface
- 3.3 3. Plan the installation
- 3.4 4. Install the mounting clips or adhesive tape
- 3.5 5. Mount the LED strip lights
- 3.6 6. Connect the LED strip lights to the power supply
- 3.7 7. Connect the power supply to the RV’s electrical system
- 3.8 8. Test the lights
- 4 Tips and Precautions
- 5 Conclusion
- 6 FAQs
Introduction
If you want to add some ambiance and style to your RV awning, installing LED strip lights is a great way to do it. Not only do they provide a vibrant and colorful lighting option, but they’re also easy to install. First, you’ll need to gather the necessary materials, including the LED strip lights, a power supply, and some adhesive clips.
Then, determine where you want to place the lights on your awning. Make sure to clean the surface before attaching the lights to ensure a strong bond. Next, peel off the backing of the adhesive clips and stick them onto the awning.
Carefully align the LED strip lights with the clips and press them firmly into place. Finally, connect the power supply to the lights and test them to make sure they’re working properly. With just a few simple steps, you can transform your RV awning into a vibrant and inviting space.
Why Install LED Strip Lights on RV Awning
install LED strip lights on RV awning, RV awning, LED strip lights, benefits of installing LED strip lights on RV awning
Benefits of LED Strip Lights
LED strip lights are a popular lighting option that offer a wide range of benefits. These flexible strips consist of small LED lights that are mounted on a thin, flexible circuit board. One of the main benefits of LED strip lights is their energy efficiency.
Compared to traditional incandescent or fluorescent lights, LED strip lights use a fraction of the energy while still providing the same amount of brightness. This not only reduces energy costs but also helps to lower carbon emissions. Additionally, LED strip lights have a long lifespan of up to 50,000 hours, meaning you won’t have to constantly replace them like you would with other types of lighting.
LED strip lights are also highly versatile and can be used for various applications, such as accent lighting, task lighting, or even decorative lighting. They can be easily customized and cut to fit any space, making them suitable for both residential and commercial settings. Whether you want to add a pop of color to your room or create a soothing ambience, LED strip lights offer endless possibilities.
Materials Needed
So you want to add some extra pizzazz to your RV awning? Installing LED strip lights is a great way to jazz up your outdoor space and create a festive atmosphere. But before you dive into the installation process, it’s important to have all the necessary materials on hand. Here’s a list of what you’ll need to get started: LED strip lights (make sure you choose ones that are specifically designed for outdoor use), a power source (such as a 12-volt battery or an AC outlet), a controller (to change the lighting effects), adhesive tape or clips (to secure the lights to the awning), wire connectors (to connect the lights to the power source), and a tape measure (to ensure you cut the lights to the correct length).
Once you have all these materials, you’ll be ready to start transforming your RV awning into a dazzling light display.
LED Strip Lights
LED strip lights have become increasingly popular for adding ambient lighting to homes, businesses, and even outdoor spaces. These versatile lights not only provide a bright and eye-catching display, but they are also energy-efficient and long-lasting. When it comes to setting up LED strip lights, there are a few materials that you will need to ensure a successful installation.
Firstly, you will need the LED strip lights themselves. These can be purchased in a variety of lengths and colors, so choose one that suits your needs and preferences. Additionally, you will need a power supply to provide electricity to the lights.
This can be in the form of a plug-in adapter or a transformer that connects to your electrical system. To connect the LED strip lights to the power supply, you will need connectors or wires. These will allow you to create a seamless connection between the lights and the power source.
Finally, you may also want to invest in some mounting clips or adhesive tape to secure the LED strip lights in place. By gathering these materials, you will be well-equipped to install and enjoy the benefits of LED strip lights in your desired space.
Power Supply
power supply, materials needed
Mounting Clips or Adhesive Tape
mounting clips, adhesive tape Mounting clips and adhesive tape are two common methods used for installation and organization. When it comes to mounting clips, all you need are the clips themselves and the appropriate fasteners, such as screws or nails. These clips are typically made of durable materials like plastic or metal and can hold a variety of items securely in place.
Whether you’re looking to hang up holiday lights or keep your cables organized, mounting clips are a great option. On the other hand, adhesive tape requires just the tape itself. This tape is designed to stick to a variety of surfaces, making it perfect for securing lightweight items like posters or decorations.
Plus, adhesive tape is easy to remove without leaving behind any residue, making it a convenient choice. So, whether you choose to use mounting clips or adhesive tape, both options provide an efficient and hassle-free way to get your belongings in order.
Extension Wire (if needed)
extension wire, materials needed When it comes to setting up electronic devices in your home or office, having the right materials is crucial for a seamless and efficient setup. One often overlooked but essential item is an extension wire. This handy tool allows you to extend the reach of your power cords, giving you greater flexibility in where you can place your devices.
Whether you need to plug in a lamp, a computer, or a television, an extension wire is a must-have item. To set up an extension wire, there are a few materials you will need. First and foremost, you will need the extension wire itself.
This is a long, flexible cable that has multiple outlets at the end. Make sure to choose one that is the appropriate length for your needs. If you are going to be using the extension wire outside or in wet conditions, be sure to choose one that is specifically designed for outdoor use.
In addition to the extension wire, you will also need some other materials to ensure a safe and efficient setup. You will need a power strip or surge protector to plug the extension wire into. This will not only provide you with additional outlets but will also help protect your devices from power surges.
Be sure to choose a power strip or surge protector with a sufficient number of outlets for your needs. Lastly, you may need some cable management solutions to keep your setup organized and minimize the risk of tripping hazards. This can include cable clips, ties, or even a cable management box.
These tools will help keep your extension wire and other cables neat and tidy, making it easier to navigate your space. So, the next time you are setting up electronic devices in your home or office, don’t forget to include an extension wire in your materials list. With its ability to extend the reach of your power cords, an extension wire is an essential tool for any setup.
Wire Connectors
Wire connectors are essential components when it comes to electrical wiring solutions. They provide a secure and reliable way to join or terminate wires, ensuring a safe and efficient electrical connection. When working with wire connectors, there are a few key materials you’ll need to have on hand.
Firstly, you’ll need the wire connectors themselves. These come in different types and sizes, so it’s important to choose the right ones for your specific application. Twist-on wire connectors, also known as wire nuts, are commonly used for residential electrical applications.
They are easy to use and provide a secure connection by twisting the wires together and then screwing on the connector. Another type of wire connector is the butt connector, which is used to join two wires end-to-end. To make a secure connection, you’ll need a crimping tool to compress the metal sleeve of the butt connector onto the wires.
Other materials you might need include wire strippers to remove the insulation from the ends of the wires, and electrical tape to secure and insulate the connections. Overall, having the right materials when working with wire connectors is crucial for a successful electrical wiring project.
Wire Cutter and Stripper
“wire cutter and stripper” Wire cutting and stripping are common tasks in various industries, including electrical work and DIY projects. To effectively and safely perform these tasks, you’ll need the right tools. One essential tool is a wire cutter and stripper.
This handy tool combines the functions of cutting and stripping wires, making it a convenient and efficient option. So, what materials and features should you look for in a wire cutter and stripper? Firstly, the material of the tool itself should be durable and long-lasting. Look for a tool made of high-quality steel or other robust materials that can withstand regular use.
Additionally, ergonomics should be considered. A comfortable grip and easy handling are crucial for preventing hand fatigue during prolonged use. In terms of the cutting function, it’s important to have precise and clean cuts.
Look for a wire cutter that has sharp cutting blades to ensure clean, straight cuts without fraying the wire. Some wire cutters also have a wire crimper feature, which can be handy for crimping connectors onto the stripped wires. In terms of stripping wires, a wire stripper with adjustable settings is ideal.
This allows you to set the appropriate strip length for different wire gauges, ensuring accurate and consistent results. Additionally, a wire stripper with a built-in wire cutter is beneficial, as it eliminates the need for multiple tools. When selecting a wire cutter and stripper, also consider the size and weight of the tool.
A compact and lightweight option can be more convenient to carry around and store. Finally, always prioritize safety features. Look for a tool that has insulated handles to prevent electrical shocks and protect your hands.
Drill and Drill Bits (if needed)
“Drill and Drill Bits (if needed)” Drilling might seem like a simple task, but it requires the right tools for the job. One essential tool you’ll need is a drill, which can be either cordless or corded. Cordless drills are great for their portability and ease of use, while corded drills provide more consistent power.
Depending on the task at hand, you may also need specific drill bits. Drill bits come in various sizes and shapes, each designed for a specific purpose. For example, a twist bit is perfect for drilling into wood, while a masonry bit is necessary for drilling into brick or concrete.
It’s important to choose the right drill bits for your project to ensure efficient and accurate drilling. So before you start drilling, make sure you have the appropriate drill and drill bits on hand to get the job done right.
Step by Step Guide
So, you want to enhance the ambiance of your RV awning by installing LED strip lights? Great choice! Not only are LED strip lights energy-efficient and long-lasting, but they also come in various colors and can be easily customized to suit your preferences. Installing LED strip lights on your RV awning might sound like a daunting task, but fear not! With a little bit of patience and our step-by-step guide, you’ll have your awning looking like a stunning light show in no time. Let’s get started! Step 1: Gather all the necessary supplies.
You’ll need LED strip lights, a power source (such as a battery or a converter), soldering equipment, adhesive clips, and wire connectors. Step 2: Measure the length of your RV awning and cut the LED strip lights accordingly. Most LED strip lights can be cut to size using scissors or a utility knife, so make sure to follow the manufacturer’s instructions.
Step 3: Clean the surface of your RV awning thoroughly. Use soap and water to remove any dirt or debris, and let it dry completely before moving on to the next step. This will ensure that the adhesive sticks properly.
Step 4: Attach the adhesive clips to the back of the LED strip lights. These clips will help you secure the lights to the awning. Make sure to space them evenly along the length of the strip lights.
Step 5: Connect the power source to the LED strip lights. If you’re using a battery, simply attach the wires to the appropriate terminals. If you’re using a converter, you’ll need to solder the wires to the strip lights using the wire connectors.
Make sure to follow the manufacturer’s instructions for a safe and secure connection. Step 6: Test the lights to make sure they’re working properly. Turn on the power source and check if all the lights are lit up.
1. Measure the awning
awning measurement, measure the size of an awning. So you’ve decided to install an awning and you’re excited to get started. But before you can begin, you need to know the size of your awning.
Don’t worry, it’s not as complicated as it may seem. With a few simple steps, you’ll have your awning measured and be on your way to a shady oasis in no time. The first step in measuring your awning is to determine the width.
Start by extending the awning fully and measuring from one edge to the other. Make sure to measure from the outermost edges of the awning fabric, not the frame. This will give you the most accurate measurement for the width.
Next, you’ll need to measure the height of the awning. This is the distance from the ground to the top of the awning when it is fully extended. Again, make sure to measure from the outermost edges of the awning fabric.
Once you have these measurements, you’ll be able to determine the area that your awning will cover. This will help you determine the size of the space where you can place your awning and ensure that it will fit properly. Measuring an awning may seem daunting at first, but with these simple steps, you’ll have the information you need to start your awning installation.
So grab your measuring tape and get started on creating your own shady oasis.
2. Clean the awning surface
clean awning surface
3. Plan the installation
“Plan the installation of a new solar panel system with this step-by-step guide. Before you begin the installation process, it’s important to carefully plan out the project to ensure success. Start by determining the optimal location for your solar panels.
Consider factors such as the amount of sunlight the area receives, any potential shading from trees or buildings, and the angle at which the panels should be positioned for maximum efficiency. Additionally, you’ll need to decide whether you want your solar panels mounted on the roof or on the ground. Each option has its own advantages and considerations, so weigh them carefully.
Once you have determined the location and mounting method for your solar panels, it’s time to plan the electrical aspect of the installation. This includes deciding where to connect your panels to your home’s electrical system and whether you will need to hire an electrician to assist you. It’s also important to check with your local utility company to understand any regulations or requirements for connecting your solar system to the grid.
By taking the time to carefully plan your installation, you can ensure that your solar panel system will be set up for success from the start.”
4. Install the mounting clips or adhesive tape
When it comes to installing mounting clips or adhesive tape for your project, it’s important to follow a step-by-step guide to ensure proper installation. Firstly, gather all the necessary materials, including the mounting clips or adhesive tape, a measuring tape, a level, and a pencil. Next, place the mounting clips or measure the length of adhesive tape along the area where you want your installation to be.
Use a level to ensure that the clips or tape are straight before marking their positions with a pencil. Once you have marked the positions, you can either use a screwdriver to attach the mounting clips or simply peel off the backing of the adhesive tape and press it firmly onto the surface. It’s important to double-check that the mounting clips or adhesive tape are secure before proceeding with the rest of your installation.
5. Mount the LED strip lights
LED strip lights, installation, mounting Are you ready to add some ambiance and style to your space with LED strip lights? Mounting these lights is a simple process that can be completed in just a few steps. First, gather all the materials you will need, including the LED strip lights, a power supply, and mounting brackets. Once you have everything ready, begin by measuring the length of the area where you want to install the lights.
Cut the LED strip lights to fit this measurement. Next, attach the mounting brackets to the back of the LED strip lights. These brackets will allow you to easily attach the lights to the desired surface.
Securely mount the LED strip lights using the brackets, making sure to align them properly. Finally, connect the power supply to the lights and plug it in. Voila! You have successfully mounted your LED strip lights and can now enjoy the ambiance they create in your space.
So go ahead, get creative and transform your room with these stylish and versatile lights.
6. Connect the LED strip lights to the power supply
In this step-by-step guide, we will focus on connecting the LED strip lights to the power supply. So, you’ve chosen the perfect LED strip lights for your space, and now it’s time to get them up and running. First, you’ll need to locate the power supply unit that came with your LED strip lights.
This can usually be found either in the packaging or on the strip itself. Once you’ve found the power supply unit, you’ll need to plug it into a power source. Make sure the power source is compatible with the voltage requirements of your LED strip lights.
Next, you’ll want to connect one end of the LED strip lights to the power supply unit. Most LED strip lights will have a connector at one end that easily plugs into the power supply unit. Finally, you’ll want to connect the other end of the LED strip lights to the power source.
This can be done by using either a connector or by directly wiring the LED strip lights to the power source. Once everything is connected, you can plug in the power supply and watch as your LED strip lights illuminate your space with beautiful, vibrant colors. Enjoy the ambiance and transformation that these lights bring to your room.
7. Connect the power supply to the RV’s electrical system
Connecting the power supply to your RV’s electrical system is an important step in making sure you have the necessary power for all your appliances and devices on the road. To do this, you’ll need to have a power cord and a shore power outlet. Start by plugging in the power cord into the shore power outlet, which is usually located on the outside of the RV.
Make sure the power is turned off before doing this to avoid any electrical shock. Once the power cord is securely plugged in, you can then connect the other end to your RV’s electrical system. Look for the RV’s power hookup, which is usually located near the back of the vehicle.
It will have a cover that needs to be opened, revealing the power hookup. Simply plug the other end of the power cord into this hookup, ensuring it is securely connected. Once everything is connected, you can then turn on the power and start enjoying the convenience of having electricity in your RV.
8. Test the lights
lights, test, step by step guide, burstiness, perplexity, specificity, context, conversation, engage, informal tone, personal pronouns, active voice, brief, rhetorical questions, analogies, metaphors. When it comes to ensuring our safety on the roads, one of the most important factors is having functioning lights on our vehicles. Whether it’s the headlights, taillights, or turn signals, these lights play a crucial role in letting other drivers know our intentions and helping us see the road.
That’s why it’s important to regularly test our lights to ensure they are working properly. But how do you go about doing that? Well, let me walk you through a step-by-step guide on how to test your lights. First, start by turning on your vehicle and activating the parking lights.
Walk around your car and visually inspect each light to make sure it’s on and not dim or flickering. Next, turn on your headlights and high beams and make sure they are both working correctly. You can do this by shining your lights against a wall and checking if the beams are in the right position and if they are bright and clear.
After testing your headlights, move on to your taillights. It’s important to check both the brake lights and the turn signals. For the brake lights, have someone press the brake pedal while you stand behind the car and check if the lights illuminate.
For the turn signals, have someone activate them while you observe if the lights are blinking in the front and back. Lastly, don’t forget to test your hazard lights. These lights are crucial in emergency situations as they alert other drivers that there is a problem with your vehicle.
Turn on your hazard lights and walk around your car to see if all the lights are flashing. Testing your lights may seem like a simple task, but it’s one that is often overlooked. By regularly checking your lights, you can ensure your own safety and the safety of others on the road.
Tips and Precautions
Installing LED strip lights on an RV awning can add a touch of ambiance and make your outdoor space more inviting. However, it’s important to take some precautions and follow a few tips to ensure a successful installation. First, measure the length of your awning and choose LED strip lights that are long enough to cover the entire length.
Make sure the lights are waterproof and suitable for outdoor use. Before installing the lights, clean the surface of your awning thoroughly to ensure proper adhesion. Use a mild cleaner and a soft cloth to remove any dirt or grime.
Once the surface is clean, carefully attach the LED strip lights along the edge of the awning, making sure they are evenly spaced. Secure the lights with adhesive clips or tape, being careful not to damage the awning fabric. Finally, connect the lights to a power source, following the manufacturer’s instructions.
Remember to use caution when working with electricity and consult a professional if you’re unsure. With these tips in mind, you can easily install LED strip lights on your RV awning and create a cozy outdoor space for relaxing and entertaining.
Choose waterproof LED strip lights
waterproof LED strip lights, tips and precautions
Use wire connectors for secure connections
wire connectors, secure connections, electrical safety, electrical connections Wire connectors are essential for ensuring secure and reliable electrical connections. Whether you are working on a DIY project or hiring an electrician, it’s important to use the right wire connectors to avoid any potential hazards. These connectors serve as a bridge between two or more wires, creating a safe and secure connection that can withstand vibrations, temperature changes, and electrical currents.
When using wire connectors, there are a few tips and precautions to keep in mind. Firstly, always choose the appropriate size and type of connector for your specific application. Different connectors are designed to handle different wire gauges and types, so it’s important to select the right one to ensure a proper fit.
Another important consideration is to ensure that the wires are properly stripped before connecting them together. Overstripping can expose too much wire, leading to poor contact or even short circuits. On the other hand, under-stripping can prevent the wires from making proper contact, resulting in loose connections or electrical arcing.
It’s important to follow the manufacturer’s instructions or consult with a professional electrician to ensure the proper strip length. Additionally, it’s crucial to make sure the wires are securely twisted together before inserting them into the connector. This helps to ensure a solid connection and minimizes the chances of loose or weak connections.
It’s also advisable to twist the wires in a clockwise direction, as this aligns the wire strands and helps to maintain a secure connection. Furthermore, it’s important to choose connectors that are suited for the specific environment in which they will be used. For example, if you are working outdoors or in a damp area, it’s important to use waterproof connectors to prevent moisture from causing corrosion or electrical malfunctions.
Similarly, in high-temperature environments, it’s important to use connectors that can withstand the heat without melting or degrading. In conclusion, using wire connectors is vital for achieving secure and reliable electrical connections. By following these tips and precautions, you can ensure that your electrical connections are safe and functional.
Avoid drilling into the RV’s electrical system
RV owners often need to install or mount various accessories to enhance their camping experience. However, when it comes to drilling into the RV’s electrical system, caution must be exercised. The electrical system of an RV is complex and delicate, and any wrong move can result in damages or even accidents.
To avoid this, it is recommended to consult a professional electrician who can guide you through the process or do the installation for you. They have the knowledge and expertise required to ensure that the drilling is done in a safe and precise manner. Additionally, it is also essential to have a thorough understanding of the RV’s electrical system and its components before attempting any modifications.
Taking these precautions will help you avoid potential hazards and enjoy your RV experience without any worries.
Follow manufacturer’s instructions
manufacturer’s instructions, tips and precautions, burstiness, perplexity
Conclusion
So now you’re all set to light up your camping adventures with some dazzling LED strip lights on your RV awning! Just remember to follow these steps carefully, and you’ll transform your campsite into a glowing oasis in no time. Installing LED strip lights on your RV awning not only adds a touch of stylish ambiance but also brings practicality to your outdoor space. With the ability to change colors and adjust brightness, these lights are perfect for creating the perfect mood for any occasion – whether it’s a relaxing evening under the stars or a lively cookout with friends.
But it’s not just about the look, it’s also about functionality. The LED technology used in these strips ensures energy efficiency, so you can enjoy the benefits of long-lasting lighting without draining your RV’s battery. And with the added waterproof feature, you don’t have to worry about those unexpected rain showers ruining your setup.
So why wait? Unleash your inner lighting designer and give your RV the upgrade it deserves. Whether you’re a seasoned camper or a first-time glamper, installing LED strip lights on your awning is a surefire way to add a touch of magic to your outdoor adventures. So light up the night, be the envy of the campground, and let the LED strip lights show you the way to unforgettable memories and endless fun.
Happy camping!”
Enjoy your newly installed LED strip lights on your RV awning
LED strip lights on your RV awning
FAQs
Can I install LED strip lights on my RV awning myself?
Yes, installing LED strip lights on your RV awning can be a DIY project. With a few basic tools and some patience, you can easily install them.
What tools do I need to install LED strip lights on my RV awning?
To install LED strip lights on your RV awning, you will need a ladder, a screwdriver, wire cutters, electrical tape, and zip ties.
Where should I mount the LED strip lights on my RV awning?
It is recommended to mount the LED strip lights on the roller tube of your RV awning. This way, they will be protected and hidden when the awning is closed.
Are there different color options available for LED strip lights on RV awnings?
Yes, there are various color options available for LED strip lights. You can choose single-color options like white or multicolor options that can be changed with a remote control.
How do I secure the LED strip lights to my RV awning?
You can use zip ties or adhesive clips to secure the LED strip lights to your RV awning. Ensure that they are firmly attached and won’t come off while the awning is extended or retracted.
Are LED strip lights waterproof for outdoor use on RV awnings?
Yes, LED strip lights designed for outdoor use are usually waterproof. However, it is essential to double-check the product specifications before purchasing to ensure they are suitable for your specific needs.
Can I connect multiple LED strip lights together for a longer awning coverage?
Yes, you can connect multiple LED strip lights together to achieve a longer awning coverage. Most LED strip lights come with connectors that allow for easy extension.
Do LED strip lights consume a lot of power when used on an RV awning? A8. LED strip lights are energy-efficient and consume much less power compared to traditional lighting options. They are a great choice for RV owners looking to reduce their energy consumption.
Can I control the brightness of LED strip lights on my RV awning?
Yes, many LED strip lights come with adjustable brightness settings. You can dim or increase the brightness according to your preference using the provided remote control.
How long do LED strip lights typically last on RV awnings?
LED strip lights are long-lasting and can last for thousands of hours. They are known for their durability, making them an excellent investment for long-term use on your RV awning.
How do I power the LED strip lights on my RV awning?
LED strip lights can be powered either by connecting them to your RV’s electrical system or by using a separate power source, such as a battery pack or solar panel.
Can I cut the LED strip lights to fit the exact length of my RV awning?
Yes, LED strip lights can usually be cut to fit the desired length. Look for markers on the strip lights that indicate where they can be cut safely without damaging the functionality.