
Rolling up your RV awning may seem like a daunting task, but with the right knowledge and a few simple steps, it can be done easily and efficiently. Whether you’re preparing to hit the road or just need to secure your awning during bad weather, knowing how to properly roll it up is essential. In this blog post, we’ll walk you through the process step-by-step, providing you with all the information you need to successfully roll up your RV awning.
So, let’s get started and make rolling up your awning a breeze!
Table of Contents
Introduction
Are you new to the RV lifestyle and wondering how to roll up your awning? Don’t worry, it’s a lot easier than you might think! Rolling up an RV awning can seem daunting at first, but with a little practice, you’ll become a pro in no time. The first thing you’ll want to do is make sure all the straps and attachments are secure. Next, using a long pole or hook, begin rolling up the awning from one side to the other, making sure to keep it tight as you go.
Finally, secure the awning in place using the provided straps or clips. It’s important to take your time and be careful not to damage the awning or the RV. With a little practice, rolling up your RV awning will become second nature and you’ll be able to enjoy the open road with ease.
Benefits of Rolling Up Your RV Awning
RV awnings are a great addition to any recreational vehicle, providing shade and protection from the elements. However, there may be times when it is beneficial to roll up your RV awning. Whether you are on the road or parked at a campground, rolling up your awning can offer various advantages.
In this blog section, we will explore the benefits of rolling up your RV awning and how it can enhance your camping experience. So, let’s dive in and discover why rolling up your awning could be a game-changer for your RV adventures!
Importance of Properly Rolling Up Your RV Awning
RV awnings are a great feature to have on your recreational vehicle. They provide shade and protection from the sun and rain, allowing you to enjoy the great outdoors in comfort. However, it is important to properly roll up your RV awning to prevent damage and ensure its longevity.
In this blog post, we will discuss the importance of properly rolling up your RV awning and provide some tips on how to do it correctly. So, let’s get started!
Step 1: Clear the Area
If you’re planning to roll up your RV awning, the first step is to clear the area. This is important to ensure that there are no obstructions or hazards that could hinder the process. Start by removing any items that may be attached or hanging from the awning, such as lights, curtains, or decorations.
Also, clear any debris or dirt that may have accumulated on the awning fabric. This can be done by using a broom or brush to gently sweep away any loose dirt or leaves. By clearing the area, you’ll have a clean and unobstructed space to safely roll up your RV awning.
Remove any chairs, tables, or other obstacles from beneath the awning
In order to prepare your outdoor space for the changing weather or an upcoming event, it’s important to start by clearing the area. This means removing any chairs, tables, or other obstacles that may be underneath the awning. By doing this, you create a clean and open space that can easily accommodate your needs.
Imagine trying to set up a beautiful seating area or prepare for a gathering, only to find that there are obstacles in the way. It would be frustrating and potentially delay your plans. So, take a few minutes to clear the area and make sure it’s ready for whatever you have in store.
Whether you’re looking to create a cozy reading nook or a space for entertaining friends, clearing the area is the first step towards making it happen.
Check for any branches or other debris that could get caught in the awning
When it comes to setting up your awning, one of the crucial steps is clearing the area before you start. You want to ensure that there are no branches or other debris that could potentially get caught in the awning. Imagine setting up your awning only to have it snag on a stray branch and potentially tear.
It would not only be frustrating but could also result in damage to your awning. So take a few minutes before you begin to inspect the area and remove any potential obstructions. It’s better to be safe than sorry!
Step 2: Loosen the Awning
If you want to know how to roll up your RV awning, the second step is to loosen it. Before you can start rolling it up, you need to release the tension on the awning fabric. There are a couple of ways you can do this, depending on the type of awning you have.
If you have a manual awning, you can simply use the cranking mechanism to slowly retract the fabric. Start by turning the crank in a clockwise direction until you feel the tension release. If you have an electric awning, you can use the control panel or remote to retract the fabric.
Look for the “retract” or “roll up” button and press it to initiate the process. As the fabric begins to roll up, you will notice the tension easing. This step is important because it allows the awning to be easily rolled up without any resistance or strain on the mechanism.
By loosening the awning first, you ensure a smooth and effortless rolling process. So, take the time to release the tension before moving on to the next step.
Release the tension by unlocking the awning arms or loosening the knobs
In order to release the tension and loosen the awning, you’ll need to unlock the awning arms or loosen the knobs. The tension in the awning can build up over time, especially if it has been tightly closed or rolled up for an extended period. This tension can make it difficult to open or close the awning, and it can also put strain on the arms and mechanisms.
To release the tension, you’ll need to locate the locking mechanism on the awning arms or the adjustment knobs. These are typically located near the base of the arms or on the brackets that hold the awning in place. By unlocking the arms or loosening the knobs, you’ll be able to relieve the tension and make it easier to open and close the awning.
Just be sure to follow the manufacturer’s instructions and take caution not to loosen the arms or knobs too much, as this can cause the awning to become unstable or fall out of alignment. With a little bit of effort, you’ll be able to release the tension and enjoy a smoothly functioning awning.
Pull down on the strap or handle to fully extend the awning
When it comes to enjoying the outdoors, an awning can be a great addition to your patio or deck. But before you can start relaxing under its shade, you’ll need to loosen the awning. This step is essential because it allows you to fully extend the awning, ensuring that it provides maximum coverage and protection from the sun.
To do so, simply pull down on the strap or handle that is attached to the awning. This will release the tension and allow the awning to unfurl completely. Once you’ve loosened the awning, you can then adjust it to the desired position and secure it in place.
So go ahead, give it a pull and get ready to enjoy your outdoor space in comfort and style.
Step 3: Secure the Awning
Now that you’ve successfully extended your RV awning, it’s important to know how to properly secure it to keep it in place. This step is crucial to ensure your awning doesn’t unexpectedly roll up or get damaged in the wind. To secure the awning, start by locating the support arms on either side of the awning.
These arms will have a locking mechanism or a latch that you need to engage. Simply pull the support arms down and insert the locking pins or latch them into place. This will secure the awning in its extended position and prevent it from rolling up unintentionally.
Take a moment to double-check that the awning is securely locked in place before moving on to the next step. This extra precaution will give you peace of mind knowing that your awning is properly secured and protected.
Lock the awning arms or tighten the knobs to secure the awning in place
awning arms, secure the awning, tighten the knobs Now that you have extended your awning and adjusted it to the desired angle, it’s time to make sure it stays in place. The last thing you want is for a gust of wind to come along and send your awning flying! To secure the awning, you need to lock the awning arms or tighten the knobs, depending on the type of awning you have. If your awning has arms, you will need to locate the lock mechanism.
This is usually a metal lever or latch that you can slide or rotate to lock the arms in place. Once you have found the lock, make sure it is engaged firmly. You may need to apply some pressure or use a tool, such as a screwdriver, to lock the arms securely.
If your awning has knobs, you will need to find the knobs located on the arms or brackets. These knobs are used to tighten the arms, ensuring that they stay in place. Rotate the knobs clockwise until they are tight.
It’s important not to overtighten the knobs, as this may cause damage to the awning or impede its functionality. Once you have locked the awning arms or tightened the knobs, give them a gentle tug to make sure they are secure. If anything feels loose or wobbly, double-check the lock or knob and try again.
It’s better to be safe than sorry! By following these steps, you can ensure that your awning stays securely in place, even in windy conditions. So go ahead and enjoy your outdoor space without worrying about your awning taking flight!
Make sure the awning is positioned evenly on both sides
Securing the awning properly is crucial to ensure it stays in place and doesn’t get damaged by strong winds or other weather elements. After you have positioned the awning correctly, the next step is to secure it. One important factor to consider is making sure the awning is positioned evenly on both sides.
This will not only make the awning look more aesthetically pleasing, but it will also distribute the weight evenly and provide better stability. To do this, you can use a measuring tape to ensure that the distance from the awning fabric to the ground is the same on both sides. Adjust the position of the awning as necessary until it is perfectly even.
Once you have achieved an even position, it’s time to secure the awning in place.
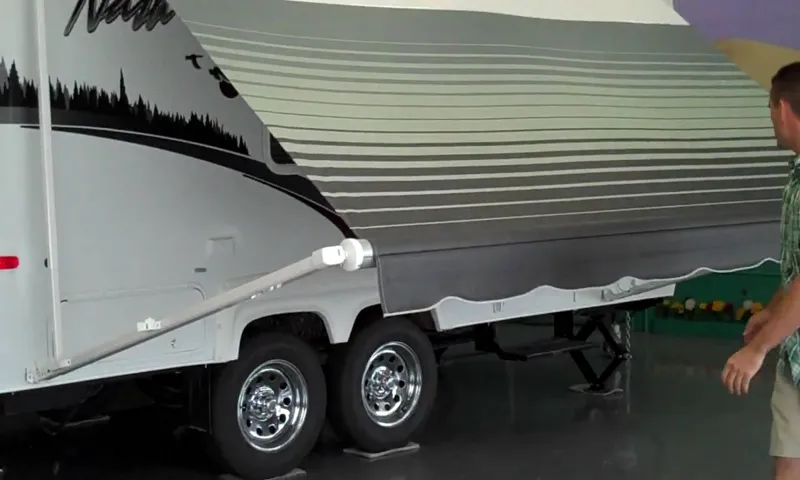
Step 4: Roll Up the Awning
After enjoying a relaxing day under your RV awning, it’s time to pack it up and hit the road. Rolling up an RV awning may seem like a daunting task, but with a little practice, it can become second nature. To start, make sure all loose items are removed from the awning and securely stowed away.
Next, release the tension on the awning by unlocking the travel locks on both sides. Slowly retract the awning by using the crank or motor, being careful not to let it snap back too quickly. As the awning rolls up, guide it with your hands to ensure it folds evenly.
Once the awning is fully retracted, secure it with adjustable straps or bungee cords to prevent it from unfurling while on the road. Remember, practice makes perfect, so don’t be discouraged if it takes a few tries to get the hang of it. Soon enough, you’ll be a pro at rolling up your RV awning and ready for your next adventure.
Start rolling up the awning by turning the crank or using the electric motor
In the previous steps, we discussed how to properly extend your awning and position it correctly. Now, it’s time to start rolling it up. This step is just as important as the others, as it will ensure that your awning is properly stored and protected when not in use.
You have two options for rolling up the awning: using a crank or an electric motor. If you have a manual awning, you can simply turn the crank to start rolling it up. This may require a little bit of effort, but it’s a simple and straightforward process.
On the other hand, if you have an electric awning, you can use the motor to roll it up with just the push of a button. This is a convenient option that saves you time and energy. Whichever method you choose, make sure to roll the awning up tight and secure, so it stays in place during transportation.
By following these steps, you’ll be able to easily roll up your awning and keep it safe until your next outdoor adventure.
Keep rolling until the awning is fully retracted and tight against the RV
When it comes to rolling up your RV awning, it’s important to take your time and do it properly to avoid any damage or mishaps. Start by making sure the awning is fully extended and locked into place. Then, use the awning rod to release the tension in the awning arms and begin rolling it up.
As you roll, make sure to keep the fabric tight against the RV to prevent any flapping or potential tears. Keep rolling until the awning is fully retracted and tight against the RV. This step is crucial in preventing any damage to the awning during travel.
By taking the time to properly roll up your awning, you can ensure it stays in good condition and ready to use for your next adventure.
Step 5: Double Check Everything
Alright, we’re at the last step of rolling up your RV awning! Before you go ahead and start rolling it up, it’s crucial to double check everything. You don’t want to find yourself in a situation where something goes wrong later on. So take a moment to inspect your awning and make sure it’s all in order.
Check for any loose screws or bolts that might need tightening. Look out for any tears or holes in the fabric that may need to be repaired. And don’t forget to ensure that the awning arms are securely locked in place.
By giving everything a once-over now, you can prevent any potential mishaps or damage down the road. So go ahead and give your awning a thorough inspection before you proceed with rolling it up.
Make sure the awning is properly locked and secured
To ensure the safety and stability of your awning, it is crucial to double-check that it is properly locked and secured. This is particularly important if you live in an area prone to strong winds or severe weather conditions. Double-checking the lock mechanism will give you peace of mind knowing that your awning will not come loose or be easily blown away by a gust of wind.
It only takes a few seconds to give it an extra tug or push to make sure it is securely in place. It is also a good idea to inspect the brackets and bolts that hold the awning in place. Make sure they are tightened and in good condition, as loose or damaged hardware can compromise the awning’s stability.
By taking these extra precautionary measures, you can enjoy your awning without worrying about it getting damaged or causing harm to your property.
Check for any tears or damage to the awning fabric
When it comes to maintaining your awning, it’s important to pay attention to any tears or damage in the fabric. This step is crucial because even a small tear can eventually lead to a larger problem if it’s not addressed. Take the time to thoroughly inspect the fabric, checking for any signs of wear and tear.
Look for frayed edges, rips, or holes that may have been caused by the elements or everyday use. If you do spot any damage, it’s important to take action right away. Depending on the severity of the tear, you may be able to repair it yourself using a patch or adhesive.
However, if the damage is extensive, it’s best to contact a professional who can properly fix the issue. By double-checking the fabric for tears or damage, you can ensure that your awning remains in proper working condition and continues to provide shade and protection for years to come.
Conclusion
In conclusion, rolling up an RV awning is like taming a wild parachute – it requires finesse, coordination, and a dash of bravery. Just like a skilled magician, you must carefully summon the awning, coax it back into its cozy cocoon, and make it disappear with the flick of a wrist. But fear not, dear adventurers, for by following this guide, you shall conquer this task with the confidence and grace of a tight-rope walker.
So go forth and conquer the unruly beast that is your RV awning, and let the world marvel at your deft skills and ingenious problem-solving. And who knows, maybe one day you’ll even join the ranks of the legendary RV awning whisperers – a rare breed known for their ability to tame the wildest of awning creatures. Happy rolling!”
Rolling up your RV awning properly can help extend its lifespan and prevent damage
“One of the most crucial steps in properly rolling up your RV awning is to double check everything before you secure it in place. This step might sound simple, but it can save you a lot of headache and potential damage in the long run. Take a few extra minutes to inspect the awning fabric, the roller tube, and the arms for any signs of wear or damage.
Look for tears, holes, or fraying in the fabric, as well as any loose or broken hardware. If you notice any issues, make note of them and address them before you roll up the awning. By taking the time to double check everything, you can ensure that your awning is in proper working order and ready for your next adventure.
“
Regular maintenance and cleaning are also important for keeping your awning in good condition
Regular maintenance and cleaning are essential to keeping your awning in good condition and prolonging its lifespan. After you have taken the time to inspect and repair any damages, it is important to double-check everything to ensure that your awning is functioning properly and securely in place. This includes making sure that all bolts and screws are tightened, and that the fabric is stretched evenly across the frame.
Take the time to wipe down the awning with a mild soap solution and rinse thoroughly to remove any dirt or debris that may have accumulated. It is also a good idea to inspect the retractable arms and make sure they are functioning smoothly. By conducting these routine checks and maintenance tasks, you can ensure that your awning will continue to provide shade and protection for years to come.
FAQs
How do I roll up my RV awning?
To roll up your RV awning, start by retracting any support arms or legs. Then, use the awning’s crank handle to slowly roll up the fabric. Make sure to keep tension on the fabric as you roll it up to ensure a tight and secure fit. Finally, secure the rolled-up awning with the necessary latches or straps.
Can I roll up my RV awning in bad weather?
It is generally not recommended to roll up your RV awning in bad weather conditions such as high winds or heavy rain. The awning may get damaged or cause damage to your RV if subjected to these conditions. It’s best to leave the awning extended until the bad weather passes or take it down completely if necessary.
How often should I clean my RV awning before rolling it up?
It’s a good idea to regularly clean your RV awning to prevent dirt, debris, and mildew from building up. Ideally, you should clean it at least once a month or more frequently if you notice any visible dirt or stains. Cleaning the awning before rolling it up ensures that you don’t trap any dirt or moisture, which can lead to damage or unpleasant odors.
What should I do if my RV awning won’t roll up?
If your RV awning is not rolling up properly, there could be a few possible issues. First, check that there are no obstructions preventing the awning from rolling up smoothly. Also, make sure that all support arms or legs are fully retracted. If the awning still won’t roll up, check the tension adjustments or consult the awning’s manual for troubleshooting tips.
How do I maintain the fabric on my RV awning?
To maintain the fabric on your RV awning, regularly remove any dirt or debris by using a soft brush or broom. Avoid scrubbing too vigorously to prevent damage. If there are any stains, use a mild soap or awning cleaner to gently spot clean the affected areas. It’s also a good practice to inspect the fabric for any tears or wear and have them repaired promptly.
Can I roll up my RV awning when it’s wet?
It is generally not recommended to roll up a wet RV awning. Moisture trapped inside the rolled-up awning can lead to mold and mildew growth, which can cause damage and unpleasant odors. If your awning gets wet, it’s best to leave it extended until it dries completely. If necessary, there are awning drying kits available that can help speed up the drying process.
How do I secure my rolled-up RV awning for travel?
When preparing your RV for travel, it’s important to secure the rolled-up awning properly to prevent it from unfurling while on the road. Most RV awnings have latches or straps that you can use to secure the rolled-up fabric to the awning arms or the side of the RV. Make sure to follow the manufacturer’s instructions for securing the awning, as each model may have slightly different methods.