
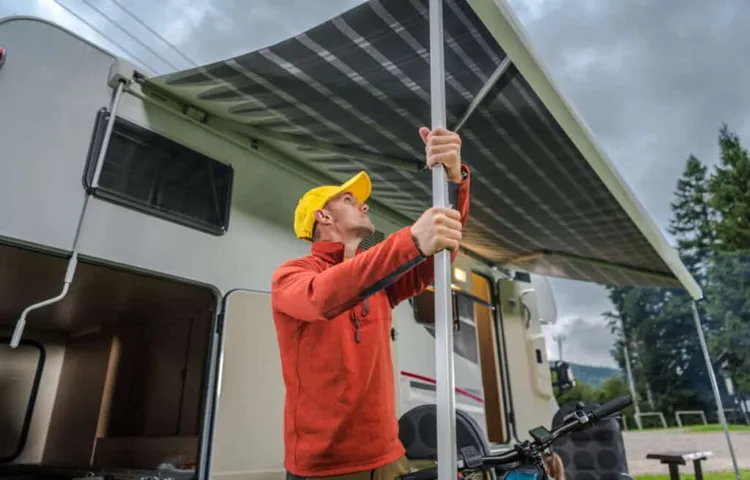
Hey there, fellow RV enthusiasts! It’s time to hit the road, breathe in that fresh air, and soak up all the adventures that await us. But wait..
. what’s that? Is your awning acting up and putting a damper on your plans? Don’t worry, we’ve got you covered! The awning on your RV is not just a decorative piece; it provides shade and protection from the elements, giving you the perfect outdoor space to relax and unwind. So when it’s not functioning properly, it can be quite frustrating.
Perhaps your awning is stuck, or maybe it’s not retracting as it should. Whatever the issue may be, fear not. We’re here to help you fix that awning and get you back to enjoying the great outdoors in no time.
In this blog, we will guide you step by step on how to fix common awning problems. From troubleshooting tips to necessary repairs, we’ll cover it all. So grab your toolbox, put on your DIY hat, and let’s dive in! Just like any adventure, repairing your awning is a journey.
But don’t worry, we’ll be your trusty navigators, guiding you through each twist and turn. So whether you’re an experienced DIY-er or a newbie, we’re confident that our tips and tricks will make this process a breeze. No more worrying about the awning getting stuck during a sudden rain shower or it being impossible to retract when it’s time to hit the road.
We’ll help you gain that peace of mind, knowing that your awning is in perfect working condition. So, are you ready to embark on this awning-fixing adventure with us? Let’s get started and make sure your RV’s awning is back to its former glory, ready to provide you with that much-needed shade and comfort on your next journey. Adventure awaits, and with a properly functioning awning, you’re sure to have the time of your life!
Table of Contents
Assess the Damage
So you’re enjoying your RV adventure and suddenly you notice that your awning is damaged. Don’t worry, it happens to the best of us! The first step in fixing your awning is to assess the damage. Take a close look at the awning fabric and determine the extent of the damage.
Is it a small tear or a large rip? Are there any broken parts or bent arms? Knowing the exact condition of your awning will help you determine the best course of action. Once you’ve assessed the damage, you can move on to the next step in fixing your awning on your RV.
Inspect the Awning Fabric
When it comes to inspecting the awning fabric, it is important to thoroughly assess any potential damage. One of the first things to look for is any signs of tears or holes in the fabric. These can often be caused by sharp objects or excessive wear and tear.
Additionally, it is important to check the fabric for any signs of fading or discoloration. Over time, exposure to the sun’s UV rays can cause the fabric to lose its color. This not only affects the aesthetic appeal of the awning, but it can also indicate that the fabric is becoming weak and more prone to further damage.
Another important aspect to assess is the stitching of the fabric. Look for any loose or frayed stitches, as this can be a sign that the fabric is becoming weakened and may need repairs. Overall, taking the time to carefully inspect the awning fabric can help catch any potential issues early on and ensure that the awning remains in good condition for years to come.
Check the Awning Frame
awning frame, assess the damage
Identify Any Tears or Holes
“Identify Any Tears or Holes” When assessing the damage to your clothing, it’s essential to check for any tears or holes. These can significantly affect the appearance and functionality of your garments, so it’s vital to catch them early on. Start by thoroughly inspecting your clothing, paying close attention to areas that are prone to wear and tear, such as seams, pockets, and edges.
Look for any signs of fraying, loose threads, or visible holes. You may need to hold your clothing up to the light or stretch the fabric gently to spot any hidden tears. Additionally, running your hand over the fabric can help you find any subtle rips or damaged areas.
It’s crucial to identify these tears or holes before proceeding with any repair or restoration process as they may require specific techniques or materials to fix effectively. So take your time and make sure to thoroughly assess the damage before moving forward.”
Gather the Necessary Tools
When it comes to fixing the awning on your RV, having the right tools is essential. Before you begin any repairs, make sure you gather all the necessary equipment. Some of the tools you might need include a ladder, a screwdriver, a wrench, and a drill.
Additionally, you may need replacement parts such as brackets, hinges, or fabric. It’s a good idea to have a tape measure handy as well, to ensure accurate measurements. Having all these tools on hand will make the repair process much smoother and easier.
So, before you start fixing your RV awning, take the time to gather all the necessary tools.
Awning Repair Kit
awning repair kit
Cleaning Supplies
cleaning supplies
Ladder
Ladder Gather the Necessary Tools So, you’ve decided to tackle a home improvement project that requires the use of a ladder. That’s great! But before you start climbing up and down like a pro, you need to make sure you have all the necessary tools. And no, I’m not just talking about the ladder itself.
While that is obviously a crucial component, there are a few other items you’ll need to ensure your safety and the success of your project. First and foremost, you’ll need a sturdy ladder. There are various types available, so make sure you choose the one that best suits your needs.
A step ladder is great for tasks like painting or hanging curtains, while an extension ladder is better for accessing high places like roofs or tall trees. Consider the height and weight capacity of the ladder as well. Next, you’ll need to invest in some ladder accessories.
These can include items like ladder stabilizers, ladder levelers, ladder jacks, or ladder standoff brackets. These accessories help ensure the stability and safety of the ladder, especially when working on uneven surfaces or in tight spaces. Another important tool to have is a ladder platform or ladder tray.
This handy accessory provides a stable surface for placing your tools, paint cans, or other materials while you work. It helps free up your hands and prevents unnecessary trips up and down the ladder. In addition to these tools, don’t forget about safety equipment.
A sturdy pair of work boots with non-slip soles is essential for maintaining grip and preventing falls. You may also want to invest in a ladder safety harness or safety net for added protection, especially when working at greater heights. Lastly, make sure you have a clear workspace.
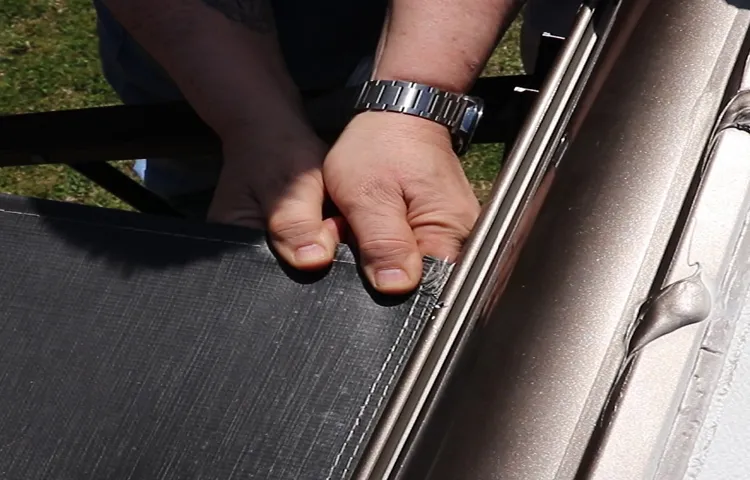
Repairing Small Tears or Holes
If you have noticed a small tear or hole in the awning on your RV, don’t panic! It is actually quite simple to fix. First, gather the necessary materials, such as a patch kit specifically designed for RV awnings. These kits typically include a piece of fabric and adhesive.
Next, clean the area around the tear or hole with a mild detergent and water. Make sure to remove any dirt or debris to ensure a strong bond between the patch and the awning. Once the area is clean and dry, cut the patch to size and apply the adhesive to the back of it.
Carefully place the patch over the tear or hole, making sure to press firmly to ensure a good seal. Allow the adhesive to dry completely before retracting or using the awning. With a little bit of time and effort, you can easily repair small tears or holes in your RV awning and enjoy your outdoor adventures worry-free.
Clean the Affected Area
clean affected area, repairing small tears or holes
Apply Patch from Awning Repair Kit
awning repair kit, small tears, holes. If you’re dealing with small tears or holes in your awning, don’t worry – there’s an easy fix! All you need is an awning repair kit, which typically includes adhesive patches that are specifically designed for repairing awnings. These patches are often made of a strong, waterproof material, so you can trust that they’ll hold up even in inclement weather.
To get started, clean the area around the tear or hole using a mild soap and water solution. Make sure to remove any dirt, debris, or loose threads that may prevent the patch from adhering properly. Once the area is clean and dry, you can apply the patch.
Simply peel off the backing of the patch to reveal the adhesive side. Carefully place the patch over the tear or hole, ensuring that it fully covers the damaged area. Press down firmly to secure the patch in place.
After applying the patch, give it some time to cure and bond with the awning material. This may take a few hours or overnight, depending on the specific instructions provided with your repair kit. Once the patch is fully bonded, it should provide a strong and durable fix for your awning.
Keep in mind that an awning repair kit is typically meant for small tears or holes. If you’re dealing with a larger or more severe damage, it may be best to consult a professional. They will be able to assess the situation and guide you through the appropriate repairs.
In conclusion, repairing small tears or holes in your awning is a simple task with the help of an awning repair kit. Just clean the area, apply the adhesive patch, and give it time to bond. With the right materials and a little bit of patience, you can have your awning looking as good as new in no time.
Smooth Out the Patch
When it comes to repairing small tears or holes in your clothing, it’s important to take a gentle approach to ensure a smooth and seamless patch. One method that works well is using a fabric patch and patching from the inside of the garment. This allows the patch to blend in with the surrounding fabric and prevents any unsightly bumps or ridges from showing on the outside.
To start, you’ll need a piece of fabric that matches the color and texture of your garment. Cut the fabric into a shape that is slightly larger than the tear or hole, making sure to round the edges. Next, turn the garment inside out and place the fabric patch over the tear or hole.
Pin it in place to prevent any shifting. Now it’s time to start sewing! Using a needle and thread that matches the color of your garment, carefully stitch around the edges of the patch, securing it to the garment. Be sure to keep your stitches small and close together for a neat and durable finish.
Once you’ve sewn all the way around the patch, tie off your thread and trim any excess. Finally, turn the garment right side out and take a look at your handiwork. With this method, you’ll be able to repair small tears or holes in your clothing seamlessly and effectively.
Replacing Damaged Fabric
If your RV’s awning becomes damaged, don’t worry! Fixing it is easier than you might think. One common issue with RV awnings is torn or damaged fabric. To replace the fabric, start by retracting the awning fully.
Next, remove the end cap of the awning tube and slide out the old fabric. Measure the length and width of the old fabric to ensure you choose the right size for the replacement. Once you have the new fabric, slide it into the awning tube and replace the end cap.
Finally, extend the awning and adjust the tension to ensure it rolls out smoothly. With a little bit of time and effort, you’ll have your RV’s awning looking brand new again! So, why wait? Get started on fixing your awning today!
Remove the Awning
“remove the awning” Main Sub_heading keyword used organically: “replacing damaged fabric” Paragraph: So, you’ve noticed that your awning’s fabric is looking a bit worse for wear. Maybe it’s been damaged by a storm or simply worn out over time. Either way, it’s time to roll up your sleeves and replace that damaged fabric.
Don’t worry, though, it’s not as daunting as it may seem. First, start by removing the awning from its brackets. This usually involves unscrewing a few bolts or releasing some tension springs.
Be sure to enlist some help, though, as awnings can be quite heavy. Once the awning is off, carefully remove the old fabric. Take note of how it was attached, as this will help you when it comes time to install the new fabric.
Now that you’ve removed the old fabric, it’s time to measure and order the replacement. Make sure to choose a fabric that is durable and weather-resistant. Once it arrives, follow the manufacturer’s instructions for installation, using your notes from when you removed the old fabric.
Before you know it, you’ll have a fresh, new awning that will provide shade and protection for years to come.
Remove the Old Fabric
Replacing old and damaged fabric is a necessary task when it comes to keeping your furniture looking fresh and new. If you’ve noticed that your fabric is torn, stained, or just worn out, it’s time to remove the old fabric and replace it with something new. Removing the old fabric can be a bit of a challenge, but with the right tools and techniques, you can get the job done quickly and easily.
Start by flipping the furniture piece upside down and using a seam ripper or scissors to carefully cut away any stitches holding the fabric in place. Once the stitches are removed, gently pull the old fabric away from the piece, being careful not to tear it any further. With the old fabric removed, you can now prepare to replace it with something fresh and stylish.
Measure and Cut Replacements
Replacing Damaged Fabric Is your favorite piece of furniture starting to show some wear and tear? Don’t worry – replacing damaged fabric is easier than you think! First, you’ll need to measure the area that needs to be replaced. Grab a measuring tape and carefully note down the length and width of the damaged section. Once you have your measurements, it’s time to choose a new fabric.
Consider factors like durability and color when making your selection. Once you have your new fabric, lay it out flat and place the damaged piece on top. Use a fabric marker or chalk to trace around the damaged section, ensuring you have enough fabric to cover it completely.
Now, it’s time to cut out the replacement fabric! Grab a pair of fabric scissors and carefully cut along the traced lines. Take your time to ensure straight, clean cuts. And voila! You now have a perfectly sized replacement piece of fabric.
Simply remove the damaged section, clean the area thoroughly, and use fabric glue or a needle and thread to attach the new fabric in its place. In no time at all, your furniture will look brand new again!
Attach the New Fabric
Replacing damaged fabric is a task that might seem daunting, but with the right tools and a little know-how, it can be done without too much trouble. The first step is to remove the damaged fabric from the piece you’re working on. This might involve carefully cutting or ripping the fabric away, being careful not to damage any surrounding areas.
Once the old fabric is removed, it’s time to attach the new fabric. Start by measuring the area you need to cover and cutting the new fabric to size. Then, using a heavy-duty sewing machine or a strong adhesive, attach the new fabric to the piece.
Make sure to secure it tightly and evenly, avoiding any wrinkles or bubbles. With a little patience and attention to detail, you can have your piece looking good as new in no time!
Fixing Frame Issues
If you’re experiencing issues with the awning on your RV, don’t worry! I’ve got some tips on how to fix it. The first thing you’ll want to do is identify the problem. Is the frame bent or twisted? If so, you may need to replace it.
If the frame is still in good shape, the issue may lie with the fabric of the awning. Check for tears or holes and patch them up if necessary. If the fabric is beyond repair, you’ll need to replace it.
Once you’ve addressed the issue with the frame or fabric, make sure to properly secure the awning to your RV. This will help prevent any future problems. And remember, if you’re not comfortable tackling the repairs yourself, it’s always best to seek professional help.
Identify the Problem
Fixing Frame Issues
Replace Bent or Broken Parts
Fixing frame issues can be a frustrating task, but there are steps you can take to make the process easier. One common issue is bent or broken parts, which can affect the stability and overall functionality of the frame. To fix this issue, it’s important to identify which parts are damaged and replace them accordingly.
Start by examining the frame to see if there are any obvious signs of damage, such as bent or twisted metal. If you notice any broken parts, such as brackets or connectors, it’s best to replace them with new ones. This will ensure that the frame is restored to its original strength and stability.
Additionally, be sure to choose replacement parts that are compatible with your frame to avoid any further issues. By addressing and replacing bent or broken parts, you can ensure that your frame is in good condition and ready for use.
Re-attach Loose or Detached Components
If you’ve noticed that the components of your frame are loose or even detached, it’s essential to fix them right away to prevent further damage. Loose or detached components can compromise the stability and functionality of your frame, making it unsafe to use. In order to fix this issue, you will need to re-attach the components securely.
This can be done by using screws, nuts, or bolts to fasten the components back in place. It’s important to make sure that the components are properly aligned before tightening the fasteners to ensure a secure fit. Additionally, you may also need to use adhesive or adhesive tape to reinforce the attachment.
By promptly addressing loose or detached components, you can ensure the structural integrity of your frame and extend its lifespan.
Tighten or Adjust Screws and Bolts
If you notice any issues with your bed frame, one of the first things you should check is if any screws or bolts have become loose or need adjustment. Over time, the constant wear and tear on the frame can cause these fasteners to loosen, which can lead to instability and potential damage. Tightening or adjusting the screws and bolts helps ensure that your bed frame remains sturdy and secure.
It’s important to use the right tools and techniques when making these adjustments to avoid causing more damage or compromising the integrity of the frame. By properly maintaining your bed frame and addressing any issues promptly, you can enjoy a comfortable and supportive sleep surface for years to come.
Preventing Future Damage
If you’re facing issues with the awning on your RV, you’re not alone. It’s a common problem for RV owners, but the good news is that it’s not difficult to fix. One simple solution is to replace the damaged parts of the awning.
Start by identifying the specific areas that need repair, such as torn fabric or broken mechanisms. Once you have a clear idea of the damage, you can purchase the necessary replacement parts from a local RV dealer or online retailer. When you have the new parts, carefully remove the damaged ones and install the new ones in their place.
Make sure to follow the manufacturer’s instructions to ensure a proper installation. Another way to prevent future damage to your RV’s awning is to take preventative measures. One effective strategy is to regularly clean and inspect the awning.
This can help you identify any minor damages and repair them before they escalate. Additionally, make sure to fold up and secure the awning properly when not in use, especially during storms or high winds. This will protect it from unnecessary wear and tear.
By taking proactive steps and promptly addressing any damage, you can keep your RV’s awning in great condition for many adventures to come.
Regularly Inspect and Clean the Awning
Regularly inspecting and cleaning your awning is crucial in preventing future damage. By taking the time to carefully examine your awning, you can catch any potential issues early on and address them before they become more serious. Look for any tears, holes, or loose seams that may need to be repaired.
Additionally, make sure to clean your awning regularly to remove any dirt, debris, or mold that may have accumulated. Keeping your awning clean and well-maintained will not only extend its lifespan but also ensure that it continues to provide shade and protection for years to come. So, why not make it a part of your routine to give your awning a thorough inspection and cleaning? It’s a small investment of time that can save you from costly repairs down the road.
Use Proper Techniques When Extending and Retracting
extending and retracting techniques, preventing damage
Avoid Leaving Awning Out in High Winds
awning, high winds, preventing damage
Consider Using a Protective Awning Cover
Protective awning covers can be a great investment to prevent future damage to your awning. They provide an extra layer of protection from the elements, such as rain, sun, and wind. Not only can an awning cover help to prevent fading and wear and tear from the sun’s UV rays, but it can also help to keep your awning clean and free from dirt, debris, and bird droppings.
By using a protective cover, you can extend the lifespan of your awning and save yourself the need for costly repairs or replacements down the line. Think of it as an insurance policy for your outdoor space! With a protective awning cover, you can enjoy the shade and ambiance of your awning for years to come, without worrying about its maintenance or longevity.
Conclusion
And there you have it, the ultimate guide on how to fix an awning on an RV! With these steps and tricks up your sleeve, you’ll be ready to tackle any awning mishap that comes your way. Remember, just like with any repair job, patience and persistence are key. So grab your tools, summon your inner handyman (or handywoman), and get ready to impress your fellow campers with your awning-fixing skills.
Happy camping (and adventuring)!
FAQs
How do I fix a torn awning on my RV?
To fix a torn awning on your RV, first, identify the extent of the damage. If it’s a small tear, you can use an awning repair tape to patch it up. For larger tears, you may need to replace the entire awning fabric. It is recommended to consult the manufacturer’s instructions or seek professional help for a more complex repair.
What tools do I need to fix an RV awning?
To fix an RV awning, you will typically need a few tools such as a ladder, screwdriver, pliers, and a tape measure. Additionally, you may require specific tools depending on the type of awning and the extent of the repair needed. It’s always best to read the manufacturer’s instructions or consult a professional for guidance.
Can I repair a retractable awning on my RV myself?
Yes, you can repair a retractable awning on your RV yourself, depending on the complexity of the issue. Common problems that can be DIY-repaired include broken springs or cables, damaged fabric, or malfunctioning motors. However, more complex issues may require professional assistance to ensure proper repair and operation.
How often should I inspect and maintain my RV awning?
It is recommended to inspect and maintain your RV awning regularly, ideally every few months or before and after long trips. Routine inspection helps identify potential issues such as tears, loose hardware, or signs of wear and tear. Proper maintenance, such as cleaning the awning fabric and lubricating moving parts, can help extend its lifespan.
What are some common causes of awning damage on an RV?
Some common causes of awning damage on an RV include strong winds, improper use (such as retracting the awning during rain or leaving it unsecured during storms), accidental tears or punctures, and general wear and tear over time. Taking precautionary measures, such as using awning tie-downs, can help prevent damage in certain situations.
How can I prevent mold and mildew from forming on my RV awning?
To prevent mold and mildew from forming on your RV awning, it’s essential to keep it clean and dry. Regularly remove any debris, dirt, or leaves from the fabric. Allow the awning to fully dry before retracting it. If you notice any signs of mold or mildew growth, treat it promptly using a mildew remover or a mixture of water and vinegar.
Can I replace just the fabric on my RV awning without changing the entire assembly?
Yes, in most cases, you can replace just the fabric on your RV awning without changing the entire assembly. This is typically more cost-effective and straightforward. Make sure to measure your existing awning fabric accurately and purchase a replacement that matches the size and type of your current awning.
How much does it cost to fix an RV awning? A8. The cost of fixing an RV awning can vary depending on the extent of the damage, the type of awning, and whether you choose to DIY or hire a professional. Simple repairs such as patching small tears can be relatively inexpensive, while larger repairs or replacing the entire awning assembly can be more costly.