
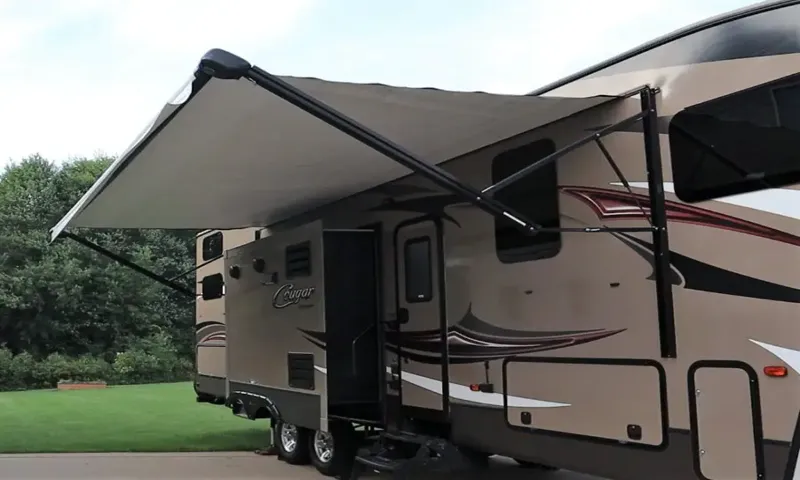
Are you looking to replace your RV awning but dreading the thought of having to remove those pesky rivets? Well, I’ve got good news for you! There’s a way to replace your RV awning without having to mess with those stubborn rivets. In this blog post, I’m going to show you exactly how to do it. RV awnings are a great addition to any camper or motorhome.
They provide shade and protection from the elements, allowing you to enjoy the great outdoors in comfort. However, over time, awnings can become worn out or damaged, and eventually, they will need to be replaced. Typically, replacing an RV awning involves removing the old awning fabric from the frame, which is usually secured with rivets.
This can be a time-consuming and frustrating process, especially if you don’t have the right tools or experience. But fear not! There is a simpler way to replace your RV awning without removing the rivets. Instead of removing the old fabric, you can simply slide the new fabric into the existing track on the awning roller.
This method is much quicker and easier, and it doesn’t require any special tools or skills. To replace your RV awning without removing rivets, start by measuring the dimensions of your existing awning fabric. This will ensure that you purchase the correct size replacement fabric.
Once you have the new fabric, unroll it and slide it into the track on the awning roller. Make sure that it is centered and evenly aligned. Next, carefully roll up the new fabric, making sure that it is smooth and taut.
Once the fabric is rolled up, secure it in place using the retaining clips or straps provided with the awning. These clips or straps will hold the fabric in place and prevent it from unfurling while you’re on the road. And that’s it! You’ve successfully replaced your RV awning without having to remove any rivets.
Introduction
If you’re looking to replace your RV awning but don’t want to go through the hassle of removing rivets, we’ve got you covered. Luckily, there’s a method to replace your RV awning without having to mess with those pesky rivets. The first step is to measure the size of your current awning so you can purchase a replacement that fits perfectly.
Next, locate the screws that hold the awning fabric in place. Unscrew these screws and carefully remove the old fabric. Once the old fabric is removed, you can then slide in the new awning fabric into the existing track.
Make sure it’s evenly placed and then screw it in place using the existing holes. This method allows you to replace your RV awning without the need to remove the rivets, saving you time and effort. Now you can enjoy a fresh and new awning without the headache of dealing with rivets!
Explanation of why someone would want to replace an RV awning without removing rivets
“Why would someone want to replace an RV awning without removing rivets?” Introduction: Many RV owners might find themselves in a situation where they need to replace their awning but don’t want to go through the hassle of removing rivets. Whether it’s due to a lack of tools or expertise, or simply a desire for a more convenient solution, there are valid reasons why someone would choose to replace an RV awning without removing rivets. In this article, we will explore some of these reasons and discuss alternative methods that can be used to replace an RV awning without removing rivets.
Benefits of replacing an RV awning without removing rivets
“RV awnings are a great addition to any recreational vehicle, providing shade and protection from the elements. However, over time, these awnings may become worn out or damaged and need to be replaced. The traditional method of replacing an RV awning involves removing a series of rivets, which can be time-consuming and labor-intensive.
But did you know that there is a way to replace an RV awning without having to remove any rivets? This method offers several benefits and can save you both time and energy. In this blog post, we will explore the advantages of replacing an RV awning without removing rivets and why it may be the best option for you.”
Overview of the process
“loan application process” In today’s fast-paced world, securing a loan has become an essential part of financial planning for many individuals. Whether it’s for buying a dream home, starting a business, or going on a well-deserved vacation, the loan application process can seem overwhelming at first. However, with the right knowledge and preparation, it can be a smooth and hassle-free experience.
The loan application process typically involves several steps, starting with gathering all the necessary documents and filling out an application form. Once the application is submitted, the lender will review it and assess your creditworthiness by considering factors such as your income, credit score, and existing debts. If approved, the lender will then determine the loan amount, interest rate, and repayment terms.
Finally, you will be required to sign the loan agreement and receive the funds. By understanding the loan application process and being prepared, you can increase your chances of obtaining the loan you need.”
Tools and Materials Needed
When it comes to replacing an RV awning without removing rivets, you’ll need a few essential tools and materials to get the job done. First, you’ll need a new awning fabric, which can be purchased from an RV dealership or online. Make sure to get the appropriate size for your specific RV model.
Additionally, you’ll need a ladder to safely reach the awning area and to remove the old fabric. A power drill will come in handy for removing any screws or brackets that are holding the old fabric in place. You may also need a screwdriver or socket set for any additional fasteners.
Finally, it’s always a good idea to have some extra screws, brackets, and sealant on hand in case any are damaged or need to be replaced during the installation process. With these tools and materials at the ready, you’ll be well-prepared to replace your RV awning without the need to remove any rivets.
List of tools required for replacing an RV awning without removing rivets
“RV awning replacement tools” When it comes to replacing an RV awning without removing rivets, there are certain tools and materials you’ll need to have on hand. First and foremost, you’ll need a replacement awning fabric that is the correct size and style for your RV. It’s important to measure your existing awning carefully to ensure that you purchase the right replacement.
In addition to the replacement fabric, you’ll also need a few tools to assist you in the installation process. One essential tool is a ladder or step stool that you can use to reach the awning and work comfortably. A drill with the appropriate size drill bit is also necessary for removing and installing screws.
To hold the awning securely in place, you’ll need a few ratchet straps or bungee cords. These can be used to secure the awning fabric to the RV while you work on attaching it. Other tools that may come in handy during the replacement process include a utility knife for cutting the old fabric away, a tape measure for ensuring accurate placement, and a wrench or socket set for tightening any screws or bolts.
It’s important to have all of these tools and materials readily available before you start the replacement process. By being prepared, you can ensure a smoother and more efficient awning replacement without the need to remove rivets.
List of materials required for replacing an RV awning without removing rivets
“To replace an RV awning without removing rivets, you’ll need the right tools and materials. Firstly, you’ll need a replacement awning fabric. Make sure to measure your existing awning to ensure you get the right size.
You’ll also need a ladder or step stool to reach the awning, as well as safety glasses to protect your eyes. A power drill with a screwdriver bit will come in handy for removing the screws holding the old fabric in place. You’ll also need new screws or rivets to secure the replacement fabric.
Additionally, a rubber mallet can be useful for gently tapping the awning rail back into place. Lastly, be sure to have a helper on hand to assist you with the installation process. With the right tools and materials, replacing your RV awning can be a straightforward task that will have your outdoor space looking brand new in no time.
“
Step-by-Step Guide
If you’re looking to replace your RV awning without removing the rivets, don’t worry; it can be done. Here’s a step-by-step guide to help you through the process. First, start by extending your existing awning to its full length.
This will ensure that you have enough space to work with. Next, locate the hinges or screws that hold the fabric to the roller tube. Remove these, taking care not to damage the fabric or the roller tube in the process.
Once the fabric is detached from the roller tube, carefully remove it from the awning arms. Again, take your time to avoid any unnecessary damage. Now it’s time to install the new awning fabric.
Begin by attaching the fabric to the awning arms, making sure it is centered and evenly stretched. Secure the fabric in place using the hinges or screws that you previously removed. Finally, reattach the fabric to the roller tube, making sure it is aligned properly.
Secure it in place, and then test the awning to ensure it operates smoothly. By following these simple steps, you can replace your RV awning without removing the rivets. This will save you time and effort, allowing you to enjoy your RV adventures without any hassle.
Step 1: Prepare the RV and Awning
RV, awning, prepare, step-by-step guide
Step 2: Release the Tension on the Awning Fabric
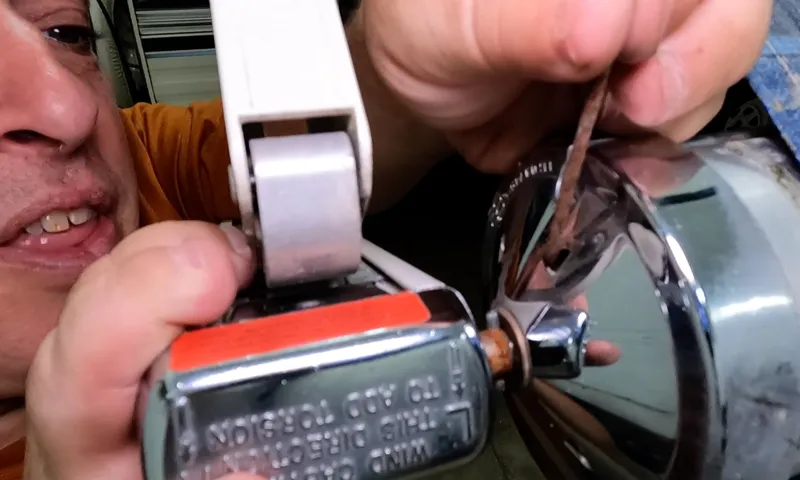
To release the tension on the awning fabric, you will need to follow a few simple steps. First, locate the tensioning knobs on either side of the awning. These knobs are usually found near the ends of the roller tube.
Begin by turning the knobs counterclockwise to release the tension. You may need to use a wrench or pliers to help you turn the knobs if they are difficult to move. As you turn the knobs, you will feel the tension in the fabric gradually lessen.
Continue turning until you feel that the fabric is loose enough to work with. It’s important to release the tension slowly to prevent any sudden movements or damage to the fabric. Once you have released the tension, you can move on to the next step in the awning maintenance process.
Step 3: Remove the Vinyl or Fabric from the Roller Tube
In the third step of removing the vinyl or fabric from the roller tube, you will need to carefully peel back the material from the tube. Start by locating the edge of the vinyl or fabric and gently pull it away from the tube. Take your time and be cautious not to rip or tear the material.
If you come across any areas that are stuck or glued down, gently use a scraper or putty knife to separate it from the roller tube. Once you have removed the material from the entire length of the roller tube, you can set it aside for cleaning or disposal. Taking your time and being cautious during this step will help ensure that you successfully remove the vinyl or fabric without causing any damage.
Step 4: Replace the Awning Fabric
awning fabric replacement. Now that you have safely removed the old awning fabric, it’s time to move on to the exciting part – replacing it! This step-by-step guide will walk you through the process of replacing your awning fabric, so grab your supplies and let’s get started. First, take a good look at your new awning fabric.
Ensure that it matches the size and color of your old fabric, as well as any specific features you may want, such as waterproofing or UV protection. Double-check everything before proceeding to save yourself any hassle later on. Next, carefully position the new fabric onto the awning frame.
Start by aligning one end of the fabric with the roller tube and then work your way across, stretching it out to the opposite end. Use clamps or clips to hold the fabric in place temporarily. Once the fabric is secure, it’s time to attach it to the roller tube.
Start by inserting one end of the fabric into the groove or slot on the tube. Use a fabric cord or rope to help guide it through if needed. Slowly roll the fabric onto the tube, making sure it stays taut and properly aligned.
Once the fabric is rolled onto the tube, secure it in place using the appropriate fasteners or attachments as specified by your awning manufacturer. This can typically be done using screws, bolts, or clips. Make sure to follow the instructions provided by the manufacturer to ensure a proper and secure installation.
Lastly, check the tension of the fabric. It should be taut but not overly tight, as this can cause stress on the fabric and potentially lead to damage. Adjust the tension if necessary by loosening or tightening the fasteners on the roller tube.
Step 5: Reattach the Awning Fabric to the Roller Tube
Now that you have removed the awning fabric from the roller tube, it’s time to reattach it. This step is crucial in getting your awning back in working order. First, take the awning fabric and align it with the roller tube.
You want to make sure the fabric is centered and evenly distributed across the length of the roller tube. Once you have it in the right position, you can attach it with the help of the awning rail. Carefully slide the awning fabric into the awning rail, making sure it is securely held in place.
It may take some finesse to get it to fit properly, but with patience and a little bit of effort, you’ll be able to get it in place. Once the awning fabric is in the rail, you can start rolling it up onto the roller tube. Use the awning crank or motor to slowly and evenly roll up the fabric.
Make sure to keep it taut as you roll it up to prevent any sagging or wrinkles. As you roll up the awning fabric, double-check that it is still aligned properly and evenly distributed across the roller tube. Adjust as necessary to ensure a tight and secure fit.
Once the fabric is fully rolled up onto the roller tube, you can secure it in place. Some awnings have a locking mechanism that will hold the fabric in place, while others may require you to manually secure it with straps or buckles. Follow the manufacturer’s instructions for your specific awning model.
With the awning fabric securely reattached to the roller tube, your awning is now ready for use again. Enjoy the shade and protection it provides!
Step 6: Test the Awning Operation
adjusting awnings for optimal performance. After following the previous steps to install and adjust your awning, it’s time to test its operation to ensure everything is working smoothly. Start by retracting the awning completely and then extend it fully.
Observe the movement of the awning as it opens and closes, making note of any areas where it seems to stick or bind. This could be an indication that the awning needs further adjustment. Next, adjust the pitch of the awning by tilting it slightly downwards to allow for proper water runoff.
This will help prevent water from pooling and potentially damaging the awning fabric. Finally, test the awning’s ability to withstand wind gusts by gently pushing on the extended awning from different directions. It should feel sturdy and secure.
If any issues are detected during the testing process, refer back to the previous steps to make necessary adjustments. With these final tests complete, your awning should be ready to provide shade and protection for years to come.
Conclusion
So there you have it, folks – the secret to replacing your RV awning without removing any rivets. Not only is this method practical and efficient, but it also saves you precious time and effort. It’s like having your RV cake and eating it too! By using this clever technique, you’ll be able to breeze through the replacement process with ease, while maintaining the structural integrity of your awning.
No need to deal with tedious rivet removal or the headache of searching for replacements – simply unzip, remove, and reattach! Just remember, as with any RV DIY project, safety first! Make sure to take the necessary precautions, have the right tools on hand, and seek professional assistance if needed. And of course, don’t forget to enjoy the satisfaction of a job well done, as your newly replaced awning adds a touch of elegance and functionality to your beloved RV. So go ahead, fellow adventure-seekers, and tackle that awning replacement with confidence.
With this witty and clever method under your belt, you’ll be the envy of every campsite, impressing fellow RVers left and right. And who knows, you might just inspire a whole new generation of awning-replacing aficionados! Happy awning replacing, and may all your RV adventures be shady and stylish!”
Summary of the benefits and process of replacing an RV awning without removing rivets
RV awning replacement, replacing an RV awning without removing rivets Replacing an RV awning can be a daunting task, but it doesn’t have to involve removing rivets. In fact, there are steps you can take to replace the awning without the need for any rivet removal. To start, you’ll need to gather the necessary tools and materials, including a new awning fabric, a drill with metal-cutting bits, pop rivets, a rivet gun, a screwdriver, and a ladder.
Once you have everything you need, you can begin the process. First, extend the awning fully and secure it in place. This will allow you to work on the fabric more easily.
Next, use a drill to remove any screws that are securing the fabric to the RV frame. Be careful not to damage the fabric or frame during this step. Once the fabric is free from the frame, carefully remove it from the RV.
Take note of how it is attached and any areas that may need repair or reinforcement. Now that the old fabric is removed, you can begin installing the new awning. Start by aligning the new fabric with the frame and ensuring it is centered.
Use the pop rivets and rivet gun to secure the fabric in place. After the new fabric is securely attached, test the function of the awning by extending and retracting it a few times to ensure it operates smoothly. With these simple steps, you can replace your RV awning without the need to remove any rivets.
Not only will this save you time and effort, but it will also prevent any potential damage to the RV frame. So, why wait? Get started on replacing your RV awning today!
Closing thoughts and final tips
In conclusion, constructing a well-optimized website is essential for driving traffic and achieving online success. By following this step-by-step guide, you can ensure that your website is properly structured, easily navigable, and highly visible to search engines. Remember to conduct thorough keyword research, optimize your content, utilize metadata, and build high-quality backlinks.
Additionally, don’t forget about the importance of mobile optimization and user experience. By incorporating these strategies, you can improve your website’s visibility, attract more visitors, and ultimately achieve your online goals. So, what are you waiting for? Start implementing these tips and watch your website soar to new heights!
FAQs
Can I replace my RV awning without removing the rivets?
Yes, it is possible to replace an RV awning without removing the rivets. There are awning replacement methods that involve using special tools to slide the new awning into the existing track, avoiding the need to remove and replace rivets.
What tools do I need to replace an RV awning without removing the rivets?
To replace an RV awning without removing rivets, you will need a flathead screwdriver, a power drill with a screwdriver bit, an awning rail slider tool, and replacement awning fabric.
How long does it take to replace an RV awning without removing rivets?
The time it takes to replace an RV awning without removing rivets can vary depending on your level of experience and the specific tools you have. On average, it can take between 1 to 2 hours to complete the replacement process.
Are there any risks involved in replacing an RV awning without removing rivets?
While replacing an RV awning without removing rivets is a common method, there are some risks involved. The new awning fabric may not fit perfectly into the existing track, which could result in gaps or insufficient tension. It is important to carefully measure and double-check all components to ensure a proper fit.
Can I hire a professional to replace my RV awning without removing the rivets?
Yes, you can hire a professional to replace your RV awning without removing the rivets. Many RV service centers or awning repair specialists offer this service and can ensure a proper installation without causing any damage to your RV.
Is it recommended to replace an RV awning without removing rivets for beginners?
While it is possible for beginners to replace an RV awning without removing rivets, it is generally recommended to have some level of experience or knowledge in RV maintenance. It may be helpful to watch tutorial videos or consult with an experienced RV owner before attempting this task.
Can I reuse the rivets when replacing my RV awning without removing them?
In some cases, it is possible to reuse the existing rivets when replacing an RV awning without removing them. However, it is recommended to carefully inspect the rivets for signs of wear or damage before reusing them. If there are any concerns, it is best to replace the rivets with new ones to ensure a secure installation.