
RV awnings are a popular addition to recreational vehicles, providing shade and protection from the elements while on the road. But why should you consider opening a manual RV awning? Well, imagine this: you’re on a long road trip, driving through beautiful countryside, and you come across a picturesque spot for a picnic. The sun is blazing down, and you and your family are eager to enjoy your lunch.
But without a shady spot to sit, you’re forced to eat in the sweltering heat, with sweat trickling down your forehead. Not exactly the peaceful and enjoyable picnic you had in mind, right? That’s where a manual RV awning comes in. With just a few simple steps, you can easily open your RV awning, providing instant shade and relief from the hot sun.
It’s like having your own portable oasis wherever you go. Whether you’re stopping for a quick lunch break or setting up camp for the night, a manual RV awning gives you the flexibility to create a comfortable outdoor space in seconds. But the benefits of a manual RV awning don’t stop at shade.
Picture this: you’re sitting outside your RV, enjoying a cup of coffee in the morning. The dew is still fresh on the grass, and the birds are chirping in the trees. But suddenly, a light rain shower begins to fall.
Without a manual RV awning, you would have to quickly retreat inside, missing out on the peaceful sounds and fresh air. But with your awning open, you can simply adjust the angle to shelter yourself from the rain while still enjoying the outdoor ambiance. Not only does a manual RV awning provide shade and protection from the elements, but it also expands your outdoor living space.
It’s like having an extra room attached to your RV. You can set up chairs, tables, and even a grill under the awning, creating a comfortable and cozy outdoor living area. It’s the perfect space for gathering with friends and family, sharing meals, playing games, or simply relaxing and enjoying nature.
Table of Contents
What is a Manual RV Awning
A manual RV awning is a type of awning that is operated by hand, rather than through automated or motorized mechanisms. It is a popular choice for RV owners who prefer a simple and straightforward solution for providing shade and protection from the elements. To open a manual RV awning, you start by releasing the travel locks that hold the awning in place during transit.
Then, you use the awning rod, which is typically provided with the awning, to turn the awning crank and extend the awning outward. As you continue to crank, the awning will roll out further, providing more shade and coverage. Once your awning is fully extended, you can lock it into place using the awning lock knobs to ensure it doesn’t retract unexpectedly.
Opening a manual RV awning is a relatively easy process that can be done quickly and efficiently. Whether you’re looking to relax under some shade or want to protect yourself from the rain, a manual RV awning is a practical and convenient option for any RV owner.
Benefits of Opening a Manual RV Awning
Are you ready to hit the open road in your RV? Before you can start your adventure, you’ll need to know how to open a manual RV awning. Opening your awning offers numerous benefits that will enhance your camping experience. One of the primary benefits is that an open awning provides shade, keeping you cool and protected from the sun’s harsh rays.
This is especially important during hot summer days when the heat can be unbearable. Additionally, an open awning creates a comfortable outdoor living space where you can relax, eat meals, or entertain guests. It gives you the feeling of having an extra room attached to your RV, allowing you to fully enjoy the beauty of your surroundings.
Whether you’re seeking refuge from the sun or simply looking to expand your living space, learning how to open a manual RV awning is a crucial skill for any RV owner.
Preparation: Tools and Safety Measures
So, you’re ready to open up your RV awning, but you’re unsure about where to start. Don’t worry, I’ve got you covered! Opening a manual RV awning is a relatively simple process, but it’s important to take some necessary precautions to ensure your safety and the longevity of your awning. First and foremost, you’ll need a few tools, such as a ladder, a screwdriver or allen wrench (depending on the type of awning), and some lubricant.
Before you begin, make sure you’re wearing appropriate safety gear, such as gloves and safety glasses, to protect yourself from any potential hazards. It’s also a good idea to have a friend or family member nearby to assist you if needed. Now, let’s get started on opening that awning and enjoy the shade and comfort it provides!
Tools Needed
preparation tools, safety measures, woodworking project When it comes to starting a woodworking project, it’s important to be prepared with the right tools and take safety measures to ensure a smooth and accident-free process. Having the right tools is crucial for achieving accurate cuts, smooth finishes, and overall high-quality results. Some basic tools that every woodworker should have include a measuring tape, a carpenter’s square, various types of saws (such as a circular saw, hand saw, and coping saw), a chisel set, clamps, sandpaper, a drill, and a variety of screws and nails.
Additionally, safety should be a top priority when working with wood. Wearing appropriate personal protective equipment (PPE) such as safety glasses, ear protection, and gloves is essential for preventing injuries. It’s also important to ensure that your work area is well-lit and free of clutter, and to always use tools properly and responsibly.
By taking these preparation steps and using the right tools, you’ll be well-equipped to take on any woodworking project with confidence and safety in mind.
Safety Measures
“Preparation: Tools and Safety Measures” When it comes to safety measures, one word comes to mind: preparation. Before embarking on any project or task, it’s important to ensure that you have the right tools and safety measures in place. Just like a chef needs his knives and mixers to create a delicious meal, a handyman or DIY enthusiast needs the right tools to complete a project safely and efficiently.
Having the right tools is important because it not only helps to make the job easier, but it also reduces the risk of accidents. For example, using a dull blade when cutting through wood can lead to slipping and potentially injuring yourself. On the other hand, using a sharp, proper-blade for the job ensures a clean cut and minimizes the risk of accidents.
In addition to having the right tools, it’s crucial to have the necessary safety measures in place. This includes wearing the appropriate safety gear such as gloves, goggles, and helmets. These gears are designed to protect you from potential hazards and injuries.
Wearing gloves, for instance, can shield your hands from sharp objects or harmful chemicals, while goggles can protect your eyes from flying debris or harsh substances. Furthermore, having a clean and organized workspace is another safety measure to consider. Taking the time to tidy up your surroundings before starting a project can save you from tripping over clutter or knocking over dangerous tools.
Keeping your workspace clean and clear will not only reduce the risk of accidents but also make the work itself more efficient and enjoyable. In summary, when it comes to preparation for any task or project, having the right tools and safety measures in place is crucial. By equipping yourself with the necessary tools and safety gear, you are not only ensuring a successful outcome but also minimizing the risk of accidents and injuries.
So, before starting your next project, take a moment to evaluate your tools and safety measures, because preparation is the key to a safe and successful experience.
Step-by-Step Guide to Opening a Manual RV Awning
Are you ready to enjoy the great outdoors in your RV? One of the first steps is to open up your manual RV awning. Don’t worry, it’s easier than you may think! Start by locating the awning release lever, typically located near the top of the awning arm. Grab the lever and pull it down towards the ground, releasing the locked position.
Next, slowly begin to extend the awning arms outwards, being mindful of any obstacles in the way. As the arms extend, you will start to see the fabric of the awning unfurl. Continue extending the arms until the awning is fully extended.
Once the awning is fully extended, you can use the support legs to stabilize it and provide extra support. Simply locate the support legs near the base of the awning arms and pull them down until they lock into place. Voila! Your manual RV awning is now open and ready for you to relax and enjoy the shade.
Step 1: Ensure the RV is parked on a level surface
manual RV awning
Step 2: Locate the awning and position yourself accordingly
When it comes to opening a manual RV awning, the second step is to locate the awning and position yourself accordingly. This may sound simple, but it’s important to know where the awning is located on your RV and how to position yourself in order to safely open it. Start by finding the awning on the side of your RV.
It is usually attached to the exterior wall and may be folded up and secured in a casing. Once you’ve located the awning, position yourself in front of it, ensuring that you have enough space to fully open it without obstructions. This will make it easier to handle and prevent any accidents or damage to the awning.
By taking the time to find the awning and position yourself correctly, you’ll be on your way to enjoying the shade and protection it provides. So, take a moment to familiarize yourself with your RV’s awning and get ready for step three in opening it up.
Step 3: Release any latches or locks on the awning
In this step of our step-by-step guide to opening a manual RV awning, we’ll focus on releasing any latches or locks that may be securing the awning in place. It’s important to ensure that the awning is properly secured before attempting to open it, as this will prevent any accidents or damage. Start by locating the latches or locks on the awning arms or brackets.
These may be in the form of levers, buttons, or other mechanisms. Once you’ve identified them, simply disengage or unlock them by following the manufacturer’s instructions. This may involve pulling a lever, pressing a button, or rotating a mechanism.
As you release the latches or locks, you may hear a subtle click or feel a slight resistance before they fully disengage. Take your time and make sure that all latches or locks have been released before proceeding to the next step. With the latches or locks released, you’re now ready to move on to the next step and continue opening your manual RV awning.
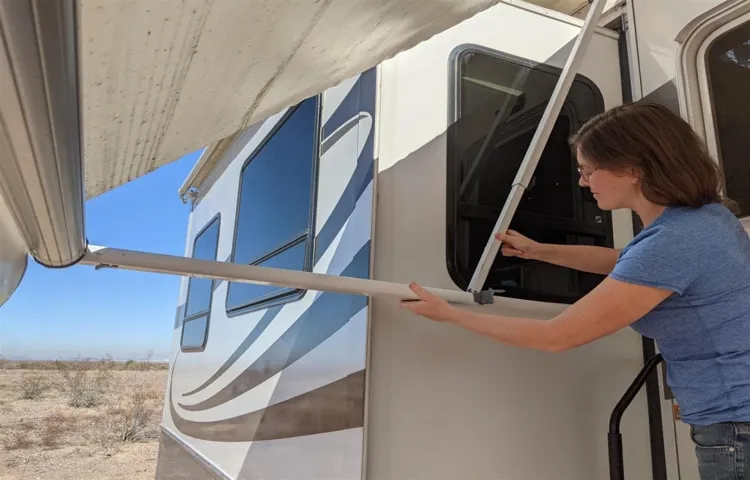
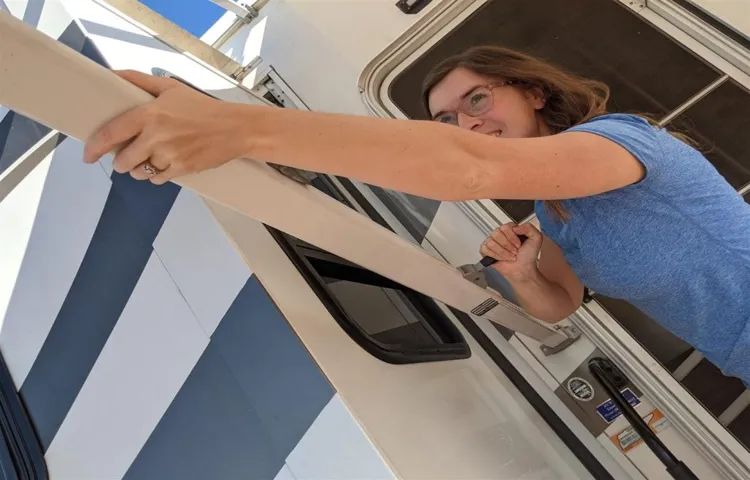
Step 4: Extend the awning by using the hand crank
manual RV awning, hand crank, extend the awning
Step 5: Secure the extended awning in place
In this step, we will focus on securing the extended awning in place. Once you have fully extended the awning, you will notice that there are usually straps or loops attached to it. These straps are designed to help keep the awning stable and prevent it from flapping in the wind.
Start by locating these straps and attach them to the designated hooks or Velcro strips on the RV. Make sure they are pulled tight and secure. This will help to keep the awning in place even on windy days.
Additionally, you may also find that there are tension knobs or levers on the awning arms or brackets. These knobs allow you to adjust the tension of the awning fabric, ensuring that it stays taut and doesn’t sag or flap in the wind. It’s important to check these tension knobs periodically, especially if you notice any looseness or movement in the awning.
By taking the time to properly secure the extended awning, you can ensure that it remains stable and in place. This will not only protect your awning from damage but also provide a more enjoyable outdoor space for you and your fellow campers to relax under. So don’t skip this important step and always double-check that everything is securely fastened before you start enjoying your camping trip.
Tips and Tricks for Opening a Manual RV Awning
If you’re planning a trip in your RV and want to enjoy some shade, it’s important to know how to open your manual RV awning. Luckily, the process is relatively straightforward. First, locate the awning crank that is usually stored in a compartment inside the RV.
Insert the crank into the designated hole on the awning tube and begin rotating it clockwise. As you rotate the crank, the awning will extend outward. Keep cranking until the awning is fully extended to your desired length.
Once it’s fully extended, you can lock it in place by sliding the awning arms into the designated slots on the RV. To ensure the awning is secure, double-check that the arms are locked into place. And that’s it! You’re now ready to relax in the shade provided by your manual RV awning.
Tip 1: Check the awning for any signs of damage before opening
RV awnings are a wonderful addition to any outdoor adventure, providing shade and protection from the elements. However, opening a manual RV awning may seem like a daunting task for first-time users. But fear not! With a few simple tips and tricks, you’ll be a pro in no time.
First and foremost, it’s essential to check the awning for any signs of damage before opening it. Inspect the fabric for rips, tears, or holes, and make sure the mechanism is in good working order. Opening a damaged awning can worsen the existing issues and may lead to further damage.
Also, check for any obstructions such as branches or debris that may prevent the awning from fully extending. Once you’ve ensured that the awning is in good condition, it’s time to start opening it. Begin by releasing any latches or locks that are holding the awning in place.
Then, slowly and steadily unwind the strap or crank to extend the awning fully. Be cautious not to rush this process and do not force it if you encounter any resistance. Applying too much pressure can cause the awning to become jammed or even break.
As the awning extends, keep an eye on the fabric to ensure it’s opening evenly and smoothly. If you notice any unevenness or sagging, adjust the tension or angle of the awning to rectify the issue. It’s also a good idea to have a second person assist you during this process, as they can provide an extra set of eyes and hands to help make any necessary adjustments.
Once the awning is fully extended, secure it in place by adjusting the support arms or legs. These can typically be locked into position using pins or knobs. Make sure the supports are firmly in place to prevent any accidents or collapses.
Tip 2: Use caution when extending the awning to avoid accidents
manual RV awning, extending the awning, caution, avoid accidents Opening a manual RV awning can provide a welcome shelter from the sun or rain, allowing you to fully enjoy your outdoor space. However, it’s important to use caution when extending the awning to avoid any potential accidents. Before you start, make sure the area around the awning is clear of any obstacles or people.
It’s also a good idea to have a helper nearby, as they can assist you in guiding the awning as it extends. As you extend the awning, be mindful of any sudden gusts of wind that may come your way. Wind can catch the awning and cause it to unexpectedly snap open, potentially causing injury or damage.
To prevent this, take your time and extend the awning slowly and steadily. It’s always better to be safe than sorry, so if the wind becomes too strong, it’s best to retract the awning until it calms down. With a little caution and care, you can enjoy the benefits of your manual RV awning without any accidents.
Tip 3: Clean and maintain the awning regularly for longevity
manual RV awning, clean, maintain, longevity
Conclusion
And there you have it, the not-so-simple steps to opening a manual RV awning. A process that can turn even the most laid-back camper into a contortionist acrobat. But fear not, with practice and a sense of humor, you too can conquer the awning-in-a-box puzzle.
Just remember to stretch beforehand, have a sturdy stepladder at the ready, and always keep a backup plan in case mother nature decides to throw a curveball your way. So, channel your inner parkour artist, embrace the challenge, and may your awning always extend with grace and elegance. Happy camping, and may the winds be ever gentle on your outdoor haven!”
FAQs
How do I open a manual RV awning?
To open a manual RV awning, locate the awning rod or crank handle and insert it into the designated slot. Begin turning the rod or handle in a clockwise direction to extend the awning. Continue cranking until the awning is fully open and securely in place.
What should I do if my RV awning is stuck or won’t open?
If your RV awning is stuck or won’t open, first check for any obstructions or debris in the awning mechanism. Clear out any blockages and try opening it again. If it still won’t open, double-check that you are using the correct cranking direction. If all else fails, consult your RV’s owner’s manual or contact a professional for assistance.
Can I open my RV awning in windy conditions?
It is generally not recommended to open your RV awning in windy conditions. Strong winds can put excessive strain on the awning fabric and frame, potentially causing damage or even detachment. Always check the forecast and avoid opening your awning if high winds are expected.
How do I secure my RV awning to prevent it from flapping in the wind?
To secure your RV awning and prevent it from flapping in the wind, you can use awning straps or tie-downs. Attach one end of the strap to the awning arm or support, and the other end to a secure anchor point, such as a stake or a weight. Adjust the tension in the straps to keep the awning taut and minimize flapping.
Can I open my RV awning partially?
Yes, you can open your RV awning partially if you prefer. Simply crank the awning until you reach the desired length, then secure it using the awning locks or latches. Partially opening the awning can offer shade and protection while still allowing airflow and maintaining visibility.
How do I close a manual RV awning?
To close a manual RV awning, grip the awning rod or crank handle and turn it counterclockwise to retract the awning. Keep cranking until the awning is fully closed and snug against the RV. Make sure to lock the awning in place using the designated locking mechanism to prevent any accidental opening while in transit.
What maintenance is required for a manual RV awning?
Regular maintenance for a manual RV awning involves cleaning the fabric, lubricating the moving parts, and inspecting for any signs of damage or wear. Clean the fabric with mild soap and water, taking care to remove any dirt or debris. Lubricate the awning mechanism with an appropriate lubricant to ensure smooth operation. Inspect the awning regularly for tears, loose hardware, or any other issues that may require repairs or replacements.