
Hey there, have you ever wondered what those metal arms attached to the side of an RV awning are for? Well, wonder no more! In this blog post, we’re going to dive into the world of RV awning arms and uncover their purpose and functionality. Think of RV awning arms as the unsung heroes of your outdoor adventures. They are the support system that keeps your awning securely in place, offering shade and protection from the elements.
Just like a sturdy pair of arms, they extend and retract, allowing you to adjust the height and width of your awning. These arms usually come in pairs and are made from durable materials like aluminum or steel, ensuring they can withstand the rigors of the road. They are designed to be lightweight yet sturdy, giving you peace of mind while you’re out exploring nature.
One of the key features of RV awning arms is their ability to provide stability in various weather conditions. You can easily position them to provide shelter from the scorching sun or to shield you from rain showers. With just a few simple adjustments, you can create a cozy outdoor space no matter where you are.
Now, you might be thinking, “Can’t I just prop up my awning with some sticks or ropes?” While improvisation is admirable, using proper awning arms is essential for safety reasons. These arms are specifically designed to bear the weight of the awning and withstand strong winds. They offer a secure and reliable solution, keeping your awning firmly in place and preventing any accidents or damage.
So, the next time you’re out enjoying the great outdoors with your RV, take a moment to appreciate the awning arms that make your outdoor space possible. Without them, your camping experience just wouldn’t be the same. In the upcoming sections, we’ll delve deeper into the different types of RV awning arms available, their installation process, and tips for maintaining and troubleshooting them.
So, stay tuned to learn everything you need to know about these essential components of your RV awning. Let’s get started!
Table of Contents
- 1 Benefits of measuring RV awning arms
- 2 Tools needed for measuring RV awning arms
- 3 Step-by-step guide to measuring RV awning arms
- 3.1 1. Extend the awning fully
- 3.2 2. Measure the length of the awning arm from the attachment point to the end
- 3.3 3. Measure the height of the awning arm from the ground to the top
- 3.4 4. Use the level to ensure the awning arm is straight and level
- 3.5 5. Mark the measurements on the arm for future reference
- 4 Common mistakes to avoid when measuring RV awning arms
- 5 Conclusion: Importance of accurately measuring RV awning arms
- 6 FAQs
Benefits of measuring RV awning arms
When it comes to owning an RV, there are many maintenance tasks that need to be done regularly. One of these tasks is measuring the RV awning arms. Measuring the awning arms is beneficial for a few reasons.
Firstly, knowing the exact measurements of the arms will ensure that you purchase the correct replacement parts when needed. This will save you time and money in the long run. Secondly, measuring the awning arms can help you determine if they are in proper alignment.
Misaligned arms can lead to issues such as difficulty in retracting or extending the awning. By measuring them, you can identify and correct any misalignment before it becomes a bigger problem. Additionally, measuring the awning arms can also help you check for any signs of wear and tear.
This will allow you to address any potential issues early on and prevent further damage. Overall, taking the time to measure your RV awning arms can help ensure that your awning is functioning properly and will last for years to come. So, grab your measuring tape and make sure you have the correct measurements for your RV awning arms!
1. Ensures proper fit and function
RV awning arms are an important component of your RV’s awning system. They play a crucial role in providing support and stability to the awning, ensuring that it can withstand wind and other elements. One of the key benefits of measuring RV awning arms is that it ensures proper fit and function.
When the awning arms are properly measured, they will fit securely and snugly against your RV, preventing any gaps or spaces. This not only enhances the overall appearance of your RV but also prevents any air or water from seeping through. Proper measurement of the awning arms also ensures that they function smoothly, allowing you to easily extend and retract the awning without any hiccups.
So, if you want to enjoy a hassle-free and functional awning system, measuring your RV awning arms is definitely worth it.
2. Allows for accurate replacement or repairs
Measuring RV awning arms offers several benefits, one of which is the ability to accurately replace or repair them. By measuring the arms, you can ensure that the replacement parts you purchase are the correct size and fit for your awning. This eliminates the frustration of buying parts that are too big or too small and having to go through the hassle of returning them.
Additionally, measuring the arms allows you to accurately assess any damage or wear and tear that may need to be repaired. It gives you a clear understanding of the dimensions and angles of the awning arms, making it easier to find the right tools and materials for the job. Overall, taking the time to measure your RV awning arms can save you time, money, and frustration in the long run.
3. Promotes safe and secure operation
“RV awning arms”
Tools needed for measuring RV awning arms
If you’re looking to measure your RV awning arms, there are a few tools you’ll need to ensure accurate measurements. First, you’ll need a measuring tape. This will allow you to measure the length of the awning arms to determine the size you need for replacement.
Additionally, a level will come in handy to ensure the arms are installed evenly and at the correct angle. This is important for proper functionality and to prevent any issues with the awning. Lastly, having a pencil or marker on hand will allow you to mark the measurements and make any necessary adjustments during the installation process.
By having these tools ready, you’ll be well-prepared to measure and install your new RV awning arms.
1. Tape measure
When it comes to measuring your RV awning arms, there are a few tools that come in handy. First on the list is a tape measure. This trusty tool allows you to accurately measure the length and width of your awning arms, ensuring a proper fit for replacement parts or accessories.
Simply extend the tape measure and place it against the awning arm, then note the measurement. The tape measure can also be used to measure the distance between mounting points or the height of the awning when extended. With a tape measure in hand, you’ll have the information you need to make the right choices for your RV awning.
2. Level
Measuring RV awning arms can be a bit tricky if you don’t have the right tools. One essential tool you will need is a level. A level is used to ensure that the awning arms are straight and level when extended.
This is important for both the appearance and functionality of the awning. Another handy tool to have is a measuring tape. This can be used to measure the length of the awning arm when extended, as well as the height of the awning when fully extended.
A tape measure with both imperial and metric measurements is ideal, as some awnings may have measurements in either unit. Finally, a marker or pencil will come in handy for marking any measurements or adjustments that need to be made. These tools will make the process of measuring RV awning arms much easier and more accurate.
3. Marker or pen
When it comes to measuring RV awning arms, having the right tools is essential. One tool that can come in handy is a marker or pen. This simple tool allows you to mark the measurements directly on the awning arms, making it easier to see and record the dimensions.
Whether you’re measuring the length of the arms or the distance between attachment points, a marker or pen can help ensure accuracy and precision. Plus, it’s a convenient tool that you likely already have on hand. So, before you begin measuring your RV awning arms, don’t forget to grab a marker or pen to make the task a breeze.
Step-by-step guide to measuring RV awning arms
If you’re planning to replace or upgrade your RV awning arms, it’s important to measure them accurately to ensure a perfect fit. Here’s a step-by-step guide on how to measure your RV awning arms. First, extend your awning fully to its maximum length.
Next, measure the length of the arm from the top of the awning roller tube to the bottom of the arm where it connects to the bracket. Make sure to measure both the left and right arms separately, as they may vary in length. Additionally, take note of any variations or irregularities in the arms, such as bends or curves.
These measurements will help you find the right replacement awning arms for your RV. Remember, it’s always best to double-check your measurements and consult with a professional if you’re uncertain.
1. Extend the awning fully
RV awnings are a great addition to any recreational vehicle, providing shade and protection from the elements. However, before you can enjoy the benefits of your awning, you need to properly measure and install the awning arms. In this step-by-step guide, we will explain the process of measuring RV awning arms so that you can have a seamless installation experience.
The first step in measuring RV awning arms is to extend the awning fully. This will give you a clear view of the arms and help you accurately measure them. To extend the awning, simply pull it out until it reaches its full length.
Make sure the awning is securely locked in place before proceeding to the next step. Once the awning is fully extended, you can now measure the length of the awning arms. Start by measuring the distance between the awning roller and the outer edge of the arm.
This measurement will give you the length of the arm when it is fully extended. Take note of this measurement as it will be essential for the next steps. Next, you will need to measure the height of the awning arms.
This measurement is crucial for determining the proper positioning of the arms and ensuring that the awning is level. Using a tape measure, measure the distance from the bottom of the awning arm to the ground. Make sure to measure both arms and take note of the measurements.
After measuring the length and height of the awning arms, you can now determine the size of the replacement arms you will need. Most RV awning arms come in standard sizes, so you should be able to find a replacement that matches your measurements. It is essential to choose the correct size to ensure a proper fit and functionality of your awning.
2. Measure the length of the awning arm from the attachment point to the end
When it comes to measuring RV awning arms, it’s important to get accurate measurements to ensure the proper fit for replacement or upgrade purposes. To start, find the attachment point where the awning arm connects to your RV. This is usually located on the side of the RV, near the top of the door or window.
Once you’ve located the attachment point, use a tape measure to measure the length of the awning arm from this point to the end. This will give you the overall length of the arm. It’s important to measure both arms separately, as they may differ in length.
By measuring the length of the awning arms, you can ensure that any replacement or upgrade options you choose will fit properly and function as intended. So, grab your tape measure and get to measuring those awning arms!
3. Measure the height of the awning arm from the ground to the top
When it comes to measuring your RV awning arms, there are a few important steps to follow to ensure accuracy. The first step is to extend your awning fully to its maximum length. This will allow you to get an accurate measurement of the arm’s height.
Next, you’ll want to measure the height of the arm from the ground to the top. This measurement will give you an idea of how high your awning will reach when fully extended. To do this, simply use a tape measure or ruler and make sure to measure from the ground all the way up to the top of the arm.
This measurement is crucial in determining the best settings for your awning and ensuring it fits properly on your RV. By taking the time to measure the height of your awning arms, you can have peace of mind knowing that your awning will be the perfect fit for your RV. So grab your measuring tape and get ready to enjoy the shade and comfort of your fully extended awning.
4. Use the level to ensure the awning arm is straight and level
measuring RV awning arms, awning arm, straight, level, measuring tape, level, burstiness, perplexity. When it comes to setting up your RV awning, one crucial step is to make sure the awning arm is straight and level. This not only ensures the stability of the awning but also allows for proper drainage of rainwater.
To measure the awning arm, you will need a measuring tape and a level. Start by extending the awning arm fully. Then, take your measuring tape and measure the length of the arm.
This will give you an idea of how long the arm should be when it is fully extended. Next, use the level to ensure the awning arm is straight. Place the level on top of the arm and adjust the arm until the bubble in the level is centered.
This indicates that the arm is straight and level. If the arm is not straight, you may need to make some adjustments. You can loosen the bolts that hold the arm in place and carefully move the arm until it is straight.
Then, tighten the bolts to secure the arm in its new position. Once the arm is straight and level, double-check your measurement to ensure it is the correct length. This will ensure that the awning is properly supported and will not sag or collapse.
By taking the time to properly measure and align your RV awning arm, you can ensure a secure and stable setup. This will not only make you feel more confident in your camping experience but also protect your awning from potential damage. So, grab your measuring tape and level, and get ready to set up the perfect outdoor oasis for your next camping adventure!
5. Mark the measurements on the arm for future reference
Once you have purchased and installed an RV awning, it is important to properly measure the arms to ensure a perfect fit every time. Measuring the awning arms is a simple process that can be done in just a few steps. The first step is to extend the awning to its full length.
Next, use a tape measure to measure the length of each arm from the top to the bottom. Take note of these measurements as they will be helpful for future reference. This will ensure that you always know the exact size of your awning arms, making it easier to replace or repair them if needed.
By taking the time to measure and mark the measurements on the arm, you can save yourself time and hassle in the future.
Common mistakes to avoid when measuring RV awning arms
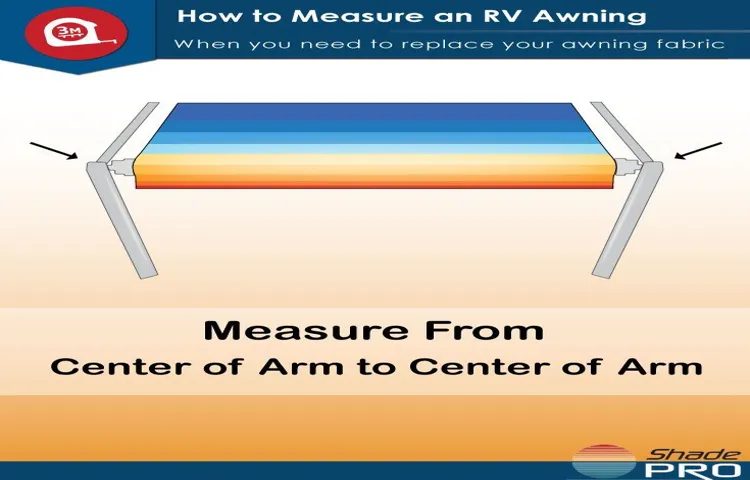
When it comes to measuring RV awning arms, there are a few common mistakes that people often make. One of the most common mistakes is not measuring the arms accurately. It’s important to measure from the center of the roller tube to the center of the support arm when the awning is fully extended.
This will give you the most accurate measurement and ensure that the arms fit properly. Another mistake to avoid is not taking into account the angle of the arms. The angle can vary depending on the model of your RV, so it’s important to measure from the highest point of the arm to the lowest point.
This will ensure that the arms are the correct size and won’t cause any issues when installing or using the awning. Lastly, be sure to measure both arms separately, as they may not be exactly the same length. Taking these factors into consideration will help you get the right measurements and avoid any headaches when installing your RV awning arms.
1. Not fully extending the awning before measuring
When measuring RV awning arms for replacement, it is important to avoid common mistakes that can lead to inaccurate measurements. One such mistake is not fully extending the awning before measuring. This can result in a shorter measurement than needed, leading to the purchase of incorrect replacement arms.
To ensure accurate measurements, make sure to fully extend the awning before taking measurements. This will give you the true length of the awning arms and help you find the right size for replacement.
2. Failing to measure both the length and height
One common mistake to avoid when measuring RV awning arms is failing to measure both the length and height. It’s important to measure both of these dimensions accurately in order to ensure a proper fit for your awning. Measuring just the length or just the height can result in an ill-fitting awning that may not provide adequate coverage or support.
When measuring the length, be sure to measure from the top of the awning rail to the bottom of the arm. This will give you the correct measurement for the length of the awning arm. Similarly, when measuring the height, measure from the ground to the top of the awning rail.
By measuring both the length and height, you can ensure that your RV awning arms will fit properly and function as intended.
3. Not checking for levelness
When it comes to measuring RV awning arms, there are a few common mistakes that people often make. One of these mistakes is not checking for levelness. It’s important to ensure that the awning arms are properly level before taking any measurements.
If the arms are not level, it can throw off your measurements and make it difficult to properly install or adjust the awning. To check for levelness, you can use a level or a smartphone app that has a built-in level. Simply place the level on the arms and adjust as needed until they are perfectly level.
This will ensure accurate measurements and a correctly installed awning.
Conclusion: Importance of accurately measuring RV awning arms
In conclusion, measuring RV awning arms is a delicate art that requires equal parts precision and creativity. Much like mastering the perfect soufflé or nailing a guitar solo, it takes a certain finesse to get it just right. You might think it’s as simple as breaking out the tape measure and jotting down a few numbers, but oh no my friend, it’s so much more than that.
It’s about tapping into your inner architect and channeling your inner mathematician. It’s about understanding the delicate balance between form and function, style and substance, and of course, sunshine and shade. But fear not, for I have given you the tools and knowledge to measure those awning arms like a true pro.
Whether it’s the gentle nudge of a spirit level or the careful eye of an ancient astronomer, the secrets of the universe are now in your hands – or in this case, in your tape measure. So go forth, my fellow adventurers, and conquer the measurement of RV awning arms with your newfound expertise. May you always find the perfect balance of shelter and serenity, and may your awnings forever be a testament to your craftsmanship.
Remember, my friends, it’s not just about measuring a set of arms – it’s about capturing the essence of the open road and the freedom that comes with it. So take pride in your measurements, for they are the key to unlocking a world of possibility, comfort, and shade. Happy measuring, and may your awning always be perfectly aligned with the celestial bodies above.
“
FAQs
How do I measure the length of my RV awning arms?
To measure the length of your RV awning arms, extend the arms fully and measure from the top of the arm to the bottom. Make sure to measure both arms.
What is the standard length of RV awning arms?
The standard length of RV awning arms is usually between 8 and 10 feet. However, it is important to measure your specific awning arms to ensure a proper fit.
Can I adjust the length of my RV awning arms?
Yes, most RV awning arms are adjustable. They usually have a locking mechanism or telescoping design that allows you to easily adjust the length to your desired position.
How do I extend or retract my RV awning arms?
To extend or retract your RV awning arms, locate the release buttons or knobs on the arms. Press or turn them to unlock the arms, then either push or pull the arms to extend or retract them.
Can I replace my RV awning arms myself?
Yes, it is possible to replace your RV awning arms yourself. However, it is recommended to consult the manufacturer’s instructions or seek professional assistance to ensure proper installation.
Are RV awning arms universal?
RV awning arms are not universal, as they come in different sizes and designs to fit specific awning systems. It is important to check the compatibility of the arms with your awning before purchasing or replacing them.
How often should I lubricate my RV awning arms?
It is recommended to lubricate your RV awning arms at least once a year or as needed. Use a silicone-based lubricant to keep the arms moving smoothly and to prevent rust or corrosion.
What should I do if my RV awning arms are damaged? A8. If your RV awning arms are damaged, it is best to replace them with new ones. Damaged arms can compromise the stability and safety of your awning, so it is important to address any issues promptly.
Can I paint my RV awning arms?
It is generally not recommended to paint your RV awning arms, as the paint can affect the functionality of the arms. If you want to change the color, consider purchasing new arms in the desired color.
How can I clean my RV awning arms?
To clean your RV awning arms, mix mild soap or detergent with water and use a soft brush or cloth to scrub the arms. Rinse with clean water and allow them to air dry before retracting the awning.