
Your RV awning is a crucial part of your outdoor space. It provides shade and protection from the elements, allowing you to enjoy the great outdoors in comfort. But over time, dirt, debris, and mildew can accumulate on your vinyl awning, making it look dirty and reducing its overall lifespan.
So, how do you clean your vinyl awning and keep it looking its best? In this blog post, we will share some tips and tricks to help you clean your RV’s vinyl awning effectively. Cleaning your vinyl awning doesn’t have to be a daunting task. With the right tools and techniques, you can have it looking brand new in no time.
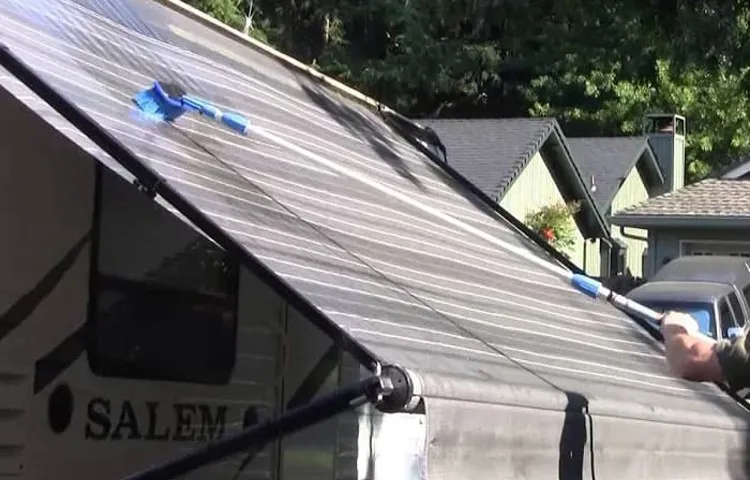
First, you’ll want to gather a few supplies. You’ll need a bucket, a soft-bristle brush, mild soap or detergent, and a hose with a spray nozzle. Once you have your supplies ready, it’s time to get started.
Before you begin cleaning, it’s important to remove any loose debris from your awning. Use the soft-bristle brush to gently sweep away any dirt, leaves, or twigs. This will make the cleaning process much easier and prevent any damage to the vinyl material.
Once you’ve cleared away the debris, it’s time to mix your cleaning solution. Fill your bucket with warm water and add a small amount of mild soap or detergent. Be sure to avoid using any harsh chemicals or abrasive cleaners as they can damage the vinyl material.
Use a clean cloth or sponge to apply the soapy water mixture to the entire surface of your awning. Gently scrub the awning using circular motions, paying extra attention to any areas with stains or mildew. After scrubbing, rinse the awning thoroughly with water from your hose.
Table of Contents
Why is Cleaning Your Vinyl Awning Important?
Cleaning your vinyl awning on your RV is important for several reasons. First and foremost, regular cleaning helps to maintain the overall appearance of your awning. Over time, dirt, dust, and other debris can accumulate on the surface of your awning, making it appear dull and dirty.
By cleaning it regularly, you can keep it looking fresh and vibrant. Additionally, cleaning your vinyl awning helps to prolong its lifespan. Over time, dirt and grime can become ingrained in the fabric of your awning, causing it to deteriorate faster.
By regularly removing this buildup, you can prevent damage and ensure that your awning lasts for years to come. Another reason to clean your vinyl awning is to prevent mold and mildew growth. Vinyl awnings are often exposed to moisture, which can create the perfect environment for mold and mildew to thrive.
Regular cleaning can help to prevent these harmful growths from taking hold and causing damage to your awning. Lastly, cleaning your vinyl awning is important for the overall maintenance of your RV. A clean awning not only looks better but also functions better.
By removing dirt and debris, you can ensure that your awning operates smoothly and efficiently. In conclusion, taking the time to clean your vinyl awning on your RV is essential for maintaining its appearance, prolonging its lifespan, and preventing mold and mildew growth. So, make sure to incorporate regular cleaning into your RV maintenance routine to keep your awning looking and functioning its best.
Protecting and Extending the Lifespan of Your Awning
“Why is Cleaning Your Vinyl Awning Important?” Cleaning your vinyl awning is important for several reasons. First and foremost, regular cleaning can help protect the lifespan of your awning. Vinyl awnings are exposed to the elements and can accumulate dirt, grime, and other debris over time.
If left uncleaned, this buildup can cause the vinyl to deteriorate and weaken, leading to costly repairs or even the need for a replacement. By regularly cleaning your awning, you can remove this buildup and prevent damage before it occurs. Additionally, cleaning your vinyl awning can help extend its aesthetic appeal.
Over time, dirt and stains can accumulate on the surface of your awning, causing it to look dull and worn. Regular cleaning can help restore its original appearance and keep it looking new and fresh. This is particularly important if you use your awning as a focal point of your outdoor space or if you frequently entertain guests in that area.
Furthermore, regular cleaning can help prevent the growth of mold and mildew on your vinyl awning. These microorganisms thrive in damp, dark environments, and a neglected awning can provide the perfect breeding ground. Not only can mold and mildew cause unsightly stains, but they can also pose a health risk to you and your family.
By regularly cleaning your awning, you can remove any potential sources of mold and prevent its growth. In summary, cleaning your vinyl awning is essential for protecting and extending its lifespan, maintaining its aesthetic appeal, and preventing the growth of mold and mildew. By taking the time to clean your awning regularly, you can ensure that it remains in excellent condition for years to come.
Supplies You Will Need
When it comes to cleaning the vinyl awning on your RV, there are a few supplies you will need to get the job done right. First and foremost, you will need a gentle cleaning solution. This could be a mild detergent or a specialized awning cleaner.
Avoid using harsh chemicals or abrasive cleaners, as they can damage the vinyl material. You’ll also want to have a soft-bristle brush or sponge to scrub away any stains or grime. A hose or bucket of water will be necessary for rinsing off the cleaning solution.
Finally, you may want to have a ladder or step stool on hand, depending on the height and accessibility of your awning. With these supplies in tow, you’ll be well-equipped to give your vinyl awning a thorough cleaning and keep it looking its best.
Soft-bristle brush
For the perfect finish to your hair, a soft-bristle brush is a must-have tool in your collection. This type of brush is designed to be gentle on your hair, making it ideal for those with delicate or damaged strands. The soft bristles help to detangle your hair without causing any breakage or pulling.
Plus, they are great for distributing natural oils from the scalp to the ends of your hair, promoting overall hair health and shine. Whether you are blow-drying, styling, or simply brushing your hair, a soft-bristle brush will give you a smooth, polished look every time. Add this essential tool to your hairstyling routine and see the difference it makes in the overall health and appearance of your locks.
Mild detergent or awning cleaner
“Mild detergent or awning cleaner” is a crucial supply you will need when it comes to cleaning your awning. Whether it’s a residential or commercial awning, regular cleaning is essential to maintain its beauty and prolong its lifespan. But you might be wondering, why not just use any cleaning product? Well, using mild detergent or awning cleaner specifically designed for this purpose ensures that you don’t damage the fabric or the structure of the awning.
These cleaners are formulated to remove dirt, grime, and stains while being gentle on the material. So, next time you plan on cleaning your awning, make sure you have a bottle of mild detergent or awning cleaner on hand to ensure optimal results and protect your investment.
Bucket
bucket, supplies, need
Water hose
water hose, garden hose, water hose supplies, hose attachment
Preparation
Cleaning the vinyl awning on your RV is an essential part of RV maintenance. Not only does it keep your awning looking clean and fresh, but it also helps to prolong its lifespan. Before you start cleaning, it’s important to gather all the necessary supplies.
You will need a bucket, mild detergent, a soft bristle brush, a hose with a sprayer, and a ladder if necessary. Start by hosing down the awning to remove any loose dirt or debris. Then, mix a small amount of detergent with water in the bucket and use the brush to scrub the awning gently.
Be sure to pay attention to any stubborn stains or mildew spots. After scrubbing, rinse the awning thoroughly with a hose, making sure to remove all soap residue. Finally, let the awning air dry completely before retracting it.
Regularly cleaning and maintaining your vinyl awning will help keep it looking great and extend its life for many RV adventures to come.
Close and secure the awning
awning, close, secure, preparation Paragraph: Before closing and securing the awning, it’s essential to properly prepare for the task at hand. The first step in this preparation process is to assess the current weather conditions. Is there a storm brewing or are strong winds expected? Understanding the weather forecast will help determine the urgency and necessity of closing and securing the awning.
It’s also crucial to gather the necessary tools and equipment, such as a ladder, to safely reach and close the awning. Additionally, it’s important to inspect the awning for any damages or signs of wear and tear that may require immediate attention. By thoroughly preparing for the task ahead, you can ensure a smooth and successful process of closing and securing the awning.
Remove any loose dirt or debris
Before you begin cleaning your item, it’s important to prepare it properly. One of the first steps in this process is to remove any loose dirt or debris from the surface. This can be done using a soft cloth or brush, depending on the material you are working with.
By taking the time to remove this initial layer of dirt, you can ensure that the cleaning process is as effective as possible. Not only does this prevent the dirt from spreading and becoming more difficult to remove, but it also allows any cleaning products you use to penetrate the surface more effectively. So, before you dive into the deep cleaning process, take a few moments to remove any loose dirt or debris.
Your item will thank you for it!
Cleaning the Awning
If your RV has a vinyl awning, it’s important to keep it clean and well-maintained to prolong its lifespan and keep it looking its best. Cleaning a vinyl awning is a fairly simple process that can be done with a few basic supplies. First, start by rinsing off any loose dirt or debris with a hose.
Then, mix a solution of warm water and mild detergent in a bucket. Use a soft-bristle brush or sponge to gently scrub the awning, working in a circular motion. Be sure to pay extra attention to any stubborn stains or spots.
Rinse thoroughly with clean water to remove any residue from the cleaning solution. Finally, allow the awning to air dry completely before retracting it. Remember to never use harsh chemicals or abrasive cleaners on your vinyl awning, as these can cause damage or discoloration.
With regular cleaning and proper care, your vinyl awning will continue to provide shade and protection for years to come.
Mix detergent and water in the bucket
“Mix detergent and water in the bucket” is a crucial step when it comes to cleaning your awning. Awning cleaning may not be the most exciting task, but it is essential for maintaining the overall appearance and longevity of your outdoor space. So, let’s dive into this step and see why it’s so important.
By mixing detergent and water in a bucket, you create a powerful cleaning solution that can effectively remove dirt, grime, and other stains from your awning. Just like how a superhero needs their trusty sidekick, the detergent acts as the sidekick to water, boosting its cleaning power. It’s like a dynamic duo ready to tackle even the toughest of stains.
Plus, the detergent helps to break down any grease or oil that may have accumulated on your awning, leaving it looking fresh and vibrant. So don’t forget to mix detergent and water in the bucket before taking on the task of cleaning your awning. Trust me, your awning will thank you for it!
Soak the brush in the soapy water
When it comes to cleaning your awning, it’s important to start with the right tools and techniques. One of the first steps in the cleaning process is to soak your brush in some soapy water. This helps to loosen any dirt or grime that may have built up on the awning.
The soapy water helps to break down any stubborn stains, making it easier to remove them later on. By soaking the brush, you can ensure that it is fully saturated and ready to tackle the awning. Using a brush that has been soaked in soapy water allows you to scrub the entire surface of the awning, reaching all the nooks and crannies effortlessly.
The soapy water acts as a lubricant, allowing the brush to glide smoothly over the fabric. This ensures that you can thoroughly clean the awning without causing any damage or discoloration. It’s important to use gentle, circular motions when scrubbing the awning, paying special attention to any areas that are particularly dirty.
When you’re finished scrubbing the awning, be sure to rinse it thoroughly with clean water. This will remove any remaining soap residue and leave your awning looking fresh and clean. It’s important to take your time when rinsing, making sure to remove all traces of soap from the fabric.
Once you’ve rinsed the awning, you can let it air dry or use a soft cloth to pat it dry. Cleaning your awning may seem like a daunting task, but with the right tools and techniques, it can be a breeze. Soaking the brush in soapy water is just one step in the process, but it’s an important one.
By loosening dirt and grime, the soapy water allows you to effectively clean the awning without causing any damage. So next time you’re ready to tackle your awning, don’t forget to soak that brush and get ready for a sparkling clean result.
Scrub the awning gently with the brush
cleaning the awning, scrub, brush
Rinse the awning thoroughly with a water hose
Cleaning the Awning When it comes to maintaining the cleanliness of your awning, rinsing it thoroughly with a water hose is an essential step. While it may seem like a simple task, this step is crucial in keeping your awning looking its best and extending its lifespan. By using a water hose, you can effectively remove dirt, dust, and debris that may have accumulated on the surface of the awning.
Not only does this help in maintaining the aesthetics of your awning, but it also prevents potential damage that can be caused by built-up grime. Think of it as giving your awning a refreshing shower! So, the next time you’re cleaning your outdoor space, don’t forget to give your awning a good rinse with a water hose.
Dealing with Stains
If you’re an RV owner, you know just how important it is to keep your awning clean. Not only does it improve the overall appearance of your RV, but it also helps to prolong the lifespan of your awning. One common issue that many RV owners face is dealing with stains on their vinyl awnings.
Whether it’s from tree sap, bird droppings, or other environmental factors, stains can be quite unsightly. So, how do you clean a vinyl awning on an RV? Well, the first thing you’ll want to do is remove any loose debris by gently brushing the surface with a soft-bristle brush or broom. Next, mix a solution of warm water and mild soap, such as dish soap or laundry detergent, in a bucket.
Using a sponge or soft cloth, scrub the stained areas with the soapy water, being sure to work in a circular motion. Rinse the awning thoroughly with clean water, and if necessary, repeat the process. In some cases, you may need to use a specialized awning cleaner for tough stains, but always check the manufacturer’s recommendations before doing so.
Remember to let the awning dry completely before retracting it to avoid any potential warping or damage. By following these simple steps, you can keep your vinyl awning on your RV looking its best and free from unsightly stains.
Use a specialized awning cleaner for tough stains
If you find that your awning has tough stains that won’t come off with regular cleaning, it might be time to bring out the big guns. Using a specialized awning cleaner can help to tackle those stubborn stains and restore the appearance of your awning. These cleaners are designed specifically for awnings and are formulated to remove tough dirt, grime, and stains.
They often contain powerful ingredients that can break down and remove even the most stubborn stains, such as mold, mildew, and bird droppings. Simply spray the cleaner onto the stained areas, let it sit for a few minutes to penetrate the stains, and then gently scrub the area with a soft brush or sponge. Rinse thoroughly with water and allow the awning to dry completely before retracting it.
By using a specialized awning cleaner, you can effectively remove tough stains and keep your awning looking its best.
Test the cleaner in an inconspicuous area first
Test the cleaner in an inconspicuous area first
Allow the cleaner to sit on the stain for a few minutes
When it comes to dealing with stains, one of the most important things to remember is allowing the cleaner to sit on the stain for a few minutes. This allows the cleaner to penetrate the stain and break it down, making it easier to remove. It’s like giving the cleaner a chance to do its magic before you start scrubbing away.
Just think of it like marinating a steak before grilling it – the longer you let the marinade sit, the more flavorful and tender the steak becomes. Similarly, the longer you let the cleaner sit on the stain, the more effective it will be in breaking down the stain and making it easier to remove. So, next time you’re faced with a stubborn stain, be patient and give the cleaner some time to work its magic.
You’ll be amazed at the results!
Scrub the stain gently with a soft-bristle brush
When it comes to dealing with stains, one of the most important things to remember is to approach the situation gently. You don’t want to further damage the affected area by scrubbing too aggressively. Instead, opt for a soft-bristle brush that will help to remove the stain without causing any harm.
By using gentle strokes, you can delicately work on lifting the stain and preventing it from spreading. This approach is particularly useful for delicate fabrics or materials that can be easily damaged by harsh scrubbing or abrasive cleaning methods. So, next time you find yourself faced with a stubborn stain, remember to take a soft and gentle approach – your items will thank you for it!
Rinse the awning thoroughly
cleaning awning, awning stains, rinse awning thoroughly
Drying and Maintenance
Cleaning and maintaining your vinyl awning on your RV is essential to prolong its lifespan and keep it looking its best. To clean the awning, start by brushing off any loose dirt or debris using a soft brush or broom. Then, mix a solution of mild soap and water in a bucket.
Use a sponge or cloth to gently scrub the awning, paying extra attention to any stubborn stains or spots. Rinse off the soap thoroughly with clean water, making sure to remove all residue. Allow the awning to air dry completely before retracting or folding it back up.
It’s important to regularly inspect your vinyl awning for any signs of damage or wear. If you notice any tears or fraying, it may be time to replace or repair the awning to prevent further damage. By regularly cleaning and maintaining your vinyl awning, you can ensure that it stays in great condition and protects you from the elements during your RV adventures.
Allow the awning to dry completely
allow the awning to dry completely After a thorough cleaning session, it is crucial to allow your awning to dry completely before retracting or using it again. The drying process is essential for maintaining the longevity and appearance of your awning. Allowing the awning to dry naturally ensures that there is no moisture trapped within the fabric or framework, which can lead to mold, mildew, or rust over time.
Just like when you hang clothes out to dry, the fresh air and sunlight will do wonders in removing any remaining dirt and moisture from your awning. So, resist the temptation of retracting it too soon or using a fan or heater to speed up the drying process. Instead, let nature take its course and patiently wait for the awning to dry completely before you fold it back up.
This simple step in maintenance will go a long way in preserving the condition and functionality of your awning for years to come.
Inspect for any damage or wear
When it comes to drying and maintaining your items, it’s important to take a close look for any signs of damage or wear. Inspecting your belongings after they’ve gone through the drying process can help you catch any issues before they become bigger problems. Whether it’s a piece of clothing or a household item, giving it a thorough once-over can save you time and money in the long run.
Check for any tears, loose threads, or missing buttons on your clothes. Examine household items for cracks, chips, or any other signs of damage. By taking the time to inspect your belongings, you can ensure that they are in good condition and ready for use.
So don’t skip this important step in the drying and maintenance process – your items will thank you for it!
Apply a vinyl protectant to prevent fading and cracking
Now that you’ve washed and thoroughly dried your vinyl surfaces, it’s time to think about maintenance. One important step in keeping your vinyl looking its best is to apply a vinyl protectant. This product helps prevent fading and cracking, which can occur over time due to exposure to the sun and other elements.
It creates a protective barrier that helps shield the vinyl from UV rays and other environmental factors that can cause damage. Think of it like sunscreen for your vinyl surfaces! By applying a vinyl protectant regularly, you can extend the life of your vinyl and keep it looking fresh and vibrant for years to come. So don’t forget this crucial step in your vinyl care routine!
Conclusion
And there you have it, the secret to restoring your vinyl awning on your RV to its former glory. By following these simple steps and making a little effort, you can say goodbye to those stubborn stains and hello to a clean and beautiful awning. Remember, maintaining the cleanliness of your awning not only improves the appearance of your RV, but also helps prolong its lifespan.
So don’t let dirt and grime ruin your outdoor adventures – take matters into your own hands and show that vinyl awning who’s boss! Happy cleaning, and may your awning always be as spotless as your sense of humor!”
FAQs
How often should I clean my vinyl awning on my RV?
It is generally recommended to clean your vinyl awning on your RV at least once a year, or more frequently if needed.
What is the best way to clean a vinyl awning on an RV?
The best way to clean a vinyl awning on an RV is to use a mild detergent mixed with water. Scrub the awning gently using a soft brush, then rinse thoroughly with clean water. Avoid using harsh chemicals or abrasive materials that could damage the vinyl.
Can I use a pressure washer to clean my vinyl awning on my RV?
It is not recommended to use a pressure washer to clean a vinyl awning on an RV, as the high pressure can potentially cause damage to the vinyl material. It is best to stick with a gentle scrubbing using a soft brush and mild detergent.
How can I remove stubborn stains from my vinyl awning on my RV?
For stubborn stains on a vinyl awning, you can try using a specialized vinyl cleaner or a mixture of vinegar and water. Apply the cleaner to the stain, let it sit for a few minutes, then gently scrub with a soft brush. Rinse thoroughly with clean water.
Can I use bleach to clean my vinyl awning on my RV?
It is not recommended to use bleach to clean a vinyl awning on an RV, as it can cause discoloration and damage to the material. Stick with mild detergents and specialized vinyl cleaners to keep your awning clean.
How should I store my vinyl awning on my RV during the off-season?
To properly store your vinyl awning during the off-season, make sure it is clean and completely dry. Fold it up neatly and secure it with bungee cords or straps to prevent any damage from wind or weather. Store it in a dry and protected area, such as a garage or storage shed.
Can I use a pressure washer on a low setting to clean my vinyl awning on my RV?
While using a pressure washer on a low setting may be less risky than using a high setting, it is still not recommended for cleaning a vinyl awning on an RV. The pressure can potentially cause damage or create weak spots in the material. Stick with gentle scrubbing using a soft brush for best results.