
Are you a camping enthusiast or a frequent traveler who loves the freedom and adventure of the open road? If so, then you know how important it is to have a comfortable and functional RV. One essential feature of any RV is the awning. But what exactly is an RV awning and what purpose does it serve? In this blog post, we will delve into the basics of RV awnings, providing you with a clear understanding of their importance and how they can enhance your camping experience.
So, grab a cup of coffee and get ready to learn all about RV awnings!
Table of Contents
Introduction to RV Awnings
One of the most useful and versatile features of an RV is the awning. Awnings provide shade and protection from the elements, allowing you to enjoy the outdoors without worrying about harsh sunlight or rain. But how exactly do you use an RV awning? It’s actually quite simple! First, make sure the awning is securely fastened to the side of your RV.
Then, release any straps or buckles that may be holding it in place. Next, gently pull the awning out to its full extension, being careful not to force or yank it. Once the awning is fully extended, lock it into place by securing the arms or brackets.
Voila! Your RV awning is ready to be enjoyed. Whether you want to relax in the shade or host a barbecue, the awning provides the perfect space for all your outdoor activities. So go ahead, grab a chair, and soak up the great outdoors while staying cool and protected under your RV awning.
What is an RV awning and why is it important?
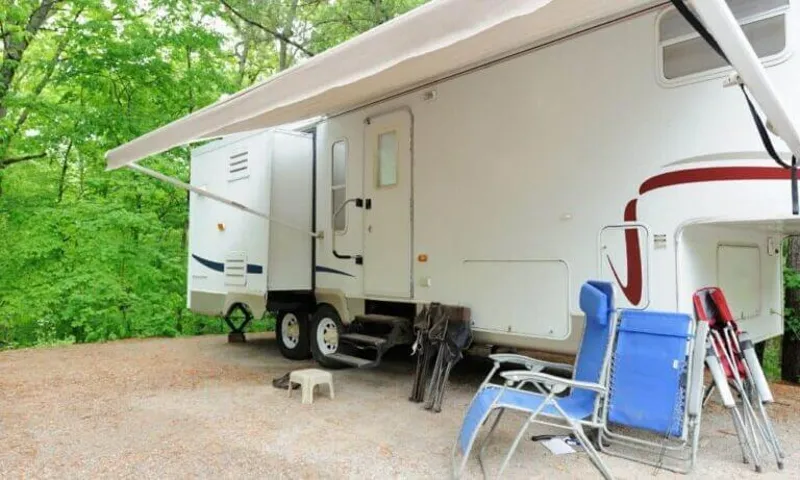
RV awnings are a vital accessory for any recreational vehicle, providing shade and protection from the elements. These fabric coverings are typically attached to the exterior of the RV and can be extended and retracted as needed. Not only do they provide shelter from the sun and rain, but they also create an additional outdoor living space, expanding the usable area of the vehicle.
Imagine sitting outside under the awning, enjoying a cool breeze while staying protected from the hot sun. It’s like having a portable porch! RV awnings are particularly important during camping trips or extended stays, as they allow you to relax outside in comfort, whether you’re grilling, reading a book, or simply enjoying nature. Additionally, the shade provided by the awning helps to keep the interior of the RV cooler, reducing the need for excessive air conditioning and saving on energy costs.
So, if you own an RV or are planning to purchase one, don’t forget to consider the importance of an RV awning. It’s a simple yet valuable addition that can greatly enhance your outdoor experience.
Different types of RV awnings and their features
“RV awnings are a valuable addition to any recreational vehicle, providing shade and protection from the elements. There are several different types of awnings available, each with its own unique features and functionality. One popular type is the roll-out awning, which can be easily extended and retracted as needed.
These awnings are typically made of durable materials such as vinyl or acrylic and are attached to the side of the RV. Another option is the window awning, which is designed to cover the windows of the RV. These awnings are typically smaller in size and can be manually or electrically operated.
For those looking for a more versatile option, there are slide-out awnings, which are designed to cover the slide-out sections of the RV. These awnings can be extended and retracted with the slide-out, providing additional shade and protection. Overall, RV awnings are a practical and stylish addition to any RV, allowing you to make the most of your outdoor space and enjoy your travels in comfort.
“
Preparing to Use Your RV Awning
Using an RV awning is a great way to add some extra shade and outdoor living space to your camping experience. But before you can start enjoying the benefits of your awning, there are a few steps you need to take to prepare it. First, make sure you have all the necessary tools and supplies, such as a broom or brush to clean off any debris that may have collected on the awning.
Next, check the condition of the awning fabric and inspect for any tears or damage that may need to be repaired. Once you’ve cleaned and inspected your awning, you’re ready to set it up. Start by extending the awning out and securing it in place using the appropriate mechanisms, such as arms or straps.
Finally, adjust the angle of the awning to provide the desired amount of shade, and voila! You’re all set to enjoy the comfort and convenience of your RV awning. So go ahead, grab a chair, and relax in the shade.
Checking for any damages or defects
Chances are, if you own an RV, you’re looking forward to spending lots of time outdoors, enjoying the sunshine and fresh air. And what better way to do that than by relaxing under the shade of your RV awning? But before you go ahead and set up your awning for the first time, it’s important to give it a thorough check for any damages or defects. This will ensure that it is safe to use and will help to prolong its lifespan.
Start by inspecting the fabric for any tears or holes. If you do find any, you can either patch them up or consider getting a replacement fabric. Next, check the hardware, such as the arms and brackets, to make sure they are secure and in good working condition.
Look out for any rust or corrosion, as this could indicate a potential problem. Finally, open and close the awning a few times to check that it operates smoothly and without any issues. By taking the time to check for damages or defects now, you can avoid any unpleasant surprises when you’re out on your RV adventures.
Gathering the necessary tools and equipment
Preparing to Use Your RV Awning requires gathering the necessary tools and equipment. Before you can enjoy the shade and protection that an awning provides, it’s important to have the right tools on hand. First, you’ll need a sturdy step ladder to reach and secure the awning to your RV.
Make sure it’s stable and able to support your weight. Next, gather adjustable straps or bungee cords to fasten the awning securely to your RV. These will help keep the awning in place during inclement weather or strong winds.
Additionally, have a rubber mallet or hammer to anchor the awning stakes into the ground if you plan on using them. Finally, make sure you have a tape measure or ruler to ensure that the awning is properly extended and aligned. Having these tools and equipment ready will make setting up your RV awning a breeze.
Understanding the safety precautions
When it comes to using your RV awning, safety should be your top priority. Before you even think about extending your awning, it’s important to make sure that you have taken the necessary precautions to ensure a safe and enjoyable experience. One of the first things you’ll want to do is check the weather conditions.
High winds can be extremely dangerous for an extended awning, so it’s best to avoid using it on particularly windy days. Additionally, you’ll want to make sure that the ground where you plan to set up your RV is level and free from any rocks or debris that could potentially damage your awning. It’s also a good idea to have a buddy with you when setting up your awning, as it can be quite cumbersome and having an extra set of hands can make the process much easier.
Remember, taking the time to properly prepare and follow the necessary safety precautions will ensure that you can enjoy your RV awning without any worry.
Extending and Retracting the RV Awning
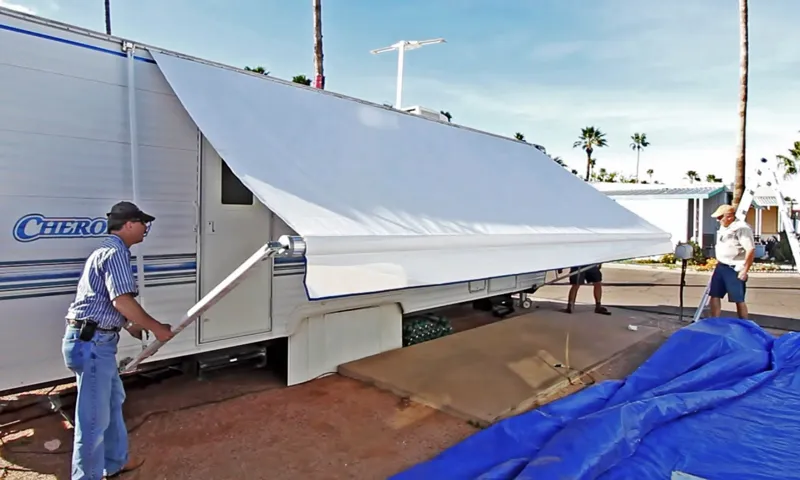
RV awnings are a great addition to any outdoor adventure, providing shade and protection from the elements. Knowing how to extend and retract your RV awning is important for properly utilizing this feature. First, locate the awning control switch or crank handle, usually located near the awning itself or inside the RV near the entrance.
If you have an electric awning, simply press the switch to extend or retract the awning. For manual awnings, insert the crank handle into the awning mechanism and turn it clockwise to extend the awning or counterclockwise to retract it. Remember to keep an eye out for any obstructions, such as tree branches or power lines, when extending or retracting your awning.
It’s also a good idea to secure your awning with straps or stakes to prevent it from getting damaged in windy conditions. So whether you’re looking to enjoy some shade on a sunny day or protect yourself from a sudden rainstorm, knowing how to use your RV awning is key to maximizing your outdoor experience.
Step-by-step guide to extending the RV awning
The awning is a key feature of any RV, providing shade and protection from the sun and rain. Extending and retracting the awning may seem like a daunting task, but with the right knowledge and a few simple steps, it can be done easily. To begin, locate the awning control switch, which is usually found near the entrance of the RV.
Next, press the extend button to start extending the awning. As the awning starts to unfurl, make sure to keep an eye on any obstacles, such as tree branches or walls, that may be in its path. Once the awning is fully extended, you can adjust the angle to better block the sun or rain.
When it’s time to retract the awning, simply press the retract button on the control switch. As the awning rolls back up, make sure to guide it back into its housing to prevent any damage. And just like that, you’ve successfully extended and retracted your RV awning! Don’t forget to check the manufacturer’s instructions for any specific steps or requirements for your awning model.
Tips for properly retracting the RV awning
RV awnings are a great feature to have on your vehicle, providing shade and protection from the elements when you’re parked or camping. However, it’s important to know how to properly extend and retract your RV awning to prevent any damage or accidents. When extending your awning, make sure to open it slowly and steadily, using caution to avoid any obstructions or obstacles.
Once fully extended, secure the arms and adjust the tension to keep the awning stable. When it comes time to retract it, again, take your time and go slowly to avoid any mishaps. Double-check that the arms are securely locked before driving off to prevent any damage while on the road.
Overall, following these tips for properly extending and retracting your RV awning will help ensure that it functions properly and lasts for years to come.
Adjusting the RV Awning
So, you’ve just arrived at your campsite and you’re ready to relax under the shade of your RV awning. But how do you actually go about adjusting it? Well, it’s much easier than you might think. First, locate the awning control panel, which is usually found on the side of your RV.
Once you’ve found it, extend the awning by pressing the appropriate button. You’ll want to make sure the awning is fully extended before making any adjustments. Next, find the awning arms and loosen the knobs that secure them in place.
Now, you can adjust the height and angle of the awning to your desired position. Once you’ve made your adjustments, tighten the knobs to secure the awning arms in place. And voila! You’re all set to enjoy some shade and relaxation.
Remember, practice makes perfect, so don’t be discouraged if it takes a few tries to get the hang of it. Soon enough, you’ll be an expert at adjusting your RV awning.
Using the manual or automatic adjustment options
Adjusting the RV awning can make a world of difference when it comes to enjoying your outdoor space while camping. Depending on your preference, you can choose from manual or automatic adjustment options. For manual adjustment, you’ll need to extend the awning by hand.
This is done by releasing the awning lock, which allows you to pull the fabric out and secure it in place. You can then adjust the pitch of the awning by using the rafter arms, which are located on the sides of the awning. By changing the angle of these arms, you can either increase or decrease the amount of shade provided by the awning.
On the other hand, automatic adjustment options provide a more convenient and hassle-free experience. Some RV awnings come with sensors that detect wind speed and automatically retract the awning to prevent damage in case of strong winds. This is especially useful when you’re away from your RV and unable to manually retract the awning in time.
Whether you choose manual or automatic adjustment, it’s important to pay attention to the weather conditions and adjust the awning accordingly. In cases of heavy rain, it’s recommended to tilt the awning slightly to allow the water to run off, preventing pooling and potential damage to the fabric. In conclusion, adjusting your RV awning can greatly enhance your outdoor camping experience.
Whether you opt for manual or automatic adjustment options, it’s important to consider the weather conditions and make appropriate adjustments to ensure the awning provides you with the shade and protection you need. So, next time you’re setting up your RV campsite, don’t forget to give some thought to your awning and make the necessary adjustments for a comfortable and enjoyable stay.
Common adjustments for optimal shade and stability
Adjusting the RV awning is an essential part of ensuring optimal shade and stability for your outdoor space. There are a few common adjustments that you can make to achieve the desired outcome. Firstly, you’ll want to make sure that the awning is properly extended.
This can be done by gently pulling on the awning arm and locking it into place. Once extended, you can adjust the angle of the awning to provide maximum shade. This can be achieved by loosening the knobs on the awning arm and tilting it to the desired angle.
It’s important to note that while you want to achieve maximum shade, you also want to ensure stability. To do this, you can adjust the tension of the awning fabric. By tightening or loosening the arms, you can ensure that the fabric is taut and secure.
It’s a good idea to test the stability of the awning by giving it a gentle shake to make sure it doesn’t wobble or sway too much. With these adjustments, you can enjoy a comfortable and stable outdoor space under your RV awning. So, go ahead and make those adjustments and get ready to relax in the shade!
Avoiding common mistakes when adjusting the RV awning
Traveling in an RV is a great way to explore the outdoors and enjoy the comforts of home. One important feature of an RV is the awning, which provides shade and protection from the elements. However, adjusting the RV awning can be a bit tricky if you don’t know what you’re doing.
There are a few common mistakes that people make when trying to adjust their awning, but with a little knowledge and practice, you can avoid these pitfalls. One mistake that people often make is not properly measuring the space where the awning will be installed. It’s important to measure the length and width of the area to ensure that the awning will fit properly.
This will help prevent any gaps or overhangs that could cause the awning to become unstable or not provide adequate coverage. Additionally, make sure to consider the height of the awning when adjusted to ensure that it will clear any obstacles such as doors or windows when fully extended. Another mistake to avoid is not properly securing the awning once it is adjusted.
This can lead to the awning becoming loose or even detaching from the RV while on the road. Always make sure to use the appropriate hardware and tighten all screws and bolts to ensure a secure fit. Additionally, consider using additional support devices such as awning tie-downs or stakes to provide extra stability in windy conditions.
Lastly, be mindful of the weather conditions when adjusting your RV awning. It’s important to retract the awning during heavy rain, wind, or snow to prevent damage. Excessive weight or force from these conditions can cause the awning to become damaged or even collapse.
If you’re unsure about the forecast or experience sudden changes in weather, it’s best to err on the side of caution and retract the awning. In conclusion, adjusting your RV awning doesn’t have to be a daunting task. By avoiding common mistakes such as improper measurements, not securing the awning, and disregarding the weather conditions, you can ensure that your awning provides the shade and protection you need while traveling in your RV.
Maintaining and Cleaning the RV Awning
Are you a proud owner of an RV and want to make the most out of your outdoor space? Then it’s time to learn how to use your RV awning! An RV awning can be a fantastic addition to your vehicle, providing shade and protection from the elements. But to enjoy all its benefits, you need to know how to properly use and maintain it. To start, make sure you have a clear understanding of how to extend and retract the awning safely.
This typically involves releasing a latch or using a crank mechanism. Once fully extended, secure the support arms in place to ensure stability. When it comes to cleaning, it’s essential to regularly remove any dirt, debris, or stains from your awning.
You can use a mild soap and water solution to gently scrub away the grime. Also, be sure to let your awning fully dry before retracting it to prevent mold and mildew growth. By taking the time to learn how to use and clean your RV awning, you’ll be able to enjoy the great outdoors in comfort and style.
Regular maintenance tasks to prolong the lifespan
Regular maintenance tasks are essential for prolonging the lifespan of your RV awning. One specific task that should not be overlooked is cleaning the awning. Over time, dirt, dust, and stains can accumulate on the fabric, making it look unsightly and potentially leading to deterioration.
To clean your RV awning, start by sweeping off any loose debris with a broom or brush. Then, mix a solution of mild soap and water and use a soft brush to scrub the fabric gently. Rinse thoroughly with water to remove all soap residue.
Finally, allow the awning to dry completely before retracting it. By regularly cleaning your RV awning, you can keep it looking great and ensure its longevity.
Cleaning techniques for various types of awning materials
Maintaining and cleaning your RV awning is an essential step in ensuring its longevity and keeping it looking great. However, different types of awning materials require different cleaning techniques. For fabric awnings, start by brushing off any loose dirt and debris.
Then, prepare a solution of water and mild soap and gently scrub the awning with a soft brush or sponge. Make sure to clean both the top and bottom of the fabric. Rinse thoroughly with water and allow it to air dry completely before retracting.
Avoid using harsh chemicals or abrasive cleaning tools, as they can damage the fabric. Vinyl awnings, on the other hand, can withstand more vigorous cleaning. Start by using a stiff brush to remove any dirt or mildew.
Next, mix a solution of warm water and mild soap or a specialized vinyl cleaner. Use a soft brush or cloth to scrub the awning, paying attention to any stubborn stains. Rinse thoroughly and allow it to air dry completely before retracting.
If you notice any tears or rips in the vinyl, be sure to patch them up promptly to prevent further damage. For metal awnings, regular cleaning can help prevent corrosion and preserve their appearance. Start by removing any loose dirt and debris with a soft brush or broom.
Next, mix a solution of warm water and mild detergent and use a soft cloth or sponge to gently scrub the awning. Pay close attention to any areas that are prone to rust or staining. Rinse thoroughly with water and use a dry cloth to buff the metal to a shine.
Tips for storing the RV awning during long periods of non-use
Maintaining and cleaning the RV awning is an essential part of ensuring its longevity and functionality. When storing the RV awning during long periods of non-use, it is important to keep it clean and protected. Before folding up the awning, make sure to remove any debris, such as leaves, twigs, or bird droppings, as these can cause stains and damage over time.
Using a soft brush or a hose with mild soap and water, gently scrub the awning to remove any dirt or grime. Allow the awning to dry completely before folding it up. It is also a good idea to inspect the awning for any signs of wear or damage, such as frayed edges or tears, and make any necessary repairs before storing it.
By taking the time to properly maintain and clean the RV awning, you can ensure that it will be ready for use and in good condition when you are ready to hit the road again.
Conclusion
So there you have it, the adventure-seeking RVers! Now you can confidently and stylishly enjoy the great outdoors with your new RV awning. Remember, using an RV awning is all about finding that perfect balance between comfort and practicality. Whether you’re sipping on a martini while lounging in the shade or using it as a makeshift laundry line, your awning will prove to be a trusty sidekick on your journey.
And hey, if you do find yourself in a predicament of unraveling chaos, just remember the 3 R’s of awning usage: Relax, Rein in, and Rejoice! With a little practice and a whole lot of laughter, you’ll become a pro in no time. So embrace the RV awning lifestyle, my friends! Dwell in the shade, dance in the rain, and bask in the glory of a perfectly pitched canopy. Your fellow campers will envy your skills, your friends will admire your expertise, and even the birds will be impressed by your ability to create the ultimate outdoor getaway.
Oh, and don’t forget to take a moment to appreciate the sheer beauty of your awning as it gracefully flutters in the breeze. It’s like a work of art, a masterpiece of functional design, and a symbol of your nomadic spirit. So go forth, intrepid traveler, and conquer the world with your newfound awning knowledge.
May you always have clear skies, firm ground, and an abundant supply of s’mores. Happy RVing!”
Final thoughts and reminders for using the RV awning safely and effectively
Maintaining and cleaning the RV awning is an essential part of ensuring its longevity and optimal performance. Regular maintenance helps prevent any potential issues and extends the lifespan of the awning. To start, it is crucial to inspect the awning regularly for any signs of damage or wear.
Look out for any tears, holes, or loose seams that may need immediate attention. In addition, it is essential to clean the awning regularly to remove any dirt, debris, or stains. Using a mild detergent and a soft-bristle brush, gently scrub the fabric to remove any stubborn stains.
Be sure to rinse the awning thoroughly and allow it to dry completely before retracting it. Proper maintenance and cleaning will not only keep your RV awning looking its best but also ensure that it functions optimally for years to come.
FAQs
How do I use my RV awning?
To use your RV awning, start by unlocking the arms and pulling the awning out. Secure the arms in place and adjust the pitch to ensure proper water runoff. Use the provided rods or straps to secure the awning fabric to the ground. When retracting the awning, reverse the steps and make sure the fabric is dry before storing.
Can I leave my RV awning out in the rain?
While most RV awnings are designed to withstand light rain showers, it is generally recommended to retract the awning during heavy rain or storms. Excessive rain or strong wind can damage the awning fabric or frame, so it’s best to err on the side of caution and retract it when uncertain about the weather conditions.
How do I clean my RV awning?
To clean your RV awning, start by sweeping off any loose dirt or debris. Then, mix a solution of mild soap and water and use a soft brush or mop to gently scrub the awning fabric. Rinse thoroughly and allow it to air dry. Avoid using harsh chemicals or abrasive cleaners as they can damage the fabric or coating.
Can I use my RV awning in high winds?
It is not recommended to use your RV awning in high winds. Even though some awnings have wind sensors and automatic retraction features, it’s best to retract the awning when wind speeds exceed the recommended limits specified by the manufacturer. Strong winds can cause the awning to flap or tear, potentially leading to costly repairs or replacement.
How do I adjust the pitch of my RV awning?
To adjust the pitch of your RV awning, locate the adjustment knobs or levers on the awning arms. Loosen the knobs or levers and carefully lift or lower one side of the awning to achieve the desired pitch. Once adjusted, tighten the knobs or levers to secure the position. It’s important to note that the pitch should be adjusted to allow water to run off the awning and prevent pooling.
Can I install an RV awning on my own?
While it is possible to install an RV awning on your own, it is generally recommended to have it professionally installed. Proper installation ensures that the awning is securely attached and functioning correctly. DIY installation can be challenging, especially for beginners, and may result in damage or incorrect alignment.
How do I maintain my RV awning?
Regular maintenance is essential to prolong the lifespan of your RV awning. Keep the awning clean, remove any debris or leaves, and regularly inspect for signs of wear or damage. Lubricate moving parts, such as hinges or cranks, with silicone spray to prevent rust and ensure smooth operation. Additionally, store the awning properly when not in use to protect it from the elements.