
Hey there! Are you ready to dive into the world of introductions? We all know that the first impression matters, whether it’s meeting someone new or starting to read a blog. An introduction sets the tone for what lies ahead, piquing your interest and making you want to know more. Think of an introduction as the opening act of a concert, grabbing your attention and setting the stage for the main event.
It’s like the first bite of a delicious meal, tantalizing your taste buds and making you crave more. It’s the opening scene of a captivating movie, drawing you in and making you eager to discover what happens next. But what makes a good introduction? It needs to be engaging, captivating, and make the reader want to keep reading.
It should be like a trail of breadcrumbs leading you deeper into the story, giving you just enough information to keep you hooked. So whether you’re writing a blog, a book, or even just introducing yourself to someone new, crafting a compelling introduction is key. Think about what makes you sit up and take notice, what grabs your attention and makes you want to learn more.
In this blog, we’ll explore the art of the introduction, delving into different techniques and strategies to create introductions that captivate and compel. From clever storytelling to intriguing questions, we’ll cover it all. So get ready to master the art of introductions and make a lasting impression.
Whether you’re a seasoned writer or just starting out, this blog is for you. Let’s dive in and unlock the secrets of compelling introductions together!
Table of Contents
What is an awning?
Installing a new awning on your RV can be a great addition to enhance your outdoor experience while traveling. An awning is a type of cover that is typically attached to the side of a vehicle, such as an RV or camper, to provide shade and protection from the elements. It is a versatile feature that can be used for various purposes, such as creating a comfortable outdoor living space, sheltering from rain or intense sun, and even extending the available space of your vehicle.
Installing a new awning can be a straightforward process, but it does require some careful planning and consideration. First, you will need to measure the area where you want to install the awning to ensure that it will fit properly. Then, you will need to choose the right type and size of awning for your RV, considering factors such as the material, color, and functionality.
Once you have selected the awning, you can begin the installation process by following the manufacturer’s instructions and using any necessary tools or hardware. It is important to ensure that the awning is securely and properly attached to your RV to avoid any accidents or damage. Once the awning is installed, you can enjoy the added comfort and convenience it provides during your outdoor adventures.
Benefits of installing a new awning on your RV
Are you looking to upgrade your RV? Adding a new awning can provide several benefits that make it a worthwhile investment. First and foremost, a new awning can enhance the overall appearance of your RV. It gives it a fresh and updated look, making it more appealing to you and others.
Additionally, installing a new awning can provide you with a more comfortable outdoor living space. Whether you’re enjoying a meal outside or just relaxing in the shade, an awning can provide protection from the sun and other elements. Furthermore, a new awning can increase the value of your RV.
If you ever decide to sell or trade in your RV, the addition of a new awning can make it more attractive to potential buyers. Lastly, a new awning can also help to prolong the life of your RV by protecting it from the sun’s harmful rays and preventing damage from elements like rain and snow. Overall, installing a new awning on your RV is a great way to enhance its appearance, provide added comfort, increase its value, and protect it from the elements.
So why wait? Get started on installing a new awning on your RV today and start enjoying all of the benefits it has to offer.
Choosing the right awning for your RV
Installing a new awning on your RV can greatly enhance your outdoor camping experience. But with so many options available, how do you choose the right one? Here are some factors to consider when selecting an awning for your RV. First, consider the size and layout of your RV.
Measure the width of your RV and choose an awning that will fit properly. Next, think about the type of material you want for your awning. Vinyl and acrylic are popular choices, as they are durable and weather-resistant.
Additionally, consider the method of operation. Manual awnings require manual labor to extend and retract, while electric awnings can be operated with the push of a button. Finally, think about the aesthetics of the awning.
Choose a color or pattern that complements the exterior of your RV. Once you have selected the right awning, installation is relatively simple. Follow the manufacturer’s instructions and seek assistance if needed.
With your new awning in place, you’ll be ready to relax and enjoy the great outdoors in style.
Size and dimensions
awning, RV, size, dimensions When it comes to selecting the perfect awning for your RV, size and dimensions play a crucial role. It’s important to choose an awning that fits properly and complements the overall design of your RV. One popular option is a retractable awning, which allows you to extend and retract the awning as needed.
This gives you the flexibility to create shade or protection from the elements whenever you want. Another consideration is the size of the awning. You want to make sure it provides enough coverage for your specific needs, whether that’s creating a comfortable outdoor living space or shielding your RV from the sun’s rays.
Taking accurate measurements of your RV’s exterior will help you determine the appropriate size and dimensions for your awning. Additionally, considering the material and durability of the awning is important, as you want it to withstand the rigors of outdoor use. Overall, choosing the right awning for your RV involves considering factors such as size, dimensions, functionality, and style to ensure you enjoy the benefits of a well-fitted and high-quality awning.
Material and durability
When it comes to choosing the right awning for your RV, one of the important factors to consider is the material and durability. RV awnings are exposed to the elements, so it’s crucial to select a material that can withstand rain, wind, and UV rays. The most common materials for RV awnings are vinyl and acrylic.
Vinyl is a durable and affordable option, but it may not hold up as well in extreme weather conditions. Acrylic, on the other hand, is more expensive but offers better resistance to fading and mildew. Another important factor to look for is the awning’s frame material.
Most RV awnings are made from aluminum or steel, with aluminum being the lighter and more corrosion-resistant option. Overall, choosing a high-quality material and durable frame will ensure that your RV awning lasts for years to come.
Style and design
rv awning styles, types of awnings, awning design, best rv awning
Tools and materials you will need
When it comes to installing a new awning on your RV, there are a few tools and materials you will need to have on hand. First and foremost, you will need the awning itself. Make sure to measure the space on your RV where the awning will be installed so you can purchase the correct size.
In addition to the awning, you will also need a drill, screws, and a screwdriver. These tools will be necessary for attaching the awning to your RV. Depending on the type of awning you choose, you may also need a ladder or step stool to help with the installation process.
It’s always a good idea to have a level handy to ensure that your awning is properly aligned. Lastly, make sure to have a friend or family member available to help you with the installation. Installing a new awning can be a two-person job to ensure everything is done correctly.
With these tools and materials on hand, you’ll be ready to install your new awning and enjoy the shade and comfort it provides on your next RV adventure.
Awning kit
The first step in installing an awning is gathering all the necessary tools and materials. To ensure a smooth installation process, you will need a few specific items. First and foremost, you’ll need an awning kit, which typically includes the main structure of the awning, such as the frame and brackets.
It’s important to choose a kit that is appropriate for the size of your desired awning and that matches the style of your home. Additionally, you’ll need a measuring tape to accurately measure the space where the awning will be installed. This will ensure that the awning fits properly and looks aesthetically pleasing.
A power drill is also necessary for attaching the brackets to the wall. Other tools that may be needed include a level, a hammer, and a stud finder. Lastly, make sure you have the appropriate hardware, such as screws and anchors, to securely fasten the awning.
By gathering all of these tools and materials ahead of time, you’ll be well-prepared to install your awning efficiently and effectively.
Measuring tape
measuring tape, tools and materials, accuracy, construction project, home improvement project, DIY projects In order to ensure accuracy and precision in your construction or home improvement projects, having the right tools is essential. One tool that you will definitely need is a measuring tape. A measuring tape is a flexible ruler that can be used to measure lengths, widths, and heights.
It consists of a long strip of metal or plastic with measurement markings on one side. The tape is usually retractable and can be easily rolled up for convenient storage. Using a measuring tape allows you to accurately measure dimensions and distances, ensuring that your project is done to the proper specifications.
Whether you are building a bookshelf, hanging curtains, or installing a new countertop, a measuring tape is a must-have tool. So, make sure to add this essential item to your toolbox before embarking on your next construction or DIY project.
Drill
drill, tools and materials
Screws
Screws come in various shapes and sizes, making them a versatile tool that is commonly used in many different projects. Whether you’re building a piece of furniture, fixing a loose hinge, or hanging a picture frame, chances are you’ll need screws to get the job done. But before you can start screwing things together, you need to make sure you have the right tools and materials on hand.
So, what exactly do you need? First and foremost, you’ll need a screwdriver. There are different types of screwdrivers available, including flathead and Phillips head, so make sure you have the right one for the job. Additionally, you’ll also need screws themselves.
These can be found in various lengths and widths, so choose the ones that best suit your project. And don’t forget about other necessary items such as drill bits, anchors, and wall plugs if you’re working with harder materials or need extra support. By having all the necessary tools and materials ready, you can ensure that your screwing project goes smoothly.
So gather your supplies and get ready to tackle those household fixes and DIY projects with ease!
Ladder
ladder, tools and materials
Preparing your RV for the installation
So you’ve decided to install a new awning on your RV, but before you dive into the installation process, there are a few important steps you should take to prepare your RV. First and foremost, you’ll want to make sure you have all the necessary tools and materials on hand. This might include a ladder, screwdrivers, a tape measure, and of course, the new awning itself.
It’s also a good idea to closely inspect your RV’s exterior to ensure that it’s in good condition and ready for the installation. This means checking for any signs of damage or wear and tear, and addressing any issues that may arise before proceeding. Additionally, you’ll want to make sure you have a clear and level space to work in.
This could be a driveway or another flat surface where you can easily access all areas of your RV. Finally, it’s important to have a plan in place. Familiarize yourself with the installation instructions that came with your new awning, and consider creating a checklist or timeline to keep yourself organized throughout the process.
With these preparations in place, you’ll be well on your way to successfully installing your new awning and transforming your RV into the ultimate outdoor oasis.
Cleaning the area
One essential step in preparing your RV for the installation of solar panels is ensuring that the area where the panels will be mounted is clean and free of debris. This is important because any dirt, dust, or grime on the surface can affect the efficiency of the panels and the overall functionality of your solar system. To clean the area, start by removing any loose dirt or debris with a broom or a brush.
Then, use a mild detergent mixed with water to wash the surface thoroughly, making sure to remove any stains or stubborn dirt. Rinse the area with clean water and allow it to dry completely before proceeding with the installation. By taking the time to clean the area properly, you will ensure that your solar panels function optimally and provide you with the maximum amount of clean energy possible for your RV adventures.
Removing the old awning (if applicable)
removing old awning, preparing RV for awning installation
Inspecting the mounting area
Preparing your RV for the installation of a mounting area is an essential step in ensuring the success and durability of your setup. Before you begin, it’s important to thoroughly inspect the area where you plan to install the mount. Look for any signs of damage or weak spots that may compromise the stability of the mount.
This could include cracks, rust, or other forms of deterioration. It’s also important to consider the weight and size of the mount you plan to install. Make sure that the mounting area is strong enough to support the weight of the mount and any additional equipment that you plan to attach.
By carefully inspecting and preparing the mounting area, you can ensure that your installation will be safe and secure, allowing you to enjoy your RV adventures without worrying about any issues with the mount.
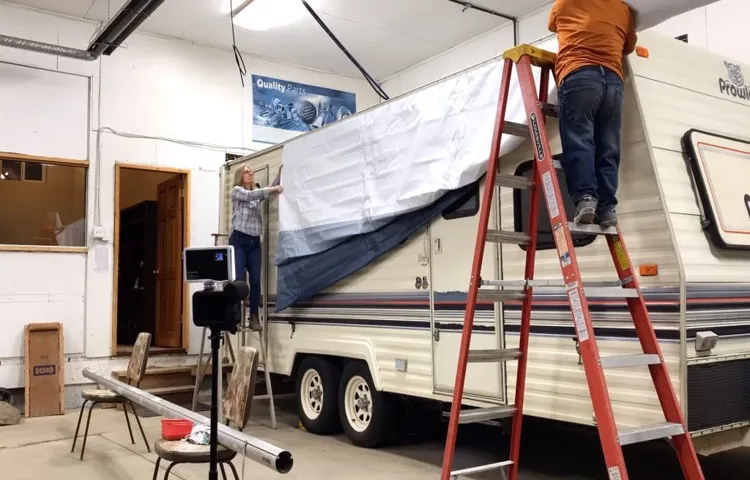
Installing the new awning
Installing a new awning on your RV can be a great way to add extra shade and protection to your outdoor space. To begin the installation process, start by measuring the length of your RV and determining the appropriate size of the awning. Next, gather all the necessary tools, including a drill, screws, and a ladder.
Then, carefully remove the old awning, making sure to disconnect any electrical or plumbing connections that may be attached to it. Once the old awning is removed, clean the area thoroughly to ensure a smooth and secure installation. Finally, follow the instructions provided with the new awning to securely attach it to your RV, making sure to tighten all screws and connections.
With a little patience and some basic DIY skills, you can easily install a new awning on your RV and enjoy the benefits it provides.
Attaching the brackets
“Attaching the brackets” Installing the new awning is an exciting project that can enhance the aesthetic appeal and functionality of your outdoor living space. One crucial step in this process is attaching the brackets to secure the awning in place. Brackets serve as the foundation for the awning, providing support and stability.
Just like the legs of a table, brackets ensure that the awning stands strong against the elements and any potential mishaps. But how do you attach these brackets seamlessly and securely? It’s as simple as following a few steps and using the right tools. Start by positioning the brackets in the desired location on your wall or roof.
Make sure they are level and aligned properly. Then, using a drill or screwdriver, anchor the brackets in place using the provided screws or bolts. Be sure to tighten them securely, but avoid over-tightening as this could damage the awning or the surface it is attached to.
Once the brackets are firmly in place, you’re ready to move on to the next step of installing your new awning.
Mounting the awning
mounting the awning, installing the new awning. Hey there! Are you ready to upgrade your outdoor space with a brand new awning? Well, you’re in luck because I’m here to guide you through the process of installing it. Mounting the awning may seem like a daunting task, but with the right tools and a little bit of patience, you’ll have it up and shading your patio in no time.
To start, make sure you have all the necessary materials handy. This includes the awning itself, mounting brackets, screws, a power drill, and a measuring tape. It’s always best to double-check that you have everything before you begin.
Trust me, you don’t want to be halfway through the installation only to realize you’re missing a crucial piece. Next, you’ll want to measure the area where you plan to mount the awning. This will help ensure that it fits properly and provides adequate coverage for your outdoor space.
Measure the width of the area and mark it with a pencil or piece of tape. You’ll also want to take into consideration any obstacles such as windows, doors, or gutters that may be in the way. Once you have your measurements, it’s time to attach the mounting brackets.
These brackets will serve as the foundation for your awning, so it’s important to secure them properly. Use your power drill to screw the brackets into the wall, making sure they are level and evenly spaced. If you’re unsure about this step, it might be helpful to have a friend or family member assist you.
Now comes the exciting part – attaching the awning to the brackets. Carefully lift the awning and slide it onto the brackets, making sure it locks into place. Double-check that it is securely attached and give it a gentle tug to test its stability.
Setting the tension
Installing a new awning can greatly improve the functionality and aesthetic appeal of any outdoor space. One important step in this process is setting the tension of the awning fabric. This ensures that the awning is properly stretched and will provide optimal shade and protection.
To set the tension, you will first need to loosen the bolts on the awning arms. Next, extend the awning fully and have someone hold it in place. Then, gradually tighten the bolts on both arms while making sure the fabric is evenly taut.
It’s important to find the right balance – too loose and the fabric may sag, while too tight could put unnecessary strain on the awning mechanism. By properly setting the tension, you can ensure that your new awning not only looks great but also functions effectively for years to come.
Testing and adjusting the awning
Installing a new awning on your RV can greatly enhance your outdoor living space and provide you with shade and protection from the elements. Once you have successfully attached the awning to your RV, it is important to test and adjust it to ensure it is functioning properly. Begin by gently extending the awning to its full length, making sure it rolls out smoothly and without any obstructions.
Next, check that the arms and hardware are securely in place and that the fabric is taut and evenly aligned. If adjustments are needed, consult the manufacturer’s instructions for guidance on tightening or loosening the components as necessary. Finally, test the retraction of the awning, ensuring that it rolls up neatly without any snags or jams.
By properly testing and adjusting your new awning, you can ensure that it will provide you with many years of reliable use on your RV adventures.
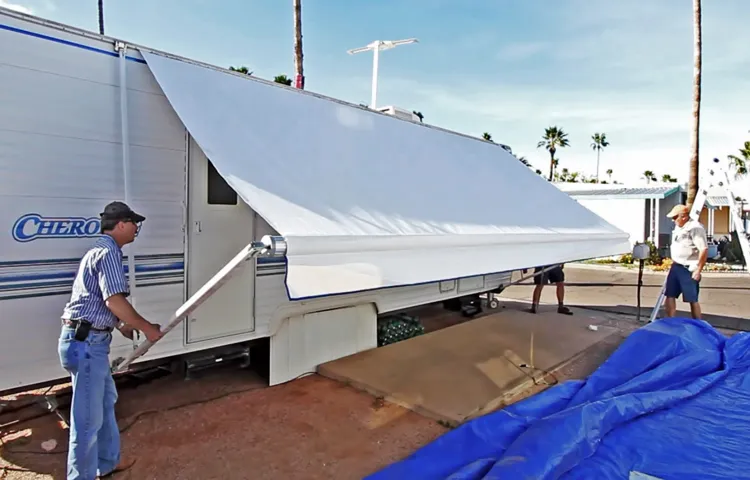
Opening and closing the awning
awning, opening and closing, testing and adjusting Opening and closing the awning may seem like a simple task, but there are a few important things to consider to ensure that it operates smoothly and safely. To begin, you will want to start by unlocking the awning, typically done by releasing a latch or lever. Once the awning is unlocked, you can begin to open it by gently pulling on the handle or strap.
It’s important to apply even pressure and avoid forcing the awning open, as this could lead to damage or misalignment. As you open the awning, you will notice that it extends outward, providing shade and protection from the elements. When it comes time to close the awning, the process is essentially the reverse of opening it.
You will want to make sure that you are standing in a position where you can safely reach the handle or strap, and then slowly and carefully guide the awning back towards the closed position. It’s important to be mindful of any obstacles or obstructions that may be in the way, as well as any potential hazards such as strong winds or heavy rain. Once the awning is closed, you can lock it securely in place to prevent it from opening unintentionally.
In order to ensure that your awning is functioning properly and remains in good condition, it’s a good idea to periodically test and adjust it. This can help to identify any issues or areas that may need attention, allowing you to address them before they become bigger problems. When testing the awning, you will want to pay close attention to how smoothly it opens and closes, as well as how securely it locks in place.
If you notice any sticking or resistance, this could indicate a need for adjustment or maintenance. Additionally, it’s important to check for any signs of wear or damage, such as fraying fabric or bent components. These issues should be addressed promptly to prevent further damage and ensure the longevity of your awning.
By regularly testing and adjusting your awning, you can ensure that it continues to provide the shade and protection you need for many years to come.
Adjusting the pitch
adjusting the pitch, testing and adjusting the awning.
Securing the awning
securing the awning, testing and adjusting the awning, awning installation, awning safety, outdoor shade solution. When it comes to enjoying the great outdoors, having a secure and reliable awning can make all the difference. Not only does it provide shade and protection from the elements, but it also adds a touch of style to any outdoor space.
However, in order to ensure that your awning is both functional and safe, it’s important to properly test and adjust its settings. Before installation, it’s crucial to carefully follow the manufacturer’s instructions and safety guidelines. Once the awning is installed, take the time to test its stability by gently applying pressure from different angles.
This will help identify any weak points or areas that may need additional reinforcement. Additionally, it’s important to adjust the awning’s pitch to ensure proper water drainage and prevent water from pooling on the fabric. Regularly inspecting and securing the bolts, nuts, and other hardware will also help to maintain the integrity of the awning.
By taking these steps, you can enjoy a secure and long-lasting outdoor shade solution. So go ahead, relax, and enjoy the outdoors knowing that your awning is properly secured and ready to provide you with the shade you need.
Maintaining your new awning
Installing a new awning on your RV can be a great way to enhance your outdoor living space and provide protection from the elements. But once the installation is complete, it’s important to take steps to maintain and care for your new awning to ensure its longevity. One key aspect of awning maintenance is keeping it clean.
Over time, dirt, pollen, and other debris can accumulate on the awning fabric, which not only looks unsightly but can also cause damage. Regularly sweeping or hosing off the fabric will help prevent dirt buildup and maintain its appearance. Additionally, be sure to check for any signs of wear or damage, such as tears or loose stitching, and address them promptly.
By taking these simple steps, you can keep your new awning in great shape and enjoy the outdoors in style for years to come.
Cleaning and removing dirt and stains
Maintaining your new awning can keep it looking fresh and vibrant for years to come. One of the most important aspects of maintenance is regular cleaning to remove dirt and stains. Start by sweeping off any loose debris, such as leaves or twigs, with a broom.
Then, using a garden hose with a gentle spray nozzle, rinse the awning thoroughly to remove any surface dirt. For more stubborn stains, a mixture of mild soap and warm water can be used. Gently scrub the stained areas with a soft brush or sponge, being careful not to apply too much pressure that could damage the fabric.
Rinse the soap away completely with the hose and allow the awning to air dry. It’s important to avoid using harsh cleaning chemicals or abrasive tools, as these can cause discoloration or damage to the fabric. By following these simple cleaning tips, you can ensure that your new awning remains pristine for years to come.
So, why not give it a try and enjoy the fresh look of your awning?
Inspecting for damage and wear
When it comes to maintaining your new awning, one important aspect to consider is inspecting for any damage or wear. This is crucial to ensure the longevity and functionality of your awning. Regular inspections can help you catch any small issues before they become larger problems.
Take some time to closely inspect the fabric, frame, and any moving parts of your awning. Look for signs of wear, such as frayed or faded fabric, loose or rusted screws, or any cracks in the frame. If you notice any damages, it’s important to address them as soon as possible to prevent further deterioration.
By regularly inspecting your awning, you can ensure that it stays in great condition for years to come.
Replacing parts if needed
Maintaining your new awning is crucial to ensuring its longevity and functionality. One important aspect of maintenance is replacing parts if needed. Over time, certain components of your awning may wear out or become damaged due to weather conditions or regular use.
By replacing these parts promptly, you can prevent further damage and extend the lifespan of your awning. Some common parts that may need replacing include the fabric, the motor, or the arms of the awning. If you notice any tears, fraying, or malfunctioning components, it is best to contact a professional to assess the situation and replace the necessary parts.
Remember, regular inspections and maintenance can help in identifying issues before they become major problems. By taking good care of your awning and promptly replacing any worn-out parts, you can enjoy a beautiful and functional outdoor space for years to come.
Conclusion
In conclusion, installing a new awning on your RV is like adding a stylish hat to a well-dressed outfit – it not only provides shade and protection, but also enhances the overall look and feel of your mobile home. Just like a well-coordinated accessory, a new awning can instantly upgrade the appearance of your RV, making it the envy of all the other campers at the campground. So, don’t let the process intimidate you – just remember to measure twice, drill once, and follow the instructions with the precision of a NASA scientist.
With a little bit of effort and a touch of craftsmanship, you’ll have your new awning installed and ready to make a fashion statement on your next road trip. Happy camping, stylish explorers!”
FAQs
Can I install a new awning on my RV by myself?
Yes, it is possible to install a new awning on your RV by yourself. However, it is recommended to have some basic knowledge of tools and DIY skills. If you are unsure, it is always best to seek professional help.
What tools do I need to install a new awning on my RV?
To install a new awning on your RV, you will need the following tools: a drill, screws, a screwdriver, a tape measure, a level, and a ladder. It is also recommended to have someone to assist you during the installation process.
How long does it take to install a new awning on an RV?
The time required to install a new awning on an RV can vary depending on your level of experience and the specific awning model. On average, it may take a couple of hours to a full day to complete the installation.
Can I replace my old awning with a larger one?
Yes, it is possible to replace your old awning with a larger one. However, you need to ensure that the new awning is compatible with your RV’s dimensions and structure. It is also important to consider any weight limitations or potential additional support required for a larger awning.
How much does it cost to install a new awning on an RV?
The cost of installing a new awning on an RV can vary depending on factors such as the awning type, size, and brand. On average, you can expect to pay anywhere between $500 to $1500 for the awning and installation services. It is recommended to obtain quotes from different suppliers or service providers to get an accurate estimate.
Can I install a retractable awning on my RV?
Yes, you can install a retractable awning on your RV. Retractable awnings offer the advantage of adjustable shade and can be easily extended or retracted as needed. However, it is important to ensure proper measurements and installation to avoid any damage to your RV or the awning itself.
Are there any maintenance tips for RV awnings?
Yes, regular maintenance is important to keep your RV awning in good condition. Some maintenance tips include: cleaning the awning fabric regularly with mild soap and water, avoiding leaving the awning open during strong winds or storms, and inspecting the awning for any signs of wear or damage. It is also recommended to lubricate the retractable mechanism of a retractable awning annually.