
Are you looking for a way to create some shade for your RV, so you can relax and enjoy the great outdoors without the scorching sun beating down on you? Well, look no further! In this blog, we will show you how to make your very own RV awning sunshade, so you can create a cool, comfortable space outside your RV. Whether you’re parked at a campground or boondocking in the wilderness, having a sunshade can make all the difference in your outdoor experience. It’s like having your own personal oasis, providing relief from the heat and protecting you from harmful UV rays.
So, let’s dive in and learn how to create this DIY project that will transform your RV setup.
Table of Contents
Introduction
If you’re looking to provide some extra shade for your RV awning, a sunshade is a great solution. Not only will it protect you from the sun’s harsh rays, but it will also help to keep your RV cooler during those hot summer days. Making a sunshade for your RV awning is a simple DIY project that can easily be done with a few basic materials.
All you need is some shade fabric, grommets, and bungee cords. First, measure the length and width of your RV awning. Then, cut the shade fabric to match these measurements, leaving a little extra on each side for hemming.
Next, fold over the edges of the fabric and sew them to create a clean hem. Once your fabric is hemmed, install the grommets along the edge of the fabric, spacing them evenly. Finally, attach the bungee cords to the grommets and secure them to your RV awning.
Now you have a custom sunshade for your RV awning that will provide you with the extra shade you need.
What is an RV Awning Sunshade?
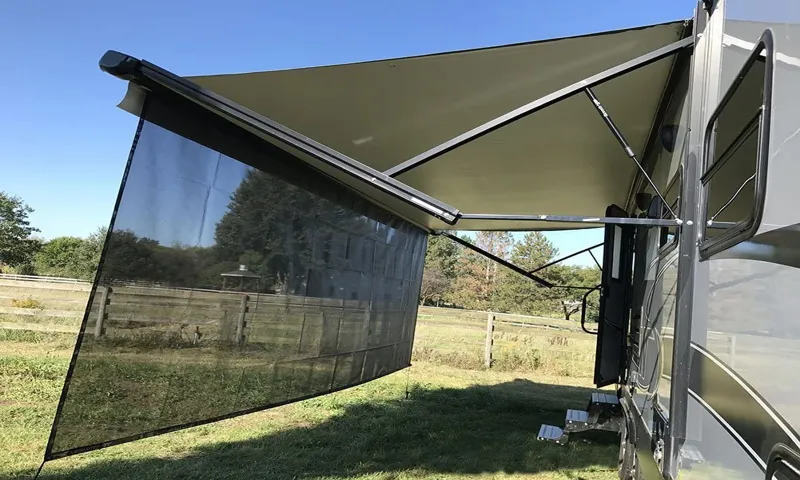
rv awning sunshade
Benefits of Using an RV Awning Sunshade
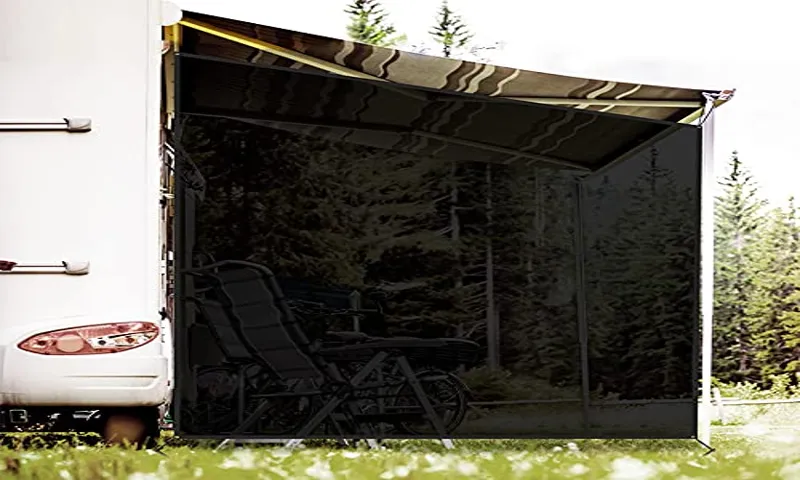
RV awning sunshades provide numerous benefits for anyone traveling in an RV. These sunshades are specifically designed to block out the harsh rays of the sun, providing much-needed shade and protection from the heat. They can be easily attached to the awning of the RV and provide a comfortable and cool space to relax and enjoy the outdoors.
Whether you’re camping in a hot and sunny location or just want some extra shade on a warm day, an RV awning sunshade is a must-have accessory. It not only helps to keep you cool and comfortable but also protects your skin from harmful UV rays.
Materials Needed
If you’re looking to make your own RV awning sunshade, you’ll need a few materials to get started. First, you’ll need a sturdy and lightweight fabric that can block out the sun’s rays. Look for one that is easy to clean and resistant to tears and fades.
Next, you’ll need some grommets or eyelets to attach the shade to your RV awning. These can be found at a hardware or camping supply store. You’ll also need some heavy-duty rope or bungee cords to secure the shade in place.
Finally, you’ll need some basic tools such as scissors, a hammer, and a grommet setting tool. With these materials in hand, you’ll be ready to create your own custom RV awning sunshade and enjoy the shade and comfort it provides on your next camping trip.
Fabric
fabric, material, materials needed. When it comes to sewing, choosing the right fabric is essential to ensure that your project turns out just the way you envision it. There are so many different types of fabrics to choose from, each with its own unique properties and characteristics.
So, what are the materials needed for sewing? Well, it really depends on the project you’re working on. If you’re making a garment, you’ll need fabric, of course, along with some thread and a sewing machine. But if you’re making something like a pillow or a quilt, you may also need some batting and stuffing to give it that plush feel.
Other materials that you might need include buttons, zippers, and trims, depending on the design and style you’re going for. The options are truly endless, and that’s what makes sewing so exciting! So, the next time you’re planning a sewing project, take some time to consider the materials you’ll need, and let your creativity run wild!
Grommets
If you’re looking to add grommets to your DIY projects or clothing, there are a few materials you’ll need. First and foremost, you’ll need the grommets themselves. Grommets are typically made of metal and come in various sizes and finishes.
They are designed to be durable and withstand a lot of wear and tear. You’ll also need a grommet setter or an eyelet setting tool. This tool is used to secure the grommets in place by applying pressure to the sides of the grommet.
It’s important to choose a grommet setter that is compatible with the size of your grommets. Additionally, you’ll need a hole punch or an awl to create the holes where the grommets will be inserted. This can be done by hand or with a mallet for added force.
Lastly, you may want to consider using a cutting mat or a hard surface to protect your work area when setting the grommets. By having these materials on hand, you’ll be ready to add grommets to your projects with ease.
Rope
“rope materials” When it comes to rope, there are a variety of different materials you can choose from. Each material has its own unique properties and benefits, so it’s important to choose the right one for your specific needs. One popular material for ropes is nylon.
Nylon is known for its strength and durability, making it a great choice for heavy-duty applications. It’s also resistant to mold, mildew, and rot, which makes it ideal for outdoor use. Another common material is polyester.
Polyester ropes are known for their low stretch and high strength, making them perfect for activities like rock climbing or sailing. If you’re looking for a natural option, you might consider hemp. Hemp ropes are eco-friendly and biodegradable, making them a great choice for those concerned about the environment.
Jute is another natural material that is often used in ropes. Jute ropes are lightweight and flexible, making them ideal for decorative purposes. Ultimately, the right material for your rope will depend on factors like the intended use and your personal preferences.
Bungee Balls
bungee balls, materials needed
Measuring and Cutting the Fabric
When it comes to making your own RV awning sunshade, measuring and cutting the fabric is a crucial step. First, determine the desired width and length of the sunshade. Measure the width of your RV’s awning and add a few inches to account for overhang.
Next, measure the desired length of the sunshade, keeping in mind that it should extend beyond the awning to provide adequate coverage. Once you have your measurements, use a straightedge and a fabric marker to mark the dimensions on the fabric. Then, using sharp fabric scissors or a rotary cutter, carefully cut along the marked lines.
Be sure to cut straight and clean lines to ensure a professional-looking finish. Remember to double-check your measurements before cutting to avoid any mistakes. With the fabric cut, you’re now one step closer to creating your very own RV awning sunshade.
Measuring the Awning
awning, measuring, cutting, fabric, burstiness
Cutting the Fabric
Cutting the fabric is a crucial step in any sewing project. It can make or break the final result, so it’s important to get it right. The first step in measuring and cutting the fabric is to determine the dimensions needed for your project.
This can be done by referring to the pattern instructions or by measuring the area where the fabric will be used. Once you have the measurements, it’s time to lay out the fabric and start cutting. A good technique is to fold the fabric in half, aligning the selvage edges.
This ensures that the fabric is straight and the pattern pieces will be the correct size. To make accurate cuts, it’s essential to use a sharp pair of fabric scissors. These scissors are designed to glide smoothly through fabric, resulting in clean edges.
When cutting, it’s important to follow the cutting lines on the pattern and to cut with precision. Taking your time and being cautious will help avoid mistakes and ensure that your fabric pieces are cut correctly. Remember, it’s always better to cut a little bit bigger than needed and trim down later, rather than cutting too small and having to start over.
So take your time, measure twice, and cut once to achieve professional-looking results in your sewing projects.
Attaching Grommets
Making an RV awning sunshade can provide much-needed shade and protection from the sun during your outdoor adventures. One important step in creating this DIY project is attaching grommets to the fabric. Grommets, small metal rings, allow you to securely fasten the sunshade to your RV and prevent it from sagging or coming loose in the wind.
To attach grommets, start by marking where you want them to be placed on the fabric. Then, use a grommet tool to punch a hole through the fabric at each mark. Once you have punched all the holes, insert a grommet into each hole and use the grommet tool to secure them in place.
This will ensure that your RV awning sunshade is stable and will stay in place while you enjoy the outdoors. So why not give it a try and create your own customized sunshade for your RV?
Placement of Grommets
The placement of grommets is an important step in various DIY projects, such as making curtains, tarps, or even clothing. Grommets are small metal rings that are used to reinforce holes in fabrics or materials, allowing them to be threaded or attached to another object. Attaching grommets may seem intimidating at first, but it’s actually a straightforward process that can be easily accomplished with the right tools and techniques.
First, you’ll need to mark the exact spot where you want the grommet to be placed. Then, using a grommet tool or kit, you’ll punch a hole through the fabric at the marked spot. The grommet is then inserted into the hole, with one side of the grommet on the front of the fabric and the other side on the back.
Finally, the grommet is secured in place by either folding down the metal tabs or using a grommet setting tool. With a little practice, you’ll be able to attach grommets with ease and achieve professional-looking results. So, why not give it a try and take your DIY projects to the next level?
Securing Grommets
grommets Are you looking for a way to secure your grommets? Well, you’ve come to the right place! Attaching grommets is an essential step in many projects, whether it’s adding them to curtains, tarps, or even shoes. The purpose of grommets is to reinforce holes in fabric or materials and provide a sturdy anchor point for cords, hooks, or laces. There are a few different methods you can use to attach grommets, depending on the materials you are working with and the tools you have available.
One popular method is using a grommet tool kit, which typically includes a punch, setter, and anvil. You simply punch a hole through the material using the punch, place the grommet on the setter and position it over the hole, and then use the anvil to hammer the grommet into place. This method is relatively simple and effective, but it does require some manual force and can be time-consuming if you have a large number of grommets to attach.
Alternatively, if you don’t have access to a grommet tool kit, you can use a hand press or even a hammer and a block of wood to secure your grommets. The process is similar to using a grommet tool kit, but instead of using specialized tools, you are using household items. Simply punch a hole through the material using a sharp tool, position the grommet over the hole, and then use the hand press or hammer and block of wood to apply pressure and secure the grommet.
No matter which method you choose, it’s important to remember to take your time and work carefully. If the grommet is not properly aligned or secured, it may come loose over time, which can be frustrating and potentially dangerous if it is supporting heavy loads. It’s also a good idea to practice on a scrap piece of material before working on your final project to ensure that you are comfortable with the process and can achieve a professional-looking result.
So, go ahead, give it a try, and enjoy the satisfaction of securely attaching your grommets!
Installing the Sunshade
So you’ve decided to add a sunshade to your RV awning – great choice! Installing a sunshade can provide much-needed shade and privacy during those hot summer days. Plus, it’s a relatively easy DIY project that can be done in just a few simple steps. First, measure the length of your awning, as this will determine the size of the sunshade you’ll need.
Once you have the measurements, you can purchase a sunshade that matches the length of your awning. Next, attach the sunshade to the awning using the provided hooks or clips. Make sure to secure the sunshade tightly so that it doesn’t flap or come loose in the wind.
Finally, extend your awning and enjoy the shade! It’s as simple as that. With a sunshade installed, you’ll be able to relax and enjoy your outdoor space without worrying about the harsh sun. So go ahead and get started – your RV will thank you!
Attaching the Rope
“Attaching the Rope” Installing the Sunshade Now that you’ve got your sunshade all set up, it’s time to tackle the next step: attaching the rope. While this may seem like a simple task, it’s important to take the time to do it right. After all, the rope is what will hold your sunshade securely in place, protecting you from those scorching rays of sunlight.
So grab your rope and let’s get started! First, find the attachment points on your sunshade. These are typically located at the corners of the shade and may be reinforced with extra fabric or stitching. Once you’ve located these points, take your rope and thread it through each attachment point, making sure to leave some excess rope for tying later on.
Next, it’s time to secure the rope. Start by tying a simple knot at one end of the rope, making sure it’s tight and secure. Then, take the other end of the rope and tie it to a sturdy anchor point.
This could be a tree, a post, or even a sturdy stake driven into the ground. Again, make sure the knot is tight and secure, as the last thing you want is your sunshade coming loose in the wind. Now that your rope is securely attached, take a step back and admire your handiwork.
You’ve successfully installed your sunshade, and now you can sit back and relax in the shade. But before you do, make sure to test the tension of the sunshade by giving it a gentle tug. It should be taut and secure, with no slack or sagging.
By taking the time to properly attach the rope, you ensure that your sunshade will stay in place, even on windy days. So next time you’re out enjoying the great outdoors, you can do so without worrying about the sun beating down on you. Happy shading!
Securing the Sunshade with Bungee Balls
Securing the Sunshade with Bungee Balls Now that you’ve got your sunshade ready to go, it’s time to install it and make sure it stays in place while you enjoy the shade. One of the best ways to secure your sunshade is by using bungee balls. These handy little accessories are perfect for keeping your sunshade securely fastened to your vehicle.
To install the sunshade, start by positioning it on your windshield. Make sure it covers the entire glass area and that the corners are lining up with the edges of your windshield. Once you have it in the right position, take the bungee balls and loop them through the grommets on the corners of the sunshade.
The great thing about bungee balls is that they provide a strong and secure hold, while still being easy to use. Simply stretch the bungee ball, slide it through the grommet, and release it. The elastic nature of the bungee ball will then create tension and keep the sunshade in place.
Not only do bungee balls provide a reliable hold, but they also offer flexibility. Unlike other securing methods, such as suction cups or magnets, bungee balls can stretch and adjust to your windshield’s shape, ensuring a snug fit. This means you won’t have to worry about your sunshade shifting or falling off while you’re driving.
Another advantage of using bungee balls is that they are quick and hassle-free to remove. If you need to remove the sunshade temporarily or take it off completely, just pull on the bungee ball to release the tension and slide it out of the grommet. It’s as simple as that.
So, when it comes to securing your sunshade, bungee balls are definitely the way to go. They provide a strong hold, adjust to your windshield’s shape, and are easy to use. With bungee balls, you can enjoy the shade without any worries of your sunshade flying off.
Maintenance and Care
If you want to enjoy your RV awning without sweltering in the heat, a sunshade is a must-have accessory. The good news is that adding a sunshade to your RV awning is a simple and straightforward process. First, you’ll want to measure the width of your RV awning and choose a sunshade that matches those dimensions.
Once you have your sunshade, installation is a breeze. Start by attaching the sunshade to the awning roller using the included attachment hardware. Make sure to securely tighten the attachments to ensure a snug fit.
Once the sunshade is attached to the roller, simply extend the awning and secure the other end of the sunshade using the included guy lines or bungee cords. It’s important to note that the sunshade should be taut but not overly tight to prevent any damage to the awning. Once everything is in place, you’ll have a shaded and comfortable outdoor living space to enjoy during your RV adventures.
Cleaning the Sunshade
maintenance and care, cleaning the sunshade
Storing the Sunshade
sunshade storage, care and maintenance, storing the sunshade When it comes to taking care of your sunshade, proper storage is important to ensure its longevity and functionality. After a long day of enjoying the shade, you should make a habit of properly storing your sunshade to protect it from damage and extend its lifespan. First, always make sure that the sunshade is clean and dry before storing it.
Any debris or moisture left on the fabric can lead to mold or mildew growth. It’s a good idea to give it a quick wipe down with a soft cloth or brush to remove any dirt or dust particles. Once it’s clean and dry, you can fold it up neatly and store it in a cool, dry place.
It’s important to keep it away from direct sunlight, as prolonged exposure can cause the fabric to fade or become brittle. If possible, store your sunshade in a carrying bag or protective cover to keep it safe from any accidental damage. By following these simple steps, you can ensure that your sunshade will be ready for use whenever you need it and will last for many years to come.
Conclusion
In conclusion, creating your own RV awning sunshade is not only a cost-effective and practical solution, but it also adds a touch of personalization and creativity to your outdoor living space. By following these simple steps and using materials readily available at your local hardware store, you can easily transform your RV awning into a shady oasis that will keep you cool and comfortable wherever your adventures take you. So, go ahead and embrace your inner DIY enthusiast, and let the sun shine on your creativity while keeping the sun’s rays at bay!”
Enjoying the Shade with Your Homemade RV Awning Sunshade
When it comes to enjoying the shade with your homemade RV awning sunshade, maintenance and care are essential. Taking proper care of your sunshade will ensure that it lasts for many seasons to come. One important aspect of maintenance is regular cleaning.
Over time, dirt, pollen, and other debris can accumulate on the fabric, which can not only affect its appearance but also its performance. By using a mild soap and water solution, you can easily clean your sunshade and keep it looking its best. Additionally, it’s important to inspect your sunshade regularly for any signs of wear or damage.
Look for any tears or fraying and address them promptly to prevent further damage from occurring. Taking the time to properly maintain and care for your homemade RV awning sunshade will allow you to continue enjoying the shade and protection it provides on your outdoor adventures.
FAQs
What are the benefits of using an RV awning sunshade?
Using an RV awning sunshade can provide protection from the sun’s rays, keeping your RV cooler and preventing UV damage to your awning and outdoor furniture. It also offers added privacy and can help to reduce glare inside your RV.
How do I install an RV awning sunshade?
Installing an RV awning sunshade is typically a straightforward process. First, extend your RV awning fully. Attach the sunshade to the top of your awning using the included clips or hooks. Secure the bottom of the sunshade using bungee cords or ropes. Adjust the tension and positioning as needed. Be sure to follow the manufacturer’s instructions for your specific sunshade.
Can I leave my RV awning sunshade up during bad weather?
It is generally recommended to retract your RV awning and remove the sunshade during high winds, heavy rain, or storms. While some sunshades are designed to withstand mild weather conditions, prolonged exposure or extreme weather can cause damage. Always use your discretion and check the weather forecast before leaving your sunshade in place.
How do I clean my RV awning sunshade?
Cleaning your RV awning sunshade is usually a simple process. Start by retracting your awning and removing the sunshade from the clips or hooks. Lay the sunshade flat on a clean surface and use a soft bristle brush or sponge to remove any dirt or debris. You can also use a mild detergent or RV awning cleaner for more stubborn stains. Rinse thoroughly with clean water and allow it to dry completely before reattaching to your awning.
Can I use my RV awning sunshade with other RV accessories?
Yes, you can use your RV awning sunshade with other accessories like RV lights, wind deflectors, or outdoor speakers. Ensure that you properly install and secure each accessory, following the manufacturer’s instructions. Consider the weight and balance of your awning when adding additional items.
Are there different types of RV awning sunshades available?
Yes, there are different types of RV awning sunshades available to suit your needs. Some options include mesh sunshades that provide shade while allowing airflow, privacy screen sunshades that offer increased privacy, and reflective sunshades that help to block out heat. Choose a sunshade that fits your preferences and offers the desired level of sun protection.
How do I maintain and prolong the lifespan of my RV awning sunshade?
To maintain and prolong the lifespan of your RV awning sunshade, regularly clean it and check for any signs of wear or damage. Repair or replace any damaged components promptly. Avoid prolonged exposure to harsh weather conditions and always retract your awning and remove the sunshade during storms or high winds. Additionally, properly store your sunshade when not in use, following the manufacturer’s instructions.