
Setting the tension on your RV awning is essential for ensuring proper function and longevity. If the tension is too loose, the awning may sag or flap in the wind, while excessive tension can put unnecessary strain on the mechanism. Finding the perfect balance is key, but how exactly do you go about it? In this blog post, we’ll walk you through the steps of setting the tension on an 8500 RV awning, providing you with the know-how to keep your outdoor space shaded and comfortable throughout your travels.
So, let’s get started!
Introduction
Setting the tension on your 8500 RV awning can be a bit tricky if you’ve never done it before. But don’t worry, I’m here to help you out! The first step is to extend the awning fully so that it is completely open. Next, locate the tensioning knobs on both ends of the awning roller.
These knobs are used to adjust the tension of the awning fabric. To increase the tension, turn the knobs in a clockwise direction. To decrease the tension, turn the knobs in a counterclockwise direction.
It’s important to find the right balance of tension so that the fabric is taut and doesn’t sag, but also not too tight that it puts unnecessary stress on the awning. A good rule of thumb is to have the fabric just slightly loose when the awning is fully extended. Take your time and make small adjustments until you get it just right.
With a little bit of patience, you’ll have your 8500 RV awning properly tensioned in no time!
Importance of Proper Awning Tension
“proper awning tension” Introduction: Having an awning is a great way to enhance the outdoor living space and create a comfortable and shaded area for relaxation or entertaining. However, many people fail to realize the importance of proper awning tension. It may seem like a small detail, but the tension of your awning can impact its durability, functionality, and appearance.
In this blog post, we will delve into the significance of having the right tension in your awning and how it can make a significant difference in your overall awning experience. So, let’s dive in and explore the reasons why proper awning tension matters!
Step-by-Step Guide
Are you looking for a step-by-step guide on how to set the tension on your 8500 RV awning? Well, you’ve come to the right place! Setting the tension on your awning is important because it ensures that it will be stable and secure, even in windy conditions. To begin, locate the tension knobs on both ends of the awning. These knobs are usually located near the end caps.
Turn the knobs in a clockwise direction to increase the tension and in a counterclockwise direction to decrease the tension. It’s important to find the right balance of tension – not too tight and not too loose. Once you’ve adjusted the tension, test it by gently pulling on the awning to see if it is secure.
If it is too loose, you can tighten the tension knobs a bit more. On the other hand, if it is too tight, you can loosen the tension knobs slightly. It may take a few adjustments to find the perfect tension for your awning, so don’t be discouraged if it takes some trial and error.
Just remember to make small adjustments at a time to avoid over-tightening or over-loosening the awning. With a little practice, you’ll be able to set the tension on your 8500 RV awning like a pro!
Step 1: Find the Awning Roller Tube
The first step in repairing or replacing your awning roller tube is locating it. This tube is what holds the fabric of your awning in place and allows it to roll out and retract. Finding the awning roller tube may seem like a daunting task, especially if you’re not sure where to look.
But don’t worry, I’m here to help! The awning roller tube is typically located on the top or underside of your awning, depending on the design. It is a long, cylindrical tube that runs parallel to the edge of your awning. You may need to extend your awning fully to locate it.
Once you’ve found the roller tube, you’ll be ready to move on to the next step in the repair or replacement process.
Step 2: Locate the Tension Adjustment Knobs
tension adjustment knobs, sewing machine, step-by-step guide, locate, function, control, thread tension, sewing projects Once you have familiarized yourself with the different parts of your sewing machine, it’s time to delve into the step-by-step process of locating the tension adjustment knobs. These knobs are an essential component of every sewing machine and play a crucial role in controlling the thread tension. As you may already know, proper thread tension is vital for achieving high-quality stitches and preventing any sewing mishaps.
So, let’s get started by finding these tension adjustment knobs! Depending on the brand and model of your sewing machine, the location of the tension adjustment knobs may vary. In most machines, these knobs can be found on the front panel, close to the needle area. Look for two small knobs that are labeled with (+) and (-) symbols or with numbers that indicate the tension levels.
To identify the specific function of each knob, refer to your sewing machine’s manual or do a quick online search for the specific model. The (+) knob typically controls the upper thread tension, while the (-) knob adjusts the bobbin thread tension. However, keep in mind that this may vary, so it’s always best to consult the manual for accurate information.
To adjust the tension, turn the knobs clockwise to increase the tension and counterclockwise to decrease it. It’s important to make small adjustments and test the tension on a scrap piece of fabric before starting your actual sewing project. This way, you can fine-tune the tension to achieve the desired stitch quality.
Remember, finding and understanding these tension adjustment knobs is just the first step. It’s important to practice and experiment with different tension settings to find what works best for your sewing projects. So, grab your manual, locate those knobs, and get ready to take control over your thread tension.
Happy sewing!
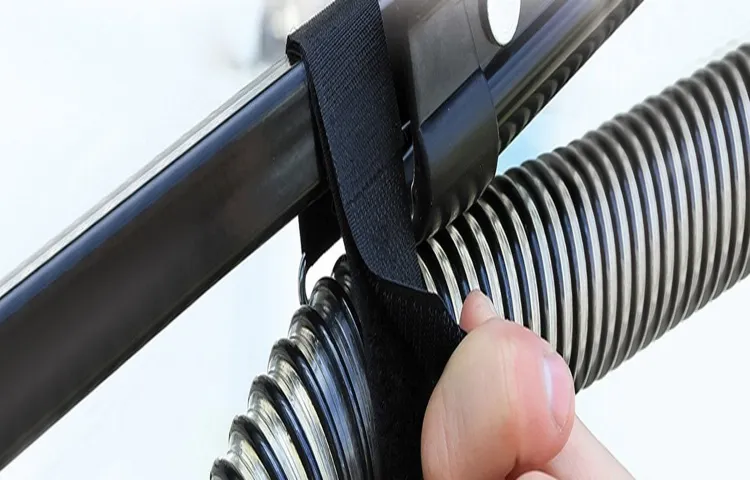
Step 3: Release the Awning Fabric
awning fabric release, step-by-step guide
Step 4: Adjust the Tension
A crucial step in adjusting the tension of your sewing machine is to make sure it is set correctly. This step is necessary to ensure that your stitches are even and secure. Adjusting the tension can be a bit tricky, but with a little practice, you’ll be able to get it just right.
Start by threading your machine as usual and using a different color thread in the bobbin. This will allow you to see the tension adjustments more clearly. Begin by taking a scrap piece of fabric and sewing a line of stitches.
Examine your stitches and determine if the tension needs to be adjusted. If the stitches are loose or uneven, the tension is too loose. If the stitches are tight and puckered, the tension is too tight.
Using the tension dial on your machine, slowly adjust the tension one notch at a time until you achieve the desired result. Remember to test the tension after each adjustment until you are satisfied with the results. It may take a few tries to get it just right, but with practice, you’ll become familiar with your machine and be able to adjust the tension with ease.
Step 5: Test the Tension
In this step-by-step guide, we’re getting closer to having perfectly tensioned wires on our fence. Now that we’ve fastened the wires to the end posts and tightened them, it’s time to test the tension. Testing the tension is crucial to ensure that the wires are secure and will effectively keep out intruders or animals.
To test the tension, you can do a simple physical check. Just lightly tap the wires with your hand or a small object and observe how they react. Ideally, the wires should have a slight amount of give but still feel taut.
If they feel too loose or slack, you may need to tighten them further. On the other hand, if the wires feel too tight and rigid, you may need to release some of the tension to prevent them from snapping or sagging. It’s important to find the right balance and adjust the tension as needed.
So go ahead, give those wires a little tap and see if they pass the tension test!
Step 6: Secure the Awning Fabric
“Securing the awning fabric is an important step in the installation process to ensure that your awning stays in place and provides the right amount of shade and protection. Once you have the frame in place and the fabric stretched taut, it’s time to secure it properly. One of the most common methods is to use a combination of screws and washers to attach the fabric to the frame.
Start by selecting the appropriate length of screws and washers based on the thickness of your fabric and the type of frame material you have. Using a drill with a screwdriver bit, gently drive the screws through the fabric and into the frame, making sure to go through both layers of fabric if you have a double-sided awning. Be careful not to overtighten the screws, as this can cause the fabric to tear or stretch too much.
Once all the screws are in place, give the fabric a gentle tug to make sure it is secure. If there is any slack or looseness, go back and tighten the screws a bit more. And voila! Your awning fabric is securely attached and ready to provide shade and protection for years to come.
“
Tips and Tricks
Setting the tension on your 8500 RV awning doesn’t have to be a difficult task. Here are some tips and tricks to help you get it just right. First, locate the tension knobs on either end of your awning.
These knobs are used to adjust the tension and keep the awning fabric taut. To increase the tension, turn the knobs clockwise. To decrease the tension, turn them counterclockwise.
Next, open your awning fully and determine if it is too loose or too tight. If it is too loose, you will need to increase the tension. If it is too tight, you will need to decrease the tension.
It’s important to find the right balance so that the awning is secure but not overly stretched. To adjust the tension, use a drill or a wrench to turn the tension knobs. Start with small adjustments and then assess the tension after each turn.
Remember, it’s better to make small incremental adjustments rather than drastic changes all at once. Once you have achieved the desired tension, double-check to make sure that the awning is properly aligned and straight. If necessary, make any additional adjustments to ensure that the fabric is evenly stretched.
It’s important to note that the tension on your awning may need to be adjusted periodically, especially if you frequently open and close it. Regular maintenance and inspections can help prevent any issues and ensure the longevity of your awning. By following these tips and tricks, you can easily set the tension on your 8500 RV awning and enjoy a securely stretched fabric for shade and protection on your outdoor adventures.
Tip 1: Use a Tension Wrench
unlocking a door, tension wrench, lock picking, locksmith, simple tool, insert the tension wrench, applying pressure, rotate the lock, feel for resistance, adjust the tension, finding the right amount, practice, gaining experience, successful unlocks. Unlocking a door can be a daunting task, especially if you don’t have the key. But fear not, there’s a simple tool that can help you out – the tension wrench.
This handy little gadget is a must-have for any aspiring locksmith or lock picking enthusiast. To use a tension wrench, start by inserting it into the keyhole. Then, apply pressure in the direction you would normally rotate the lock.
You want to apply just enough pressure to create tension, but not so much that you risk breaking the lock. Once you have applied the right amount of tension, you can begin to rotate the lock. As you do this, pay attention to any resistance you may feel.
This resistance is a sign that you are on the right track. If you don’t feel any resistance, you may need to adjust the tension. Gradually increase or decrease the amount of pressure you are applying until you find the sweet spot.
It may take some trial and error, but with practice, you will become more adept at finding the right amount of tension. Remember, lock picking is a skill that requires practice and experience. So don’t get discouraged if you don’t have success right away.
Keep practicing, and soon enough, you’ll be a pro at unlocking doors with a tension wrench.
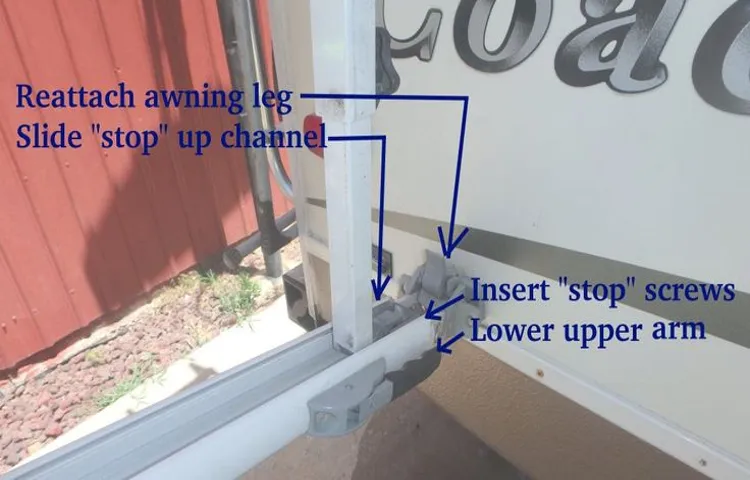
Tip 2: Check the Awning Arms
awning arms, tips and tricks, RV When it comes to maintaining your RV’s awning, there are a few essential tips and tricks to keep in mind. One important aspect to check regularly is the awning arms. These are the metal bars that support and extend the awning.
Over time, these arms can become loose or damaged, affecting the stability and functionality of your awning. To ensure they are in good condition, give them a thorough inspection. Look for any signs of rust, cracks, or bends.
If you notice any problems, it’s important to address them promptly. You may need to tighten loose screws or replace damaged parts. By taking the time to check your awning arms, you can keep your RV’s awning in optimal condition and avoid any unexpected issues during your travels.
Tip 3: Regular Maintenance
regular maintenance In order to keep your belongings in top shape, regular maintenance is crucial. This applies to everything from your car to your home appliances. Regular maintenance ensures that any potential issues are detected early on and can be addressed before they turn into major problems.
It also helps to prolong the lifespan of your belongings and prevents the need for costly repairs or replacements down the line. Just like you wouldn’t neglect your car’s oil change or your home’s HVAC system, it’s important to prioritize regular maintenance for all of your belongings. So, whether it’s scheduling regular check-ups for your car, cleaning out your gutters periodically, or having your HVAC system serviced annually, investing a little time and effort into regular maintenance can go a long way in keeping everything functioning smoothly.
So, don’t neglect regular maintenance tasks and make them a part of your routine. Your belongings will thank you in the long run!
Conclusion
So there you have it, folks! Setting tension on your 8500 RV awning is as easy as pie, with our step-by-step guide. Just remember to bring your A-game and a dash of determination, because you’re about to become the ultimate awning-tensioner extraordinaire! With a few simple twists and turns, you’ll have that awning singing to the tune of the perfect tension in no time. So go forth, my friends, and conquer the world of awning-tensioning like the skilled adventurer you are.
Happy exploring, and may the tension be with you!”
FAQs
How do I set the tension on my 8500 RV awning?
To set the tension on your 8500 RV awning, start by fully extending the awning. Then, locate the tensioning knobs on the roller tube. Use a flathead screwdriver to turn the knobs clockwise to increase tension or counterclockwise to decrease tension until the awning fabric is taut but not overly stretched. Adjust both tensioning knobs evenly to ensure even tension across the awning. Test the tension by gently pushing up on the fabric. It should have a slight give but not sag or droop.
What happens if the tension on my 8500 RV awning is too loose?
If the tension on your 8500 RV awning is too loose, the fabric may sag or droop. This can make your awning less effective in providing shade and protection from the sun. Additionally, a loose awning can be more prone to damage or billowing in windy conditions. It is important to regularly check and adjust the tension on your awning to ensure optimal performance.
How often should I check the tension on my 8500 RV awning?
It is recommended to check and adjust the tension on your 8500 RV awning at least once a month, or more frequently if you frequently use your awning or experience varying weather conditions. Regularly monitoring the tension will help ensure that your awning operates correctly and prevents any potential sagging or damage.
Can I adjust the tension on my 8500 RV awning while it is fully extended?
Yes, you can adjust the tension on your 8500 RV awning while it is fully extended. In fact, it is best to adjust the tension with the awning fully extended to ensure accurate and even tension across the fabric. Remember to use a flathead screwdriver and turn the tensioning knobs clockwise to increase tension or counterclockwise to decrease tension.
Is it possible to over-tighten the tension on my 8500 RV awning?
Yes, it is possible to over-tighten the tension on your 8500 RV awning. Over-tightening the tension can cause unnecessary strain on the fabric and components of the awning, potentially leading to damage or premature wear. It is important to find the right balance of tension where the fabric is taut but not overly stretched.
How can I tell if the tension on my 8500 RV awning is too tight?
If the tension on your 8500 RV awning is too tight, you may notice excessive creasing or wrinkling of the fabric when the awning is fully extended. Additionally, the fabric may appear stretched or strained. In extreme cases, over-tightened tension can lead to damage to the fabric or components of the awning. It is important to find the right balance of tension for optimal performance.
Can I adjust the tension on my 8500 RV awning by myself, or do I need professional assistance?
In most cases, you can adjust the tension on your 8500 RV awning by yourself. It is a relatively simple process that can be done with a flathead screwdriver and the appropriate caution. However, if you are unsure or uncomfortable with adjusting the tension yourself, it is always best to seek professional assistance to ensure the proper adjustment and prevent any potential damage.