
Hey there! Are you ready to dive into the exciting world of introductions? Well, buckle up because I’m about to take you on a journey of discovery. From the moment we meet someone new or start reading a book, the introduction plays a crucial role in capturing our attention and setting the stage for what’s to come. Think of introductions as the gateway to the main event.
They provide a sneak peek into what lies ahead and give us a taste of what we can expect. Just like the first few minutes of a movie or the opening lines of a song, a good introduction has the power to draw us in and make us want more. But what makes a great introduction? Is it the suspenseful build-up or the cleverly crafted hook? Or is it the intriguing questions that make us pause and ponder? Well, it’s a little bit of everything.
A great introduction is like a puzzle, piecing together bits of information to create a bigger picture. Imagine yourself standing in front of a locked door. You have the key, but you don’t know what lies beyond.
The introduction is that key, unlocking the door to a world of possibilities. It grabs your attention, arouses your curiosity, and compels you to keep going. In the world of writing, introductions serve a similar purpose.
They entice readers, making them eager to find out what awaits them in the rest of the piece. Whether it’s a blog, an essay, or a novel, a well-crafted introduction sets the tone and lays the foundation for the entire piece. So, are you ready to master the art of introductions? In this blog, we’ll explore the different types of introductions, learn how to write a gripping opening, and discover the secrets to keeping your readers hooked from start to finish.
Get ready to captivate your audience with the power of a compelling introduction. Let’s dive in!
Table of Contents
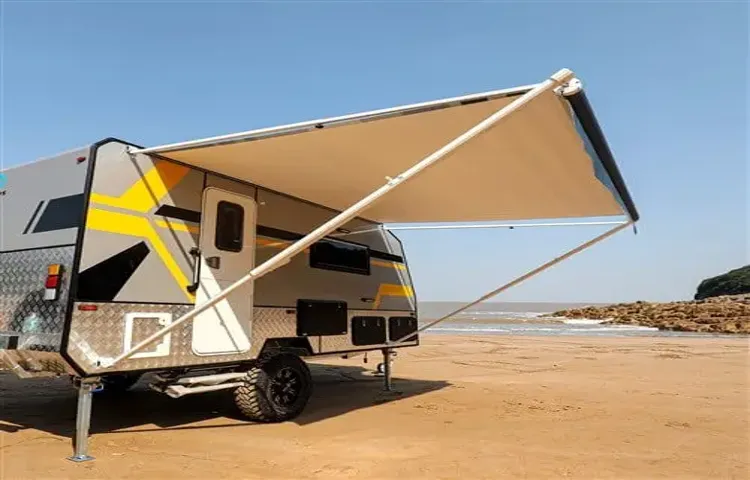
What is an RV awning
Installing a 15′ RV awning may seem like a daunting task, but with a little bit of know-how, it can be done with ease. An RV awning is a great addition to your vehicle, as it provides shelter and shade from the elements. It can also be a perfect spot to relax and enjoy your outdoor surroundings.
To install a 15′ RV awning, the first step is to measure the length of your RV to ensure that the awning will fit properly. Once you have the measurements, you can then proceed to purchase the awning that best suits your needs. When installing the awning, it is important to follow the manufacturer’s instructions carefully.
This usually involves securing the brackets to the side of your RV and then attaching the awning fabric to the brackets. It is essential to make sure that the awning is properly tensioned and that all the hardware is securely tightened. Once the awning is installed, you can then adjust the angle and height to your desired position.
With a little bit of time and effort, you can have your 15′ RV awning up and ready to enjoy in no time. So, why wait? Get started on installing your awning and start enjoying the great outdoors in comfort and style.
Benefits of installing an RV awning
Installing a 15′ RV awning can transform your outdoor living experience and provide a range of benefits for your recreational vehicle. Firstly, an awning extends the usable space of your RV, giving you a shaded area to relax, dine, or entertain guests. It provides protection from the sun’s rays, keeping you cooler and more comfortable during the hot summer months.
Additionally, an awning can shield you from light rain showers or provide a dry space for outdoor cooking. Installing an awning is a relatively simple process and can be done with basic tools and equipment. By following the manufacturer’s instructions, you can have your awning installed in no time and start enjoying the many advantages it brings to your RV adventures.
So why wait? Take the leap and enhance your RV experience with a 15′ awning today!
Things to consider before installing an RV awning
Installing an RV awning can be a great way to enhance your outdoor living space and provide some much-needed shade during those hot summer days. Before diving into the installation process, there are a few things to consider. First and foremost, you’ll need to determine the size of the awning that will best fit your RV.
In this case, we’re looking at a 15′ RV awning. It’s important to measure the length of your RV’s roof to ensure that the awning will fit properly. Additionally, you’ll need to take into account the type of mounting hardware that is compatible with your RV.
Some awnings come with brackets that attach directly to the side of the RV, while others require additional support arms. Lastly, you’ll want to consider the type of fabric you’d like for your awning. There are several options available, including vinyl, acrylic, and polyester.
Each has its own pros and cons, so it’s important to do your research before making a decision. With these considerations in mind, you’ll be ready to tackle the installation of your 15′ RV awning and enjoy your outdoor space in style.
Tools and materials needed
When it comes to installing a 15′ RV awning, there are a few tools and materials that you will need to have on hand. First and foremost, you will need the awning itself, as well as the necessary hardware such as brackets and screws. You will also need a drill with the appropriate drill bit, as well as a tape measure and level to ensure that everything is installed correctly.
Additionally, it can be helpful to have a ladder or step stool to reach the awning and a friend to assist you during the installation process. By having all of these tools and materials ready to go, you can ensure that the installation of your 15′ RV awning goes smoothly and without any hiccups.
Step-by-step guide on how to install a 15′ RV awning
If you’re looking to install a 15′ RV awning, you’ve come to the right place. Installing an awning on your RV can provide much-needed shade and protection from the elements while you’re out camping. To start, you’ll need a few tools and materials.
You’ll need the awning itself, which should come with all the necessary hardware for installation. You’ll also need a ladder, a drill with the appropriate drill bits, and a tape measure. Additionally, it’s a good idea to have a second person to help you with the installation process.
First, measure the area where you want to install the awning. Make sure you have enough clearance and that the awning will fit properly. Once you have the measurements, mark the spots where you will need to drill holes for the mounting brackets.
Next, attach the mounting brackets to the RV using the drill and the provided screws. Make sure the brackets are secure and level before moving on. Once the brackets are in place, it’s time to attach the awning to the brackets.
Slide the awning into the brackets and secure it with the provided hardware. Make sure everything is tightened down and secure before moving on. Finally, extend the awning and test it out to make sure everything is working properly.
Adjust the angle of the awning as needed and make any necessary adjustments. Installing a 15′ RV awning may seem like a daunting task, but with the right tools and a little bit of patience, it can be done. Just follow these steps and you’ll be enjoying your new awning in no time.
Step 1: Measure the area
In order to install a 15′ RV awning, the first step is to measure the area where the awning will be installed. This is an important step because it will help determine the size of the awning and ensure a proper fit. To measure the area, start by extending a tape measure from one end of the RV to the other, making sure to include any attachments or accessories that may affect the width.
Next, measure the height of the RV from the ground to the desired installation height of the awning. This will help determine the drop or projection of the awning. Take accurate measurements and double-check to ensure accuracy, as any discrepancies could result in an ill-fitting awning.
Once the area has been measured, you can move on to the next step in the installation process.
Step 2: Prepare the installation area
RV awning installation. To begin installing your 15′ RV awning, the first step is to prepare the installation area. This ensures that you have a stable and secure foundation for your awning.
Start by clearing any debris or obstacles from the installation area, such as rocks or branches. This will prevent any damage to the awning fabric or framework. Next, assess the ground for any slopes or unevenness.
If you encounter any, you may need to level the area by using sand, gravel, or blocks to create a flat surface. This will help ensure that your awning is not only installed correctly but also provides proper shelter and stability. Finally, mark the exact position where you want to install the awning.
This will serve as a guide later on during the installation process. Taking the time to prepare the installation area will make the overall installation process smoother and more effective, allowing you to enjoy your new RV awning to its fullest potential.
Step 3: Install mounting brackets
RV awning, mounting brackets
Step 4: Attach the awning arms and roller tube
In this step of the installation process for a 15′ RV awning, it’s time to attach the awning arms and roller tube. This is an important step that will ensure your awning operates smoothly and securely. Start by sliding the awning arms into the designated slots on the roller tube.
Make sure they are positioned correctly and securely in place. Then, use the provided hardware to attach the arms to the side of your RV. This may involve drilling holes and using screws or bolts, so be sure to have the right tools on hand.
Once the arms are attached, it’s a good idea to test the awning by extending and retracting it a few times to ensure everything is working properly. With the arms and roller tube securely in place, your RV awning is now one step closer to being fully installed and ready for use on your next outdoor adventure.
Step 5: Extend and secure the fabric
install a 15′ RV awning
Additional tips for installing an RV awning
Installing a 15′ RV awning can enhance your outdoor camping experience, providing you with shade and protection from the elements. In addition to the basic steps mentioned earlier, there are a few additional tips that can make the installation process smoother. Firstly, make sure to measure the area where the awning will be installed to ensure a proper fit.
It’s also important to check the mounting brackets and hardware to ensure they are secure and in good condition. Before extending the awning, it’s a good idea to clean the fabric and inspect it for any tears or damage. If necessary, you can use a mild detergent and a soft brush to clean the fabric.
When extending the awning, be mindful of any obstructions that may be in the way, such as branches or other campsite structures. Once the awning is fully extended, check for proper alignment and tension. Adjust the arms and support legs as needed to ensure the awning is level and secure.
Remember to always follow the manufacturer’s instructions for your specific RV awning model to ensure a successful installation process. With these additional tips, you can confidently install your 15′ RV awning and enjoy your camping experience to the fullest.
Conclusion
Congratulations! You are now a certified awning installation expert, ready to tackle the wild adventures that await you in your 15-foot RV. By following these simple steps, you have not only transformed your humble abode on wheels, but also elevated your status as the neighborhood’s envy-inducing RV owner. As you zip down the open road, basking in the shade provided by your stunning awning, you might find yourself dreaming up new ways to showcase your newfound talent.
Perhaps you’ll start a YouTube channel dedicated to awning-enthusiasts, or maybe you’ll even launch a line of designer awnings for the most stylish campers. But no matter what creative endeavors lie ahead, you can rest assured that installing a 15-foot RV awning will forever remain your entryway into the elite world of RV prowess. So go forth, my friend, and let your awning unfurl like a flag of triumph as you embark on your next epic journey.
The world is your oyster, and your RV awning is the pearl that sets you apart from the ordinary. Happy travels!”
FAQs
Can I install a 15′ RV awning myself or do I need professional help?
Yes, you can install a 15′ RV awning yourself with the help of some basic tools and instructions. However, if you are unsure of your abilities or have no prior experience, it is recommended to seek professional help to ensure proper installation and avoid any potential damage.
What tools do I need to install a 15′ RV awning?
To install a 15′ RV awning, you will typically need a drill, screwdriver, measuring tape, level, ladder, and silicone sealant. These tools will help you in attaching the awning brackets to the RV and securing the awning in place.
How long does it take to install a 15′ RV awning?
The time required to install a 15′ RV awning can vary depending on your experience with the installation process and the specific awning model. On average, it may take a few hours to complete the installation, including measuring, drilling, attaching brackets, and securing the awning. For beginners, it might take slightly longer.
Are there any specific instructions I should follow while installing a 15′ RV awning?
Yes, it is important to follow the manufacturer’s instructions provided with the awning to ensure proper installation. These instructions will guide you through the step-by-step process and provide any specific guidelines or precautions to take during installation. It is crucial to read and understand these instructions before starting the installation.
What are some common mistakes to avoid when installing a 15′ RV awning?
Some common mistakes to avoid when installing a 15′ RV awning include not properly measuring and leveling the awning, over-tightening or under-tightening the awning brackets, using incorrect or insufficient sealant, and not following the manufacturer’s instructions. These mistakes can lead to an unstable or improperly installed awning, causing potential damage or malfunction.
Can I install a 15′ RV awning on any type of RV?
In most cases, a 15′ RV awning can be installed on various types of RVs, including motorhomes, travel trailers, and fifth wheels. However, it is essential to check the compatibility of the awning model with your specific RV before purchasing and attempting installation. Some awnings may have size or mounting restrictions that need to be considered.
Can a 15′ RV awning withstand strong winds and rain?
Most 15′ RV awnings are designed to withstand moderate wind conditions and light rain. However, it is important to retract the awning during severe weather conditions, including heavy rain, strong winds, or storms, to prevent damage. Leaving the awning extended in harsh weather can lead to tearing, bending, or even detachment from the RV.
How often do I need to clean and maintain a 15′ RV awning? A8. It is recommended to clean and inspect your 15′ RV awning regularly to keep it in good condition. Depending on the amount of dirt, debris, and environmental factors, cleaning can be done as frequently as once a month. Use mild soap, water, and a soft brush or sponge to clean the fabric and ensure it is fully dry before retracting the awning. Additionally, inspect the awning for any signs of wear, damage, or loose components and address them promptly.
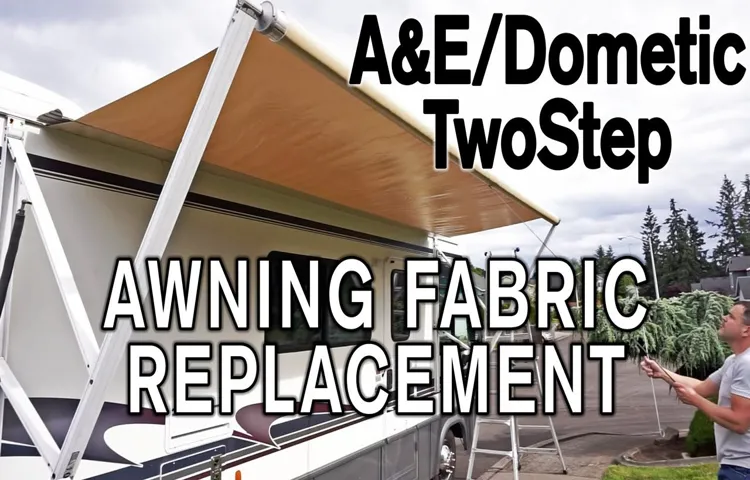
Can I replace the fabric of a 15′ RV awning myself?
Yes, it is possible to replace the fabric of a 15′ RV awning yourself if you have some basic DIY skills. You will need to order the correct size and type of fabric, carefully remove the old fabric, and attach the new fabric according to the manufacturer’s instructions. Keep in mind that replacing the fabric can be a bit more challenging compared to installing the awning itself, so it is recommended to have some prior experience or research thoroughly before attempting.
Where can I find additional resources or videos on installing a 15′ RV awning?
There are various online resources, tutorials, and videos available that can provide step-by-step guidance on installing a 15′ RV awning. You can search for specific awning brands or models, visit RV-related forums, watch YouTube tutorials, or consult manufacturer websites for detailed installation instructions and tips.