
Have you ever tried to open your RV awning, only to be met with resistance and frustration? It’s a common problem for RV owners, but luckily there’s a simple solution – recoiling the spring in your awning. By doing this, you can ensure that your awning functions smoothly and easily, making your outdoor adventures more enjoyable. In this complete guide, we’ll take you through the steps you need to take to recoiling the spring in your RV awning, from identifying the problem to fixing it.
So let’s dive in and get started – your stress-free RV trip awaits!
Table of Contents
Step-by-Step Guide to Recoiling Your Spring
Recoiling the spring in your RV awning can be a daunting task, especially if you haven’t done it before. However, with the right steps, it can be a relatively straightforward process. Start by locating the awning’s winding mechanism and making sure it is secure.
Then, gently unwind the awning and remove its screws and bolts from the roller tube. Once the roller tube is free, take out the spring assembly and carefully release the tension. Next, unwind the spring and remove it from the assembly.
Be sure to handle the spring with caution, as it can be under a lot of tension. To recoiling the spring, wrap the tensioned spring in the opposite direction. Finally, reassemble the spring assembly and roller tube, and test the awning to ensure it is functioning correctly.
With these steps in mind, you should be able to successfully recoil the spring in your RV awning and continue enjoying your outdoor adventures with confidence!
Step 1: Remove Tension from Your Awning
When it comes to recoiling your awning’s spring, the first step is to remove any tension in the fabric. This is crucial to avoid any accidents or injuries during the process. To do this, you should first make sure the awning is fully extended and locked into place.
Then, use a pair of pliers to loosen the spring tension adjustment knobs on both sides of the awning. Slowly turn the knobs counterclockwise until all tension is released. It’s important to take your time and not rush this step to ensure your safety.
Once the tension is released, you can move on to recoiling the spring as per your awning’s manufacturer’s instructions. Remember to always proceed with caution and take the necessary safety measures to avoid any mishaps.
Step 2: Remove the End Cap on Your Awning’s Roller Tube
Recoiling Your Awning’s Spring Now that you’ve prepared to recoil your awning’s spring, the next step is removing the end cap on the roller tube. This process can be a bit challenging, so it’s important to have the right tools on hand before getting started. Begin by locating the end cap, which is typically found at one end of the roller tube.
Once you’ve located it, use a flathead screwdriver to pry off the end cap. This may take some effort, so don’t be afraid to apply a bit of force while being careful not to damage the end cap or roller tube. Once you’ve successfully removed the end cap, set it aside in a safe place where it won’t get lost.
Congratulations, you’re now ready to move onto the next step in recoiling your awning’s spring!
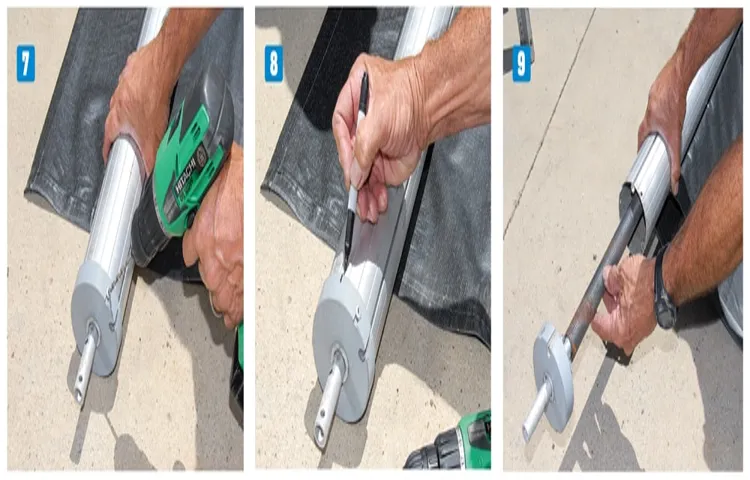
Step 3: Loosen the Springs
Loosening the springs is a crucial step in recoiling your spring. It’s not a difficult task, but it requires some patience and precision to get it right. The first step is to locate the cones that are on each end of the spring.
Once you find them, mark which one is left and which one is right. This will prevent any confusion when you’re putting the spring back together. You’ll need to insert a winding bar into the winding cone and unscrew the set screws.
This will allow you to loosen the tension on the spring. It’s important to note that you should never touch the spring itself with your hands as it can be dangerous. Use the winding bar to turn the cone counter-clockwise to loosen the spring.
Repeat this step on the other side and ensure that both sides are evenly loosened. Once you’ve completed this step, you’ll be ready to move onto the next step in recoiling your spring.
Step 4: Recoil the Spring
Recoiling a spring may seem like a daunting task, but with some practice and patience, it can be done easily. Step 4 of the process involves actually recoiling the spring. Once the spring is compressed and held in place, you will need to carefully turn it in the opposite direction of its winding, using a winding tool.
It’s important to keep steady pressure on the spring as you turn the tool, ensuring that it coils evenly and doesn’t get tangled or kinked. This step requires a bit of finesse, so take your time and make sure you are turning the tool in the correct direction. Once the spring is fully recoiled, you can carefully release the tension and remove it from the winding tool.
With a little practice, you’ll be able to master the technique and successfully recoil your springs with ease.
Step 5: Reinstall the End Cap and Test the Awning
After completing the previous steps, you’re almost done recoiling your spring. The fifth and final step is to reinstall the end cap and test the awning. Firstly, make sure the end cap is clean and free from any debris.
Then, align the end cap with the awning tube and tap it gently into place. Once installed securely, gently slide the awning back into the arm and allow it to retract fully. To test the awning, extend it fully and then retract it back to its original position.
If there are no issues, you’re good to go! Remember to always be careful when working with awning springs as they can be hazardous if not handled properly. By following these steps, you can ensure your awning is functioning properly and safely once more.
Tips for Recoiling Your RV Awning’s Spring
If you’re an RV owner, you know how important it is to keep your awning in good condition, not just for aesthetic purposes but for safety reasons as well. As with any piece of equipment, regular maintenance is key in preventing issues from arising. One of the crucial maintenance tasks you’ll need to undertake with your RV awning is recoiling the spring.
The process can seem daunting, but with the right tools and a bit of patience, you can do it on your own. Here’s how to recoil the spring in your RV awning: Start by finding the appropriate size replacement cord or rope. Next, release the tension on the spring by unwinding it, making sure to keep one hand on the awning to prevent it from rolling up too quickly.
Once all the tension is released, remove the old cord or rope and replace it with the new one. Secure the cord in place and then begin winding the spring back up, making sure to wind it in the same direction as the original cord. Keep in mind that this process can be dangerous, so it’s essential to exercise caution and wear protective gear.
By following these tips, you can keep your RV awning in top shape and enjoy your adventures on the road without any worries.
Tip 1: Use the Proper Tools
If you plan on recoiling your RV awning’s spring, you must use the proper tools to ensure a smooth and safe process. Using suitable tools can prevent injuries and damage to your awning. The necessary tools include gloves, pliers, and a wrench.
Gloves protect your hands while working with the spring, which can pinch or cut fingers easily. Pliers and a wrench help you maintain control of the spring, making the process of recoiling more manageable. Using proper tools can make the task of recoiling your RV awning’s spring much more comfortable and efficient.
Plus, it will save you a lot of time and effort. So be sure to gather the right tools before attempting any maintenance on your RV awning.
Tip 2: Work with a Partner
If you’re recoiling your RV awning’s spring, it’s a good idea to work with a partner. Not only does this make the process easier and quicker, but it’s also safer. You and your partner can ensure that you have a good grip on the awning and that it doesn’t slip out of your hands.
Plus, with two people working together, you can evenly distribute the weight and avoid any strain or injury. Make sure that you and your partner communicate throughout the recoiling process to ensure that you’re both on the same page. Working together as a team can make the job go smoothly and result in a successful recoiling of your RV awning’s spring.
Tip 3: Don’t Rush the Process
When it comes to recoiling your RV awning’s spring, it’s important not to rush the process. Taking your time and being patient can save you from any potential accidents or injuries. Before beginning the process, make sure you have all the necessary tools and read through the instructions carefully.
It’s also important to know the limits of the awning’s spring and not to over-stretch it. Remember to wear protective gloves and eyewear to prevent any serious harm. If you’re unsure about any step in the process, don’t hesitate to seek the help of a professional.
By being cautious and methodical, you can successfully recoil your RV awning’s spring without any mishaps.
When to Call in the Professionals
If you encounter problems while trying to recoil the spring in your RV awning, it might be time to call in the professionals. While it may be tempting to watch a few YouTube videos and attempt to fix it yourself, awning springs can be quite complicated to work with. If you don’t have the experience or the right tools to fix the spring properly, you could end up causing more damage to your awning.
Professionals have the equipment and expertise necessary to diagnose and fix the problem as quickly and safely as possible. Don’t risk damaging your RV or injuring yourself – call in the experts to take care of your awning problem.
Conclusion
In conclusion, mastering the art of recoiling a spring in your RV awning may seem daunting at first, but with a little bit of patience and some elbow grease, even the most novice of RV enthusiasts can get the job done. Just remember to take things slow, work carefully with your tools, and always keep an eye out for any potential mishaps (or runaway springs!). And who knows, with enough practice, you just might find yourself “springing” into action at all sorts of problems that come your way on the open road.
Happy recoiling!”
FAQs
1. What is a recoil spring in an RV awning? A: The recoil spring in an RV awning is a coiled metal spring that retracts and expands the awning fabric. 2. How do I know if my RV awning recoil spring is damaged? A: You may notice that the awning doesn’t retract or expand smoothly, makes strange noises, or seems loose. If you suspect damage, it’s best to have a professional inspect it. 3. Can I replace the recoil spring in my RV awning myself? A: It’s possible, but it can be challenging and dangerous. It’s best to leave this job to a professional to avoid injury or further damage to the awning. 4. How often should I have my RV awning recoil spring inspected? A: It’s recommended to have your RV awning inspected annually to ensure it’s in good working condition and address any issues early on. 5. How much does it cost to replace an RV awning recoil spring? A: The cost of replacing an RV awning recoil spring can vary depending on the type of awning and the extent of the damage. It’s best to get a quote from a professional. 6. Can I prevent damage to my RV awning recoil spring? A: Regular maintenance, such as cleaning and lubricating the awning components, can help prevent damage to the recoil spring and other parts of the awning. 7. How long does an RV awning recoil spring typically last? A: The lifespan of an RV awning recoil spring can vary depending on use and maintenance, but it’s generally expected to last several years with proper care.