

Is the sight of mold and mildew growing on your RV awning enough to ruin your road trip vibes? It’s understandable; mold can be pesky and odor-releasing. It can also wreak havoc on your awning’s longevity, causing it to lose its strength and durability. The good news is, removing mold growth from your RV awning is a manageable task.
You don’t have to be a professional cleaner to remove mold from your awning. With the right tools and techniques, you can restore your awning’s original texture and appearance. In this blog, we will explore tips and tricks on how to remove mold from your RV awning and keep it sparkling clean.
Table of Contents
Gathering Materials
If you are wondering how to get mold off rv awning, the first step is to gather all the necessary materials. You will need a long-handled brush, a bucket of warm water, a mild detergent, and a hose. You can use a specific mold and mildew cleaner for RV awnings if you prefer, but you can also create a homemade solution by mixing equal parts of water and white vinegar.
Before starting, make sure your RV is parked on a level surface and that the awning is extended fully. Next, remove any loose debris and dirt from the awning with the brush. Once that’s done, apply the detergent or vinegar solution to the affected areas and let it sit for several minutes before scrubbing with the brush.
Rinse the awning thoroughly with the hose and let it dry completely before retracting it. Regular cleaning and maintenance will help prevent mold and mildew from forming in the future, ultimately extending the life of your RV awning.
Inspecting the Awning for Mold
Inspecting an awning for mold is an essential step in maintaining a clean and safe outdoor space. Before getting started with the inspection process, you’ll need to gather a few materials. First and foremost, you’ll need a sturdy ladder to climb up and get a closer look at the awning.
Additionally, you’ll want to have a flashlight on hand to help illuminate any dark or hard-to-see spots. A pair of gloves can also come in handy, especially if you’ll be touching any potentially moldy areas. Finally, a mold testing kit can be a helpful tool in identifying the specific type of mold you may be dealing with.
By taking the time to gather these materials before beginning your inspection, you’ll be better equipped to identify and address any potential mold growth on your awning.
Choosing a Cleaning Solution
Choosing a cleaning solution can often be overwhelming, especially with the abundance of options available. Therefore, it’s crucial to gather all the necessary materials before making a decision. Firstly, consider what needs to be cleaned.
Is it a fragile surface, heavily soiled carpet, or tough grease stains on a stovetop? This will determine which type of cleaning solution is required. Secondly, ensure you have all the necessary tools such as gloves, sponges, and cleaning cloths to avoid any skin irritation or damage to surfaces. Lastly, read the labels carefully and follow the instructions for diluting the solution if necessary.
This will help avoid any damage to the area being cleaned or any inhalation of harmful chemicals. By taking these preliminary steps, you’ll be on your way to selecting the perfect cleaning solution for your needs.
Cleaning the Awning
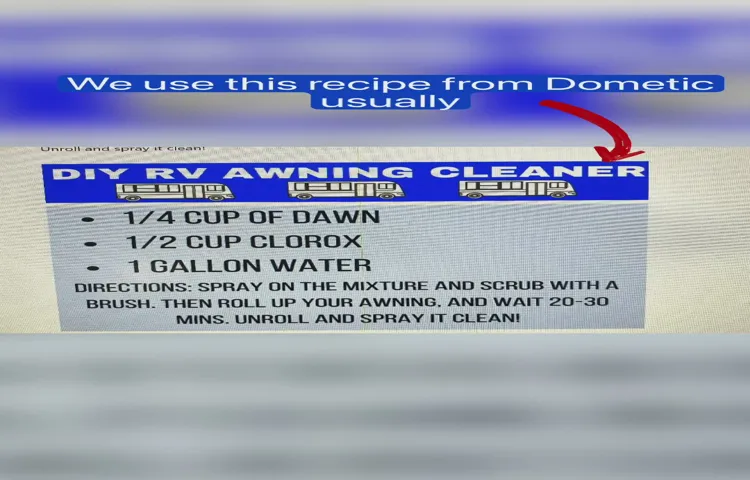
If you have an RV awning, you know how important it is to keep it clean and free of mold. Not only does mold look unsightly, but it can also cause health issues. But how do you effectively get rid of mold on your RV awning? Start by preparing a cleaning solution of equal parts water and white vinegar.
Next, roll out the awning and spray the cleaning solution onto the affected areas. Let it sit for 15-20 minutes before using a soft-bristled brush to gently scrub the mold away. Rinse the awning thoroughly with a hose and let it air dry completely before retracting it.
Repeat the process if necessary. Remember, prevention is key, so make sure to keep your awning clean and dry to avoid mold growth in the first place.
Preparing the Awning for Cleaning
The first step in cleaning your awning is to prepare it properly. Start by removing any loose debris such as leaves, twigs, and dirt. If you have a retractable awning, be sure to retract it to its closed position before beginning.
Next, mix a solution of warm water and mild detergent. You can also use specialized awning cleaners, but be sure to read the label carefully to ensure it’s safe for the material your awning is made from. Once you have your cleaning solution ready, use a soft-bristled brush or sponge to gently scrub the awning, starting at the top and working your way down.
Be careful not to put too much pressure on the awning, as this can cause damage to the fabric or frame. Rinse the awning thoroughly with a hose or pressure washer, making sure to remove all soap residue. Allow the awning to air dry completely before retracting or storing.
With these steps, your awning will be looking clean and refreshed in no time! The main keyword used in this paragraph is “cleaning the awning.”
Applying the Cleaning Solution
When it comes to cleaning the awning, the first step is to apply the appropriate cleaning solution. Before getting started, make sure to read the manufacturer’s instructions thoroughly. Depending on the type of awning and the severity of the stains, you may need different cleaning products.
Generally, mild solutions like dish soap and water work well for light dirt and grime. For tougher stains, a bleach-based cleaner or specialized awning cleaner may be necessary. Apply the solution generously and make sure to cover all areas of the awning, including the hardware and support structure.
Use a soft-bristled brush or a sponge to gently scrub the surface, being careful not to damage the material. Avoid using abrasive cleaners or tools, which can scratch and ruin the awning. Once the cleaning is complete, rinse thoroughly with a hose and let the awning dry completely before retracting or storing.
With the right cleaning techniques and products, you can keep your awning looking and functioning great for many years.
Scrubbing the Mold Away
If you’re a fan of spending time outside in the sun, then you know what a valuable addition a good awning can be to your property. However, over time, awnings can become a magnet for mold and mildew, which is not only unsightly but can be harmful to your health. So, how do you go about scrubbing away that mold? One method is to use a mixture of warm water and mild detergent to clean the affected areas, making sure to scrub gently to avoid damaging the material.
Another option is to use a specialized cleaning solution, specifically designed to tackle mold and mildew. Remember to rinse the awning thoroughly with clean water, and allow it to dry completely before retracting it. With some regular care and attention, you can keep your awning looking great and free from harmful mold all season long.
Rinsing and Drying the Awning
After successfully removing any stains or debris, the next step to cleaning your awning is rinsing and drying it. Use a garden hose with a nozzle attachment to spray the awning down thoroughly, making sure to remove any remaining cleaning solution. Pay close attention to the seams and crevices as any remaining soap residue can cause damage to the material over time.
After rinsing, let the awning air dry completely before retracting it or storing it away. Avoid using a pressure washer as the force of the water can damage the fabric and cause further wear and tear. By properly rinsing and drying your awning, you’ll not only maintain its longevity but also ensure that it looks its best.
Preventing Future Mold Growth
If you want to prevent future mold growth on your RV awning, there are a few things you can do. Firstly, make sure to clean your awning regularly. You can use a solution of water and mild soap, or a specialized cleaning product designed for awnings.
It’s essential to remove any mold spores before they have the chance to grow. Secondly, keep your awning dry and well-ventilated. After a rainstorm or period of high humidity, make sure to open your awning up fully to allow it to dry completely.
If you’re storing your RV for a long period, make sure to fold up your awning only when it’s dry. Finally, you may want to consider using a mold-resistant coating for your awning. This type of coating can help prevent mold from growing in the first place, making it an effective preventative measure.
By taking these steps, you can keep your RV awning free from mold and prevent future growth.
Regularly Cleaning and Inspecting the Awning
Regularly cleaning and inspecting your awning is crucial to prevent future mold growth. Mold can easily accumulate on your awning due to moisture buildup, especially in humid areas or after rainfall. To avoid this, it’s essential to clean your awning regularly and ensure it’s completely dry before retracting it.
Inspecting your awning for any signs of mold growth, such as stains or discolorations, can also help you catch it early before it spreads further. Additionally, using a mold-resistant awning fabric can help prevent and minimize mold growth in the first place. By taking these steps, you can keep your awning in top condition and protect it from mold damage.
Storing the Awning Properly During Winter Months
When it comes to storing your awning during the winter months, preventing mold growth is crucial for its longevity and functionality. Mold can not only damage your awning, but it can also lead to health issues. To avoid mold growth, make sure to clean your awning thoroughly before storing it.
Remove any debris, dirt, or stains using a mild detergent and water solution. Avoid using strong chemicals that can damage the material of your awning. Once it is clean and dry, store it in a cool and dry place.
You can also use a fabric cover to protect it from any potential moisture. By taking these steps, you can prevent mold growth and ensure that your awning is ready for use when the weather warms up again.
Conclusion
If you want to make your RV awning as fresh and clean as a daisy, then getting rid of mold is a must-do task! By following these simple steps, you can say goodbye to that pesky mold and hello to a sparkling clean awning. So don’t let mold get ahold of your awning – fight back with these tips and tricks, and enjoy your outdoor adventures in style!”
FAQs
What causes mold to grow on RV awnings?
Mold can grow on RV awnings due to exposure to moisture and lack of proper cleaning.
Can mold on RV awnings be harmful to health?
Yes, mold can cause health problems such as respiratory issues, allergies, and infections.
How can I prevent mold from growing on my RV awning?
Regularly clean your RV awning with a mild soap and water solution and make sure it is fully dry before retracting it.
What cleaning solutions work best for removing mold from RV awnings?
A mixture of vinegar and water or a specialized RV awning cleaner can effectively remove mold from RV awnings.
Can pressure washing remove mold from RV awnings?
Yes, pressure washing can remove mold from RV awnings but it should be done carefully to avoid damaging the awning fabric.
How often should I clean my RV awning to prevent mold growth?
It is recommended to clean your RV awning at least once a month to prevent mold growth.
Is it necessary to remove the RV awning to clean mold off of it?
No, it is not necessary to remove the RV awning to clean mold off of it. It can be cleaned in place with the right cleaning solutions and techniques.