
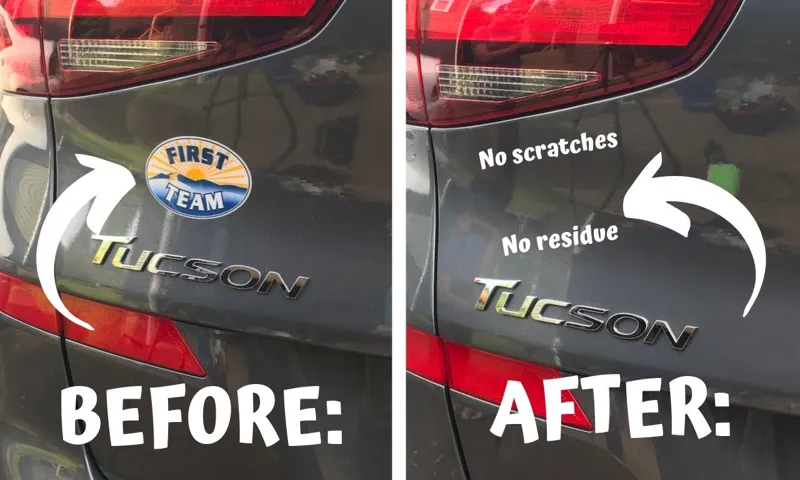
Have you just purchased a new car, only to be met with an unsightly dealer decal plastered on the back? You’re not alone – many new car owners feel the frustration of having to drive around with a glaring advertisement for their dealer. But fear not, removing car dealer decals is a simple process that can be done in just a few easy steps. In this how-to guide, we’ll cover everything you need to know about removing these pesky decals and restoring your car’s sleek appearance.
So grab your tools and let’s get started!
Table of Contents
Gathering the Right Tools
If you’re looking to remove a dealer decal from your car, you’ll need to gather the right tools beforehand. One of the most important tools you’ll need is a plastic razor blade, which is less likely to scratch the surface of your car than a metal razor blade. You’ll also need a heat gun or a hairdryer to warm up the area around the decal and soften the adhesive.
Additionally, you’ll need some adhesive remover, which is available at most hardware stores. Once you’ve gathered these tools, you can begin the process of removing the decal. Start by warming up the area around the decal with your heat gun or hairdryer, and then use your plastic razor blade to gently scrape away the decal.
If there is any remaining adhesive, apply the adhesive remover to a cloth and rub the area until the adhesive comes off. With a little patience and the right tools, you’ll be able to remove your dealer decal in no time!
Tools you’ll need
When it comes to tackling any project, having the right tools is essential to ensure success and efficiency. The same goes for blog writing. In order to produce quality content that’s both engaging and informative for your readers, you’ll need a few key tools.
First and foremost, a reliable computer or laptop is a must-have. Preferably with a larger screen, a comfortable keyboard and, if possible, a separate mouse. Writing and editing blog posts can be time-consuming, so investing in a comfortable workspace is crucial.
Additionally, you’ll need a word processing software to write, edit, and format your blog posts. Microsoft Word or Google Docs are great choices for this purpose. They both come with many useful features such as spellcheck, synonym suggestions, and various formatting options.
Another essential tool is a good quality camera to take photos that complement your written content. If you’re in a pinch, a newer smartphone camera can suffice, but it’s worth investing in a high-quality camera for improved images. Additionally, images can either be created by software such as Canva or designed using Adobe Photoshop, InDesign or Illustrator.
Finally, you’ll need a content management system (CMS) like WordPress, Squarespace, or Wix to publish your blog post. These platforms allow you to easily manage your content, optimize it for SEO, and share it on social media platforms. Overall, having access to these tools can help ensure your blogging experience is much more successful and enjoyable.
Whether you’re a beginner or an expert blogger, having access to the right tools can make all the difference in producing quality content that will engage your audience.
Preparation is Key
Preparing for any task can be a daunting task in and of itself. However, the key to success often lies in gathering the right tools for the job. This holds true for both physical tasks and mental ones.
Let’s focus on the former – physical tasks – for now. If you’re embarking on a new project or looking to complete a DIY task, you’ll want to make sure you have the right tools for the job. This means doing your research beforehand and identifying the specific tools you’ll need.
Maybe you need a saw, a screwdriver, a hammer, or a drill. Whatever the case may be, make sure you have all the necessary tools before you begin. Otherwise, you run the risk of running into roadblocks or even injuring yourself.
Remember, preparation is key!
Heat the Decal and Soften the Adhesive
Removing the dealer decal from your car can be a bit challenging, especially if you don’t want to damage the car’s paint. One of the best ways to get rid of the dealer decal is by using heat. Heat helps to soften the adhesive on the decal, making it easier to remove.
A hairdryer or heat gun can be used to heat the decal. Hold the hairdryer or heat gun close to the decal and move it back and forth over the decal. Be careful not to overheat the area, as this can damage the paint.
The heat will make the decal more pliable, so you can gently peel it off using a plastic scraper or your fingers. Once you have removed the decal, you can use rubbing alcohol or adhesive remover to remove any residual glue. With this simple trick, you can get rid of the dealer decal without damaging your car’s paint and enjoy a cleaner look.
Using Heat Guns or Hair Dryers to Remove Decals
If you’re looking for an easy and effective way to remove decals from your car or other surfaces, you might want to consider using a heat gun or hair dryer. Both of these tools work by heating up the decal, which softens the adhesive and makes it easier to peel off. Simply point the heat gun or hair dryer at the decal for a few seconds, or until it becomes warm to the touch.
Then, use a plastic scraper or a credit card to gently lift the decal off the surface. Be careful not to overheat the area or let the scraper slip and scratch the surface. With a little patience and practice, you’ll be able to remove decals with ease using a heat gun or hair dryer.
Be Careful with Plastic Cars and Overheating
If you’re a fan of plastic cars, it’s essential to be mindful of when and where you leave them. High temperatures can cause them to melt or become distorted. While this may seem like common sense, sometimes it’s overlooked.
If you don’t store your plastic car in a shaded area, you risk exposing it to an overheating problem. However, there is a solution to fix any decal issues that may arise. Heat the decal and soften the adhesive.
You can do this by using a hair dryer or a heat gun on low intensity. Be sure to apply the heat to the area surrounding the decal’s edge before attempting to peel it off. By doing so, you’ll loosen the adhesive, making it easier to remove without damaging the decal or the plastic car’s surface.
In short, taking good care of your plastic cars won’t just make them last longer, but also save you time and money in the long run.
Removing the Decal
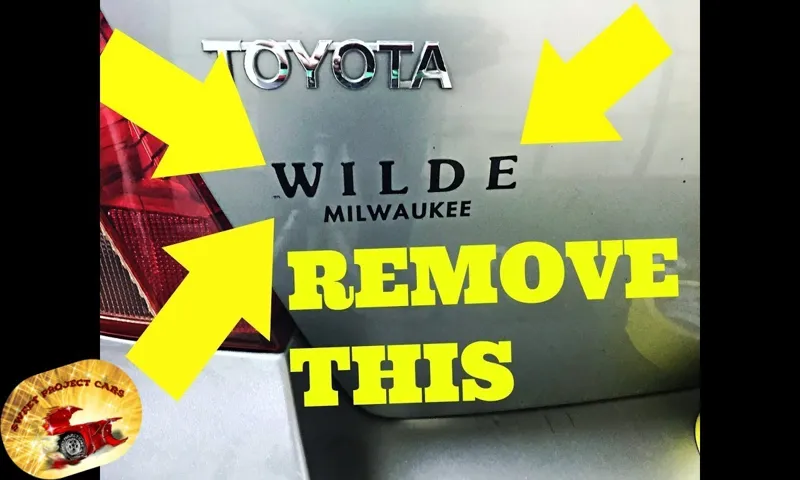
If you’ve recently bought a car from a dealer, you might find a decal on the car that you don’t necessarily want there. Maybe it’s a dealership logo or a slogan that you don’t necessarily agree with. Whatever the case may be, you can remove the decal with a few simple steps.
First, use a hairdryer or a heat gun to warm up the decal. This will make it easier to peel off. Once it’s warm, use a plastic scraper to get underneath the edge of the decal.
Slowly and gently peel it back, keeping the angle sharp so that the decal comes off in one clean piece. If there is any residue left behind, use a solvent like rubbing alcohol or Goo Gone to loosen it up. Then, wipe it away with a clean cloth.
With a little bit of effort, you can remove the dealer decal and make your car look the way you want it to.
Peel off the Decal
Removing a decal can be a hassle, especially if it has been on for a long time. The first step is to prepare the surface by cleaning it thoroughly. Then, gently peel off the top edge of the decal, making sure not to damage the surface beneath it.
Depending on the adhesive, it may come off easily or require more effort. If it is stubborn, use a hairdryer to heat up the decal, which can loosen the adhesive, making it easier to remove. Once the decal is off, clean the surface again, and remove any leftover adhesive using rubbing alcohol or a specialized adhesive remover.
With patience and the right technique, removing a decal can be done without causing any damage to the surface.
Using Adhesive Remover
Removing a decal can leave behind sticky and unsightly residue. Luckily, using adhesive remover can make this process a breeze. Before beginning, gather the necessary supplies, including adhesive remover, a plastic scraper or credit card, and a cloth or paper towel.
Apply the adhesive remover to the residue and let it sit for a few minutes. Using the scraper, gently scrape away the residue in a back and forth motion. If there is still residue left, reapply the adhesive remover and scrape again.
Once the residue is gone, wipe down the area with the cloth or paper towel. Remember to always wear gloves and work in a well-ventilated area when using adhesive remover. This method can also be used for removing stickers, tape, and other adhesives from surfaces like glass, metal, and plastic.
Overall, using adhesive remover makes removing decals and other adhesives a quick and easy process.
Cleaning the Area
If you’re looking to remove a dealer decal from your car, the first step is to clean the area thoroughly. It’s important to remove any debris or dirt around the decal, as this will make the removal process easier and help prevent any damage to the paint. Start by using soapy water and a clean cloth to scrub the area around the decal.
For stubborn grime, a clay bar can be useful. Once the area is clean, use a hair dryer or a heat gun to warm up the decal. This will soften the adhesive and make it easier to peel off.
Take care not to overheat the area, which could damage the paint. Once the decal is removed, use rubbing alcohol to clean any leftover adhesive. It’s important to avoid using abrasive materials, like steel wool, which could scratch the paint.
With some patience and a little elbow grease, you can remove a dealer decal and leave your car looking as good as new.
Final Steps in Removing Car Dealer Decals
When it comes to removing car dealer decals, the final step is cleaning the area. After successfully peeling off the sticker, the remnants of the adhesive and other particles can still be left behind. To effectively clean the surface, start by wiping it down with a clean, damp cloth.
Then, use a specialized adhesive remover or rubbing alcohol to break down any remaining sticky residue. Make sure to read the instructions on the product to ensure safe and effective use. After applying the adhesive remover or rubbing alcohol, use a clean cloth to wipe away the remaining residue.
And voila! Your car will be looking brand new without any unwanted dealer decals. Remember to take your time with this process and avoid using harsh chemicals or rough materials that may damage the surface of your car.
Conclusion
So there you have it, my friends. Removing a pesky dealer decal from your new car doesn’t have to be a daunting task. With just a few easy steps and some handy tools, you can rid yourself of that eyesore and have a sleek, sticker-free ride.
And you know what they say: no pain, no gain – except in this case, the only pain is saying goodbye to that awful decal. Happy driving!”
FAQs
What is a dealer decal?
A dealer decal is a sticker or emblem that is placed on a new or used vehicle by the dealership where it was purchased.
Can I remove a dealer decal myself?
Yes, you can remove a dealer decal yourself. You will need a hairdryer, a plastic scraper, and some rubbing alcohol.
Is it safe to use rubbing alcohol to remove a dealer decal?
Yes, rubbing alcohol is safe to use to remove a dealer decal. It helps to remove any adhesive residue left behind.
Will removing a dealer decal damage my car’s paint?
If you use the right tools and techniques, removing a dealer decal should not damage your car’s paint. However, if the decal has been on the car for a long time, it may have damaged the paint underneath.
How do I remove an old, stubborn dealer decal?
If the dealer decal is old and stubborn, you may need to use a stronger adhesive remover, such as Goo Gone or WD-40. Be sure to test the product on a small, inconspicuous area first.
Can a dealership charge me for removing a dealer decal?
No, a dealership cannot charge you for removing a dealer decal. It is your car, and you have the right to remove any stickers or emblems that you do not want on it.
Is it better to leave the dealer decal on my car?
It is up to personal preference whether or not to leave the dealer decal on your car. Some people like to show off where they purchased their vehicle, while others prefer a clean, uncluttered look.