
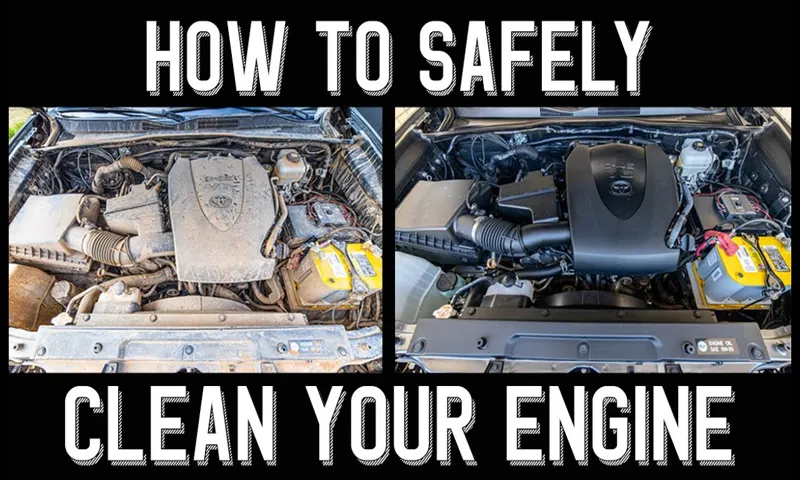
Got an oil leak on your engine? It happens more often than you might think. Whether it’s due to a loose oil filter or a cracked engine block, the result is the same: a giant mess. The good news is that cleaning up engine oil is not as difficult as you might think.
With the right products and a little bit of elbow grease, you can get your engine looking good as new in no time. In this step-by-step guide, we’ll walk you through everything you need to know to clean engine oil off your engine with ease. So roll up your sleeves, grab your tools, and let’s get started!
Table of Contents
What You Will Need
Cleaning engine oil off your engine can seem like a daunting task, but with the right tools, it’s a task that can be done quickly and easily. Here are the things you’ll need to get started: a degreaser or engine cleaner, a stiff brush or scraper, a bucket of water, a clean rag, and protective gloves. The first step is to make sure your engine is cool before attempting to clean it.
Then, use the degreaser or engine cleaner to spray all over the affected areas. Allow it to sit for a few minutes to let the solution penetrate the oil, and then use the stiff brush or scraper to agitate the area. After you’ve scrubbed down the engine, rinse it thoroughly with water.
Dry off the engine with a clean rag, and then you’re done! By following these simple steps and using the right tools, you’ll be able to effectively remove engine oil from your engine, leaving it looking and functioning like new.
Absorbent Material
When it comes to cleaning up spills and messes, having the right materials can make all the difference. One key item that you’ll want to have on hand is absorbent material. This can include towels, cloths, sponges, rags, and even specialized products like granular absorbents or pads.
The type of material you choose will depend on the nature of the spill and the surface it has landed on. For example, a spill on a hard floor may require a different type of absorbent than a spill on carpet. When selecting your absorbent material, be sure to consider factors like absorbency rate, durability, and ease of use.
By having a variety of options available and choosing the right one for each job, you can ensure that spills are cleaned up quickly and easily, preventing damage and potential safety hazards. So, whether you’re in a professional cleaning setting or just tackling a mess at home, remember: having the right absorbent material on hand is key to effective cleanup.
Degreaser or Engine Cleaner
When it comes to cleaning your engine, there are a few tools you’ll need before getting started. First and foremost, you’ll need either a degreaser or an engine cleaner. These products work to break down and dissolve grease and grime on your engine block, allowing for a thorough clean.
A degreaser is a more heavy-duty option that is typically used for heavily soiled engines. On the other hand, an engine cleaner is a milder version of a degreaser and is suitable for engines that aren’t extremely dirty. Additionally, you’ll need a few brushes of various sizes to help scrub away any remaining dirt and debris.
Make sure to wear protective gloves and eyewear, as these products can be harsh on the skin and eyes. By using the right tools and products, you can ensure that your engine is clean and running smoothly.
Soft-Bristle Brush
If you’re looking to take care of your hair properly, investing in a soft-bristle brush is a must. Unlike regular brushes, which can be harsh on your hair and scalp, a soft-bristle brush gentler and kinder. To start, you’ll need a soft-bristle brush.
Look for one with a mix of nylon and natural boar bristles. These types of brushes have the perfect balance of softness and grip, which means they do a great job of detangling hair without pulling or tugging. Additionally, it’s important to choose the right type of brush for your hair type.
If you have thick, curly hair, opt for a brush with longer bristles. For fine, straight hair, a shorter bristle brush will do the trick. Remember, using a soft-bristle brush regularly promotes hair growth, improves hair texture, and keeps your scalp healthy and happy.
Overall, it’s a wise investment for anyone looking to maintain beautiful, healthy hair.
Water Hose or Pressure Washer
When it comes to cleaning your outdoor space, whether it’s your car, patio, or driveway, you have two main options – a water hose or a pressure washer. Choosing between the two can be a difficult decision. If you’re simply looking to wash away dirt and debris from a surface, a water hose will likely do the trick.
However, when it comes to removing built-up grime and stains, a pressure washer is your best bet. To use a pressure washer, you’ll need a few things – the machine itself, an outdoor power source, and a water source. Most pressure washers come with a spray gun, wand, and nozzle, but you may also want to invest in specialized attachments for specific tasks.
Before using a pressure washer, it’s important to read the instruction manual carefully and ensure that you have the necessary protective gear, such as safety goggles and sturdy shoes. Overall, whether you choose a water hose or pressure washer, both options can help you achieve a cleaner, more polished outdoor space.
Step 1: Prepare the Engine
If you’ve got engine oil on your engine, you need to clean it off before it creates bigger problems. The first step is to prepare the engine. Firstly, let the engine cool down completely before starting to clean it.
This will prevent any injuries from hot surfaces or unexpected movements. Then, cover any electrical components such as the battery, alternator, and fuse boxes with plastic bags to prevent water from getting in and causing damage. Next, you can use an engine degreaser to spray onto the affected area.
Let it sit for around 10-15 minutes before using a stiff brush to scrub away at the oil. Finally, rinse the engine with water, being careful to avoid electrical components, and let it dry completely before starting it up again. By following these steps, you’ll be able to effectively clean the engine oil off your engine and keep it running smoothly.
Turn off the Engine
To turn off the engine, the first step is to prepare it properly. Firstly, make sure that your vehicle is not in motion, and then shift it to the park or neutral position, depending on the type of transmission you have. After this, give the engine a few minutes to cool down and reach the normal operating temperature range.
Once this is done, turn off all electrical accessories, such as the air conditioner, power windows, and headlights. This will help reduce the load on the battery and make it easier for the engine to stop running smoothly. After completing these preparatory steps, turn off the ignition key, and the engine will stop running.
Remember not to remove the key from the ignition until the engine is completely turned off, as removing the key too early can cause damage to the starter or electronics. By following these simple steps, you can ensure that your engine turns off efficiently and safely every time you stop your vehicle.
Let the Engine Cool Down
Before you begin any maintenance or repair work on your engine, it’s important to let the engine cool down first. This will prevent any injuries from hot components and ensure that your work is done safely. The last thing you want is to burn yourself on a hot engine or accidentally touch a hot part of the engine.
To prepare the engine for maintenance, start by turning off the engine and giving it a few minutes to cool down. Open the hood and remove any covers or shields that may be covering the engine. This will give you better access to the engine and allow you to see the parts that need attention.
So, be patient and wait for the engine to cool down before moving on to the next step.
Cover Sensitive Electrical Components
When it comes to working on an engine, it’s important to take precautions to protect sensitive electrical components. One of the first steps in preparing the engine for any maintenance or repairs is to cover these components. This can be done using specialized tape or plastic covers designed specifically for this purpose.
By covering up parts such as the battery terminals, spark plugs, and wiring harnesses, you can prevent accidental damage or short circuits that could cause more serious issues down the line. Covering sensitive electrical components is a simple step that can help to ensure the smooth operation of your engine and prolong its lifespan. So, before getting hands-on with any engine work, take the time to properly protect these areas.
Step 2: Apply the Degreaser
Once you have prepared the engine surface, it’s time to apply the degreaser and get rid of that stubborn engine oil. Choose a high-quality engine degreaser that is suitable for your engine type. You can either use a spray bottle or a brush to apply the degreaser to the engine surface, depending on the product’s instructions.
It’s essential to follow the manufacturer’s guidelines carefully to avoid damaging the engine. Allow the degreaser to sit on the engine surface for a few minutes, but don’t let it dry out. This will enable it to penetrate the oil and lift the dirt from the engine.
After a few minutes, use a brush to scrub the engine surface gently. Be careful not to scrub too hard and damage the engine. You can also use a pressure washer to rinse off the degreaser and dirt from the engine surface.
Once you’ve finished, dry the engine surface with a clean, dry cloth, and voila, your engine will look as good as new!
Spray or Pour Degreaser on Oil Stains
When it comes to removing oil stains from surfaces like driveways or garage floors, applying a degreaser is crucial for achieving a successful outcome. There are two ways to apply degreaser: spraying and pouring. Spraying is a convenient option if you have a large area to cover or if the stain is difficult to reach.
You can use a spray bottle or a pressure washer to apply the degreaser evenly over the stain. On the other hand, pouring degreaser is the best option if you have a small, concentrated stain. Simply pour a small amount of the degreaser over the stain and use a brush to scrub it into the surface.
Make sure to read the instructions on the degreaser label and wear protective gear like gloves and goggles. By using the right method to apply degreaser and taking necessary precautions, you’ll be able to get rid of even the most stubborn oil stains.
Let the Degreaser Soak In
Before you start scrubbing off the grime and grease from your kitchen appliances, you need to apply the degreaser first. This second step is crucial in ensuring that the degreaser dissolves the grease effectively and makes it easier to clean. A degreaser is a powerful cleaning agent designed to break down grease and oil buildup.
It’s important to note that different types of degreasers are formulated for different surfaces, so make sure you choose the right one for your appliance. Once you have your degreaser, apply it to the surface and let it soak in for a few minutes. This will give the degreaser enough time to work its magic and dissolve the grime, making it effortless to scrub off later.
Remember, it’s always best to follow the manufacturer’s recommendation on how long to let the degreaser sit to avoid damage or discoloration. By applying the right degreaser and letting it soak in, you’ll save yourself time, effort, and frustration while cleaning your kitchen appliances.
Scrub with a Soft-Bristle Brush
When it comes to cleaning your grill, simply scrubbing with a random brush won’t do the trick. Instead, it’s important to use a soft-bristle brush to avoid damaging the grill’s surface. Once you’ve got your brush, it’s time to move onto the next step: applying the degreaser.
This step is crucial for removing any excess grease or grime that has built up on your grill. Make sure to follow the instructions on the degreaser bottle, evenly applying it across the surface of the grill. Give the degreaser time to sit on the grill, allowing it to do its work and break down any stubborn buildup before scrubbing it away.
By taking the time to properly apply the degreaser, you’ll ensure that your grill is thoroughly cleaned and ready to use. With just a little bit of elbow grease, your grill will look as good as new. And the best part? You’ll be able to cook up some delicious meals knowing that your grill is free from any harmful buildup.
So, grab your brush and degreaser and get to cleaning!
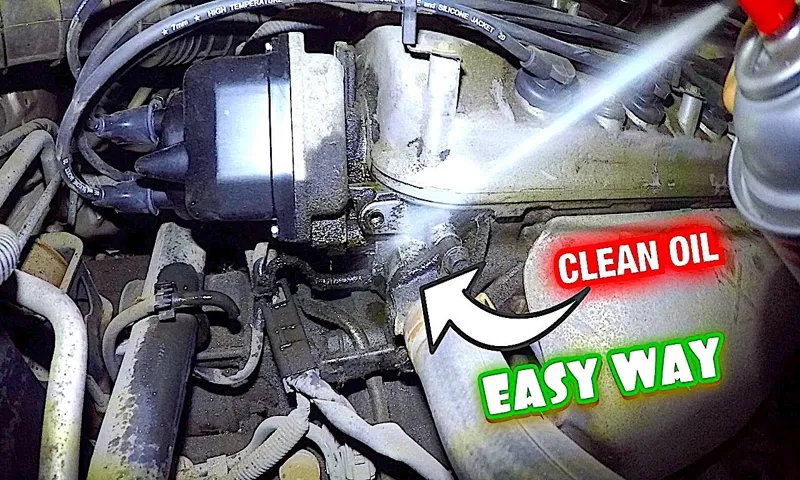
Step 3: Remove the Degreaser
Once you have allowed the degreaser to sit on the engine for the recommended amount of time, it is time to remove it thoroughly. Using a high-pressure hose, generously spray down the engine, ensuring that all degreaser and oil residue is cleaned off. Make sure to cover electrical components and connectors in plastic bags to prevent any water damage during the cleaning process.
The high-pressure hose will effectively remove all traces of oil and degreaser, leaving your engine clean and spotless. After you have finished rinsing, remove the plastic bags and inspect the engine for any remaining oil spots. If there are still areas that need attention, repeat the degreasing and rinsing process until all visible oil has been removed.
By following these simple steps, you can successfully remove engine oil from your engine, ensuring that it is running smoothly and efficiently.
Rinse off the Engine with Water Hose or Pressure Washer
Now that the engine has been properly degreased, it’s time to remove all the residue. This means rinsing it off with a water hose or pressure washer. This step is crucial in ensuring that all the degreaser is removed, as any residue left behind can damage the engine over time.
To begin, make sure the engine is cool to the touch and cover any electrical components with plastic bags or towels to prevent water damage. Then, use a steady stream of water to rinse the engine, starting from the top and working your way down. Pay special attention to crevices and hard-to-reach places where degreaser may accumulate.
If you’re using a pressure washer, use the lowest setting and hold it at least 12 inches away from the engine to avoid damaging any parts. Once the engine is thoroughly rinsed, take a clean, dry towel and wipe away any excess water. Your engine is now free of degreaser and ready to be dried and inspected for any other issues.
Remember, regular engine maintenance is vital to keeping your car running smoothly and preventing costly repairs down the line.
Dry the Engine Thoroughly
After thoroughly cleaning the engine, it’s important to remove the degreaser from its surface. Degreasers are powerful chemical agents that can cause damage to your engine if left on for too long. To remove the degreaser, use clean water and a scrub brush to rinse off all the degreaser from the surface.
It’s important to rinse the engine thoroughly and make sure no spots are left behind. After rinsing, use a clean, dry cloth to wipe down the surface and remove any excess water. Once the engine is dry, inspect it carefully to make sure that no degreaser is left behind.
Removing the degreaser will help to prevent any potential damage to the engine and ensure it stays in top condition for longer. Remember to take your time and do a thorough job to keep the engine running smoothly.
Step 4: Check for Residue
After scrubbing away at the engine oil stains on your vehicle, it’s important to check for any leftover residue. Even after cleaning, sometimes there may still be oily residue on the surface. You can start by using a clean cloth or rag to see if any oil comes off.
If it does, continue wiping until there is no more residue left. If you’re still seeing residue after wiping, you could try using a degreaser or other specialized engine cleaning product. It’s important to double-check for any remaining oil, as it could potentially harm your engine if left untreated.
By checking for residue and ensuring a thoroughly cleaned engine, you can keep your vehicle running smoothly and maintain its overall performance.
Inspect the Engine for Remaining Oil Stains
When inspecting your engine, it’s important to check for any remaining oil stains or residue. This step may seem tedious, but it’s crucial to ensure that there are no underlying issues with your engine. Residue can indicate a leak or spillage, which can lead to a range of problems if not dealt with promptly.
To check for residue, visually inspect the engine and look for any areas that appear discolored or have a slick sheen. You can also run your fingers along the engine parts to feel for a greasy film. If you discover any residue, it’s important to take action immediately and identify the source of the problem.
One tip is to use a degreaser to clean the engine parts thoroughly before re-inspecting for further residue. Remember, keeping your engine clean and properly maintained is essential for its longevity and performance.
Repeat Steps 2 to 3 if Needed
Once you’ve completed the cleaning process by using a solution and a microfiber cloth, it’s essential to check for residue. This residue could result from the cleaning solution not being entirely removed or dirt that was missed during the cleaning process. Simply run your hand over the surface to check if there’s any residue left.
If there is, repeat steps 2 to 3 until the surface is entirely clean. Make sure not to overuse the cleaning solution because using a lot of it could potentially damage the surface, leading to scratches or discolouration. Always check the manufacturer’s instructions and follow them accordingly.
By using this simple four-step process, you can achieve a sparkling clean surface in no time!
Step 5: Prevent Future Oil Stains
Once you’ve successfully removed the engine oil stains from your engine, the next step is to prevent future stains. One way to do this is to regularly check the engine for leaks or other issues that could cause oil to spill onto the engine. Additionally, you can use a degreaser to clean the engine regularly, especially before long trips or when the engine is exposed to extreme temperatures.
Using a high-quality engine oil can also help reduce the likelihood of leaks and stains. By taking these preventative measures, you can keep your engine looking clean and running smoothly for years to come. So, remember to stay vigilant and proactive when it comes to maintaining your engine, and you’ll be able to enjoy a clean, well-oiled machine for a long time!
Regularly Check the Engine for Leaks
Regularly checking your engine for leaks is an important step in preventing future oil stains. If you notice any oil spots on your driveway or garage floor, it’s essential to identify the source of the leak right away. Leaks can occur due to worn out gaskets or seals, damaged oil pans, or loose oil filters.
A quick inspection of your engine’s components, including the oil pan, valve covers, and oil filter, can help you identify any leaks before they turn into larger problems. You can also invest in a drip tray or oil absorbent mat to catch any small leaks and prevent them from staining your garage floor or driveway. By taking the time to regularly check your engine for leaks, you can keep your vehicle running smoothly and avoid the need for costly repairs down the line.
Remember that prevention is always better than cure!
Clean Oil Spills Immediately
Oil spills can be a mess to clean up and can cause severe damage to our environment. Preventing future oil stains is crucial for protecting our planet. For starters, store your oil carefully, and ensure it’s in a secure container.
Avoid leaving oil containers in areas where they may tip over and spill. Additionally, check your car for oil leaks regularly. Small oil leaks may seem harmless, but they accumulate over time and can cause significant damage.
Lastly, make sure to clean any oil spills immediately. Use absorbent materials like kitty litter, baking soda, or sand to soak up the spilled oil. Scrub the affected area with a degreaser, and rinse it off with water.
By following these simple steps, you can prevent future oil stains and actively contribute to the conservation of our environment.
Park the Car on Smooth and Level Surface
When it comes to preventing future oil stains on your driveway, one of the most important steps is to park your car on a smooth and level surface. This may seem like a small detail, but it can actually make a big difference in preventing oil leaks and spills. When your car is parked on a bumpy or uneven surface, it puts extra stress on the oil pan and other components, which can lead to leaks and spills over time.
By parking on a smooth and level surface, you’ll help ensure that your car’s oil stays where it belongs and doesn’t end up staining your driveway or garage floor. So, the next time you park your car, take a moment to find a smooth and level surface to park on, and you’ll be doing your part to prevent future oil stains.
Conclusion
Cleaning engine oil off your engine doesn’t have to be a slippery situation. With the right tools and techniques, you can get your engine shining like a star and back on the road in no time. So don’t wait until the oil is as thick as mud, take action today and show your engine some love.
After all, a clean engine is a happy engine.”
FAQs
What causes engine oil to leak onto the engine?
There are several reasons for this, such as damaged gaskets or seals, loose or faulty oil filters, damaged oil pans, or overfilled oil levels.
Is it safe to use a degreaser to clean engine oil from the engine?
Yes, it is safe to use a degreaser to remove engine oil from the engine, but it should be a specifically designed engine degreaser and applied carefully to avoid damaging any sensitive parts.
How often do you need to clean the engine oil off the engine?
It is recommended to clean the engine oil off the engine after every oil change, or at least every few months to prevent buildup that can lead to engine damage.
Can you use water to clean engine oil off the engine?
It is not recommended to use water to clean engine oil from the engine as it can cause rusting and corrosion of metal parts. It is best to use a specialized engine degreaser.
What steps should be taken before cleaning engine oil off the engine?
Some of the main steps include disconnecting the battery, covering sensitive electrical parts to avoid damage, ensuring the engine is cool before cleaning, and following proper safety protocols.
Can you prevent engine oil from leaking onto the engine?
Yes, by following proper maintenance procedures such as checking and replacing gaskets and seals regularly, ensuring the oil filter is tightened correctly, and maintaining the proper oil level.
What type of degreaser is best for cleaning engine oil off the engine?
It is best to use a degreaser specifically designed for engines, such as citrus-based degreasers or solvent-based degreasers, which are effective in removing engine oil buildup without damaging sensitive parts.