
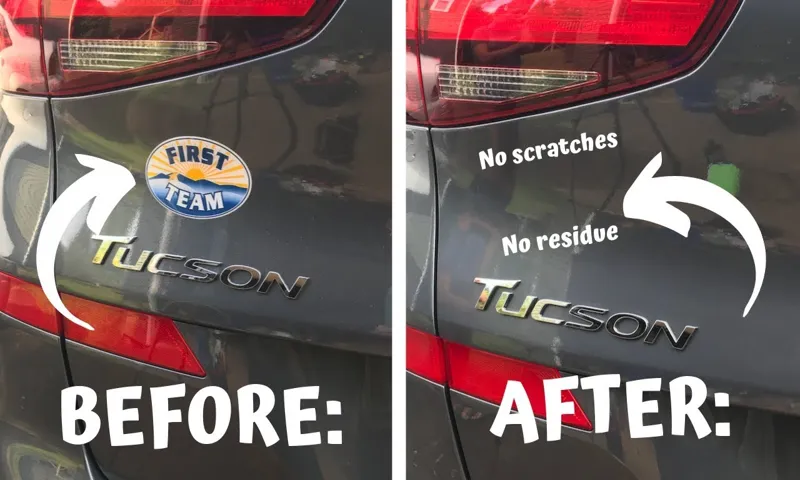
Have you recently purchased a new car from a dealership and noticed their branding on the back of your vehicle? While some people might enjoy the free advertising for the dealership, others may find it an eyesore or an invasion of their personal space. If you’re looking for a quick and easy way to remove those dealership decals from your car, you’re in luck. In this guide, we’ll cover everything you need to know to get rid of those pesky decals without damaging your car’s paint or leaving behind any residue.
So, grab some tools and get ready to take back control of your car’s appearance!
Table of Contents
Introduction
If you have recently purchased a new car, you may have noticed a dealership decal on the back of your vehicle. While this decal may serve as free advertising for the dealership, it may not align with your personal style or preferences. Luckily, removing dealership decals is a fairly simple and easy process.
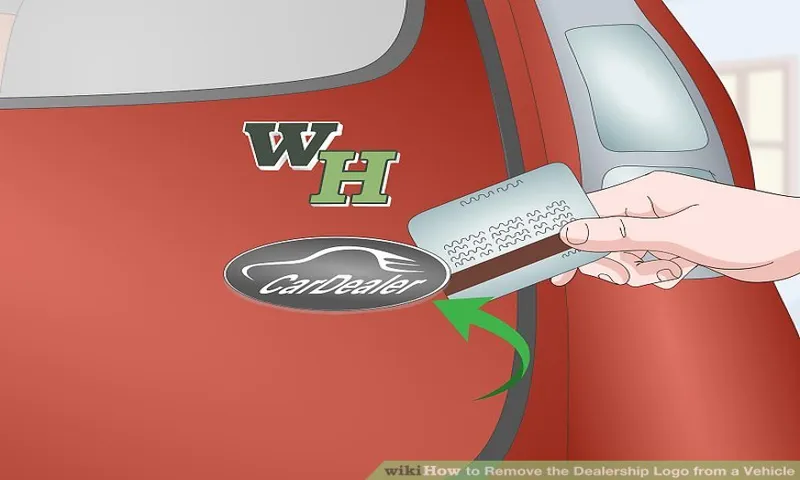
First, you will want to gather the necessary materials, including a heat source (such as a hair dryer) and a plastic scraper or credit card. Then, use the heat source to warm up the decal, making it easier to peel off. Once the decal is warm, use your plastic scraper or credit card to gently pry it off, being careful not to damage the paint or finish of your car.
If there is any leftover adhesive residue, use rubbing alcohol or adhesive remover to clean it off. With just a little bit of time and effort, you can easily remove the dealership decal from your car and make it truly your own.
Why Remove Dealership Decals?
car dealership decals Introduction: There are several reasons why people choose to remove dealership decals from their cars. Car dealerships often put their logos or names on a car’s back or side, which can be quite distracting and take away from the overall beauty of the vehicle. Additionally, many people find dealership decals to be an eyesore or cheesy, detracting from the car’s overall sleek appearance.
Another reason to remove dealership decals is that they can make it difficult to sell the car later on. Many potential buyers do not want to drive a car around with someone else’s name or logo on it, and the presence of dealership decals could make it harder to find a buyer. Whatever your reason for wanting to remove your car’s dealership decal, it’s important to do it correctly to avoid causing damage to your car’s exterior.
The Tools You Will Need
When starting on a new project that requires specific tools, it can be overwhelming to figure out everything you need. However, having the right tools is essential to ensuring a successful outcome. For this project, there are several tools that you will need to have on hand.
The first tool you will need is a powerful computer with enough memory and processing power to handle the software you’ll use. Additionally, investing in a quality pair of noise-canceling headphones can make a big difference in helping you focus during the creative process. You’ll also need a digital camera or smartphone to capture images for your project and software such as Adobe Photoshop or GIMP for editing and manipulation.
Finally, having a solid online storage solution such as Dropbox or Google Drive will allow you to access your work from anywhere and provide a backup in the event of hardware failure. By making sure you have everything you need before starting, you set yourself up for success and give yourself the best chance to create something amazing.
Step-by-Step Guide
If you recently purchased a new car, chances are the dealership slapped on a decal with their logo or branding to serve as a promotion. While some people might not mind having it on their vehicle, others might want to remove it for various reasons. The good news is that removing a dealership decal is a simple process that anyone can do without damaging the paint job.
Start by cleaning the area around the decal with soap and water, and then heat the decal with a hairdryer or heat gun for a minute or two until it becomes pliable. Carefully lift one corner of the decal with a plastic scraper or credit card and slowly peel it off the surface, applying more heat if necessary. Once the decal is removed, clean the area again with soap and water or a specialized solvent to get rid of any adhesive residue.
Voila! Your car is free of any dealership branding, and you can enjoy a cleaner look without any unsolicited promotion.
Start with Heat
Starting with heat is a great way to ensure success in cooking, as it helps to evenly distribute heat to your food. To begin, preheat your oven or stove to the desired temperature, taking care to read the recipe carefully and make note of any specific heating instructions. If you’re using the stovetop, be sure to use the appropriate size and type of pot or pan for your cooking needs, as this can greatly affect the amount of heat your food receives.
Don’t forget to use a timer to keep track of your cooking time! Over time, you’ll develop a better understanding of how long different foods take to cook and at what temperatures. Remember, starting with heat is just one aspect of cooking, but it’s an essential one that can make all the difference in the final dish. So fire up that stove or oven and get cooking!
Use a Razor Blade
If you’re looking for a quick and efficient way to cut through materials, using a razor blade might just be the solution you need. But before you start wielding the blade, it’s essential to take some precautionary measures to avoid unnecessary accidents. First and foremost, ensure that you’re using a sharp blade to prevent it from slipping.
Secondly, wear gloves to protect your hands from any possible cuts or nicks. Lastly, always cut away from your body to avoid self-injury. Once you’ve taken these safety measures, the next step is to position your material correctly and make precise cuts using the razor blade.
Whether you’re cutting through cardboard, paper, or thin plastic, a razor blade can provide you with a clean and accurate cut. With its sharp edge, you’ll be able to make quick work of any project you have at hand. So, try using a razor blade today, and experience the precision and ease of cutting through materials like a pro!
Apply Adhesive Remover
If you’re looking to remove adhesive from a surface, then you’ll need to apply adhesive remover. This substance is specially designed to break down the sticky bond between a surface and any adhesive that has been applied to it. To apply adhesive remover, start by choosing a product that’s suitable for the type of adhesive you want to remove.
Then, apply the remover generously to the affected area and wait for it to penetrate the adhesive. Depending on the strength of the adhesive and the type of surface it’s attached to, you may need to leave the adhesive remover for up to an hour. Once the adhesive has been broken down, you can use a scraper, brush, or rag to gently remove the adhesive residue.
Be careful not to damage the surface underneath. With a bit of patience and care, you can successfully remove adhesive from any surface using adhesive remover. So, don’t hesitate, grab a bottle of adhesive remover and get to work!
Alternative Methods
If you’ve recently purchased a vehicle from a dealership, you may have noticed a rather conspicuous decal on the back or side of the car advertising the dealership’s name and information. While some people may not mind leaving the decal on their car, others may find it unsightly or want to remove it for personal reasons. The good news is that there are a few alternative methods to remove dealership decals without causing damage to the car’s paint or leaving residue behind.
One option is to use a hairdryer or heat gun to warm up the decal, then carefully peel it off with a plastic scraper. Another method is to use rubbing alcohol or adhesive remover to dissolve the glue that holds the decal in place. Regardless of the method you choose, it’s important to be patient and take your time to avoid scratching or damaging the surface of your car.
With a little effort and some elbow grease, you can remove dealership decals and enjoy a sleek, customized ride.
Use a Hairdryer
If you’re without a heat gun or embossing tool for your crafting projects, you can always use a hairdryer as an alternative method. A hairdryer can be used for embossing by blowing hot air onto your project. First, apply embossing powder onto the desired area and shake off any excess powder.
Then hold the hairdryer several inches away from the surface and aim it at the embossing powder, moving the hairdryer around to ensure that all areas are heated evenly. The heat will activate the embossing powder, creating a raised design on your project. This method can be a great option for those who are on a budget or don’t have access to a heat gun.
However, keep in mind that using a hairdryer may take longer and may not produce the same quality results compared to a heat gun. So, if you’re looking to take your crafting to the next level, investing in a proper embossing tool would be beneficial!
Try Peanut Butter
When it comes to alternative methods of incorporating a healthy protein source into your diet, why not try peanut butter? Not only is peanut butter delicious, but it’s also packed with protein, healthy fats, and fiber. You can add peanut butter to smoothies, spread it on toast or fruit, or even use it as a dip. Peanut butter is a versatile ingredient that can be incorporated into many recipes, including baking.
Plus, it’s a great option for those with allergies to other nuts. So, why not try swapping out your usual protein source for a serving of peanut butter? Your taste buds (and muscles) may thank you for it.
Conclusion
You know what they say, out with the old and in with the new! And that includes getting rid of any dealership decals that may be cluttering up your car. Fortunately, removing them is easier than you might think. All you need is a little elbow grease, some patience, and a few household items.
So go ahead, channel your inner DIY guru, and reclaim the clean and stylish look of your ride. Your car (and your ego) will thank you for it!”
FAQs
What is a dealership decal?
A dealership decal is a sticker or emblem placed on a car to signify which dealership it was purchased from.
Can a dealership decal be removed easily?
It depends on the type of decal, but most can be removed with some effort using heat, solvents, or adhesive removers.
Will removing a dealership decal damage the car’s paint or finish?
If done properly, it should not cause any damage, but it’s important to be careful and follow the proper steps to avoid damaging the paint or finish.
Why do people choose to remove their dealership decal?
Some people prefer the look of a clean, unbranded car, while others may not want to advertise the dealership they purchased from.
Are there any tools or products recommended for removing a dealership decal?
Heat guns, plastic razor blades, adhesive removers, and rubbing alcohol are commonly used tools and products for removing decals.
Is it possible to remove a dealership decal without leaving any residue behind?
It can be difficult to remove all residue completely, but using an adhesive remover or rubbing alcohol can help to minimize any residue left behind.
Should I remove a dealership decal if I plan to sell my car in the future?
It’s a personal preference, but removing the decal can make your car more appealing to potential buyers who may not want to advertise the previous dealership.