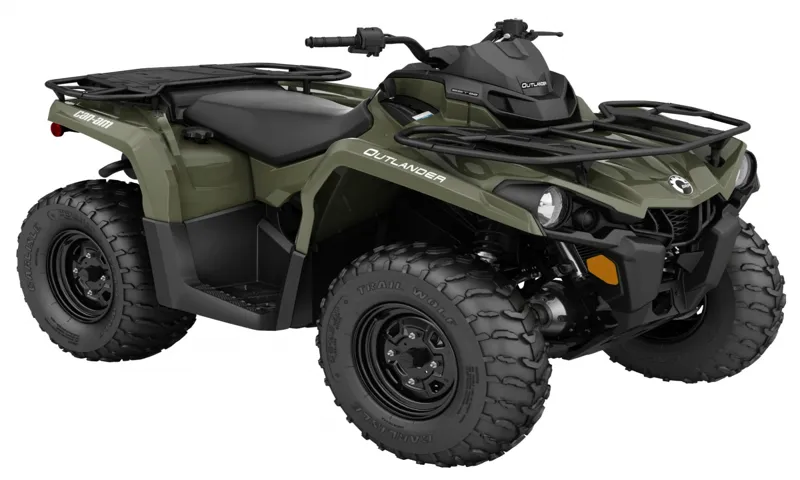
Are you looking to add some extra utility to your Can Am 450 ATV? One great way to do that is by installing a winch. A winch is an essential tool for any off-road enthusiast, allowing you to overcome obstacles and get yourself out of tough situations. Whether you’re stuck in the mud or need to tow a heavy load, a winch can be a lifesaver.
But how do you go about installing one on your Can Am 450 ATV? In this blog post, we’ll walk you through the steps and give you some tips and tricks along the way. So, grab your tools and let’s get started!
Table of Contents
Introduction
Are you an avid ATV rider looking to add a winch to your Can-Am 450? Installing an ATV winch can be a great addition to your off-road adventures, offering added functionality and peace of mind. Whether you find yourself stuck in a mud hole or need to pull a fallen tree out of your path, a winch can be a real lifesaver. The Can-Am 450 ATV winch installation is a straightforward process that can be done by most ATV owners with basic mechanical skills and some tools.
In this blog post, we will walk you through the steps of installing a winch on your Can-Am 450 ATV, so you can hit the trails with confidence knowing you have the power to overcome any obstacle that comes your way.
What is a winch?
winch

Why install a winch on your Can Am 450 ATV?
ATV winches are essential accessories for off-road enthusiasts who want to take their adventures to the next level with their Can Am 450. So, why should you install a winch on your Can Am 450 ATV? Well, picture this: you’re out in the wilderness, exploring rugged terrains, and suddenly you find yourself stuck in a mud pit or facing a steep incline. This is where a winch comes in handy.
With its powerful motor and durable cable, a winch can quickly and effortlessly pull your ATV out of trouble. It’s like having a superhero by your side, ready to save the day when you need it most. Whether you’re a weekend warrior or a seasoned thrill-seeker, a winch is a must-have accessory for your Can Am 450 ATV.
Tools and Materials
So you just got yourself a new Can-Am 450 ATV and now you’re thinking about installing a winch. Well, you’ve come to the right place! Installing a winch on your ATV can be a game-changer when it comes to tackling tough trails and getting yourself out of sticky situations. But before you dive into the installation process, let’s talk about the tools and materials you’ll need.
First and foremost, you’ll need a winch kit specifically designed for your Can-Am 450 ATV. This will include the winch itself, a mounting plate, and all the necessary hardware. It’s important to choose a winch that is compatible with your ATV’s weight and power requirements.
Next, you’ll need some basic tools like a socket wrench set, a screwdriver, and some zip ties. Depending on your specific ATV model, you may also need some additional tools like a drill or a wrench. It’s always a good idea to have a set of wire strippers and crimpers on hand as well.
In terms of materials, you’ll need some electrical wire, preferably a heavy-duty wire that is rated for outdoor use. You’ll also need some cable ties to secure the wires and keep them organized. Additionally, you’ll need some electrical connectors to make secure and reliable connections between the winch and your ATV’s electrical system.
Before you begin the installation process, it’s important to read the instructions that come with your winch kit thoroughly. These instructions will guide you through the specific steps for your ATV model and ensure that you install the winch correctly. So there you have it, the tools and materials you’ll need to install a winch on your Can-Am 450 ATV.
With the right equipment and a little bit of know-how, you’ll be ready to take on any trail and conquer any obstacle that comes your way. Happy riding!
List of tools needed
When it comes to starting a new project or tackling a DIY task, having the right tools and materials is essential. Whether you’re building a piece of furniture, fixing a leaky faucet, or making repairs around the house, having the right tools on hand can make all the difference. So, what tools do you need? Well, it really depends on the project at hand.
But, there are a few basic tools that every homeowner should have in their toolbox. A good set of screwdrivers, both Phillips and flathead, is a must-have. A tape measure, level, and hammer are also essential.
For more specialized tasks, you may need tools like a power drill, wrench set, or pliers. Additionally, having a collection of basic materials like nails, screws, and wood glue is always a good idea. So, before you dive into your next DIY project, take the time to gather the tools and materials you’ll need.
Trust me, you’ll be glad you did!
List of materials needed
In order to successfully complete any project, it is important to have the right tools and materials on hand. When it comes to DIY projects, having the right tools and materials can make all the difference in the final outcome. Whether you are building a piece of furniture, installing new flooring, or painting a room, having the right tools and materials will make the job much easier.
Some common tools that you may need include a hammer, screwdriver set, paintbrushes, and measuring tape. As for materials, it will depend on the specific project you are working on. For example, if you are building a piece of furniture, you may need wood, screws, and nails.
If you are painting a room, you will need paint, primer, rollers, and trays. It is always a good idea to make a list of the tools and materials you will need before starting any DIY project to ensure that you have everything you need on hand.
Safety precautions
When it comes to safety precautions, one important aspect to consider is the use of proper tools and materials. Using the right tools not only ensures efficient and accurate work but also contributes to a safer working environment. Before starting any project, it’s essential to assess the tools and materials needed and make sure they are in good condition.
This includes checking for any damages or defects that could compromise safety. Additionally, it’s crucial to use tools and equipment that are appropriate for the specific task at hand. Using the wrong tool can lead to accidents and injuries.
Therefore, taking the time to select the right tools and materials and ensuring they are in good working order is an essential step in promoting safety in any project or workshop.
Step-by-Step Installation Process
So, you’ve got yourself a Can-Am 450 ATV and now you’re looking to install a winch. Well, you’re in luck because I’m about to walk you through the step-by-step installation process. Now, installing a winch might sound a bit daunting, but don’t worry, it’s actually a fairly straightforward process.
First things first, you’ll need to gather all the necessary tools and materials. You’ll need a winch mounting plate specifically designed for your Can-Am 450 ATV, a winch, a winch rope or cable, a fairlead, and all the necessary hardware. Once you’ve got everything ready, the next step is to locate the mounting points on your ATV.
These are typically located on the front of the ATV, near the bumper or on the frame. The specific location may vary depending on the make and model of your ATV, so be sure to consult your owner’s manual for guidance. Once you’ve located the mounting points, you’ll need to attach the winch mounting plate to your ATV.
This is usually done using bolts or screws, but again, the specific method may vary depending on your ATV. Follow the manufacturer’s instructions to ensure a secure installation. Next, you’ll need to mount the winch onto the mounting plate.
This is typically done using a combination of bolts, washers, and nuts. Make sure to tighten everything down securely to ensure the winch is properly attached. After the winch is mounted, you’ll need to install the winch rope or cable.
This is typically done by threading the rope through the fairlead and attaching it to the winch drum. Again, consult the manufacturer’s instructions for the specific method of attachment. Once the winch rope is installed, you’ll want to make sure everything is working properly before hitting the trails.
Preparing the ATV
“ATV installation can seem like a daunting task, but with a step-by-step approach, it can be a smooth and enjoyable process. The first step is to gather all the necessary tools and equipment. Make sure you have a wrench, screwdriver, and any other tools specified in the ATV’s instruction manual.
Next, find a clean and well-lit workspace where you can comfortably work on the ATV. This will ensure you have enough space to maneuver and reduce the risk of damaging the vehicle. Once you have everything ready, it’s time to start the installation process.
Begin by carefully reading the owner’s manual and following the manufacturer’s instructions. This will give you a clear understanding of the installation process and any specific guidelines. As you progress through the steps, take your time and double-check each component and screw to ensure they are properly tightened.
Remember, a secure and stable installation is crucial for your safety and the ATV’s performance. By following these steps, you’ll have your ATV ready for adventure in no time!”
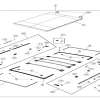
Mounting the winch plate
winch plate, installation process, mounting the winch plate, step-by-step Installing a winch plate on your vehicle can greatly enhance its off-road capabilities and allow you to tackle even the toughest terrains with ease. The winch plate serves as a sturdy base for your winch, ensuring that it is securely attached to your vehicle’s front end. But how exactly do you go about mounting the winch plate? Well, fear not, because we have got you covered with a simple step-by-step installation process.
Firstly, you’ll need to gather all the necessary tools and equipment. This may include a socket set, wrenches, a drill, and the winch plate itself. Once you have everything ready, you can move on to the next step.
To begin, you’ll want to locate the mounting points on your vehicle’s front frame. These are usually marked by pre-drilled holes or brackets. Carefully align the winch plate with these mounting points, ensuring that it sits flush and level against the vehicle’s frame.
Once you have the winch plate positioned correctly, you can start attaching it to the frame. Use the provided bolts and nuts to secure the winch plate in place, making sure to tighten them securely. It’s important to follow the manufacturer’s instructions and torque specifications during this step to ensure proper installation.
After the winch plate is securely attached to the frame, you can move on to mounting the winch itself. This will involve aligning the winch with the mounting holes on the winch plate and securing it in place using the provided bolts. Again, make sure to tighten the bolts securely to ensure a solid connection.
Once the winch is mounted, double-check all the connections to ensure that everything is properly tightened and secure. You’ll also want to test the winch to make sure it functions correctly before heading out on your next off-road adventure. And there you have it – a step-by-step guide to mounting a winch plate on your vehicle.
Installing the winch
winch installation, step-by-step installation process
Wiring the winch
winch, installation process, wiring, step-by-step Installing a winch on your vehicle can be a great addition for off-roading adventures or hauling heavy loads. One crucial step in the installation process is wiring the winch properly. This ensures that you have a reliable power source and that the winch functions effectively when you need it most.
The step-by-step process for wiring a winch may seem overwhelming at first, but with some guidance, it can be easily accomplished. So, let’s dive into the details and simplify the process. First, you will need to gather the necessary tools and materials, such as a winch wiring kit, a wrench, pliers, wire strippers, electrical tape, and zip ties.
Next, locate a suitable location on your vehicle to mount the winch control box. The control box should be easily accessible and protected from various elements. Once the control box is mounted, you will need to connect the positive and negative power cables to the winch motor.
The positive cable is usually colored red, while the negative cable is black. Make sure to securely tighten the connections with a wrench to ensure a solid electrical connection. Next, you will need to connect the winch solenoid to the control box.
The solenoid is responsible for controlling the power flow to the winch motor. Follow the manufacturer’s instructions on how to properly connect these components. It usually involves connecting the positive and negative battery terminals to the designated solenoid ports.
After connecting the solenoid, it’s time to wire the control switch. This switch allows you to control the winch from inside your vehicle or a remote location. Find a suitable location for the switch, such as the dashboard or console, and mount it securely.
Testing and Troubleshooting
So you’ve got yourself a shiny new Can-Am 450 ATV and now you’re ready to take it out for some off-road adventures. But before you hit the trails, you might want to consider installing a winch on your ATV. Trust me, it’s a game-changer.
With a winch, you’ll be able to tackle even the toughest terrains with ease. But how do you install a winch on your Can-Am 450 ATV? Well, it’s not as complicated as you might think. All you need is a few basic tools and a little bit of patience.
Start by finding a secure mounting location on your ATV, usually on the front bumper or the frame. Make sure it’s a sturdy spot that can handle the weight and force of the winch. Once you’ve found the right spot, attach the winch mounting plate using the provided hardware.
Then, mount the winch onto the mounting plate using the mounting bolts. Finally, connect the winch to the ATV’s electrical system using the provided wiring harness. And that’s it! You’re now ready to hit the trails with your Can-Am 450 ATV and your brand new winch.
Bring on the mud and the rocks, because you’re now prepared to conquer any obstacle in your path. So what are you waiting for? Let the adventures begin!
Checking the winch operation
“winch operation” Other topics/keywords to consider organically within the paragraph: – winch testing – winch troubleshooting Paragraph: Testing and troubleshooting the winch operation is vital for ensuring its proper functioning and preventing any potential issues during its use. One of the first steps in this process is conducting a thorough inspection of the winch, checking for any visible damage or loose parts. Once the visual inspection is complete, it’s essential to test the winch by activating it and observing its performance.
This includes checking if the winch motor runs smoothly and if the cable spools in and out correctly. Additionally, it’s important to verify that the winch stops when the control is released and that there are no abnormal noises during operation. If any issues are detected, troubleshooting may be required to identify the underlying cause and determine the appropriate solution.
By regularly testing and troubleshooting the winch operation, you can ensure that it is in optimal condition and ready for use whenever needed.”
Troubleshooting common issues
In the world of testing and troubleshooting, there are bound to be some common issues that arise. Whether it’s a bug in the code or a malfunctioning device, it’s important to have a plan in place to effectively identify and resolve these problems. One common issue that often pops up is compatibility problems.
This occurs when two software or hardware components don’t work well together, resulting in errors or crashes. To troubleshoot this issue, it’s important to first identify the incompatible components and then find a solution that will allow them to work together harmoniously. Another common issue is performance problems.
This can include slow or unresponsive software, as well as devices that freeze or crash frequently. To troubleshoot performance issues, it’s important to check for resource-intensive tasks or processes that may be causing the slowdown. Additionally, checking for updates and ensuring that all necessary drivers are installed can also help improve overall performance.
In conclusion, testing and troubleshooting can be a challenging but essential part of any development process. By understanding and addressing common issues such as compatibility and performance problems, developers can ensure that their software or hardware functions optimally for end users.
Conclusion
After hours of wrestling with wires, bolts, and instruction manuals, I can confidently say that installing a winch on the Can Am 450 ATV is no easy feat. It’s like a game of mechanical Tetris, trying to fit all the pieces in just the right spots. But fear not, adventurous ATV enthusiasts, because once you conquer this installation challenge, you’ll be equipped with the ultimate tool to overcome any obstacle Mother Nature throws your way.
Whether you find yourself stuck in a mud pit, stranded in a snowstorm, or just need to show off your winch skills to your friends, this addition will surely give you the upper hand. Remember, though, that a winch is not just for show. It’s a practical accessory that can save the day when all seems lost.
So the next time you’re out in the wild, tackling rough terrains, make sure you have your trusty winch installed and ready for action. So gather your tools, tighten those bolts, and let the adventure continue with your Can Am 450 ATV and its impressive winch attached. Your off-roading experiences will never be the same again, and you’ll be the envy of fellow riders who are still struggling to master the art of winch installation.
So go forth, my ATV-loving friends, and embrace the thrill of the winch. Just remember to always ride responsibly and use your new-found powers for good (and maybe a little showboating every now and then). Cheers to conquering obstacles with style and a touch of mechanical genius!”
Enjoying the benefits of a winch on your Can Am 450 ATV
Can Am 450 ATV, winch, testing, troubleshooting Testing and troubleshooting your winch on your Can Am 450 ATV is essential to ensure that it functions properly when you need it most. Before heading out on your next off-road adventure, take the time to put your winch through its paces. Start by testing the remote control to make sure it responds correctly and that the winch engages and disengages smoothly.
Next, connect the winch to a stationary object, such as a tree or post, and test its pulling power. Make sure the winch operates smoothly and that the cable doesn’t get tangled or jammed. This will give you confidence in the winch’s capabilities and allow you to troubleshoot any potential issues before they become a problem on the trail.
Additionally, make sure to regularly inspect and maintain your winch, checking for any signs of wear or damage. This will help prevent any unexpected failures and ensure that your winch is ready to assist you in any sticky situation. With a properly tested and maintained winch, you can confidently tackle any off-road challenge and enjoy the benefits of having a reliable recovery tool at your disposal.
Final thoughts
testing and troubleshooting. When it comes to software development, testing and troubleshooting are crucial steps in ensuring that the product is functioning properly and meeting the needs of the users. Testing involves running the software through a series of tests to identify any bugs or errors.
This can include functionality testing, performance testing, and compatibility testing, among others. Troubleshooting, on the other hand, is the process of identifying and resolving any issues that arise during testing or in the live environment. This can involve debugging code, analyzing error messages, or troubleshooting configuration issues.
Both testing and troubleshooting require a systematic approach and a keen attention to detail. They are essential for delivering a high-quality product that meets the expectations of the end users. So, next time you’re working on a software project, make sure you don’t skip these important steps!
FAQs
How do I install a winch on a Can Am 450 ATV?
To install a winch on a Can Am 450 ATV, first, locate the mounting spot on the front of the ATV where the winch will be installed. Next, remove any necessary panels or parts to access the mounting area. Attach the winch to the designated mounting spot using the provided hardware. Make sure to securely tighten all bolts and connections. Finally, connect the winch wiring to the ATV’s electrical system, following the manufacturer’s instructions.
What tools do I need to install a winch on a Can Am 450 ATV?
To install a winch on a Can Am 450 ATV, you will need a set of basic hand tools such as wrenches, pliers, and screwdrivers. Additionally, you may need a drill and drill bits if you need to create holes for mounting the winch. It is also recommended to have wire strippers and crimping tools to properly connect the winch wiring.
Can I install a winch on a Can Am 450 ATV without any previous experience?
While it is possible to install a winch on a Can Am 450 ATV without any previous experience, it is highly recommended to have basic mechanical knowledge and understanding of the ATV’s electrical system. It can be helpful to consult the ATV’s owner manual or online resources for specific instructions and guidance. If you are unsure or uncomfortable with the installation process, it is always best to seek professional assistance.
How much time does it take to install a winch on a Can Am 450 ATV?
The time it takes to install a winch on a Can Am 450 ATV can vary depending on the individual’s mechanical skills and familiarity with the ATV. On average, it can take anywhere from 1-3 hours to complete the installation. It is important to allocate enough time for the installation to ensure it is done correctly and safely.
Can I use any winch on a Can Am 450 ATV?
No, not all winches are compatible with a Can Am 450 ATV. It is important to choose a winch specifically designed for the ATV’s make and model. This ensures proper fitment and compatibility with the ATV’s electrical system. It is recommended to consult the ATV’s owner manual or speak with a reputable ATV accessories dealer to determine the appropriate winch for your Can Am 450 ATV.
What is the maximum weight capacity of a winch for a Can Am 450 ATV?
The maximum weight capacity of a winch for a Can Am 450 ATV can vary depending on the specific winch model and manufacturer. Generally, winches for this ATV model range from 2,500 lbs to 4,500 lbs capacity. It is important to choose a winch with a weight capacity that matches your intended use and towing needs.
Can a winch be used for purposes other than towing on a Can Am 450 ATV?
Yes, a winch on a Can Am 450 ATV can be used for various purposes other than towing. It can be used for tasks such as recovering the ATV from mud or difficult terrains, removing fallen trees or obstacles from trails, or securing the ATV during transportation on a trailer. It is important to use the winch responsibly and within its specified weight capacity to prevent damage or accidents.