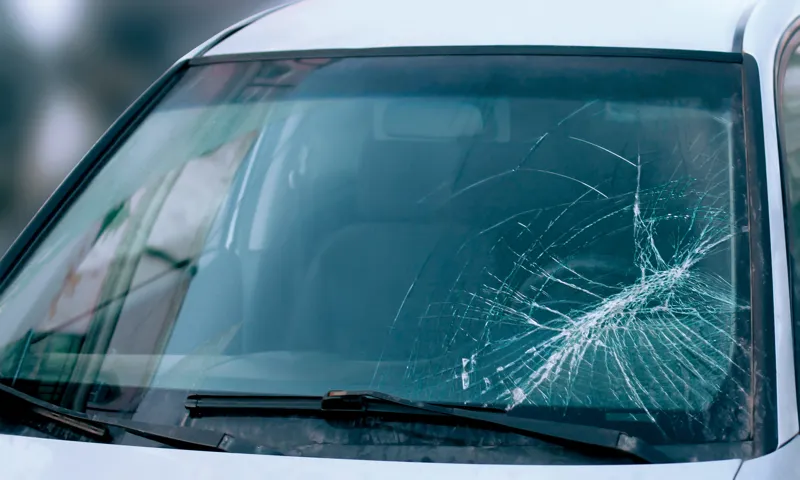
Do you have a crack or chip in your windshield that needs repairing? Don’t worry, we’ve got you covered! In this step-by-step guide, we will walk you through the process of how to do windshield repair. Whether you’re a DIY enthusiast or just looking to save some money, repairing your windshield can be a simple and rewarding task. So grab your tools and let’s get started! Think of your windshield as the guardian of your car.
It’s there to protect you from the elements and keep you safe while you’re on the road. But over time, it’s bound to get damaged. Rocks, debris, and even extreme weather conditions can cause cracks and chips in your windshield.
But fear not! With a few simple tools and a little bit of patience, you can fix these issues yourself. Not only will it save you money, but it will also prevent the damage from spreading and potentially costing you even more in the long run. Before we dive into the repair process, let’s talk about safety.
It’s important to wear protective gear, such as gloves and safety glasses, to prevent any injuries. Additionally, make sure to work in a well-lit area and park your car in a shaded spot to avoid the hot sun from interfering with the repair. Now, let’s get to the fun part – repairing the windshield! The first step is to assess the damage.
Is it a small chip or a crack? Depending on the severity, you may need different materials or techniques to fix it. Once you’ve determined the extent of the damage, it’s time to gather your materials. You’ll need a windshield repair kit, which typically includes resin, curing strips, and a repair bridge.
These kits are readily available at most auto supply stores or online. Next, clean the damaged area of your windshield with a mild detergent and water. Ensure that it’s completely dry before moving on to the next step.
Table of Contents
- 1 Section 1: Gathering the necessary tools and materials
- 2 Section 2: Assessing the damage
- 3 Section 3: Preparing the windshield for repair
- 4 Section 4: Performing the windshield repair
- 5 Section 5: Finalizing the repair and ensuring its durability
- 6 Section 6: Frequently asked questions about windshield repair
- 7 Section 7: Conclusion
- 8 FAQs
Section 1: Gathering the necessary tools and materials
If you’re wondering how to do windshield repair, the first step is to gather the necessary tools and materials. Before you begin the repair process, it’s essential to have the right equipment on hand. Some of the tools you’ll commonly need include a windshield repair kit, which usually includes a resin and an applicator, as well as a UV light used to cure the resin.
Additionally, you may need a drill with different size drill bits, a razor blade or scraper to remove any debris or loose glass, and a cleaning solution to ensure the area is prepped correctly. Having all these tools ready beforehand can make the repair process much more efficient and ensure that you have everything you need to complete the task at hand.
1.1 Why it’s important to repair windshield damage
Windshield damage may seem like a minor inconvenience, but it is actually incredibly important to repair it as soon as possible. One of the main reasons for this is safety. A damaged windshield can compromise the structural integrity of your vehicle, making it less able to withstand impacts in the event of a collision.
Additionally, a cracked or chipped windshield can obstruct your vision while driving, putting you and your passengers at risk. Repairing windshield damage also helps to prevent further cracking or spreading of the damage, which can save you money in the long run. So, if you notice any chips or cracks in your windshield, it’s important to gather the necessary tools and materials and fix it as soon as possible.
1.2 Tools and materials needed for windshield repair
When it comes to repairing windshields, having the right tools and materials is crucial. Section 1 of our windshield repair guide focuses on gathering everything you’ll need for the job. So, what exactly do you need? Well, first and foremost, you’ll need a windshield repair kit.
These kits usually come with an adhesive and resin that can be used to fill in cracks and chips in the glass. Additionally, you’ll need a UV lamp, which is used to cure the resin and make it hard and durable. A bridge or injector is another important tool that is used to apply the resin to the damaged area.
You’ll also need a razor blade or some other tool for cleaning the surface of the windshield before applying the resin. Lastly, don’t forget gloves and safety glasses to protect yourself during the repair process. By gathering all of these tools and materials, you’ll be well-prepared to tackle any windshield repair job that comes your way.
1.3 Where to find and purchase the necessary tools and materials
tools and materials gathering, purchase necessary tools and materials, where to find tools and materials With the right tools and materials, you can tackle any DIY project with confidence. But where do you find these necessary items and how do you go about purchasing them? Luckily, there are a few different options available to you. One option is to visit your local home improvement store.
These stores often have a wide selection of tools and materials, from basic hand tools to more specialized equipment. You can browse the aisles and ask the helpful staff for advice on which tools are best for your project. Another option is to shop online.
There are many websites that specialize in selling DIY tools and materials. This can be a convenient way to find exactly what you need, without even leaving your home. Plus, you can read reviews from other customers to ensure you are getting a quality product.
Additionally, you may want to consider borrowing tools from friends or family members. This can be a cost-effective option, especially if you only need a tool for a one-time project. Just be sure to return the tool promptly and in good condition.
So whether you prefer to shop in person or online, there are plenty of options available to help you gather the necessary tools and materials for your next DIY project.
1.4 Safety precautions to take before starting the repair process
safety precautions for repair process, gathering tools and materials Before starting any repair process, it is crucial to take proper safety precautions to ensure your own well-being. First and foremost, make sure to wear protective gear such as gloves, safety glasses, and a dust mask if necessary. This will protect you from any potential hazards that may arise during the repair.
It is also important to work in a well-ventilated area, especially if you will be dealing with any chemicals or fumes. Additionally, make sure to unplug any electrical devices before attempting to repair them to avoid the risk of electrocution. Another important precaution to take is to have a fire extinguisher nearby, especially if you will be working with flammable materials.
Lastly, it is always a good idea to have a first aid kit on hand for any minor injuries that may occur during the repair process. By following these safety precautions, you can ensure a safe and successful repair process.
Section 2: Assessing the damage
So, you’ve got a crack or chip in your windshield, and you’re wondering how do they do windshield repair? Well, let me break it down for you. When you take your car to a professional windshield repair shop, the first thing they’ll do is assess the damage. They’ll carefully examine the size, shape, and location of the crack or chip to determine the best course of action.
They’ll also check to see if there’s any underlying damage to the glass or the surrounding frame. Once they have a complete understanding of the extent of the damage, they can proceed with the repair process.
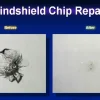
2.1 Understanding the different types of windshield damage
windshield damage, types of damage
2.2 How to evaluate the extent of the damage
evaluating the extent of the damage, damage assessment, assessing the damage, evaluating damage Once a disaster strikes, it is crucial to assess the extent of the damage promptly. This step is crucial in determining the necessary actions to take and the resources required for the recovery process. When evaluating the extent of the damage, several factors come into play.
First and foremost, it’s essential to conduct a thorough inspection of the affected area to identify all the damages. This includes examining the structural integrity of buildings, assessing the condition of infrastructure, and determining the level of damage to personal property. Additionally, it’s crucial to consider the magnitude of the disaster and its impact on the community.
Are there any immediate safety concerns or environmental hazards that need to be addressed? By carefully evaluating all these factors, emergency responders and disaster management teams can create a comprehensive damage assessment report, which serves as a vital tool in planning and executing the recovery efforts effectively.
2.3 Identifying any underlying issues or complications
After assessing the physical damage to a property, it is crucial to dig deeper and identify any underlying issues or complications that may be present. This is an essential step in the restoration process, as it allows for a more comprehensive understanding of the problem at hand. It is possible that the initial damage may have caused secondary issues that need to be addressed.
For example, a water leak may have resulted in mold growth or structural damage that is not immediately visible. By identifying these underlying issues, restoration professionals can develop a more effective plan of action and ensure that all aspects of the damage are adequately addressed. Additionally, identifying any complications early on can help prevent further damage from occurring in the future.
By addressing these issues promptly, homeowners can avoid long-term consequences and ensure a safe and functional living environment.
2.4 Documenting the damage for insurance purposes
When it comes to filing an insurance claim for damages, it’s crucial to document the damage thoroughly. This means taking detailed photos and videos of the affected areas, as well as collecting any relevant receipts or proof of ownership for damaged items. By providing this documentation to your insurance company, you can ensure that you receive the maximum amount of compensation for your losses.
Additionally, having this evidence on hand will help expedite the claims process and prevent any disputes or delays. So, remember to document your damages as soon as possible and keep all the necessary records organized for a smooth insurance claim experience.
Section 3: Preparing the windshield for repair
So, you’ve got a chip or crack in your windshield and you’re wondering how the professionals go about fixing it. Well, the first step in preparing the windshield for repair is to clean it thoroughly. This may seem simple enough, but it’s actually a crucial part of the process.
The technician will use a special cleaner and a lint-free cloth to remove any dirt, dust, or debris from the surface of the windshield. This ensures that the repair material will adhere properly and will result in a stronger and more effective repair. After the windshield is cleaned, the technician will then assess the size and location of the damage.
This is important because it will determine the technique and tools that will be used for the repair. For example, if the chip or crack is small and located near the edge of the windshield, a different repair method may be used compared to a larger or more centrally located damage.
3.1 Cleaning the damaged area thoroughly
cleaning the damaged area, preparing the windshield for repair When it comes to repairing a damaged windshield, the first step is to clean the affected area thoroughly. This is an essential part of the preparation process because any dirt or debris on the surface can hinder the effectiveness of the repair. To ensure a successful repair, it’s important to remove any loose pieces of glass or debris from the damaged area.
This can be done using a soft brush or cloth, as well as a vacuum cleaner to get rid of any tiny particles. Once the area is clear of loose debris, a glass cleaner or mild detergent can be used to clean the surface of the windshield. This will remove any dirt or grime that may have accumulated, allowing for a clean and smooth surface for the repair to adhere to.
It’s important to dry the area thoroughly before proceeding with the repair, as any moisture on the surface can affect the bonding process. By taking the time to clean the damaged area thoroughly, you can ensure the best possible outcome for your windshield repair.
3.2 Removing any loose debris or glass fragments
windshield repair, preparing the windshield, removing debris, glass fragments When it comes to preparing your windshield for repair, it’s important to start with a clean surface. One of the first steps in this process is to remove any loose debris or glass fragments that may be present. This is crucial because if these particles are not removed, they can interfere with the repair process and potentially weaken the integrity of the windshield.
Just like when you’re cooking, you wouldn’t want any unwanted crumbs or bits to ruin the final result, right? Similarly, removing the loose debris and glass fragments ensures that the repairs are done properly and that there are no obstacles in the way of a successful fix. It’s a simple but important step that sets the stage for a seamless windshield repair.
3.3 Applying masking tape to protect the surrounding areas
masking tape, windshield repair, protect surrounding areas, preparing windshield. When it comes to repairing a windshield, there are a few important steps to take before diving into the actual repair process. One crucial step is to apply masking tape to protect the surrounding areas.
Now you might be thinking, why is masking tape necessary? Well, let me explain. Masking tape acts as a barrier between the windshield and the surrounding areas, such as the body of the car or the dashboard. By applying masking tape, you can ensure that no accidental damage is done to these areas during the repair process.
Think of it as a protective shield, just like wearing gloves before handling something delicate. It’s a simple but effective way to prevent any mishaps and keep the surrounding areas in pristine condition. So, before you start any windshield repair, take the time to carefully apply masking tape and give yourself that added peace of mind.
3.4 Preparing the repair kit and tools for use
In Section 4 of our windshield repair guide, we will talk about preparing the repair kit and tools for use. Now that you’ve assessed the damage and determined that a repair is possible, it’s time to gather your materials.
The repair kit will typically include a bridge or injector tool, resin, curing film, and other necessary accessories. Before you start, it’s essential to read the instructions carefully and familiarize yourself with the different components. Make sure all the tools are clean and in good working condition.
The last thing you want is to realize halfway through the repair that a crucial tool is missing or malfunctioning. Additionally, check that you have enough resin for the job. It’s always better to have a little extra on hand in case you need it.
By being prepared and having all your tools and materials ready, you can ensure a smoother and more efficient windshield repair process. So, gather your kit, make sure everything is in order, and let’s get started on fixing that windshield!
Section 4: Performing the windshield repair
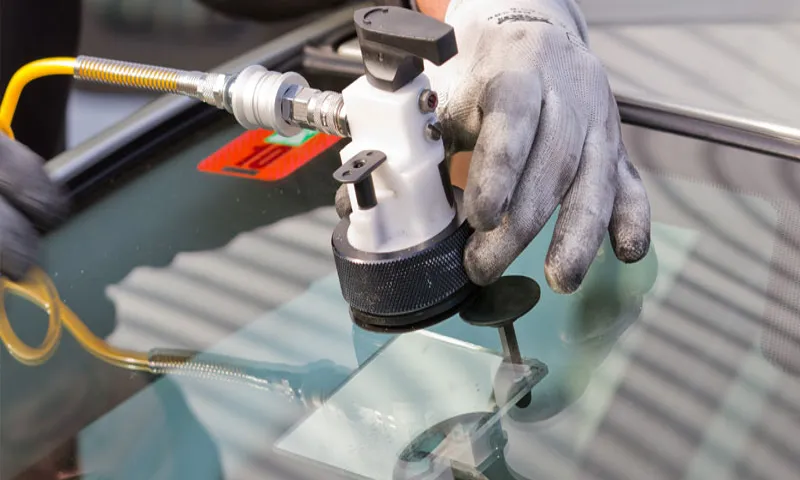
When it comes to windshield repair, there are a few different methods that professionals use to fix those annoying chips and cracks. One common technique is called the resin injection method. This involves injecting a special resin into the damaged area of the windshield.
The resin is then cured with ultraviolet light, which hardens it and helps to seal the crack. Another method that is sometimes used is called the windshield replacement method. This involves removing the damaged windshield and replacing it with a brand new one.
While this method is more expensive, it is often necessary if the damage is extensive or if the crack extends into the driver’s line of sight. So, whether it’s a minor chip or a major crack, there are expert technicians out there who are skilled at fixing and replacing windshields.
4.1 Different methods for repairing windshield damage
windshield repair methods, repairing windshield damage, different methods for repairing windshield damage. When it comes to repairing windshield damage, there are several methods that can be used depending on the severity and type of damage. One common method is using a windshield repair kit, which typically includes a resin that is applied to the damaged area.
This resin helps to fill in the crack or chip and restore the integrity of the glass. Another method is windshield replacement, which is necessary for more severe damage that cannot be repaired. This involves removing the old windshield and installing a new one.
Lastly, some damage may require the use of a professional windshield repair service, where a technician will assess the damage and determine the best course of action. They may use techniques such as resin injection or even a complete windshield replacement if necessary. Regardless of the method used, it’s important to address windshield damage promptly to prevent further spreading and ensure the safety of both the driver and passengers.
So, if you notice any chips or cracks in your windshield, it’s best to get it repaired as soon as possible.
4.2 Step-by-step instructions for each repair method
windshield repair method
4.3 Tips and tricks for a successful repair
windshield repair, successful repair, tips and tricks
4.4 Dealing with any challenges or complications during the process
windshield repair, challenges, complications, process Sometimes, during the process of performing a windshield repair, you might encounter certain challenges or complications. One common challenge is when the crack or chip is located in a difficult-to-reach area, such as near the edge of the windshield or in a curved part of the glass. In these cases, it can be tricky to properly repair the damage and ensure a strong bond between the resin and the glass.
Another challenge can arise when dealing with extreme weather conditions. For example, if it’s too cold outside, the resin may take longer to cure, affecting the overall repair quality. Additionally, if it’s too hot, the resin can dry too quickly, leaving air bubbles or a hazy appearance.
It’s important to be aware of these challenges and adjust your repair process accordingly. By taking your time, properly preparing the damaged area, and using high-quality repair materials, you can overcome these challenges and ensure a successful windshield repair.
Section 5: Finalizing the repair and ensuring its durability
So, you’ve brought your car in for a windshield repair and now you’re wondering, how do they actually do it? Well, let me break it down for you. First, the technician will clean the damaged area and remove any debris that may be present. Then, they will inject a special resin into the crack or chip.
This resin is specifically designed to bond with the glass and prevent further damage. After the resin is injected, it is cured using UV light. This helps to harden the resin and ensure its durability.
Finally, the technician will polish the repaired area to smooth out any imperfections and make it as seamless as possible. And that’s it! Your windshield repair is complete and you can hit the road with confidence knowing that your windshield is as good as new.
5.1 Checking the repaired area for any imperfections
In Section 5 of the repair process, it’s important to thoroughly check the repaired area for any imperfections. This step is crucial in finalizing the repair and ensuring its durability. Even a small imperfection can compromise the overall integrity of the repair, so it’s important to be thorough.
Take the time to carefully inspect the area, using both sight and touch to identify any potential issues. Are there any rough spots or uneven surfaces? Are there any gaps or cracks that need to be addressed? By addressing these imperfections now, you can avoid potential problems down the line and ensure a high-quality repair that will stand the test of time.
5.2 Cleaning up and removing any excess materials
After completing the repair job on your damaged item, it’s important to take the time to clean up and remove any excess materials. This final step not only ensures that your repair looks professional and neat, but also helps to ensure its durability. Begin by carefully removing any tape, adhesives, or other temporary fixes that you used during the repair process.
Use a gentle hand and take your time to avoid causing any further damage. Once all the temporary materials are removed, inspect the repaired area for any leftover debris or residue. Wipe it clean using a soft cloth or sponge and a mild cleaning solution if necessary.
This will help to remove any dirt, dust, or adhesive residue that may have accumulated during the repair. Finally, give the entire item a thorough cleaning to ensure that it is free of any excess materials or debris. This will not only make your repair look better but also help to ensure its longevity.
5.3 Assessing the overall effectiveness of the repair
effectiveness of the repair. Once the repair has been completed, it is crucial to assess the overall effectiveness to ensure its durability. This step is vital because even though a repair might look good on the surface, it doesn’t necessarily mean it will hold up over time.
To do this, you should first inspect the repair closely to check for any visible flaws or weak points. Are there any signs of stress or wear? Is the repaired area structurally sound? These are important questions to ask yourself during the assessment. Additionally, it’s helpful to test the repaired item under normal usage conditions to see if it performs as expected.
Does it function properly? Is it able to withstand the same level of stress as before the repair? By thoroughly evaluating the repair, you can determine if it meets the desired standards and if any further adjustments or improvements are needed. Remember, the goal is not just to fix the problem temporarily, but to ensure that the repair is long-lasting and effective.
5.4 Steps to take to prevent future windshield damage
One of the key steps to take after repairing your windshield is to prevent future damage. By following a few simple guidelines, you can ensure the durability of your windshield over time. First and foremost, it’s important to avoid parking under trees or in areas with heavy foot traffic.
Falling branches or accidental bumps can easily cause cracks or chips in your windshield. Additionally, be mindful of driving on rough terrain or gravel roads, as the vibrations and debris can also lead to damage. Another important tip is to regularly clean your windshield, as dirt and debris can weaken the glass and make it more susceptible to cracks.
When cleaning, use gentle, non-abrasive products and avoid using excessive force. Lastly, maintain a safe distance from other vehicles on the road to minimize the risk of stone chips or other debris being kicked up by their tires. By taking these preventative measures, you can significantly reduce the likelihood of future windshield damage and prolong the lifespan of your repair.
Section 6: Frequently asked questions about windshield repair
So you’ve got a chip or crack in your windshield and you’re wondering, how do they actually repair it? Well, the process is actually quite fascinating. Windshield repair technicians use a special resin that is injected into the damaged area. This resin is then cured using ultraviolet light, which hardens it and bonds it with the glass.
Once the resin has hardened, the chip or crack is virtually invisible and the structural integrity of the windshield is restored. But how does the resin actually fix the damage? Well, think of it like a type of glue. The resin fills in the cracks or gaps in the glass, preventing them from spreading further.
It also helps to restore the smooth surface of the windshield, making it safer and more aerodynamic. And because the resin is clear, it is virtually invisible once it has hardened, so you won’t even be able to tell that there was ever any damage in the first place. Now, you might be wondering if windshield repair is a permanent solution.
While it can definitely extend the life of your windshield and prevent further damage, it’s important to remember that it is not a permanent fix. Over time, the resin may degrade or the damage may expand, requiring a more extensive repair or even a replacement. That’s why it’s important to have any chips or cracks addressed as soon as possible, before they have a chance to worsen.
So, the next time you find yourself with a chip or crack in your windshield, don’t panic. Windshield repair technicians have the skills, tools, and materials to fix the damage and get you back on the road safely. Whether it’s a small chip or a larger crack, they can assess the situation and determine the best course of action.
And with their expertise, you can rest easy knowing that your windshield will be repaired with care and precision.
6.1 Can I repair my windshield myself or should I hire a professional?
windshield repair, repair windshield yourself, hire professional, windshield cracks, rock chips Repairing a windshield can be a tricky task, and whether you should attempt to fix it yourself or hire a professional largely depends on the extent of the damage. Small rock chips or minor cracks can often be repaired by the average person with a DIY kit. These kits usually come with clear resin that can fill in the cracks and prevent further damage.
However, it’s important to note that DIY repairs are not always 100% effective and may not produce the same results as a professional repair. Additionally, attempting a DIY repair on a larger crack or extensive damage could worsen the situation and even compromise the structural integrity of your windshield. In such cases, it’s best to leave it to the experts.
Professional windshield repair services have the necessary tools, skills, and experience to accurately assess the damage and perform the appropriate repairs. They can also handle more complex issues like deep cracks or spreading damage. Ultimately, the decision to repair your windshield yourself or hire a professional should be based on the severity of the damage and your own level of confidence and expertise.
6.2 How long does a windshield repair typically take?
windshield repair, typically take
6.3 Will my insurance cover the cost of windshield repair?
windshield repair costs Yes, in many cases, your insurance will cover the cost of windshield repair. However, the specific coverage will depend on your insurance policy and the circumstances of the damage. If you have comprehensive coverage, which is an optional addition to your auto insurance, it typically includes coverage for windshield repair or replacement.
This coverage is designed to protect you from the cost of unexpected damage, such as cracks or chips caused by rocks or debris on the road. In some cases, your insurance may also cover the cost of windshield repair if the damage is caused by acts of nature, vandalism, or accidents. It’s important to check the details of your insurance policy or contact your insurance provider to understand what is covered and any specific deductibles or limitations that may apply.
6.4 When is windshield replacement necessary instead of repair?
windshield replacement, windshield repair When it comes to windshield damage, it’s important to know when a replacement is necessary instead of a repair. In general, small cracks or chips can often be repaired, but there are situations where a replacement is the only option. One example is if the damage is located in the driver’s line of sight.
Even if the crack or chip is small, it can still be distracting and obstruct the driver’s view of the road. Another reason why a replacement may be necessary is if the damage is extensive or spreading rapidly. If the crack or chip is too large or the damage is spreading, a repair may not be sufficient to restore the strength and integrity of the windshield, putting the safety of the driver and passengers at risk.
Ultimately, if you’re unsure whether a repair or replacement is needed, it’s best to consult with a professional technician who can assess the damage and provide the best solution for your specific situation.
Section 7: Conclusion
And there you have it, the fascinating and mind-boggling world of windshield repair! It may seem like magic, but it is actually a carefully orchestrated process where skilled technicians work their wizardry to ensure your windshield is as good as new. From the precise positioning of the glass to the expert application of the resin, every step is taken with utmost care and attention. So, the next time you find a pesky chip or crack on your windshield, don’t fret.
Just remember, there are talented professionals out there who can work their magic and restore your view of the road in no time. It’s like a little touch of sorcery right on your car’s front window. After all, who needs a wand and a spellbook when you’ve got a resin and a steady hand? So, drive on confidently, knowing that the secrets of windshield repair are out there, doing their mischief in the least wicked way possible.
“
Summarize the key points covered in the blog post
In this blog post, we discussed frequently asked questions about windshield repair. We covered a range of topics, providing valuable information to readers who may have questions or concerns about their car’s windshield. One of the key points we focused on was the importance of addressing small chips or cracks in the windshield promptly.
We explained that even a small chip can quickly become a larger crack, which may compromise the integrity of the windshield and increase the risk of breakage. We also discussed the process of windshield repair, explaining how professionals use specialized techniques and materials to fix chips and cracks. We emphasized that it is crucial to choose a reputable and experienced windshield repair service to ensure a quality repair job.
Another important point we covered was insurance coverage for windshield repair. We explained that many insurance policies cover windshield repairs, sometimes without requiring policyholders to pay a deductible. We advised readers to review their insurance policies to determine if they are eligible for coverage.
Additionally, we addressed the question of whether it is necessary to replace a windshield instead of repairing it. We explained that in some cases, such as large cracks or damage in the driver’s line of sight, windshield replacement may be necessary. However, in many cases, repairs can be a cost-effective and reliable solution.
Overall, this blog post aimed to provide readers with answers to frequently asked questions about windshield repair, helping them make informed decisions when it comes to maintaining the safety and integrity of their vehicle’s windshield.
Encourage readers to take action and repair their windshields
windshield repair, cracked windshield, windshield damage, auto glass repair, windshield replacement
FAQs
How do I know if my windshield needs repair?
If you notice any cracks, chips, or damage on your windshield, it is recommended to get it repaired as soon as possible to prevent further damage.
Can I repair a small chip on my windshield myself?
While it is possible to find DIY windshield repair kits, it is generally recommended to seek professional assistance for the best results and to prevent further damage.
How long does it take to repair a windshield?
The time taken to repair a windshield can vary depending on the extent of the damage. In general, smaller chips or cracks can be repaired in around 30 minutes to an hour, while more significant damage may take longer.
What is the cost of windshield repair?
The cost of windshield repair can vary depending on several factors, including the extent of the damage, the type of vehicle, and the location. It is recommended to contact a reputable windshield repair service for an accurate estimate.
Will my insurance cover windshield repair?
Many comprehensive auto insurance policies cover windshield repair or replacement. It is recommended to check your policy or contact your insurance provider to confirm coverage details.
Can a repaired windshield be as strong as a new one?
While a properly repaired windshield can restore its structural integrity, it may not be as strong as a new one. However, it should still meet safety standards and provide adequate protection.
How long will a repaired windshield last?
The lifespan of a repaired windshield can vary depending on various factors, such as the quality of the repair and the extent of the initial damage. A well-done repair can last for several years, but eventually, the windshield may need to be replaced if the damage worsens or spreads.